手写mnist项目pycaffe实战
这篇也是手写mnist的python接口的讲解:
http://www.cnblogs.com/denny402/p/5684431.html
Caffe学习笔记(六):mnist手写数字识别训练实例
版权声明:本文为博主原创文章,未经博主允许不得转载。
转载请注明作者和出处:http://blog.csdn.net/c406495762
Python版本: Python2.7
运行平台: Ubuntu14.04
一、前言
深度学习的一个简单实例就是mnist手写数字识别,只要这个例子弄明白,其它的内容就可以举一反三了。之前的内容如有遗忘,可以进行回顾。
- 使用pycaffe生成train.protxt、test.prototxt
- 使用pycaffe生成solver.prototxt
- 数据层、视觉层、激活层等知识点回顾
二、准备数据
数据集可以直接从我的github下载,包括数据集和代码,使用如下指令:
git clone https://github.com/Jack-Cherish/DeepLearning/tree/master/mnist- 1
- 1
如果github网速过慢,也可以从百度云下载:
数据集下载链接
获取的数据是zip格式的,在Linux下可以使用如下指令进行解压(已安装unzip,没有安装使用指令unzip):
unzip mnist.zip- 1
- 1
数据分成了训练集(60000张共10类)和测试集(共10000张10类),每个类别放在一个单独的文件夹里。并且将所有的图片,都生成了txt列表清单(train.txt和test.txt)。下载下来后,直接解压到当前用户根目录下即可。
三、开始训练
之前讲解的训练方法是,将原始图片转换成db(leveldb/lmdb)文件,并计算图像均值。然后在网络的第一层数据层Data中指定db文件和均值文件的位置,创建数据层的方法还有几种,另一种常见的方法是把原始图片做成一个列表清单txt文件(一行一张图),则省去了图片格式转化和图片均值计算的过程,提供的数据集中已经包括了txt列表清单文件,因此也省却了我们手动生成的步骤,直接使用即可。因此我们可以使用ImageData作为数据源输入。训练步骤如下:
- 获取数据集
- 生成txt列表清单文件(已有)
- 生成train.prototxt、test.prototxt、solver.prototxt文件
- 训练数据,生成模型
1.编写代码
在my-caffe-project根目录下解压文件后,即可创建mnist.py文件,编写如下代码:
# -*- coding: UTF-8 -*-
import caffe                                                     #导入caffe包

def create_net(img_list, batch_size, include_acc=False):
    #网络规范
    net = caffe.NetSpec()
    #ImageData数据层
    net.data, net.labels = caffe.layers.ImageData(batch_size = batch_size,
                                                source = img_list,
                                                transform_param = dict(scale = 1./255),
                                                ntop = 2)
    #卷积层
    net.conv1 = caffe.layers.Convolution(net.data, kernel_size = 5, num_output = 20,
                                         weight_filler = dict(type = 'xavier'))
    #池化层
    net.pool1 = caffe.layers.Pooling(net.conv1, kernel_size = 2, stride = 2,
                                     pool = caffe.params.Pooling.MAX)
    #卷积层
    net.conv2 = caffe.layers.Convolution(net.pool1, kernel_size = 5, num_output = 50,
                                         weight_filler = dict(type = 'xavier'))
    #池化层
    net.pool2 = caffe.layers.Pooling(net.conv2, kernel_size = 2, stride = 2,
                                     pool = caffe.params.Pooling.MAX)
    #全连层
    net.fc1 =   caffe.layers.InnerProduct(net.pool2, num_output = 500,
                                          weight_filler = dict(type = 'xavier'))
    #激活函数层
    net.relu1 = caffe.layers.ReLU(net.fc1, in_place = True)
    #全连层
    net.score = caffe.layers.InnerProduct(net.relu1, num_output = 10,
                                          weight_filler = dict(type = 'xavier'))
    #softmax层
    net.loss =  caffe.layers.SoftmaxWithLoss(net.score, net.labels)

    if include_acc:
        net.acc = caffe.layers.Accuracy(net.score, net.labels)
        return net.to_proto()

    return net.to_proto()

def write_net(train_proto, train_list, test_proto, test_list):
    #写入prototxt文件
    with open(train_proto, 'w') as f:
        f.write(str(create_net(train_list, batch_size = 64)))
    #写入prototxt文件
    with open(test_proto, 'w') as f:
        f.write(str(create_net(test_list, batch_size = 100, include_acc = True)))

def write_sovler(my_project_root, solver_proto, train_proto, test_proto):
    sovler_string = caffe.proto.caffe_pb2.SolverParameter()                    #sovler存储
    sovler_string.train_net = train_proto                                    #train.prototxt位置指定
    sovler_string.test_net.append(test_proto)                                 #test.prototxt位置指定
    sovler_string.test_iter.append(100)                                        #10000/100 测试迭代次数
    sovler_string.test_interval = 938                                        #60000/64 每训练迭代test_interval次进行一次测试
    sovler_string.base_lr = 0.01                                            #基础学习率
    sovler_string.momentum = 0.9                                            #动量
    sovler_string.weight_decay = 5e-4                                        #权重衰减
    sovler_string.lr_policy = 'step'                                        #学习策略
    sovler_string.stepsize = 3000                                             #学习率变化频率
    sovler_string.gamma = 0.1                                                  #学习率变化指数
    sovler_string.display = 20                                                #每迭代display次显示结果
    sovler_string.max_iter = 9380                                            #10 epoch 938*10 最大迭代数
    sovler_string.snapshot = 938                                             #保存临时模型的迭代数
    sovler_string.snapshot_prefix = my_project_root + 'mnist'                #模型前缀
    sovler_string.solver_mode = caffe.proto.caffe_pb2.SolverParameter.GPU    #优化模式

    with open(solver_proto, 'w') as f:
        f.write(str(sovler_string))


def train(solver_proto):
    caffe.set_device(1)
    caffe.set_mode_gpu()
    solver = caffe.SGDSolver(solver_proto)
    solver.solve()


if __name__ == '__main__':
    my_project_root = "/home/Jack-Cui/caffe-master/my-caffe-project/"    #my-caffe-project目录
    train_list = my_project_root + "mnist/train/train.txt"                #train.txt文件的位置
    test_list = my_project_root + "mnist/test/test.txt"                    #test.txt文件的位置
    train_proto = my_project_root + "mnist/train.prototxt"                #保存train.prototxt文件的位置
    test_proto = my_project_root + "mnist/test.prototxt"                #保存test.prototxt文件的位置
    solver_proto = my_project_root + "mnist/solver.prototxt"            #保存solver.prototxt文件的位置

    write_net(train_proto, train_list, test_proto, test_list)
    print "生成train.prototxt test.prototxt成功"
    write_sovler(my_project_root, solver_proto, train_proto, test_proto)
    print "生成solver.prototxt成功"
    train(solver_proto)
    print "训练完成"
- 1
- 2
- 3
- 4
- 5
- 6
- 7
- 8
- 9
- 10
- 11
- 12
- 13
- 14
- 15
- 16
- 17
- 18
- 19
- 20
- 21
- 22
- 23
- 24
- 25
- 26
- 27
- 28
- 29
- 30
- 31
- 32
- 33
- 34
- 35
- 36
- 37
- 38
- 39
- 40
- 41
- 42
- 43
- 44
- 45
- 46
- 47
- 48
- 49
- 50
- 51
- 52
- 53
- 54
- 55
- 56
- 57
- 58
- 59
- 60
- 61
- 62
- 63
- 64
- 65
- 66
- 67
- 68
- 69
- 70
- 71
- 72
- 73
- 74
- 75
- 76
- 77
- 78
- 79
- 80
- 81
- 82
- 83
- 84
- 85
- 86
- 87
- 88
- 89
- 90
- 91
- 92
由于以上内容在之前已经进行详细讲解,如有遗忘请回顾之前笔记。
2.运行结果:

3.总结
从运行结果可以看出,训练准确率高达99.11%。训练生成的mnist_iter_9380.caffemodel即为最终训练得到的模型,下篇笔记将继续讲解,如何使用这个训练好的模型做预测。
- 顶
- 5
- 踩
- 0
- 上一篇Caffe学习笔记(五):使用pycaffe生成solver.prototxt文件并进行训练
- 下一篇Caffe学习笔记(七):使用训练好的model做预测(mnist)
- • [记录caffe学习]1.caffe自带数字识别例子
- • Caffe学习-手写数字识别
- • 使用Caffe进行手写数字识别执行流程解析
- • 【深度学习】笔记3_caffe自带的第一个例子,Mnist手写数字识别所使用的LeNet网络模型的详细解释
- • caffe示例实现之5用CaffeNet训练与测试自己的数据集
- • caffe示例实现之4在MNIST手写数字数据集上训练与测试LeNet
- • 【深度学习】笔记2_caffe自带的第一个例子,Mnist手写数字识别代码,过程,网络详解
- • 使用caffe训练好的模型测试单张手写数字
- • caffe识别手写数字
- • 【机器学习Machine Learning】资料大全
Caffe学习笔记(七):使用训练好的model做预测(mnist)
版权声明:本文为博主原创文章,未经博主允许不得转载。
转载请注明作者和出处: http://blog.csdn.net/c406495762
Python版本: Python2.7
运行平台: Ubuntu14.04
一、前言
在之前的笔记中,已经生成了训练好的mnist.cafffemodel,接下来我们就可以利用这个model做预测了。在这之前,我们还需要一个文件:deploy.prototxt。那么,就让我们从deploy.prototxt开始说起。
二、deploy.prototxt
deploy.prototxt文件和train.prototxt相似,区别在于第一层的输入数据层被删除,然后添加一个数据维度的描述。同时,移除了最后的”loss”和”accurary”层,加入”prob”层,也就是一个Softmax概率层。
1.第一层数据维度描述如下:

-
input:”data” 对输入数据维度进行描述;
-
input_dim:1 表示对待识别样本进行数据增广的数量,该值的大小可自行定义。但一般会进行5次crop,将整幅图像分为多个flip。该值为10则表示会将待识别的样本分为10部分输入到网络进行识别。如果相对整幅图像进行识别而不进行图像数据增广,则可将该值设置为1;
-
input_dim:3 该值表示处理的图像的通道数,若图像为RGB图像则通道数为3,设置该值为3;若图像为灰度图,通道数为1则设置该值为1;
-
input_dim:28 图像的长度,可以通过网络配置文件中的数据层中的crop_size来获取;
-
input_dim:28 图像的宽度,可以通过网络配置文件中的数据层中的crop_size来获取。
2.最后一层”prob”层:

3.编写代码:
# -*- coding: UTF-8 -*-
import caffe

def creat_deploy():
    net = caffe.NetSpec()
    net.conv1 = caffe.layers.Convolution(bottom = 'data', kernel_size = 5, num_output = 20,
                                         weight_filler = dict(type = 'xavier'))
    net.pool1 = caffe.layers.Pooling(net.conv1, kernel_size = 2, stride = 2,
                                     pool = caffe.params.Pooling.MAX)
    net.conv2 = caffe.layers.Convolution(net.pool1, kernel_size = 5, num_output = 50,
                                         weight_filler = dict(type = 'xavier'))
    net.pool2 = caffe.layers.Pooling(net.conv2, kernel_size = 2, stride = 2,
                                     pool = caffe.params.Pooling.MAX)
    net.fc1 =   caffe.layers.InnerProduct(net.pool2, num_output = 500,
                                          weight_filler = dict(type = 'xavier'))
    net.relu1 = caffe.layers.ReLU(net.fc1, in_place = True)
    net.score = caffe.layers.InnerProduct(net.relu1, num_output = 10,
                                          weight_filler = dict(type = 'xavier'))
    net.prob = caffe.layers.Softmax(net.score)
    return net.to_proto()

def write_net(deploy_proto):
    #写入deploy.prototxt文件
    with open(deploy_proto, 'w') as f:
        #写入第一层数据描述
        f.write('input:"data"\n')
        f.write('input_dim:1\n')
        f.write('input_dim:3\n')
        f.write('input_dim:28\n')
        f.write('input_dim:28\n')
        f.write(str(creat_deploy()))

if __name__ == '__main__':
     my_project_root = "/home/Jack-Cui/caffe-master/my-caffe-project/"
     deploy_proto = my_project_root + "mnist/deploy.prototxt"
     write_net(deploy_proto)
- 1
- 2
- 3
- 4
- 5
- 6
- 7
- 8
- 9
- 10
- 11
- 12
- 13
- 14
- 15
- 16
- 17
- 18
- 19
- 20
- 21
- 22
- 23
- 24
- 25
- 26
- 27
- 28
- 29
- 30
- 31
- 32
- 33
- 34
- 35
- 36
- 37
- 1
- 2
- 3
- 4
- 5
- 6
- 7
- 8
- 9
- 10
- 11
- 12
- 13
- 14
- 15
- 16
- 17
- 18
- 19
- 20
- 21
- 22
- 23
- 24
- 25
- 26
- 27
- 28
- 29
- 30
- 31
- 32
- 33
- 34
- 35
- 36
- 37
4.deploy.prototxt生成的内容如下:
input:"data"
input_dim:1
input_dim:3
input_dim:28
input_dim:28
layer {
  name: "conv1"
  type: "Convolution"
  bottom: "data"
  top: "conv1"
  convolution_param {
    num_output: 20
    kernel_size: 5
    weight_filler {
      type: "xavier"
    }
  }
}
layer {
  name: "pool1"
  type: "Pooling"
  bottom: "conv1"
  top: "pool1"
  pooling_param {
    pool: MAX
    kernel_size: 2
    stride: 2
  }
}
layer {
  name: "conv2"
  type: "Convolution"
  bottom: "pool1"
  top: "conv2"
  convolution_param {
    num_output: 50
    kernel_size: 5
    weight_filler {
      type: "xavier"
    }
  }
}
layer {
  name: "pool2"
  type: "Pooling"
  bottom: "conv2"
  top: "pool2"
  pooling_param {
    pool: MAX
    kernel_size: 2
    stride: 2
  }
}
layer {
  name: "fc1"
  type: "InnerProduct"
  bottom: "pool2"
  top: "fc1"
  inner_product_param {
    num_output: 500
    weight_filler {
      type: "xavier"
    }
  }
}
layer {
  name: "relu1"
  type: "ReLU"
  bottom: "fc1"
  top: "fc1"
}
layer {
  name: "score"
  type: "InnerProduct"
  bottom: "fc1"
  top: "score"
  inner_product_param {
    num_output: 10
    weight_filler {
      type: "xavier"
    }
  }
}
layer {
  name: "prob"
  type: "Softmax"
  bottom: "score"
  top: "prob"
}
- 1
- 2
- 3
- 4
- 5
- 6
- 7
- 8
- 9
- 10
- 11
- 12
- 13
- 14
- 15
- 16
- 17
- 18
- 19
- 20
- 21
- 22
- 23
- 24
- 25
- 26
- 27
- 28
- 29
- 30
- 31
- 32
- 33
- 34
- 35
- 36
- 37
- 38
- 39
- 40
- 41
- 42
- 43
- 44
- 45
- 46
- 47
- 48
- 49
- 50
- 51
- 52
- 53
- 54
- 55
- 56
- 57
- 58
- 59
- 60
- 61
- 62
- 63
- 64
- 65
- 66
- 67
- 68
- 69
- 70
- 71
- 72
- 73
- 74
- 75
- 76
- 77
- 78
- 79
- 80
- 81
- 82
- 83
- 84
- 85
- 86
- 87
- 88
- 89
- 90
三、预测
运行上述代码,就可在my-caffe-project/mnist目录下生成deploy.prototxt文件,生成的deploy.prototxt文件即可用于使用训练好的模型做预测,如下图所示:

上个笔记中训练生成的模型在my-caffe-project目录下,如下图所示:
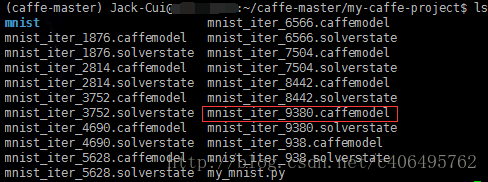
现在就可以使用deploy.prototxt和mnist_iter_9380.caffemodel做预测了,编写代码如下:
# -*- coding: UTF-8 -*-
import caffe
import numpy as np

def test(my_project_root, deploy_proto):
    caffe_model = my_project_root + 'mnist_iter_9380.caffemodel'        #caffe_model文件的位置
    img = my_project_root + 'mnist/test/6/09269.png'                    #随机找的一张待测图片
    labels_filename = my_project_root + 'mnist/test/labels.txt'            #类别名称文件,将数字标签转换回类别名称

    net = caffe.Net(deploy_proto, caffe_model, caffe.TEST)                #加载model和deploy

    #图片预处理设置
    transformer = caffe.io.Transformer({'data': net.blobs['data'].data.shape})  #设定图片的shape格式(1,3,28,28)
    transformer.set_transpose('data', (2,0,1))                            #改变维度的顺序,由原始图片(28,28,3)变为(3,28,28)
    transformer.set_raw_scale('data', 255)                                # 缩放到【0,255】之间
    transformer.set_channel_swap('data', (2,1,0))                       #交换通道,将图片由RGB变为BGR

    im = caffe.io.load_image(img)                                       #加载图片
    net.blobs['data'].data[...] = transformer.preprocess('data',im)     #执行上面设置的图片预处理操作,并将图片载入到blob中

    out = net.forward()                                                    #执行测试

    labels = np.loadtxt(labels_filename, str, delimiter='\t')           #读取类别名称文件
    prob = net.blobs['prob'].data[0].flatten()                             #取出最后一层(Softmax)属于某个类别的概率值
    order = prob.argsort()[-1]                                          #将概率值排序,取出最大值所在的序号
    print '图片数字为:',labels[order]                                   #将该序号转换成对应的类别名称,并打印

if __name__ == '__main__':
    my_project_root = "/home/Jack-Cui/caffe-master/my-caffe-project/"    #my-caffe-project目录
    deploy_proto = my_project_root + "mnist/deploy.prototxt"            #保存deploy.prototxt文件的位置
    test(my_project_root, deploy_proto)
- 1
- 2
- 3
- 4
- 5
- 6
- 7
- 8
- 9
- 10
- 11
- 12
- 13
- 14
- 15
- 16
- 17
- 18
- 19
- 20
- 21
- 22
- 23
- 24
- 25
- 26
- 27
- 28
- 29
- 30
- 31
- 32
- 1
- 2
- 3
- 4
- 5
- 6
- 7
- 8
- 9
- 10
- 11
- 12
- 13
- 14
- 15
- 16
- 17
- 18
- 19
- 20
- 21
- 22
- 23
- 24
- 25
- 26
- 27
- 28
- 29
- 30
- 31
- 32
运行结果如下:
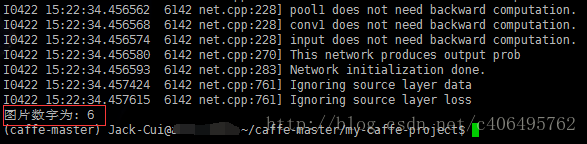
可以看到结果正确无误,我随机选取的待测图片就是数字6(mnist/test/6/09269.png)。
- 顶
- 3
- 踩
- 0
- 上一篇Caffe学习笔记(六):mnist手写数字识别训练实例
- 下一篇Jetson TX1开发笔记(一):开机设置与刷机
- • Caffe学习笔记(六):mnist手写数字识别训练实例
- • 练习声明
- • 第十四天、二分查找
- • Linux应用层查看系统时间的方法
- • Caffe学习笔记(二):使用Python生成caffe所需的lmdb文件和txt列表清单文件
- • 答答租车系统(imooc综合练习)
- • 第八天、直接插入排序
- • Caffe学习笔记(六):mnist手写数字识别训练实例
- • 【机器学习Machine Learning】资料大全
- • Qt Model/View 学习笔记 (七)