SpringBoot2.x学习之路(二)JdbcTemplate以及Mybatis的使用
上一篇博文,小七介绍了如何搭建一个Spring Boot项目,那么接下来,咱们就学习一下如何在Spring Boot项目中操作数据库。
目前在我们的项目开发过程中,常用的框架有JPA(Hibernate)、Mybatis等,这里小七不推荐JPA的方式,因为小七认为SQL就应该写在专门的地方,不应该写在业务代码或者通过实体逆向生成SQL,这样太不灵活了。当然,平时自己写一些小工具的话,还是可以使用使用,但是在项目中还是尽量不要使用。
JdbcTemplate,这个算不上框架,只是对JDBC进行了封装,避免写一些重复的代码,比如获取连接、处理结果集、关闭连接等;但是,平时如果也想使用什么持久层框架的话,使用这个进行DB操作,还是可以减少很多重复代码的。
下面,小七分以下几个步骤进行介绍:
(一)pom依赖
之前Spring Boot需要引入的依赖,这里小七就不再贴出来了。其实,要进行DB操作,主要是驱动包,持久层框架包,如下:
      mysql
      mysql-connector-java


      org.mybatis.spring.boot
      mybatis-spring-boot-starter
      2.0.0


      com.google.guava
      guava
      24.1-jre


      com.alibaba
      fastjson
      1.2.28
这里guava 和 JSON 可以不需要,只是小七这边为了使用guava 的一个驼峰式名称转换方法以及打印日志时转换成JSON字符串所引入的。
(二)数据库连接(JDBC)配置
这里,只需要在对应环境的.yml文件中,加入以下配置即可:
spring:
  datasource:
    url: jdbc:mysql://localhost:3306/test?serverTimezone=UTC&useUnicode=yes&characterEncoding=UTF8&allowMultiQueries=true
    username: root
    password:
    driver-class-name: com.mysql.cj.jdbc.Driver
(三)JdbcTemplate的使用
这里想使用JdbcTemplate很简单,因为spring启动的时候,spring容器就已经帮我们实例化了JdbcTemplate,我们在代码里可以直接注入进去即可,如下:
package org.qyk.springboot.dao.impl;

import org.qyk.springboot.dao.PersonDao;
import org.springframework.beans.factory.annotation.Autowired;
import org.springframework.jdbc.core.JdbcTemplate;
import org.springframework.stereotype.Repository;

import java.util.List;
import java.util.Map;

/**
 *
 *
 * @version 1.0
 *
 * Author       Date            Changes
 * yongkang.qi   2020年04月05日   Created
 *
 *
 * @since 1.7
 */
@Repository
public class PersonDaoImpl implements PersonDao {

    @Autowired
    private JdbcTemplate template;

    @Override
    public List> queryList(String userName) {
        String sql = "SELECT * FROM person WHERE username LIKE ?";
        List> maps = template.queryForList(sql, userName);
        return maps;
    }
}
PersonDao 只是定义的一个接口类而已,小七也贴出来:
package org.qyk.springboot.dao;

import java.util.List;
import java.util.Map;

/**
 *
 *
 * @version 1.0
 *
 * Author       Date            Changes
 * yongkang.qi   2020年04月05日   Created
 *
 *
 * @since 1.7
 */
public interface PersonDao {

    List> queryList(String userName);
}
然后,咱们来测试一波,先写个单元测试类,如下:
package org.qyk.springboot.dao;

import java.util.List;
import java.util.Map;

import javax.annotation.Resource;

import org.junit.Test;
import org.junit.runner.RunWith;
import org.qyk.springboot.entity.PersonEntity;
import org.springframework.boot.test.context.SpringBootTest;
import org.springframework.test.context.junit4.SpringRunner;

import com.alibaba.fastjson.JSON;

/**
 *
 *
 * @version 1.0
 *
 *
 * Author       Date            Changes
 * yongkang.qi   2020年04月05日   Created
 *
 *
 * @since 1.7
 */
@RunWith(SpringRunner.class)
@SpringBootTest
public class PersonDaoTest {

    @Resource
    private PersonDao    personDao;
    @Resource
    private PersonMapper personMapper;

    @Test
    public void testJdbcTemplateQueryList() {
        List> mapList = personDao.queryList("%new%");
        System.out.println(mapList);
    }

    @Test
    public void testMybatisQueryList() {
        List> mapList = personMapper.queryList("%%");
        for (Map stringObjectMap : mapList) {
            System.out.println(stringObjectMap);
        }

    }

    @Test
    public void testMybatisGet() {
        PersonEntity entity = personMapper.get(41L);
        System.out.println(JSON.toJSONString(entity));
    }
}
目前,大家只需要关注testJdbcTemplateQueryList方法即可,后面的两个方法是后面测试Mybatis用的。
然后,小七来运行一下试试看,日志如下:

这里,想要打印SQL的话,只需要在.yml文件中加入以下配置:
# 日志设置
logging:
  file:
    path: E:\log
  level:
    org.qyk.springboot: INFO
    org.springframework.jdbc.core: DEBUG  # 可以打印SQL
(四)Mybatis配置
下面,我们再来看看Mybatis该如何配置,其实之前在搭建SSM的项目时,咱们就已经要知道要配置哪些东西啦,无法就是指定mapper文件放置的路径,Mapper接口的包扫描路径,还有类别名的配置以及一些其它的配置。
下面,小七先贴出配置文件内容,如下:
mybatis:
  #config-location: classpath:mybatis/mybatis-config.xml 这个配置和下面configuration是一样的效果,只能选其一
  mapper-locations: classpath:mybatis/**/*Mapper.xml  #指定mapper路径
  typeAliasesPackage: org.qyk.springboot.entity   # 别名配置
  configuration:
    log-impl: org.apache.ibatis.logging.stdout.StdOutImpl # 打印sql
    map-underscore-to-camel-case: true  # 返回字段驼峰式设置
    call-setters-on-nulls: true  # 字段空值,也需要返回
这里也是一样,配置到.yml文件中即可。每个配置项的作用,相应大家看了,应该很清楚吧。
(五)Mybatis接口类和Mapper编写
接下来,我们来创建一个接口类,如下:
package org.qyk.springboot.dao;

import org.apache.ibatis.annotations.Mapper;
import org.apache.ibatis.annotations.Param;
import org.qyk.springboot.entity.PersonEntity;

import java.util.List;
import java.util.Map;

/**
 *
 *
 * @version 1.0
 *
 * Author       Date            Changes
 * yongkang.qi   2020年04月05日   Created
 *
 *
 * @since 1.7
 */
@Mapper
public interface PersonMapper {

    /**
     * 根据用户名模糊搜索
     * @param userName
     * @return
     */
    List> queryList(String userName);

    /**
     * 根据id单个查询
     * @param id
     * @return
     */
    PersonEntity get(@Param("id") Long id);
}
这里,@Mapper也可以去掉,但是在SpringBoot入口类需要加上一个配置,如下:
package org.qyk.springboot;

import org.mybatis.spring.annotation.MapperScan;
import org.springframework.boot.SpringApplication;
import org.springframework.boot.autoconfigure.SpringBootApplication;

/**
 * SpringBoot入口类
 *
 * @version 1.0
 *
 * Author       Date            Changes
 * yongkang.qi   2020年03月22日   Created
 *
 *
 * @since 1.7
 */
@SpringBootApplication
/*@MapperScan("org.qyk.springboot.dao")*/
public class Application {
    public static void main(String[] args) {
        SpringApplication.run(Application.class, args);
    }
}
这里,小七先注释了,只需要选其一即可。很显然通过@MapperScan要方便一点,不需要在每个Mapper接口类上加注解了。
然后,咱们再来看一下mapper文件,PersonMapper.xml,如下:
ID,USERNAME,AGE,BIRTH,SEX,ORGANIZATION_ID,CREATEDBY,CREATED,UPDATEDBY,UPDATED,IS_ACTIVE,IS_DELETE
和之前写法是一样的,这里就不解释了。
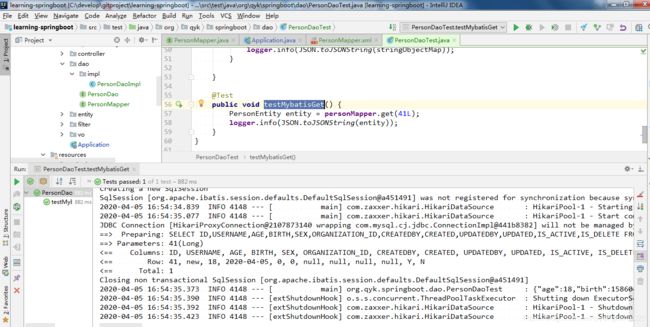
然后,这样就完啦,我们再来运行上面已经贴出来测试类的testMybatisGet,看看运行效果,如下图:

(六)结语
好啦,到此结束了,小七上面零零散散贴出了一些代码,但是又担心刚学习的小伙伴,看起来不方便,这里小七已把代码上传到了码云,地址如下:https://gitee.com/qiyongkang/learning-springboot