faster-rcnn python3.5环境下使用自定义数据集复现
一. 简单说明
本篇文章主要是简单叙说一下 faster-rcnn,在ubuntu16.04,python3.5,cuda8.0,cudnn 6.0,caffe1.0环境下的复现,要知道faste-rcnn官方的代码环境是python2.7的,所以这里改动比较多,同时这里也会说一下怎样训练自己的数据集。
二. faster rcnn环境搭建
1. 准备工作
(1)安装cython,python-opencv,easydict
执行命令:
pip install cython
pip install easydict
apt-get install python-opencv(安装过了就不必安装)
2. 编译faster rcnn
(1)下载 py-faster-rcnn
在某个文件夹下执行命令:
git clone --recursive https://github.com/rbgirshick/py-faster-rcnn.git

(2)进入py-faster-rcnn/lib 文件夹执行命令:make
(4)进入py-faster-rcnn\caffe-fast-rcnn
拷贝一份配置,执行命令:执行 cp Makefile.config.example Makefile.config
然后,配置Makefile.config文件,与上篇文档中记录的caffe相同:
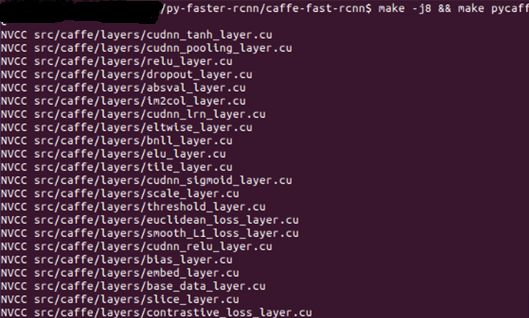
配置好Makefile.config文件后,执行命令:make -j8 && make pycaffe
如果之前安装过caffe,则这里可能出现下面错误中的1情况,具体解决方法见错误1。
三. 使用官方数据集训练测试
1. 准备数据集
(1) 下载VOC2007数据集:
https://pan.baidu.com/s/1u50VVcfdmOCWPLDVqPHqzw
解压后将数据集放在py-faster-rcnn\data下
(2)下载ImageNet数据集下预训练得到的模型参数(用来初始化)
https://pan.baidu.com/s/12renKYoytqk9-9bMrI73Lg
解压,然后将该文件放在py-faster-rcnn\data下
2. 训练模型
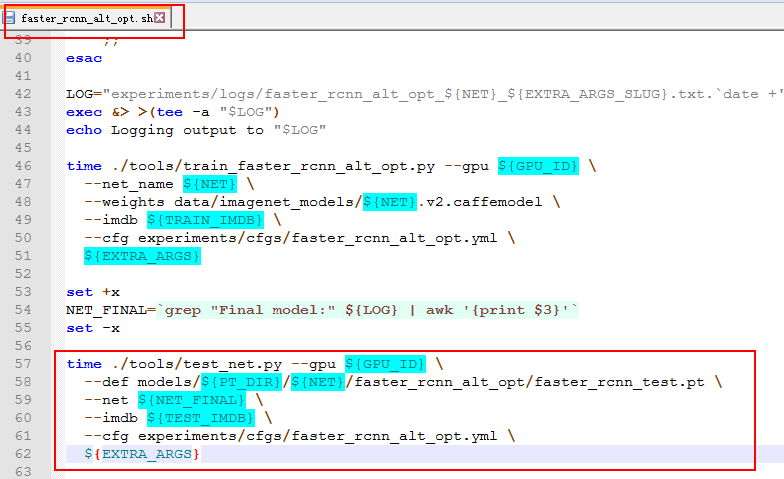
注:训练脚本的最后面会有对训练好的模型进行测试的代码,这段代码在执行时会有错误,为了避免出错,可以将其删除掉(下面红色框住的部分):
由于faster-caffe是基于python2.7版本编写的,所以在训练的过程中会有很多错误:会遇到以下的2,3,4,5,6,7,8中的错误,python3中的print()函数需要加上括号的。
一切就绪后 在py-faster-rcnn文件夹下执行命令:
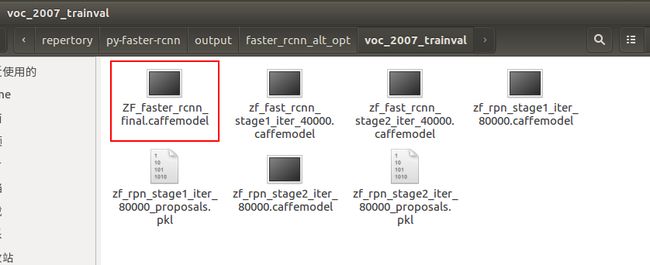
./experiments/scripts/faster_rcnn_alt_opt.sh 0 ZFpascal_voc执行完毕后在 py-faster-rcnn/output/faster_rcnn_alt_opt/voc_2007_trainval文件夹下可以看到生成的最终模型文件:ZF_faster_rcnn_final.caffemodel
3. 测试模型
(1) 将训练得到的ZF_faster_rcnn_final.caffemodel 拷贝至 py-faster-rcnn\data\faster_rcnn_models(如果没有这个文件夹,就新建一个)
(2) 修改 py-faster-rcnn\tools\demo.py
将:im_names =['1559.jpg','1564.jpg']中图片改为自己的图片名称 (测试图片放在py-faster-rcnn\data\demo中)
(3) 执行测试:
在py-faster-rcnn下执行:
./tools/demo.py --net zf
四. 使用自定义数据集训练模型并测试
1. 制作数据集
(1)将需要标记的图片归整化一下,转化成固定尺寸(可选)
(2)将每类的图片重新更改一下文件名,这里提供一个手写版java程序:
public class Demo {
	public static void main(String[] args) {
		Demo demo = new Demo();
		demo.test();
	}

	int i = 0;
	public void test() {
		String path = "E:\\python\\togue\\数据集\\crack\\";
		File f = new File(path);
		File[] files = f.listFiles();
		for (File file : files) {
			file.renameTo(new File(path+getNum(6)+"."+file.getName().split("\\.")[1]));
		}
	}

	public String getNum(int digit) {
		StringBuffer sbf = new StringBuffer("crack_");
		i++;
		if((i+"").length() < digit) {
			for(int j=0;j
可以进行批量更改,具体说明看代码,很简单,此步骤就是为了让图片名变得好看有序,
建议图片名修改为【 分类名_数字.jpg】 格式
(3)使用标记工具对每一类图片进行标记,这里建议每一类都建立一个文件夹,分开标记后分别生成txt文件,最后组合在一起(不知道哪位大神弄的,这里借用了,内附使用说明)
下载链接:
https://pan.baidu.com/s/19UFtwfaLtAsIhxtLrDl3hQ
标记后生成output.txt文件,内容大致如下:
crack_000001.jpg 1 106 50 143 240
crack_000002.jpg 1 128 29 192 214
crack_000003.jpg 1 106 32 164 256
前面是图片名,中间是目标类别,最后是目标的包围框坐标(左上角和右下角坐标)。
将每一类的output.txt文件组合在一起 形成一个output.txt文件,将output.txt文件转化为xml标记文件,python代码为:
from xml.dom.minidom import Document
import os
import os.path

xml_path = "E:\\资源共享\\python\\生成测试\\Annotations\\"

if not os.path.exists(xml_path):
    os.mkdir(xml_path)

def writeXml(tmp, imgname, w, h, objbud, wxml):
    doc = Document()
    # owner
    annotation = doc.createElement('annotation')
    doc.appendChild(annotation)
    # owner
    folder = doc.createElement('folder')
    annotation.appendChild(folder)
    folder_txt = doc.createTextNode("SkinLesion")
    folder.appendChild(folder_txt)

    filename = doc.createElement('filename')
    annotation.appendChild(filename)
    filename_txt = doc.createTextNode(imgname)
    filename.appendChild(filename_txt)
    # ones#
    source = doc.createElement('source')
    annotation.appendChild(source)

    database = doc.createElement('database')
    source.appendChild(database)
    database_txt = doc.createTextNode("The SkinLesion Database")
    database.appendChild(database_txt)

    annotation_new = doc.createElement('annotation')
    source.appendChild(annotation_new)
    annotation_new_txt = doc.createTextNode("SkinLesion")
    annotation_new.appendChild(annotation_new_txt)

    image = doc.createElement('image')
    source.appendChild(image)
    image_txt = doc.createTextNode("flickr")
    image.appendChild(image_txt)
    # onee#
    # twos#
    size = doc.createElement('size')
    annotation.appendChild(size)

    width = doc.createElement('width')
    size.appendChild(width)
    width_txt = doc.createTextNode(str(w))
    width.appendChild(width_txt)

    height = doc.createElement('height')
    size.appendChild(height)
    height_txt = doc.createTextNode(str(h))
    height.appendChild(height_txt)

    depth = doc.createElement('depth')
    size.appendChild(depth)
    depth_txt = doc.createTextNode("3")
    depth.appendChild(depth_txt)
    # twoe#
    segmented = doc.createElement('segmented')
    annotation.appendChild(segmented)
    segmented_txt = doc.createTextNode("0")
    segmented.appendChild(segmented_txt)


    for i in range(0, int(len(objbud) / 5)):
        # threes#
        object_new = doc.createElement("object")
        annotation.appendChild(object_new)

        name = doc.createElement('name')
        object_new.appendChild(name)
        name_txt = doc.createTextNode(objbud[i * 5])
        name.appendChild(name_txt)

        pose = doc.createElement('pose')
        object_new.appendChild(pose)
        pose_txt = doc.createTextNode("Unspecified")
        pose.appendChild(pose_txt)

        truncated = doc.createElement('truncated')
        object_new.appendChild(truncated)
        truncated_txt = doc.createTextNode("0")
        truncated.appendChild(truncated_txt)

        difficult = doc.createElement('difficult')
        object_new.appendChild(difficult)
        difficult_txt = doc.createTextNode("0")
        difficult.appendChild(difficult_txt)
        # threes-1#
        bndbox = doc.createElement('bndbox')
        object_new.appendChild(bndbox)

        xmin = doc.createElement('xmin')
        bndbox.appendChild(xmin)
        xmin_txt = doc.createTextNode(objbud[i * 5 + 1])
        xmin.appendChild(xmin_txt)

        ymin = doc.createElement('ymin')
        bndbox.appendChild(ymin)
        ymin_txt = doc.createTextNode(objbud[i * 5 + 2])
        ymin.appendChild(ymin_txt)

        xmax = doc.createElement('xmax')
        bndbox.appendChild(xmax)
        xmax_txt = doc.createTextNode(objbud[i * 5 + 3])
        xmax.appendChild(xmax_txt)

        ymax = doc.createElement('ymax')
        bndbox.appendChild(ymax)
        ymax_txt = doc.createTextNode(objbud[i * 5 + 4])
        ymax.appendChild(ymax_txt)
        # threee-1#
        # threee#

    tempfile = tmp + "test.xml"
    with open(tempfile, "wb+") as f:
        f.write(doc.toprettyxml(indent="\t", encoding='utf-8'))

    rewrite = open(tempfile, "r")
    lines = rewrite.read().split('\n')
    newlines = lines[1:len(lines) - 1]

    fw = open(wxml, "w")
    for i in range(0, len(newlines)):
        fw.write(newlines[i] + "\n")

    fw.close()
    rewrite.close()
    os.remove(tempfile)
    return


temp = "C:\\temp2\\"
if not os.path.exists(temp):
    os.mkdir(temp)

fopen = open("E:\\资源共享\\python\\生成测试\\output.txt", 'r')
lines = fopen.readlines()
for line in lines:
    line = (line.split('\n'))[0]
    obj = line.split(' ')
    image_name = obj[0]
    xml_name = image_name.replace('.jpg', '.xml')
    filename = xml_path + xml_name
    obj = obj[1:]
    if obj[0] == '1':
        obj[0] = 'car'

    if obj[0] == '2':
        obj[0] = 'nocar'
    writeXml(temp, image_name, 299, 299, obj, filename)

os.rmdir(temp)
->fopen = open("E:\\资源共享\\python\\生成测试\\output.txt", 'r'),为output.txt文件路径
->
if obj[0] == '1':
obj[0] = 'car'if obj[0] == '2':
obj[0] = 'nocar'
这里的1 对应着car分类,2对应着nocar分类
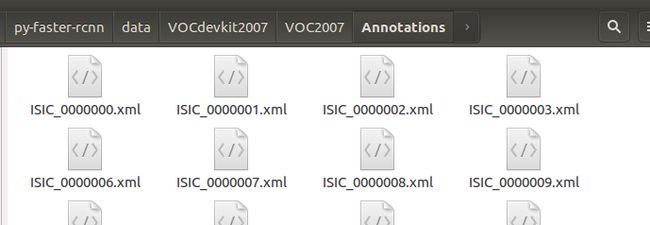
执行后即可生成每张图片对应的标准xml文件:xml文件大致内容如下:
SkinLesion
car_000001.jpg
The SkinLesion Database
SkinLesion
flickr
299
299
3
0
(4)生成训练,测试集txt文件
新建文件夹 ImageSets,进入文件夹再新建Main文件夹,执行python代码:
import os
import random
import numpy as np

xmlfilepath = 'E:\\资源共享\\python\\生成测试\\Annotations\\'
txtsavepath =  'E:\\资源共享\\python\\生成测试\\'

trainval_percent = 0.5
train_percent = 0.5

xmlfile = os.walk(xmlfilepath)
numOfxml = sum([len(x) for _, _, x in xmlfile])

name_list = list(name for name in  os.listdir(xmlfilepath))
trainval = sorted(list(random.sample(name_list, int(numOfxml * trainval_percent))))
test = np.setdiff1d(np.array(name_list), np.array(trainval))

trainvalsize = len(trainval)
t_name_list = list(name for name in  trainval)
train = sorted(list(random.sample(t_name_list, int(trainvalsize * trainval_percent))))
val = np.setdiff1d(np.array(t_name_list), np.array(train))

ftrainval = open(txtsavepath + "ImageSets\\Main\\trainval.txt", 'w')
ftest = open(txtsavepath + "ImageSets\\Main\\test.txt", 'w')
ftrain = open(txtsavepath + "ImageSets\\Main\\train.txt", 'w')
fval = open(txtsavepath + "ImageSets\\Main\\val.txt", 'w')

for name in  os.listdir(xmlfilepath):
    if name in trainval:
        ftrainval.write(name.replace(".xml", "") + "\n")
        if name in train:
             ftrain.write(name.replace(".xml", "") + "\n")
        else:
            fval.write(name.replace(".xml", "") + "\n")
    else:
        ftest.write(name.replace(".xml", "") + "\n")

ftrainval.close()
ftrain.close()
fval.close()
ftest.close()
其中:txtsavepath 是生成txt的根目录
xmlfilepath 是xml标注文件的文件夹地址
执行后会生成4个txt文件
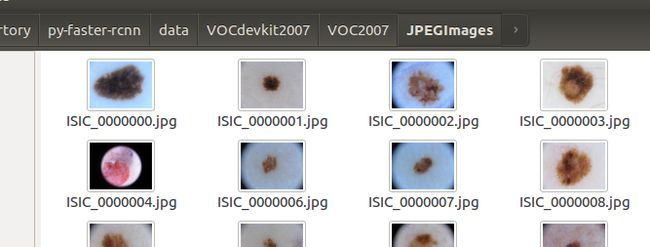
(5)新建文件夹VOC2007,进入文件夹再新建JPEGImages文件夹,将之前用于标注的图片全部放到改文件夹下
(6)数据集文件如下所示:
(7) 用制作好的数据集中 Annotations,ImagesSets和JPEGImages替换py-faster-rcnn\data\VOCdevkit2007\VOC2007中对应文件夹);
(8) 下载ImageNet数据集下预训练得到的模型参数(用来初始化)
https://pan.baidu.com/s/12renKYoytqk9-9bMrI73Lg
解压,然后将该文件放在py-faster-rcnn\data下
2. 训练模型(需要改动以下文件)
(1)py-faster-rcnn/models/pascal_voc/ZF/faster_rcnn_alt_opt/stage1_fast_rcnn_train.pt修改,有3处:
layer {
  name: 'data'
  type: 'Python'
  top: 'data'
  top: 'rois'
  top: 'labels'
  top: 'bbox_targets'
  top: 'bbox_inside_weights'
  top: 'bbox_outside_weights'
  python_param {
    module: 'roi_data_layer.layer'
    layer: 'RoIDataLayer'
    param_str: "'num_classes': 16" #按训练集类别改,该值为类别数+1
  }
}

layer {
  name: "cls_score"
  type: "InnerProduct"
  bottom: "fc7"
  top: "cls_score"
  param { lr_mult: 1.0 }
  param { lr_mult: 2.0 }
  inner_product_param {
    num_output: 16 #按训练集类别改,该值为类别数+1
    weight_filler {
      type: "gaussian"
      std: 0.01
    }
    bias_filler {
      type: "constant"
      value: 0
    }
  }
}

layer {
  name: "bbox_pred"
  type: "InnerProduct"
  bottom: "fc7"
  top: "bbox_pred"
  param { lr_mult: 1.0 }
  param { lr_mult: 2.0 }
  inner_product_param {
    num_output: 64 #按训练集类别改,该值为(类别数+1)*4
    weight_filler {
      type: "gaussian"
      std: 0.001
    }
    bias_filler {
      type: "constant"
      value: 0
    }
  }
}
(2)py-faster-rcnn/models/pascal_voc/ZF/faster_rcnn_alt_opt/stage1_rpn_train.pt修改
layer {
  name: 'input-data'
  type: 'Python'
  top: 'data'
  top: 'im_info'
  top: 'gt_boxes'
  python_param {
    module: 'roi_data_layer.layer'
    layer: 'RoIDataLayer'
    param_str: "'num_classes': 16" #按训练集类别改,该值为类别数+1
  }
}
(3)py-faster-rcnn/models/pascal_voc/ZF/faster_rcnn_alt_opt/stage2_fast_rcnn_train.pt修改
layer {
  name: 'data'
  type: 'Python'
  top: 'data'
  top: 'rois'
  top: 'labels'
  top: 'bbox_targets'
  top: 'bbox_inside_weights'
  top: 'bbox_outside_weights'
  python_param {
    module: 'roi_data_layer.layer'
    layer: 'RoIDataLayer'
    param_str: "'num_classes': 16" #按训练集类别改,该值为类别数+1
  }
}

layer {
  name: "cls_score"
  type: "InnerProduct"
  bottom: "fc7"
  top: "cls_score"
  param { lr_mult: 1.0 }
  param { lr_mult: 2.0 }
  inner_product_param {
    num_output: 16 #按训练集类别改,该值为类别数+1
    weight_filler {
      type: "gaussian"
      std: 0.01
    }
    bias_filler {
      type: "constant"
      value: 0
    }
  }
}


layer {
  name: "bbox_pred"
  type: "InnerProduct"
  bottom: "fc7"
  top: "bbox_pred"
  param { lr_mult: 1.0 }
  param { lr_mult: 2.0 }
  inner_product_param {
    num_output: 64 #按训练集类别改,该值为(类别数+1)*4
    weight_filler {
      type: "gaussian"
      std: 0.001
    }
    bias_filler {
      type: "constant"
      value: 0
    }
  }
}
(4)py-faster-rcnn/models/pascal_voc/ZF/faster_rcnn_alt_opt/stage2_rpn_train.pt修改
layer {
  name: 'input-data'
  type: 'Python'
  top: 'data'
  top: 'im_info'
  top: 'gt_boxes'
  python_param {
    module: 'roi_data_layer.layer'
    layer: 'RoIDataLayer'
    param_str: "'num_classes': 16" #按训练集类别改,该值为类别数+1
  }
}
(5)py-faster-rcnn/models/pascal_voc/ZF/faster_rcnn_alt_opt/faster_rcnn_test.pt修改
layer {
  name: "cls_score"
  type: "InnerProduct"
  bottom: "fc7"
  top: "cls_score"
  inner_product_param {
    num_output: 16 #按训练集类别改,该值为类别数+1
  }
}


layer {
  name: "bbox_pred"
  type: "InnerProduct"
  bottom: "fc7"
  top: "bbox_pred"
  inner_product_param {
    num_output: 64 #按训练集类别改,该值为(类别数+1)*4
  }
}
(6) py-faster-rcnn/lib/datasets/pascal_voc.py修改
class pascal_voc(imdb):
    def __init__(self, image_set, year, devkit_path=None):
        imdb.__init__(self, 'voc_' + year + '_' + image_set)
        self._year = year
        self._image_set = image_set
        self._devkit_path = self._get_default_path() if devkit_path is None \
                            else devkit_path
        self._data_path = os.path.join(self._devkit_path, 'VOC' + self._year)
        self._classes = ('__background__', # always index 0
                         '你的标签1','你的标签2',你的标签3','你的标签4'
                      )
其中:self._data_path =os.path.join(self._devkit_path, 'VOC'+self._year) 为训练集文件夹,
若自定义的数据集直接替换原来VOC2007内的Annotations,ImageSets和JPEGImages,此处不用修改(推荐使用)
self._classes= ('__background__', '你的标签1','你的标签2','你的标签3','你的标签4')
修改成自定义的标签,需要注意顺序对应。
cls =self._class_to_ind[obj.find('name').text.lower().strip()]
.lower()会将标签转成小写,所以数据标签中字母最好是小写的,如果不是则将.lower()去掉,(推荐全部使用小写)
(7) py-faster-rcnn/lib/datasets/imdb.py修改,该文件的append_flipped_images(self)函数修改为
def append_flipped_images(self):
        num_images = self.num_images
        widths = [PIL.Image.open(self.image_path_at(i)).size[0]
                  for i in xrange(num_images)]
        for i in xrange(num_images):
            boxes = self.roidb[i]['boxes'].copy()
            oldx1 = boxes[:, 0].copy()
            oldx2 = boxes[:, 2].copy()
            boxes[:, 0] = widths[i] - oldx2 - 1
            print boxes[:, 0]
            boxes[:, 2] = widths[i] - oldx1 - 1
            print boxes[:, 0]
            assert (boxes[:, 2] >= boxes[:, 0]).all()
            entry = {'boxes' : boxes,
                     'gt_overlaps' : self.roidb[i]['gt_overlaps'],
                     'gt_classes' : self.roidb[i]['gt_classes'],
                     'flipped' : True}
            self.roidb.append(entry)
        self._image_index = self._image_index * 2
若出现错误:这里assert (boxes[:, 2] >= boxes[:, 0]).all()可能出现AssertionError
可参照错误9中解决方法。
(8)为防止与之前的模型搞混,训练前把output文件夹删除(或改个其他名),还要把py-faster-rcnn/data/cache中的文件和py-faster-rcnn/data/VOCdevkit2007/annotations_cache中的文件删除(如果有的话)。
(9)至于学习率等之类的设置,可在py-faster-rcnn/models/pascal_voc/ZF/faster_rcnn_alt_opt中的solve文件设置,迭代次数可在py-faster-rcnn\tools的train_faster_rcnn_alt_opt.py中修改:max_iters = [80000, 40000, 80000,40000]
分别为4个阶段(rpn第1阶段,fast rcnn第1阶段,rpn第2阶段,fast rcnn第2阶段)的迭代次数。可改成你希望的迭代次数。
如果改了这些数值,最好把py-faster-rcnn/models/pascal_voc/ZF/faster_rcnn_alt_opt里对应的solver文件(有4个)也修改,stepsize小于上面修改的数值。
(10)进行训练
可以同官方数据集训练一样将faster_rcnn_alt_opt.sh中测试部分的代码删除掉
再进入py-faster-rcnn,执行:
./experiments/scripts/faster_rcnn_alt_opt.sh 0 ZFpascal_voc执行完毕后在 py-faster-rcnn/output/faster_rcnn_alt_opt/voc_2007_trainval文件夹下可以看到生成的最终模型文件:ZF_faster_rcnn_final.caffemodel
3. 训练测试
同官方数据集测试一样。
4. 提供调用接口
由于该测试需要提供给其他程序调用,故需要编写接口,规定接口调用时指定图片路径,对demo.py代码改写如下所示
#!/usr/bin/env python

# --------------------------------------------------------
# Faster R-CNN
# Copyright (c) 2015 Microsoft
# Licensed under The MIT License [see LICENSE for details]
# Written by Ross Girshick
# --------------------------------------------------------

"""
Demo script showing detections in sample images.

See README.md for installation instructions before running.
"""

import _init_paths
from fast_rcnn.config import cfg
from fast_rcnn.test import im_detect
from fast_rcnn.nms_wrapper import nms
from utils.timer import Timer
import matplotlib.pyplot as plt
import numpy as np
import scipy.io as sio
import caffe, os, sys, cv2
import argparse

CLASSES = ('__background__','nevus','melanoma')
#VARIABLE = None
NETS = {'vgg16': ('VGG16',
                  'VGG16_faster_rcnn_final.caffemodel'),
        'zf': ('ZF',
                  'ZF_faster_rcnn_final.caffemodel')}

def vis_detections(im, class_name, dets, thresh=0.5):
    """Draw detected bounding boxes."""
    inds = np.where(dets[:, -1] >= thresh)[0]
    if len(inds) == 0:
        return

    im = im[:, :, (2, 1, 0)]
    fig, ax = plt.subplots(figsize=(12, 12))
    ax.imshow(im, aspect='equal')
    for i in inds:
        bbox = dets[i, :4]
        score = dets[i, -1]

        ax.add_patch(
            plt.Rectangle((bbox[0], bbox[1]),
                          bbox[2] - bbox[0],
                          bbox[3] - bbox[1], fill=False,
                          edgecolor='red', linewidth=3.5)
            )
        ax.text(bbox[0], bbox[1] - 2,
                '{:s} {:.3f}'.format(class_name, score),
                bbox=dict(facecolor='blue', alpha=0.5),
                fontsize=14, color='white')
    print("class_name:",class_name,"--score:",score)

    ax.set_title(('{} detections with '
                  'p({} | box) >= {:.1f}').format(class_name, class_name,
                                                  thresh),
                  fontsize=14)
    plt.axis('off')
    plt.tight_layout()
    plt.draw()

def demo(net,_imgpath):
    """Detect object classes in an image using pre-computed object proposals."""


	#im_file = os.path.join(cfg.DATA_DIR, 'demo', image_name)
    im_file = os.path.join(_imgpath)

    im = cv2.imread(im_file)

    # Detect all object classes and regress object bounds
    timer = Timer()
    timer.tic()
    scores, boxes = im_detect(net, im)
    timer.toc()
    #print (('Detection took {:.3f}s for ''{:d} object proposals').format(timer.total_time, boxes.shape[0]))

    # Visualize detections for each class
    CONF_THRESH = 0.8
    NMS_THRESH = 0.3
    for cls_ind, cls in enumerate(CLASSES[1:]):
        cls_ind += 1 # because we skipped background
        cls_boxes = boxes[:, 4*cls_ind:4*(cls_ind + 1)]
        cls_scores = scores[:, cls_ind]
        dets = np.hstack((cls_boxes,
                          cls_scores[:, np.newaxis])).astype(np.float32)
        keep = nms(dets, NMS_THRESH)
        dets = dets[keep, :]
        vis_detections(im, cls, dets, thresh=CONF_THRESH)


def parse_args():
    """Parse input arguments."""
    parser = argparse.ArgumentParser(description='Faster R-CNN demo')
    parser.add_argument('--gpu', dest='gpu_id', help='GPU device id to use [0]',
                        default=0, type=int)
    parser.add_argument('--cpu', dest='cpu_mode',
                        help='Use CPU mode (overrides --gpu)',
                        action='store_true')
    parser.add_argument('--net', dest='demo_net', help='Network to use [vgg16]',
                        choices=NETS.keys(), default='zf')
                        #choices=NETS.keys(), default='vgg16')
    parser.add_argument('--imgpath', dest='imgpath', help='Absolute path to detect pictures',default='/usr/develop/repertory/py-faster-rcnn/tools/')


    args = parser.parse_args()

    return args

if __name__ == '__main__':

    cfg.TEST.HAS_RPN = True  # Use RPN for proposals

    args = parse_args()

    prototxt = os.path.join(cfg.MODELS_DIR, NETS[args.demo_net][0],'faster_rcnn_alt_opt', 'faster_rcnn_test.pt')
    print(cfg.DATA_DIR)

    caffemodel = os.path.join(cfg.DATA_DIR, 'faster_rcnn_models',NETS[args.demo_net][1])

    if not os.path.isfile(caffemodel):
        raise IOError(('{:s} not found.\nDid you run ./data/script/'
                       'fetch_faster_rcnn_models.sh?').format(caffemodel))

    if args.cpu_mode:
        caffe.set_mode_cpu()
    else:
        caffe.set_mode_gpu()
        caffe.set_device(args.gpu_id)
        cfg.GPU_ID = args.gpu_id
    net = caffe.Net(prototxt, caffemodel, caffe.TEST)

    #print('\n\nLoaded network {:s}'.format(caffemodel))

    # Warmup on a dummy image
    im = 128 * np.ones((300, 500, 3), dtype=np.uint8)
    for i in range(2):
        _, _= im_detect(net, im)

    #Call detection pictures
    #print("args.imgpath : ",args.imgpath)
    demo(net, args.imgpath);

    #plt.show()
调用方式如:
./demo.py –imgpath /work/01.jpg (注意这里有两个‘’-‘’)
五. 错误解决方法
(由于版本的问题导致faster-rcnn错误很多,以下为部分错误记录)
1. 错误:【python3.5环境下caffe安装正常,但是编译faster rcnn的caffe-faster-rcnn老是报错:
In file included from ./include/caffe/util/device_alternate.hpp:40:0】
•	                 from ./include/caffe/common.hpp:19,
•	                 from ./include/caffe/blob.hpp:8,
•	                 from ./include/caffe/fast_rcnn_layers.hpp:13,
•	                 from src/caffe/layers/smooth_L1_loss_layer.cpp:8:
•	./include/caffe/util/cudnn.hpp: In function ‘const char* cudnnGetErrorString(cudnnStatus_t)’:
•	./include/caffe/util/cudnn.hpp:21:10: warning: enumeration value ‘CUDNN_STATUS_RUNTIME_PREREQUISITE_MISSING’ not handled in switch [-Wswitch]
•	   switch (status) {
•	          ^
•	./include/caffe/util/cudnn.hpp:21:10: warning: enumeration value ‘CUDNN_STATUS_RUNTIME_IN_PROGRESS’ not handled in switch [-Wswitch]
•	./include/caffe/util/cudnn.hpp:21:10: warning: enumeration value ‘CUDNN_STATUS_RUNTIME_FP_OVERFLOW’ not handled in switch [-Wswitch]
•	./include/caffe/util/cudnn.hpp: In function ‘void caffe::cudnn::setConvolutionDesc(cudnnConvolutionStruct**, cudnnTensorDescriptor_t, cudnnFilterDescriptor_t, int, int, int, int)’:
解决方法:
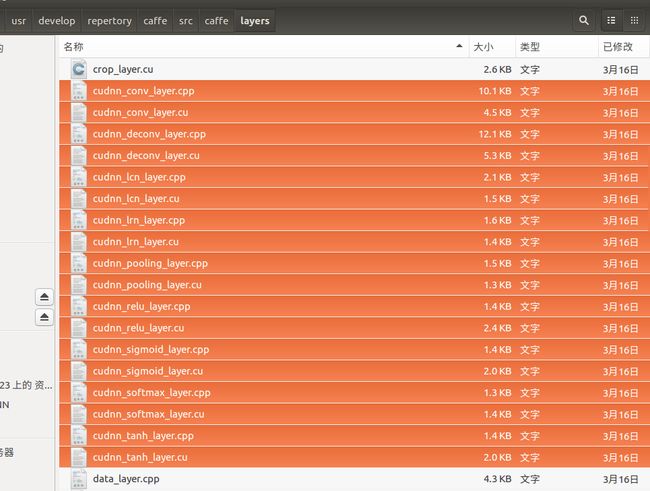
把caffe里面的所有与cudnn相关的.h 和.cpp 替换成能用cudnn 编译过的caffe
需要替换的cudnn:
(1). 路径:/usr/develop/repertory/caffe/include/caffe/util下的 cudnn.hpp复制到caffe-faste-rcnn中对应文件夹
(2). 路径:/usr/develop/repertory/caffe/src/caffe/util下的cudnn.cpp复制到faster-caffe-faste-rcnn对应文件夹
(3).路径:/usr/develop/repertory/caffe/include/caffe/layers下的
cudnn_conv_layer.hpp,cudnn_deconv_layer.hpp, cudnn_lcn_layer.hpp, cudnn_lrn_layer.hpp,cudnn_pooling_layer.hpp, cudnn_relu_layer.hpp, cudnn_sigmoid_layer.hpp,cudnn_softmax_layer.hpp, cudnn_tanh_layer.hpp
复制到faster-caffe-faste-rcnn对应文件夹
(4).路径:/usr/develop/repertory/caffe/src/caffe/layers下的 cudnn_conv_layer.cpp, cudnn_conv_layer.cu, cudnn_deconv_layer.cpp,cudnn_deconv_layer.cu, cudnn_lcn_layer.cpp, cudnn_lcn_layer.cu,cudnn_lrn_layer.cpp, cudnn_lrn_layer.cu, cudnn_pooling_layer.cpp,cudnn_pooling_layer.cu, cudnn_relu_layer.cpp, cudnn_relu_layer.cu, cudnn_sigmoid_layer.cpp,cudnn_sigmoid_layer.cu, cudnn_softmax_layer.cpp, cudnn_softmax_layer.cu,cudnn_tanh_layer.cpp, cudnn_tanh_layer.cu
复制到faster-caffe-faste-rcnn对应文件夹
再次编译即可
2. 错误:【ImportError:/usr/develop/repertory/py-faster-rcnn/tools/../caffe-fast-rcnn/python/caffe/_caffe.so:undefinedsymbol:_ZN5boost6python6detail11init_moduleER11PyModuleDefPFvvE】
解决方法:
makefile中boost版本不匹配boost.python是一个类似翻译器的东西,所以如果你是python3的程序,却用了python2的翻译器,那语法、定义等等各方面必然会有冲突。
makefile中查找这个变量PYTHON_LIBRARIES
PYTHON_LIBRARIES ?= boost_python python2.7
改成:PYTHON_LIBRARIES := boost_python3 python3.5m

3. 错误:
File"/usr/develop/repertory/py-faster-rcnn/tools/../lib/datasets/pascal_voc.py",line 16, in import cPickleImportError: No module named 'cPickle'
解决方法:
python2有cPickle,但是在python3下,是没有cPickle的;
解决办法:将cPickle改为pickle即可
4. 错误:【Traceback (most recent call last):File"./tools/train_faster_rcnn_alt_opt.py", line 211, incfg_from_file(args.cfg_file)File"/usr/develop/repertory/py-faster-rcnn/tools/../lib/fast_rcnn/config.py",line 263, in cfg_from_file_merge_a_into_b(yaml_cfg, __C)File"/usr/develop/repertory/py-faster-rcnn/tools/../lib/fast_rcnn/config.py",line 232, in _merge_a_into_b for k, v in a.iteritems():AttributeError:'EasyDict' object has no attribute 'iteritems' 】
解决方法:
iteritems()改为items()
5. 错误:【AttributeError: 'EasyDict' object has noattribute 'has_key'】
解决方法:
has_key方法在python2中是可以使用的,在python3中删除了。
比如:
if dict.has_key(word):
改为:
if word in dic
6. 错误:【NameError:name 'xrange' is not defined】
解决方法:
xrange改为range,并且range(x)中x要为整数:int(x)
7. 错误:【AttributeError:'module' object has no attribute 'text_format' 】
解决方法:
代码上方(train.py)增加一行importgoogle.protobuf.text_format 即可解决问题
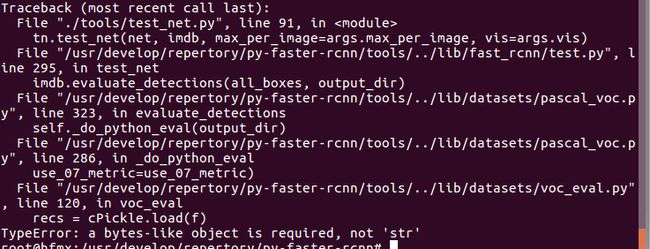
8. 错误:【typeError: a byte-like Objectis required,not ‘str’】
解决方法:

9. 错误:【faster-rcnn中训练时assert(boxes[:,2]>=boxes[:,0]).all()】
原因:左上角坐标(x,y)可能为0,或标定区域溢出图片,
而faster rcnn会对Xmin,Ymin,Xmax,Ymax进行减一操作
如果Xmin为0,减一后变为65535
解决方法:
① 修改lib/datasets/imdb.py,append_flipped_images()函数
数据整理,在一行代码为 boxes[:, 2] = widths[i] - oldx1- 1下加入代码:
for bin range(len(boxes)):
if boxes[b][2]< boxes[b][0]:
boxes[b][0] = 0
② 修改lib/datasets/pascal_voc.py,_load_pascal_annotation(,)函数
将对Xmin,Ymin,Xmax,Ymax减一去掉,变为:

③ 修改lib/fast_rcnn/config.py,不使图片实现翻转,如下改为:
# Usehorizontally-flipped images during training?
__C.TRAIN.USE_FLIPPED= False

