SSH免密登录以及建立共享硬盘
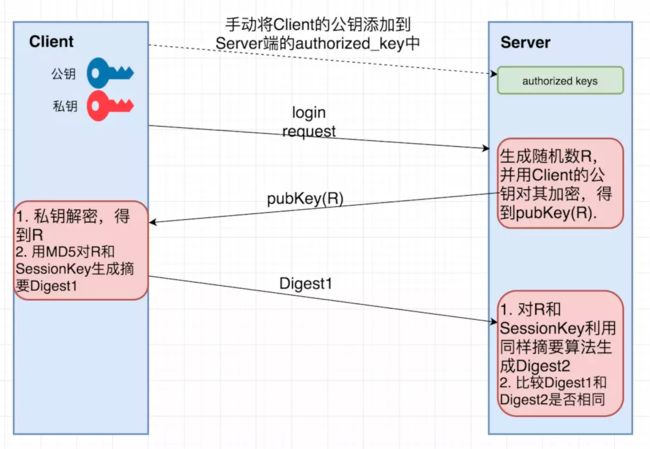
SSH免密登录—原理
- 在客户端使用
ssh-keygen生成一对密钥:公钥+私钥 - 将客户端公钥追加到服务端的
authorized_key文件中,完成公钥认证操作 - 认证完成后,客户端向服务端发起登录请求,并传递公钥到服务端
- 服务端检索
authorized_key文件,确认该公钥是否存在 - 如果存在该公钥,则生成随机数
R,并用公钥来进行加密,生成公钥加密字符串pubKey(R) - 将公钥加密字符串传递给客户端
- 客户端使用私钥解密公钥加密字符串,得到
R - 服务端和客户端通信时会产生一个会话
ID(sessionKey),用MD5对R和SessionKey进行加密,生成摘要(即MD5加密字符串) - 客户端将生成的
MD5加密字符串传给服务端 - 服务端同样生成
MD5(R,SessionKey)加密字符串 - 如果客户端传来的加密字符串等于服务端自身生成的加密字符串,则认证成功
- 此时不用输入密码,即完成建连,可以开始远程执行
shell命令了
在~/.ssh/目录下,我们会看到这些文件:
id_rsa    // 私钥文件
id_rsa.pub    // 公钥文件
authorized_keys    // 存放客户端公钥的文件
known_hosts    // 确认过公钥指纹的可信服务器列表的文件
config // 指定不同域名使用哪个密钥的配置文件因为一台机器即能是客户端,又能是服务端,因此同时存在authorized_keys(在该机器为服务端时使用)和Known_hosts(在该机器为客户端时使用)。
authorized_keys 别人来找我
Known_hosts 我去找别人的 authorized_keys
SSH免密登录—实现
1、克隆虚拟机
A、当前克隆节点的信息:
两个用户:
root jiaxuan
jiaxuan jiaxuan
B、查看当前版本
lsb_release -c
现在克隆节点虚拟机里边安装了
- 安装了vim
- SSH服务,
- 安装了expect
- 配置了阿里云apt源
克隆虚拟机节点1、2、3
2、SSH免密登录
- 设置网络
现在 节点1是登录节点 节点1添加一张局域网的网卡Network2
在节点1的虚拟机中网卡2的配置
Ip:192.168.1.1
掩码:255.255.255.0
克隆节点2和节点3,设置网卡为Network2
节点2
Ip:192.168.1.10 掩码:255.255.255.0 网关:192.168.1.1
节点3
Ip:192.168.1.11 掩码:255.255.255.0 网关:192.168.1.1
- 在各个节点终端输入sudo passwd root,按回车,系统会提示输入普通用户的密码。输入后,按回车,然后重复输入两次新的root密码即可激活root用户。
- 配置ip和对应的主机名
vi /etc/hostname
vi /etc/hosts
重启虚拟机。
- ssh-keygen -t rsa 生成秘钥
(1)ssh-keygen –t rsa是指定加密的算法是rsa
(2)(/root/.ssh/id_rsa)是保存秘钥的路径
(3)/root/.ssh/id_rsa.pub是生成的公钥
注意:ubuntu18.04是默认不允许root账号登录SSH
表现形式是通过普通账号可以进行SSH远程登录,但是root账号不行,即使输入的是正确的root密码,仍然提示Permission denied, please try again.
解决方法在3个节点修改ssh配置文件:
1、vi /etc/ssh/sshd_config
2、将PermitRootLogin no的注释去掉,改为yes
补:AddressFamily any #允许任何地方登录
PermitRootLogin yes # 允许root账号登录
PubkeyAuthentication yes # 启用公钥私钥配对认证方式
3、重启:service sshd restart
- 将公钥传到节点2、3
ssh-copy-id [email protected] 或
ssh-copy-id ubuntu3
root用户可以不加,默认是当前用户。
Ip地址可以换成机器名。
直接可以 ssh ubuntu2免密登录到节点2
1、使用脚本实现SSH免密登录
Ubuntu下面安装expect: sudo apt-get install tcl tk expect
本机通过ssh-keygen -t rsa指令生成秘钥。
执行脚本
#!/bin/sh

SERVERS="ubuntu1 ubuntu2 ubuntu3"
PASSWORD=jiaxuan

auto_ssh_copy_id() {
    expect -c "set timeout -1;
        spawn ssh-copy-id $1;
        expect {
            *(yes/no)* {send -- yes\r;exp_continue;}
            *assword* {send -- $2\r;exp_continue;}
            eof        {exit 0;}
        }";
}

ssh_copy_id_to_all() {
    for SERVER in $SERVERS
    do
        auto_ssh_copy_id $SERVER $PASSWORD
    done
}

ssh_copy_id_to_all
3、建立共享硬盘
建立硬盘2
服务端配置
sudo apt install nfs-kernel-server用到的命令贴到下边:
root@ubuntu1:~#   lsblk


root@ubuntu1:~#   fdisk  /dev/sdb

Command (m for help):   g

Command (m for help):   n

Command (m for help):   w


root@ubuntu1:~#   lsblk

root@ubuntu1:~#   mkfs.ext4  /dev/sdb1


root@ubuntu1:~#   fdisk  -l


root@ubuntu1:~#   cd /


root@ubuntu1:/#   mkdir share


root@ubuntu1:/#   mount   /dev/sdb1    /share


root@ubuntu1:/#   lsblk
修改配置文件:
root@ubuntu1:/#   vi /etc/fstab

root@ubuntu1:/#   umount   /share

root@ubuntu1:/#   mount -a

root@ubuntu1:/#   lsblk
服务端:/etc/fstab配置文件
客户端配置
sudo apt install nfs-commonmkdir /share
mount -t nfs ubuntu1:/share /share
umount /share
echo 192.168.1.1:/share /share nfs defaults 0 0 >> /etc/fstab
mount -a
客户端:/etc/fstab配置文件
补充点:
:set nu vim编辑器显示行号
:3,5d 删除指定行数
文本处理三剑客grep、awk、sed
需求分析:
1、ssh公钥拷贝,提供无密码管理。
2、批量同步hosts文件到多台主机。
3、批量修改主机名。
实现在下一篇博客!
17:31下班啦!


