代码一键自动生成,拿走不谢
程序猿学社的GitHub,欢迎Star
github技术专题
本文已记录到github
文章目录
- 前言
- 起源
- 环境
- 实战
- sql脚本
- pom.xml
- application.yml
- 启动类
- 代码自动生成
- controller类
- 测试
前言
隔壁老王: 社长,我工作有一段时间咯,我看其他的同事,上班都很悠闲,而且,那些实体类,感觉有模板似的,有点像机器生成的,是不是有什么工具,可以自动生成代码。
社长: 有的,嘻嘻,MP的AutoGenerator 插件,一键生成代码,并且,可以集成swagger,加上对应的注释,大大提高你的开发效率。
隔壁老王: 这么优秀,难怪,我看我们项目组的那些人,这么多时间撩妹。
起源
社长刚刚开始工作的时候,那时候,dao,entity,service,controller都要自己去编写。而这部分代码,都是有一定的规范,有需求,就有对应的产品应运而生,AutoGenerator 是 MyBatis-Plus 的代码生成器,通过 AutoGenerator 可以快速生成 Entity、Mapper、Mapper XML、Service、Controller 等各个模块的代码,极大的提升了开发效率。
环境
springboot 2.2.6.RELEASE
mybatis-plus 3.3.0
spring-boot-starter-swagger 1.5.1.RELEASE
- 环境版本最好保持一致,不然,你可以收获意外的惊喜

实战
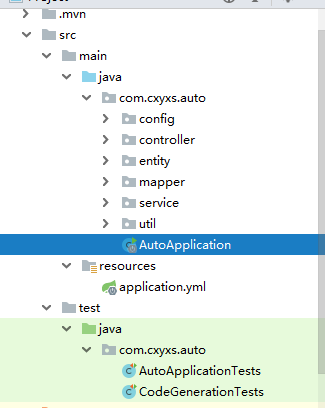
- 如遇到不清楚的,文件如何存放的,可以参考我的结构
sql脚本
/*
 Navicat Premium Data Transfer
Source Server : 本地
Source Server Type : MySQL
Source Server Version : 50722
Source Host : localhost:3306
Source Schema : pro
Target Server Type : MySQL
Target Server Version : 50722
File Encoding : 65001
Date: 05/04/2020 19:17:01
*/
SET NAMES utf8mb4;
SET FOREIGN_KEY_CHECKS = 0;
– ----------------------------
– Table structure for student
– ----------------------------
DROP TABLE IF EXISTS student;
CREATE TABLE student (
id int(111) NOT NULL AUTO_INCREMENT COMMENT ‘编号’,
name varchar(255) CHARACTER SET utf8 COLLATE utf8_general_ci NULL DEFAULT NULL COMMENT ‘姓名’,
age int(11) NULL DEFAULT NULL COMMENT ‘年龄’,
PRIMARY KEY (id) USING BTREE
) ENGINE = InnoDB AUTO_INCREMENT = 4 CHARACTER SET = utf8 COLLATE = utf8_general_ci ROW_FORMAT = Dynamic;
– ----------------------------
– Records of student
– ----------------------------
INSERT INTO student VALUES (1, ‘社长’, 18);
INSERT INTO student VALUES (2, ‘老王’, 20);
INSERT INTO student VALUES (3, ‘兰陵王’, 11);
SET FOREIGN_KEY_CHECKS = 1;
- 1
- 2
- 3
- 4
- 5
- 6
- 7
- 8
- 9
- 10
- 11
- 12
- 13
- 14
- 15
- 16
- 17
- 18
- 19
- 20
- 21
- 22
- 23
- 24
- 25
- 26
- 27
- 28
- 29
- 30
- 31
- 32
- 33
- 34
- 35
- 36
- 37
- 38
pom.xml
<?xml version="1.0" encoding="UTF-8"?> <project xmlns="http://maven.apache.org/POM/4.0.0" xmlns:xsi="http://www.w3.org/2001/XMLSchema-instance" xsi:schemaLocation="http://maven.apache.org/POM/4.0.0 https://maven.apache.org/xsd/maven-4.0.0.xsd"> <modelVersion>4.0.0</modelVersion> <parent> <groupId>org.springframework.boot</groupId> <artifactId>spring-boot-starter-parent</artifactId> <version>2.2.6.RELEASE</version> <relativePath/> <!-- lookup parent from repository --> </parent> <groupId>com.cxyxs</groupId> <artifactId>auto</artifactId> <version>0.0.1-SNAPSHOT</version> <name>auto</name> <description>Demo project for Spring Boot</description><properties> <java.version>1.8</java.version> </properties> <dependencies> <!--web依赖--> <dependency> <groupId>org.springframework.boot</groupId> <artifactId>spring-boot-starter-web</artifactId> </dependency> <!--junit测试--> <dependency> <groupId>org.springframework.boot</groupId> <artifactId>spring-boot-starter-test</artifactId> <scope>test</scope> </dependency> <dependency> <groupId>com.baomidou</groupId> <artifactId>mybatis-plus-boot-starter</artifactId> <version>3.3.0</version> </dependency> <!--代码生成模式插件 3.0.3以后需要手动设置依赖--> <dependency> <groupId>com.baomidou</groupId> <artifactId>mybatis-plus-generator</artifactId> <version>3.3.1.tmp</version> </dependency> <!--代码生成模板--> <dependency> <groupId>org.apache.velocity</groupId> <artifactId>velocity-engine-core</artifactId> <version>2.2</version> </dependency> <!--简化代码插件--> <dependency> <groupId>org.projectlombok</groupId> <artifactId>lombok</artifactId> <optional>true</optional> </dependency> <!--mysql驱动--> <dependency> <groupId>mysql</groupId> <artifactId>mysql-connector-java</artifactId> <version>8.0.18</version> </dependency> <!-- druid阿里巴巴数据库连接池 --> <dependency> <groupId>com.alibaba</groupId> <artifactId>druid</artifactId> <version>1.1.6</version> </dependency> <!-- 热部署 --> <dependency> <groupId>org.springframework.boot</groupId> <artifactId>spring-boot-devtools</artifactId> <optional>true</optional> </dependency> <!--swagger2--> <dependency> <groupId>com.spring4all</groupId> <artifactId>spring-boot-starter-swagger</artifactId> <version>1.5.1.RELEASE</version> </dependency> </dependencies> <build> <!--打包后的项目名--> <finalName>codeauto</finalName> <!--解决mapper文件不到class文件夹的问题--> <resources> <resource> <directory>src/main/resources</directory> <includes> <include>**/*</include> </includes> <filtering>true</filtering> </resource> <resource> <directory>src\main\java</directory> <includes> <include>**/*.xml</include> </includes> </resource> </resources> <plugins> <plugin> <groupId>org.springframework.boot</groupId> <artifactId>spring-boot-maven-plugin</artifactId> </plugin> <!-- 1、设置jar的入口类 --> <plugin> <groupId>org.apache.maven.plugins</groupId> <artifactId>maven-jar-plugin</artifactId> <configuration> <archive> <manifest> <addClasspath>true</addClasspath> <classpathPrefix>lib/</classpathPrefix> <mainClass>com.cxyxs.auto.AutoApplication</mainClass> </manifest> </archive> </configuration> </plugin> <!--2、把附属的jar打到jar内部的lib目录中 --> <plugin> <groupId>org.apache.maven.plugins</groupId> <artifactId>maven-dependency-plugin</artifactId> <executions> <execution> <id>copy-dependencies</id> <phase>package</phase> <goals> <goal>copy-dependencies</goal> </goals> <configuration> <outputDirectory>${project.build.directory}/lib</outputDirectory> </configuration> </execution> </executions> </plugin> <!-- 3、打包过程忽略Junit测试 --> <plugin> <groupId>org.apache.maven.plugins</groupId> <artifactId>maven-surefire-plugin</artifactId> <configuration> <skip>true</skip> </configuration> </plugin> </plugins> </build>
</project>
- 1
- 2
- 3
- 4
- 5
- 6
- 7
- 8
- 9
- 10
- 11
- 12
- 13
- 14
- 15
- 16
- 17
- 18
- 19
- 20
- 21
- 22
- 23
- 24
- 25
- 26
- 27
- 28
- 29
- 30
- 31
- 32
- 33
- 34
- 35
- 36
- 37
- 38
- 39
- 40
- 41
- 42
- 43
- 44
- 45
- 46
- 47
- 48
- 49
- 50
- 51
- 52
- 53
- 54
- 55
- 56
- 57
- 58
- 59
- 60
- 61
- 62
- 63
- 64
- 65
- 66
- 67
- 68
- 69
- 70
- 71
- 72
- 73
- 74
- 75
- 76
- 77
- 78
- 79
- 80
- 81
- 82
- 83
- 84
- 85
- 86
- 87
- 88
- 89
- 90
- 91
- 92
- 93
- 94
- 95
- 96
- 97
- 98
- 99
- 100
- 101
- 102
- 103
- 104
- 105
- 106
- 107
- 108
- 109
- 110
- 111
- 112
- 113
- 114
- 115
- 116
- 117
- 118
- 119
- 120
- 121
- 122
- 123
- 124
- 125
- 126
- 127
- 128
- 129
- 130
- 131
- 132
- 133
- 134
- 135
- 136
- 137
- 138
- 139
- 140
- 141
- 142
- 143
- 144
- 145
- 146
- 147
- 148
- 149
- 150
- 151
- 152
- 153
- 154
- 155
- 156
- 157
- 158
- 159
- 160
- 161
- 162
- 163
- MyBatis-Plus 从 3.0.3 之后移除了代码生成器与模板引擎的默认依赖,需要手动添加相关依赖:
- 为方便以后前后端对接,集成了swagger
- 可达成jar包,直接build就行,build里面的配置,就是为了打成jar包
application.yml
server:
  port: 8888
spring:
datasource:
# 配置数据源
driver-class-name: com.mysql.cj.jdbc.Driver
# 使用druid连接池
type: com.alibaba.druid.pool.DruidDataSource
url: jdbc:mysql://127.0.0.1:3306/pro?useUnicode=true&characterEncoding=utf8&useJDBCCompliantTimezoneShift=true&useLegacyDatetimeCode=false&serverTimezone=GMT%2B8
username: root
password: root
###增加日志输出,方便定位问题
logging:
level:
root : warn
com.cxyxs.mybatisplus.dao: trace
###控制台输出格式
pattern:
console: ‘%p%m%n’
mybatis-plus:
mapper-locations: classpath:/com/cxyxs/auto/mapper/xml/.xml
global-config:
db-config:
###逻辑未删除的值
logic-not-delete-value: 0
###逻辑已删除的值
logic-delete-value: 1
####扫描swagger注解
swagger:
base-package: com.cxyxs
- 1
- 2
- 3
- 4
- 5
- 6
- 7
- 8
- 9
- 10
- 11
- 12
- 13
- 14
- 15
- 16
- 17
- 18
- 19
- 20
- 21
- 22
- 23
- 24
- 25
- 26
- 27
- 28
- 29
- 30
- 31
- 32
- 33
- 34
- 35
- 配置数据库的信息,以自己的配置为主
- mapper-locations 是根据自动生成代码的规则而定义的
- swagger 配置swagger注解,扫描范围
启动类
package com.cxyxs.auto;
import com.spring4all.swagger.EnableSwagger2Doc;
import org.mybatis.spring.annotation.MapperScan;
import org.springframework.boot.SpringApplication;
import org.springframework.boot.autoconfigure.SpringBootApplication;
@SpringBootApplication
@MapperScan(“com.cxyxs.auto.mapper”)
@EnableSwagger2Doc
public class AutoApplication {
public static void main(String[] args) {
    SpringApplication.run(AutoApplication.class, args);
}
}
- 1
- 2
- 3
- 4
- 5
- 6
- 7
- 8
- 9
- 10
- 11
- 12
- 13
- 14
- 15
- 16
- @MapperScan配置扫描dao包的位置(以我们常用的思维),社长习惯以mapper命名
- @EnableSwagger2Doc 启用swagger注解

代码自动生成
package com.cxyxs.auto;
import com.baomidou.mybatisplus.annotation.DbType;
import com.baomidou.mybatisplus.annotation.FieldFill;
import com.baomidou.mybatisplus.generator.AutoGenerator;
import com.baomidou.mybatisplus.generator.config.DataSourceConfig;
import com.baomidou.mybatisplus.generator.config.GlobalConfig;
import com.baomidou.mybatisplus.generator.config.PackageConfig;
import com.baomidou.mybatisplus.generator.config.StrategyConfig;
import com.baomidou.mybatisplus.generator.config.po.TableFill;
import com.baomidou.mybatisplus.generator.config.rules.DateType;
import com.baomidou.mybatisplus.generator.config.rules.NamingStrategy;
import org.junit.runner.RunWith;
import org.springframework.boot.test.context.SpringBootTest;
import org.springframework.test.context.junit4.SpringRunner;
import java.util.ArrayList;
import java.util.List;
/**
-
Description:
-
Author: wude
-
Date: 2020/4/5 9:14
-
Modified By:
*/
@RunWith(SpringRunner.class)
@SpringBootTest
public class CodeGenerationTests {
public static void main(String[] args) {
// 代码生成器
AutoGenerator mpg = new AutoGenerator();// 全局配置 GlobalConfig gc = new GlobalConfig(); //当前路径 String projectPath = System.getProperty("user.dir"); //输出路径 gc.setOutputDir(projectPath + "/src/main/java"); gc.setAuthor("程序猿学社"); //设置作者 //生成代码后,是否打开文件夹 gc.setOpen(false); gc.setFileOverride(false); //是否覆盖原来代码,个人建议设置为false,别覆盖,危险系数太高 gc.setServiceName("%sService"); //去掉service的I前缀,一般只需要设置service就行
/* gc.setMapperName("%sMapper");
gc.setXmlName("%sMapper");
gc.setServiceImplName("%sServiceImpl");
gc.setControllerName("%sController");*/
    gc.setDateType(DateType.ONLY_DATE);   //日期格式
    gc.setSwagger2(true);       // 实体属性 Swagger2 注解,实体类上会增加注释
    mpg.setGlobalConfig(gc);

    // 数据源配置
    DataSourceConfig dsc = new DataSourceConfig();
    dsc.setUrl("jdbc:mysql://127.0.0.1:3306/pro?useUnicode=true&characterEncoding=utf8&useJDBCCompliantTimezoneShift=true&useLegacyDatetimeCode=false&serverTimezone=GMT%2B8");
    // dsc.setSchemaName("public");
    dsc.setDriverName("com.mysql.cj.jdbc.Driver");
    dsc.setUsername("root");
    dsc.setPassword("root");
    dsc.setDbType(DbType.MYSQL);    //指定数据库的类型
    mpg.setDataSource(dsc);

    // 包配置
    PackageConfig pc = new PackageConfig();
    pc.setParent("com.cxyxs.auto");   //自定义包的路径
    //pc.setModuleName("module");   //模块名称  设置后,会生成com.cxyxs.test.module,里面存放之前设置的mapper,entity
    pc.setEntity("entity");
    pc.setMapper("mapper");
    pc.setService("service");
    pc.setController("controller");
    mpg.setPackageInfo(pc);

    // 策略配置
    StrategyConfig strategy = new StrategyConfig();
    strategy.setInclude("student");    //设置映射的表名,可以设置多个表

    //表前缀设置  cxyxs_student
    //strategy.setTablePrefix(new String[]{"cxyxs_"});
    //包的命名规则,使用驼峰规则
    strategy.setNaming(NamingStrategy.underline_to_camel);
    //列的名称,使用驼峰规则
    strategy.setColumnNaming(NamingStrategy.underline_to_camel);
    //是否使用lombok
    strategy.setEntityLombokModel(true);
    //驼峰命名
    strategy.setRestControllerStyle(true);
    strategy.setLogicDeleteFieldName("is_delete");   //逻辑删除,假删除会用到

    //自动填充字段,在项目开发过程中,例如创建时间,修改时间,每次,都需要我们来指定,太麻烦了,设置为自动填充规则,就不需要我们赋值咯
    TableFill fillInsert = new TableFill("create_time", FieldFill.INSERT);
    TableFill fillUpdate= new TableFill("update_time", FieldFill.UPDATE);
    List fillLists = new ArrayList();
    fillLists.add(fillInsert);
    fillLists.add(fillUpdate);
    strategy.setTableFillList(fillLists);
    //乐观锁
    //strategy.setVersionFieldName("version");
    mpg.setStrategy(strategy);

    mpg.execute();  //执行
}
}
- 1
- 2
- 3
- 4
- 5
- 6
- 7
- 8
- 9
- 10
- 11
- 12
- 13
- 14
- 15
- 16
- 17
- 18
- 19
- 20
- 21
- 22
- 23
- 24
- 25
- 26
- 27
- 28
- 29
- 30
- 31
- 32
- 33
- 34
- 35
- 36
- 37
- 38
- 39
- 40
- 41
- 42
- 43
- 44
- 45
- 46
- 47
- 48
- 49
- 50
- 51
- 52
- 53
- 54
- 55
- 56
- 57
- 58
- 59
- 60
- 61
- 62
- 63
- 64
- 65
- 66
- 67
- 68
- 69
- 70
- 71
- 72
- 73
- 74
- 75
- 76
- 77
- 78
- 79
- 80
- 81
- 82
- 83
- 84
- 85
- 86
- 87
- 88
- 89
- 90
- 91
- 92
- 93
- 94
- 95
- 96
- 97
- 98
- 99
- 100
- 101
- 102
直接启动main方法 ,见证奇迹的时候到咯。

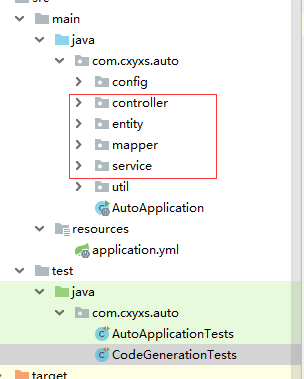
- contoller,entity,mapper,service代码都给我们生成好咯。
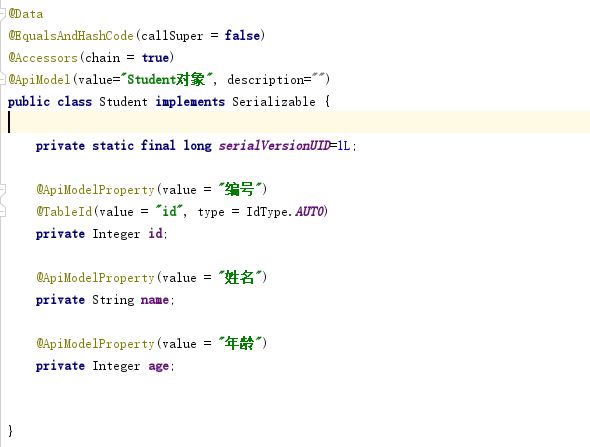
- swagger注释都给我们生成好咯,而且代码也很规范,让我们自己来写,可能会遇到很多很低级的错误。
- 虽说,代码自动生成很智能,智能的前提,是有规范的,数据库命令,最高遵守相关的规范,这里就不过多阐述咯
controller类
package com.cxyxs.auto.controller;
import com.cxyxs.auto.entity.Student;
import com.cxyxs.auto.mapper.StudentMapper;
import com.cxyxs.auto.util.Result;
import io.swagger.annotations.ApiOperation;
import org.springframework.beans.factory.annotation.Autowired;
import org.springframework.web.bind.annotation.GetMapping;
import org.springframework.web.bind.annotation.RequestMapping;
import org.springframework.web.bind.annotation.RestController;
import java.util.List;
/**
-
前端控制器
-
@author 程序猿学社
-
@since 2020-04-05
*/
@RestController
@RequestMapping("/student")
public class StudentController {
@Autowired
private StudentMapper studentMapper;@GetMapping("/test")
@ApiOperation(value = “测试接口”,notes = “测试”)
public List<Student> getStudent1(Student stu){
List<Student> lists = studentMapper.selectList(null);
return lists;
}
}
- 1
- 2
- 3
- 4
- 5
- 6
- 7
- 8
- 9
- 10
- 11
- 12
- 13
- 14
- 15
- 16
- 17
- 18
- 19
- 20
- 21
- 22
- 23
- 24
- 25
- 26
- 27
- 28
- 29
- 30
- 31
- 32
- 33
- 34
- 35
- 36
- StudentController这个类,是自动生成的,增加一个方法,来看看效果。
测试
http://localhost:8888/swagger-ui.html

- 通过页面可以发现有一个basic-error-controller,实际上,我们代码里面没有定义这个,有强迫症的,可以百度解决方法,配置一下,这里社长,就不配置咯。

- 通过可视化界面,前端可以看到返回的参数注释

- 传参也有注释
点击try it out按钮

- 跟前端需要对接的传参和返回参数都有注释,那个接口,用来干嘛的,都有注释文档。就没有后台什么事咯

在公众号"程序猿学社",后台回复关键字"代码自动生成",获取源码
原创不易,不要白嫖,觉得有用的社友,给我点赞,让更多的老铁看到这篇文章。
因技术能力有限,如文中有不合理的地方,希望各位大佬指出,在下方评论留言,谢谢,希望大家一起进步,一起成长。
作者:程序猿学社
原创公众号:『程序猿学社』,专注于java技术栈,分享java各个技术系列专题,以及各个技术点的面试题。
原创不易,转载请注明来源(注明:来源于公众号:程序猿学社, 作者:程序猿学社)。


 博客专家
博客专家