【学习笔记】——16路PWM舵机驱动板(PCA 9685) + Arduino
16路12位PWM信号发生器 PCA 9685
节省主机资源,值得拥有。此舵机驱动板使用PCA9685芯片,是16通道12bit PWM舵机驱动,用2个引脚通过I2C就可以驱动16个舵机。
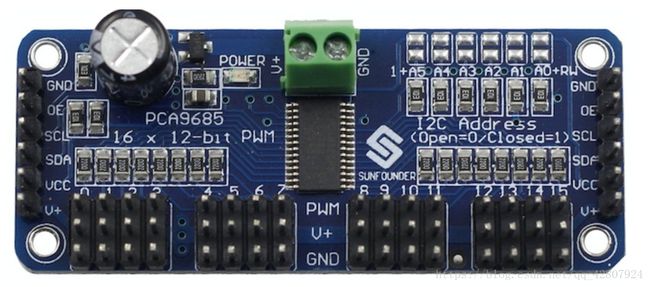
强大如斯!

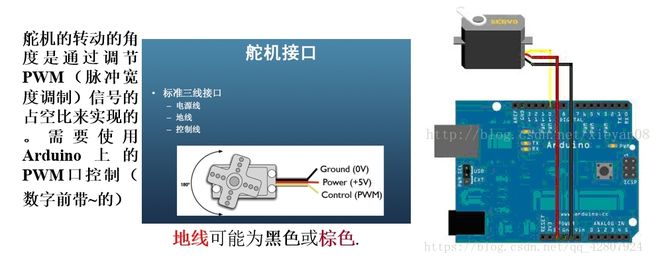
先对单个舵机尝试一下,了解一下PWM
单个舵机例程1:
非常简单的舵机例子,实现效果是使得电机转动:
#include 单个舵机例程2:
#include 单个舵机使用板上的I/O口就可以,可是舵机多了呢?
来学习PCA 9685
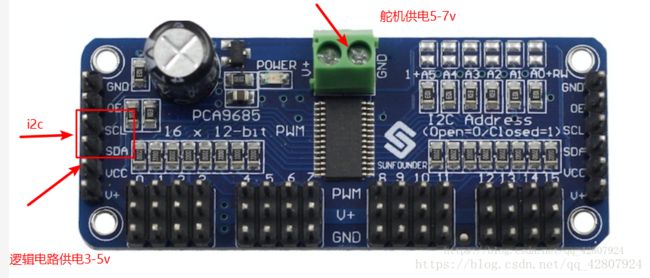
主要参数以及引脚定义:
- 电压:舵机供电5-7v,接受高一点的电压。
大多数的舵机设计电压都是在5~6V,尤其在多个舵机同时运行时,跟需要有大功率的电源供电。如果直接使用Arduino
5V引脚直接为舵机供电,会出现一些难以预测的问题,所以我们建议你能有个合适的外部电源为驱动板供电。
-
逻辑电路电压:3-5V
-
通信接口:使用i2c通信,就是SCL、SDA引脚
7位的I2C地址为:0x40 + A5:A0,A5到A0如果不做任何处理的话是0,想要把哪一位置1就把那个引脚焊到一起。另外用i2cdetect检测出还有一个0x70地址一直存在,这是一个通用地址,可以给所有从机下达指令。
-
OE反使能脚:这个引脚低电平使能,不接的话模块内部默认已经接地使能了,所以正常使用可以不接。
-
工作频率:40-1000HZ
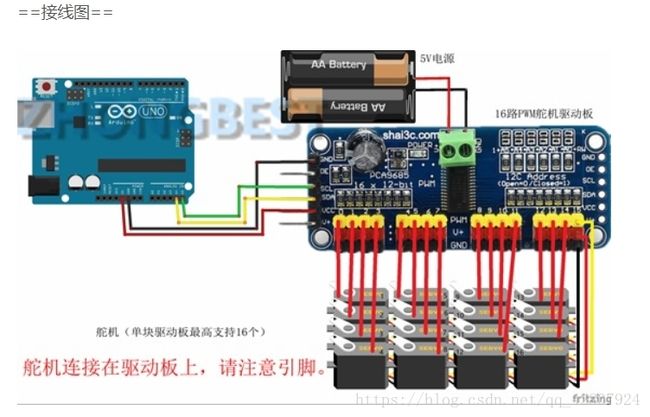
接线图:
注意!!!下面例子需要用到外部库文件,如果你IDE没有,那么下载这个并放在安装路径的文档—arduino-libraries路径下面
16路舵机驱动板资料(内含模块级联说明):https://pan.baidu.com/s/1gfhFGDP
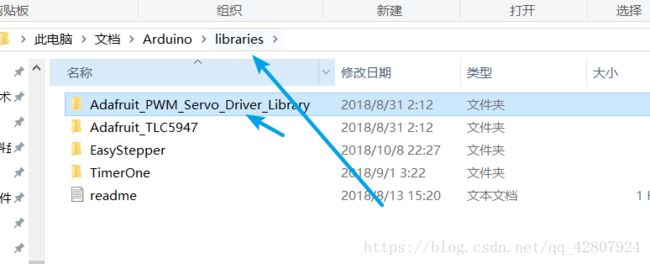
例子程序1
(有时间就简化一下,好像还不是最好的例子)
16路舵机同时转动。原理是定义脉宽最大和最小,通过改变0-15号舵机的脉宽大小实现角度转动
/***************************************************
This is an example for our Adafruit 16-channel PWM & Servo driver
Servo test - this will drive 16 servos, one after the other
这是我们的Adafruit 16通道PWM和伺服驱动器的一个例子,驱动16个伺服电机
Pick one up today in the adafruit shop!
------> http://www.adafruit.com/products/815
These displays use I2C to communicate, 2 pins are required to
interface. For Arduino UNOs, thats SCL -> Analog 5, SDA -> Analog 4
这些显示器使用I2C进行通信,需要2个引脚。
接口。对于ARDUINO UNOS,这是SCL->模拟5,SDA - >模拟4
****************************************************/
#include 例子程序2:
#include IDE自带例程:
/***************************************************
This is an example for our Adafruit 16-channel PWM & Servo driver
PWM test - this will drive 16 PWMs in a 'wave'
Pick one up today in the adafruit shop!
------> http://www.adafruit.com/products/815
These displays use I2C to communicate, 2 pins are required to
interface. For Arduino UNOs, thats SCL -> Analog 5, SDA -> Analog 4
Adafruit invests time and resources providing this open source code,
please support Adafruit and open-source hardware by purchasing
products from Adafruit!
Written by Limor Fried/Ladyada for Adafruit Industries.
BSD license, all text above must be included in any redistribution
这是我们的AdfRuIT 16通道PWM和伺服驱动器的一个例子。
PWM测试-这将驱动16个波姆斯在“波”
今天在AdfRuIT商店挑选一个!
------HTTP://www. AdAfRuIT.COM/PROSTS/815
这些显示器使用I2C进行通信,需要2个引脚。
接口。对于ARDUINO UNOS,这是SCL->模拟5,SDA - >模拟4
ADAFRUIT投入时间和资源来提供这个开源代码,
请通过购买支持AdfRuIT和开源硬件
来自AdfRuIT的产品!
由Limor Fray/Lajayad撰写的AdfuRIT产业。
BSD许可证,以上所有文本必须包含在任何再分配中
***********************************************/
#include Arduino的例子暂时没有找到很简洁的,OpenMv例子很简单易懂,欢迎围观我的Blog——【OpenMV学习笔记】 pca9685学习之用python尝试写代码:https://blog.csdn.net/qq_42807924/article/details/82354781
OpenMV控制单个PWM舵机:https://blog.csdn.net/qq_42807924/article/details/82563671
基础知识:
上面有出现uint8_t uint16_t,那它们是什么?其实很简单:
1字节 uint8_t //无符号整型
2字节 uint16_t
编程语言不扎实看一下字节定义:
    B就是Byte,也就是字节;b是bit的缩写,b就是bit,也就是比特位(bit)。B与b不同,注意区分,KB是千字节,Kb是千比特位。
    8bit(比特位)=1Byte(字节);
    1024Byte(字节)=1KB(千字节);
    1024KB(千字节)=1MB(兆字节);
    1MB(兆字节)=1024KB(千字节)=1024*1024B(字节)=1048576B(字节);
    1024MB=1GB;
    1024GB=1TB;

_t的意思到底表示什么?
它就是一个结构的标注,可以理解为type/typedef的缩写,表示它是通过typedef定义的,而不是其它数据类型
头文件内定义:
typedef signed char int8_t;
//无符号整型
typedef unsigned char uint8_t;
typedef int int16_t;
typedef unsigned int uint16_t;
进阶学习:
从例子中模仿,从库函数中掌握!
库文件:AdafruitPWMServoDriverLibrary
1.
setPWMFreq(freq)
eg: pwm.setPWMFreq(1000); // set the PWM frequency to the maximum value of 1000Hz
Description: 用来调节PWM频率,范围 freq:40-1000Hz
setPWM(channel, on, off)
Description
This function sets the start (on) and end (off) of the high segment of the PWM pulse on a
specific channel. You specify the ‘tick’ value between 0…4095 when the signal will turn on,
and when it will turn of. Channel indicates which of the 16 PWM outputs should be updated
with the new values.
Arguments
channel: The channel that should be updated with the new values (0…15)
on: The tick (between 0…4095) when the signal should transition from low to high
off:the tick (between 0…4095) when the signal should transition from high to low
Example
The following example will cause channel 15 to start low, go high around 25% into the pulse
(tick 1024 out of 4096), transition back to low 75% into the pulse (tick 3072), and remain low
for the last 25% of the pulse:
描述
该功能设置a上PWM脉冲高段的开始(on)和end(off)
特定渠道。 当信号打开时,指定0…4095之间的’tick’值,
什么时候会转。 通道指示应更新16个PWM输出中的哪一个
用新的价值观。
参数
channel:应使用新值更新的通道(0…15)
on:当信号从低电平变为高电平时的滴答(在0…4095之间)
off:当信号从高电平变为低电平时的滴答(在0…4095之间)
例
以下示例将导致通道15从低电平开始,在脉冲中高达25%左右
(在4096中打勾1024),转换回脉冲的低75%(勾选3072),并保持低位
对于最后25%的脉冲:
eg: setPWM(15, 1024, 3072);
4096这个数到底是什么?
The turn-on time of each LED driver output and the duty cycle of PWM can be controlled
independently using the LEDn_ON and LEDn_OFF registers.
There will be two 12-bit registers per LED output. These registers will be programmed by
the user. Both registers will hold a value from 0 to 4095. One 12-bit register will hold a
value for the ON time and the other 12-bit register will hold the value for the OFF time. The
ON and OFF times are compared with the value of a 12-bit counter that will be running
continuously from 0000h to 0FFFh (0 to 4095 decimal).
Update on ACK requires all 4 PWM channel registers to be loaded before outputs will
change on the last ACK.
The ON time, which is programmable, will be the time the LED output will be asserted and
the OFF time, which is also programmable, will be the time when the LED output will be
negated. In this way, the phase shift becomes completely programmable. The resolution
for the phase shift is 1⁄4096
4096 of the target frequency. Table 7 lists these registers.
The following two examples illustrate how to calculate values to be loaded into these
registers.
Example 1: (assumes that the LED0 output is used and
(delay time) + (PWM duty cycle) 100 %)
Delay time = 10 %; PWM duty cycle = 20 % (LED on time = 20 %; LED off time = 80 %).
Delay time = 10 % = 409.6 ~ 410 counts = 19Ah.
Since the counter starts at 0 and ends at 4095, we will subtract 1, so delay time = 199h
counts.
LED0_ON_H = 1h; LED0_ON_L = 99h (LED start turn on after this delay count to 409)
LED on time = 20 % = 819.2 ~ 819 counts.
LED off time = 4CCh (decimal 410 + 819 1 = 1228)
LED0_OFF_H = 4h; LED0_OFF_L = CCh (LED start turn off after this count to 1228)
PWM频率PRE_SCALE
硬件强制可以加载到PRE_SCALE寄存器中的最小值
在’3’。 PRE_SCALE寄存器定义输出调制的频率。该
预分频值由公式1中所示的公式确定:
(1)
其中更新速率是所需的输出调制频率。例如,对于
输出默认频率为200 Hz,振荡器时钟频率为25 MHz:
(2)
如果PRE_SCALE寄存器设置为“0x03h”,则最大PWM频率为1526 Hz。
如果PRE_SCALE寄存器设置为“0xFFh”,则最小PWM频率为24 Hz。
只有当MODE1寄存器的SLEEP位设置为时,才能设置PRE_SCALE寄存器
逻辑1.例1 :(假设使用了LED0输出和
(延迟时间)+(PWM占空比)100%)
延迟时间= 10%; PWM占空比= 20%(LED导通时间= 20%; LED关闭时间= 80%)。
延迟时间= 10%= 409.6~410计数= 19Ah。
由于计数器从0开始并在4095结束,我们将减去1,因此延迟时间= 199h
计数。
LED0_ON_H = 1h; LED0_ON_L = 99h(此延迟计数到之后LED开启亮起
409)
LED导通时间= 20%= 819.2~819计数。
LED关闭时间= 4CCh(十进制410 +8191= 1228)
LED0_OFF_H = 4h; LED0_OFF_L = CCh(此计数到1228后LED开始关闭)
这居然是最高阅读量的Blog,开始写的有点迷惑,今天抽点时间优化一下结构,后面会继续优化,博主也不是完全掌握,有任何疑问评论区见,大家共同学习,如果有帮到你,记得点赞噢!——2018年10月11日13点32分编辑
2019年1月19日,插播一波,如果感兴趣的童鞋们可以加入技术交流群~
![]()


