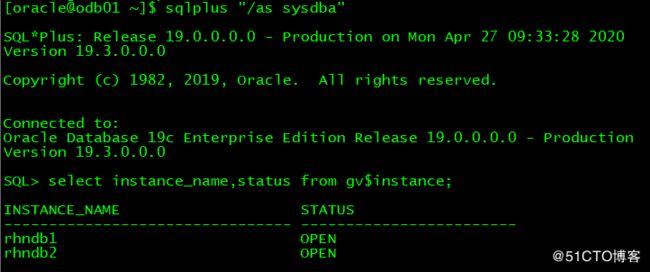
由于搞不到红帽官网的软件包,只能使用CentOS的软件仓库,环境信息如下:
本文主要介绍服务端的安装配置,客户端的配置以及使用将在下一篇描述。
1、配置yum软件仓库
[root@ceph01 ~]# vi /etc/yum.repos.d/CentOS-Base.repo

[Storage]
name=CentOS-$releasever - Storage
baseurl=https://mirrors.huaweicloud.com/centos/7.7.1908/storage/x86_64/ceph-nautilus/
gpgcheck=0
enabled=1

[Gluster]
name=CentOS-$releasever - Storage
baseurl=https://mirrors.huaweicloud.com/centos/7.7.1908/storage/x86_64/gluster-5/
gpgcheck=0
enabled=1

[ceph-iscsi]
name=CentOS-$releasever - Storage
baseurl=https://mirrors.huaweicloud.com/ceph/ceph-iscsi/3/rpm/el7/noarch/
gpgcheck=0
enabled=1

[epel]
name=CentOS-$releasever - Storage
baseurl=https://mirrors.huaweicloud.com/epel/7Server/x86_64/
gpgcheck=0
enabled=1
2、配置节点互信操作(ommit)
这里就是配置ssh互信操作,可以参考其他文章。
3、管理节点安装ceph-ansible
这里使用ceph01作为ansible的管理节点。
[root@ceph01 ~]# yum install ceph-ansible4、创建yml配置文件
切换目录至/usr/share/ceph-ansible文件夹,分别创建all.yml、osds.yml以及site.yml。
[root@ceph01 ceph-ansible]# cd group_vars/
[root@ceph01 group_vars]# cp all.yml.sample all.yml
[root@ceph01 group_vars]# vi all.yml
dummy:
fetch_directory: ~/ceph-ansible-keys
mon_group_name: mons
osd_group_name: osds
rgw_group_name: rgws
mds_group_name: mdss
nfs_group_name: nfss
rbdmirror_group_name: rbdmirrors
client_group_name: clients
iscsi_gw_group_name: iscsigws
mgr_group_name: mgrs
rgwloadbalancer_group_name: rgwloadbalancers
grafana_server_group_name: grafana-server
configure_firewall: true
ceph_origin: distro
ceph_repository: dummy
cephx: true
monitor_interface: eth0
public_network: 192.168.120.0/24
radosgw_interface: eth0
dashboard_admin_password: redhat
grafana_admin_user: admin
grafana_admin_password: redhat
[root@ceph01 group_vars]# cp osds.yml.sample osds.yml
[root@ceph01 group_vars]# vi osds.yml
dummy:
devices:
  - /dev/sdb
osd_auto_discovery: true
[root@ceph01 group_vars]# cp iscsigws.yml.sample iscsigws.yml
[root@ceph01 group_vars]# cp rgws.yml.sample rgws.yml
[root@ceph01 group_vars]# cd ../
[root@ceph01 ceph-ansible]# cp site.yml.sample site.yml
5、定义Ansible inventory文件
此文件就是/etc/ansible/hosts文件,加入以下内容:
[root@ceph01 ceph-ansible]# vi /etc/ansible/hosts
[mons]
ceph01
ceph02
ceph03

[osds]
ceph01
ceph02
ceph03
ceph04

[mgrs]
ceph01
ceph02

[grafana-server]
ceph03

[rgws]
ceph03
ceph04

[iscsigws]
ceph03
ceph04

[mdss]
ceph01
ceph02
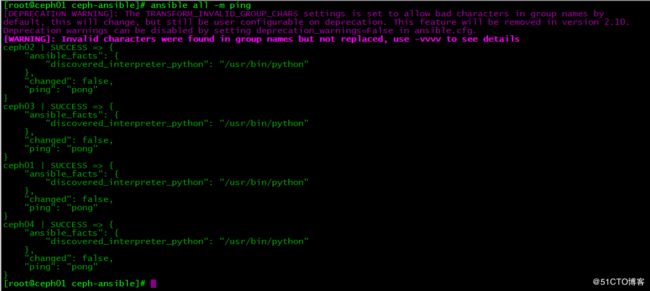
6、检查各节点是否能正常通信
[root@ceph01 ceph-ansible]# ansible all -m ping7、安装依赖软件包(可选)
这里的依赖软件是指ceph-iscsi依赖的tcmu-runner软件包。如果ceph-iscsi的版本为3.4-1,则tcmu-runner版本必须大于等于1.4.0,否则在部署过程会报错。另外CentOS的软件仓库中的版本最高为1.3也不满足(ceph-nautilus)的要求,所以需单独下载源代码进行编译安装。我这里直接在redhat官方网站下载的二进制rpm包,直接在iscsigws节点上安装即可。
[root@ceph03 ~]# yum -y localinstall /mnt/tcmu-runner-1.4.0-2.el7cp.x86_64.rpm
[root@ceph04 ~]# yum -y localinstall /mnt/tcmu-runner-1.4.0-2.el7cp.x86_64.rpm建议:在各个节点先安装好ceph相关软件包,避免在部署过程中因为网络或者其他原因导致部署中断。
8、开始安装配置
在执行之前,一定要切换到all.yml和site.yml文件所在的目录,否则会报错的。
[root@ceph01 ~]# cd /usr/share/ceph-ansible
[root@ceph01 ceph-ansible]# ansible-playbook site.yml
......
PLAY RECAP ***************************************************************************************************************
ceph01                     : ok=353  changed=46   unreachable=0    failed=0    skipped=509  rescued=0    ignored=0
ceph02                     : ok=299  changed=42   unreachable=0    failed=0    skipped=451  rescued=0    ignored=0
ceph03                     : ok=260  changed=53   unreachable=0    failed=0    skipped=385  rescued=0    ignored=0
ceph04                     : ok=141  changed=23   unreachable=0    failed=0    skipped=264  rescued=0    ignored=0

INSTALLER STATUS *********************************************************************************************************
Install Ceph Monitor           : Complete (0:01:21)
Install Ceph Manager           : Complete (0:02:19)
Install Ceph OSD               : Complete (0:01:36)
Install Ceph Dashboard         : Complete (0:01:11)
Install Ceph Grafana           : Complete (0:03:12)
Install Ceph Node Exporter     : Complete (0:01:54)

Friday 24 April 2020  12:20:47 +0800 (0:00:00.123)       0:38:03.733 **********
===============================================================================
ceph-common : install redhat ceph packages --------------------------------------------------------------------- 1267.52s
ceph-infra : install firewalld python binding ------------------------------------------------------------------- 131.81s
ceph-grafana : wait for grafana to start ------------------------------------------------------------------------ 106.77s
ceph-mgr : install ceph-mgr packages on RedHat or SUSE ----------------------------------------------------------- 62.62s
ceph-container-engine : install container packages --------------------------------------------------------------- 60.26s
check for python ------------------------------------------------------------------------------------------------- 21.11s
ceph-common : install centos dependencies ------------------------------------------------------------------------ 19.93s
ceph-grafana : install ceph-grafana-dashboards package on RedHat or SUSE ----------------------------------------- 19.47s
gather and delegate facts ---------------------------------------------------------------------------------------- 12.02s
ceph-osd : use ceph-volume lvm batch to create bluestore osds ---------------------------------------------------- 10.15s
ceph-facts : generate cluster fsid -------------------------------------------------------------------------------- 9.09s
ceph-mgr : wait for all mgr to be up ------------------------------------------------------------------------------ 8.02s
ceph-mon : fetch ceph initial keys -------------------------------------------------------------------------------- 7.40s
ceph-dashboard : set or update dashboard admin username and password ---------------------------------------------- 6.92s
ceph-facts : check if it is atomic host --------------------------------------------------------------------------- 6.21s
ceph-container-engine : start container service ------------------------------------------------------------------- 5.94s
ceph-mgr : create ceph mgr keyring(s) on a mon node --------------------------------------------------------------- 4.98s
ceph-mgr : add modules to ceph-mgr -------------------------------------------------------------------------------- 4.95s
ceph-facts : check for a ceph mon socket -------------------------------------------------------------------------- 4.39s
ceph-mgr : disable ceph mgr enabled modules ----------------------------------------------------------------------- 4.34s
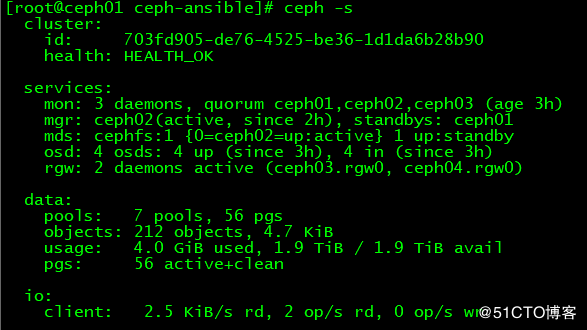
配置完成后,使用下面的目录验证集群状态:
[root@ceph01 ceph-ansible]# ceph -s9、配置Metadata servers服务
[root@ceph01 ceph-ansible]# vi /etc/ansible/hosts
[mdss]
ceph01
ceph02
[root@ceph01 ceph-ansible]# cp group_vars/mdss.yml.sample group_vars/mdss.yml
[root@ceph01 ceph-ansible]# ansible-playbook site.yml --limit mdss
......
PLAY RECAP ***************************************************************************************************************
ceph01                     : ok=419  changed=20   unreachable=0    failed=0    skipped=561  rescued=0    ignored=0
ceph02                     : ok=344  changed=16   unreachable=0    failed=0    skipped=498  rescued=0    ignored=0

INSTALLER STATUS *********************************************************************************************************
Install Ceph Monitor           : Complete (0:01:09)
Install Ceph Manager           : Complete (0:00:59)
Install Ceph OSD               : Complete (0:01:34)
Install Ceph MDS               : Complete (0:02:01)
Install Ceph Dashboard         : Complete (0:01:24)
Install Ceph Grafana           : Complete (0:01:10)
Install Ceph Node Exporter     : Complete (0:00:56)

Friday 24 April 2020  15:02:58 +0800 (0:00:00.121)       0:11:36.111 **********
===============================================================================
ceph-grafana : wait for grafana to start ------------------------------------------------------------------------- 35.44s
ceph-mds : install ceph-mds package on redhat or suse ------------------------------------------------------------ 16.13s
ceph-infra : install firewalld python binding -------------------------------------------------------------------- 15.14s
ceph-dashboard : set or update dashboard admin username and password ---------------------------------------------- 7.62s
gather and delegate facts ----------------------------------------------------------------------------------------- 6.37s
ceph-mds : create filesystem pools -------------------------------------------------------------------------------- 6.11s
ceph-mds : assign application to cephfs pools --------------------------------------------------------------------- 5.12s
ceph-mds : set pg_autoscale_mode value on pool(s) ----------------------------------------------------------------- 4.83s
ceph-mds : customize pool size ------------------------------------------------------------------------------------ 4.17s
ceph-mds : get keys from monitors --------------------------------------------------------------------------------- 3.40s
ceph-config : look up for ceph-volume rejected devices ------------------------------------------------------------ 3.34s
ceph-osd : get keys from monitors --------------------------------------------------------------------------------- 3.08s
ceph-mgr : create ceph mgr keyring(s) on a mon node --------------------------------------------------------------- 3.01s
ceph-config : look up for ceph-volume rejected devices ------------------------------------------------------------ 2.80s
ceph-config : look up for ceph-volume rejected devices ------------------------------------------------------------ 2.71s
check for python -------------------------------------------------------------------------------------------------- 2.70s
ceph-osd : apply operating system tuning -------------------------------------------------------------------------- 2.67s
ceph-osd : copy ceph key(s) if needed ----------------------------------------------------------------------------- 2.56s
ceph-mds : copy ceph key(s) if needed ----------------------------------------------------------------------------- 2.44s
ceph-osd : set noup flag ------------------------------------------------------------------------------------------ 2.40s
10、使用web管理页面
如果安装了mgr服务,则使用web界面进行访问并操作,如下: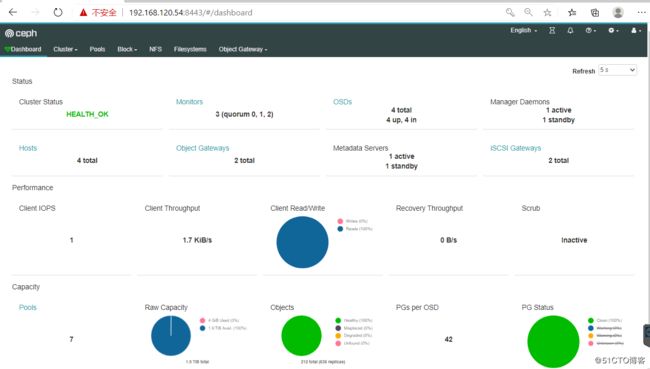
11、ISCSI服务端配置
安装完成后,在任意一个iscsi gateway节点通过gwcli命令进行配置,或者使用web界面。
- 定义Target
[root@ceph03 ~]# gwcli /> /iscsi-targets create iqn.2020-04.com.redhat.iscsi-gw:oradb ok - 创建gateways
/> goto gateways /iscsi-target...radb/gateways> create ceph03.xzxj.edu.cn 192.168.120.55 Adding gateway, sync'ing 0 disk(s) and 0 client(s) ok /iscsi-target...radb/gateways> create ceph04.xzxj.edu.cn 192.168.120.56 Adding gateway, sync'ing 0 disk(s) and 0 client(s) ok - 创建disks
/iscsi-target...radb/gateways> goto disks /disks> ls o- disks ............................................................................................... [0.00Y, Disks: 0] /disks> /disks/ create rbd image=vol01 size=100G ok /disks> /disks/ create rbd image=vol02 size=100G ok /disks> /disks/ create rbd image=vol03 size=100G ok - 添加客户端
linux下,客户端的InitiatorName名称可以通过/etc/iscsi/initiatorname.iscsi文件获取,此名称可以自定义。如果不想使用chap认证,可以禁用后再添加客户端。
--禁用chap认证
/disks> goto hosts
/iscsi-target...w:oradb/hosts> ls
o- hosts ................................................................................... [Auth: ACL_ENABLED, Hosts: 0]
/iscsi-target...w:oradb/hosts> auth disable_acl
ok
--添加客户端
/iscsi-target...w:oradb/hosts> create iqn.1988-12.com.odb01:4538c26dc31
ok
/iscsi-target...w:oradb/hosts> create iqn.1988-12.com.odb02:4f12e9497a3
ok
/iscsi-target...w:oradb/hosts> ls
o- hosts ................................................................................... [Auth: ACL_ENABLED, Hosts: 2]
  o- iqn.1988-12.com.odb01:4538c26dc31 ..................................................... [Auth: None, Disks: 0(0.00Y)]
o- iqn.1988-12.com.odb02:4f12e9497a3 ..................................................... [Auth: None, Disks: 0(0.00Y)]- 向客户端映射disks
/iscsi-target...w:oradb/hosts> cd iqn.1988-12.com.odb02:4f12e9497a3
/iscsi-target...2:4f12e9497a3> disk add rbd/vol01
ok
/iscsi-target...2:4f12e9497a3> disk add rbd/vol02
ok
/iscsi-target...2:4f12e9497a3> disk add rbd/vol03
ok
/iscsi-target...2:4f12e9497a3> cd ..
/iscsi-target...w:oradb/hosts> cd iqn.1988-12.com.odb01:4538c26dc31
/iscsi-target...1:4538c26dc31> disk add rbd/vol01
Warning: 'rbd/vol01' mapped to 1 other client(s)
ok
/iscsi-target...1:4538c26dc31> disk add rbd/vol02
Warning: 'rbd/vol02' mapped to 1 other client(s)
ok
/iscsi-target...1:4538c26dc31> disk add rbd/vol03
Warning: 'rbd/vol03' mapped to 1 other client(s)
ok
/iscsi-target...1:4538c26dc31> cd ..
/iscsi-target...w:oradb/hosts> ls
o- hosts ................................................................................... [Auth: ACL_ENABLED, Hosts: 2]
o- iqn.1988-12.com.odb02:4f12e9497a3 ...................................................... [Auth: None, Disks: 3(300G)]
| o- lun 0 ................................................................ [rbd/vol01(100G), Owner: ceph03.xzxj.edu.cn]
| o- lun 1 ................................................................ [rbd/vol02(100G), Owner: ceph04.xzxj.edu.cn]
| o- lun 2 ................................................................ [rbd/vol03(100G), Owner: ceph03.xzxj.edu.cn]
o- iqn.1988-12.com.odb01:4538c26dc31 ...................................................... [Auth: None, Disks: 3(300G)]
o- lun 0 ................................................................ [rbd/vol01(100G), Owner: ceph03.xzxj.edu.cn]
o- lun 1 ................................................................ [rbd/vol02(100G), Owner: ceph04.xzxj.edu.cn]
o- lun 2 ................................................................ [rbd/vol03(100G), Owner: ceph03.xzxj.edu.cn]
/iscsi-target...w:oradb/hosts>
最后的总览如下图所示:
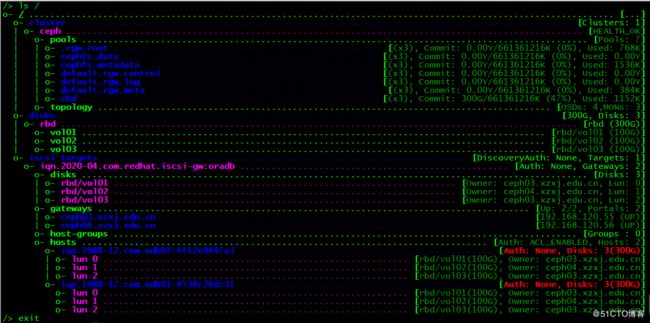
web管理界面的iscsi服务如下图所示: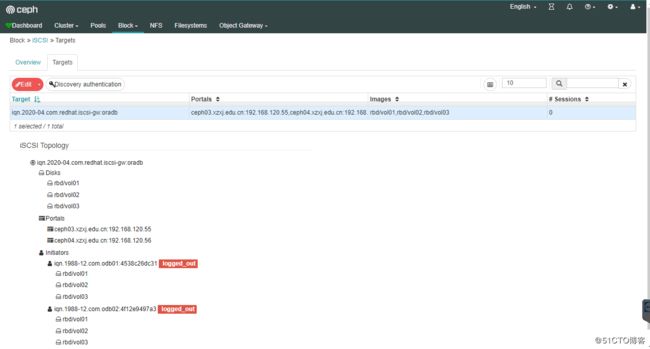
12、ISCSI客户端配置
这里有两个节点:odb01和odb02,上面装有Oracle 19c RAC。通过替换现有的ISCSI磁盘,将其迁移到ceph服务上。
以下操作分别在RAC节点执行:- 安装配置device-mapper-multipath
[root@odb02 ~]# yum -y install device-mapper-multipath [root@odb02 ~]# mpathconf --enable --with_multipathd y [root@odb02 ~]# vi /etc/multipath.conf devices { device { vendor "LIO-ORG" product "TCMU device" hardware_handler "1 alua" path_grouping_policy "failover" path_selector "queue-length 0" failback 60 path_checker tur prio alua prio_args exclusive_pref_bit fast_io_fail_tmo 25 no_path_retry queue } } [root@odb02 ~]# systemctl reload multipathd - 访问ISCSI服务端
[root@odb02 ~]# iscsiadm -m discovery -t sendtargets -p 192.168.120.55:3260
192.168.120.55:3260,1 iqn.2020-04.com.redhat.iscsi-gw:oradb
192.168.120.56:3260,2 iqn.2020-04.com.redhat.iscsi-gw:oradb
[root@odb02 ~]# iscsiadm -m node -T iqn.2020-04.com.redhat.iscsi-gw:oradb -p 192.168.120.55:3260 -l
Logging in to [iface: default, target: iqn.2020-04.com.redhat.iscsi-gw:oradb, portal: 192.168.120.55,3260] (multiple)
Login to [iface: default, target: iqn.2020-04.com.redhat.iscsi-gw:oradb, portal: 192.168.120.55,3260] successful.
[root@odb02 ~]# iscsiadm -m node -T iqn.2020-04.com.redhat.iscsi-gw:oradb -p 192.168.120.56:3260 -l
Logging in to [iface: default, target: iqn.2020-04.com.redhat.iscsi-gw:oradb, portal: 192.168.120.56,3260] (multiple)
Login to [iface: default, target: iqn.2020-04.com.redhat.iscsi-gw:oradb, portal: 192.168.120.56,3260] successful.
[root@odb02 ~]# iscsiadm -m node -T iqn.2020-04.com.redhat.iscsi-gw:oradb -p 192.168.120.55:3260 --op update -n node.startup -v automatic
[root@odb02 ~]# iscsiadm -m node -T iqn.2020-04.com.redhat.iscsi-gw:oradb -p 192.168.120.56:3260 --op update -n node.startup -v automatic
[root@odb02 ~]# multipath -ll
mpathc (360014057cfbd54533ee4679b225daef0) dm-4 LIO-ORG ,TCMU device
size=100G features='1 queue_if_no_path' hwhandler='1 alua' wp=rw
|-+- policy='queue-length 0' prio=50 status=active
| `- 5:0:0:1 sdj                8:144  active ready running
`-+- policy='queue-length 0' prio=10 status=enabled
`- 4:0:0:1 sdg                8:96   active ready running
mpathb (360014055c461669ff424d119df5d42f9) dm-3 LIO-ORG ,TCMU device
size=100G features='1 queue_if_no_path' hwhandler='1 alua' wp=rw
|-+- policy='queue-length 0' prio=50 status=active
| `- 4:0:0:2 sdf                8:80   active ready running
`-+- policy='queue-length 0' prio=10 status=enabled
`- 5:0:0:2 sdi                8:128  active ready running
mpatha (36001405c45e2209dbc7414c8cf316e1b) dm-2 LIO-ORG ,TCMU device
size=100G features='1 queue_if_no_path' hwhandler='1 alua' wp=rw
|-+- policy='queue-length 0' prio=50 status=active
| `- 4:0:0:0 sde                8:64   active ready running
`-+- policy='queue-length 0' prio=10 status=enabled
`- 5:0:0:0 sdh                8:112  active ready running
到此,已成功访问ceph的iscsi服务并发现磁盘。
- 替换Oracle RAC现有共享存储
替换之前,在任意一节点停止Oracle RAC服务。
- 安装配置device-mapper-multipath
[root@odb01 ~]# /u01/app/19.3.0/grid/bin/crsctl stop cluster -all- 同步旧存储数据到新盘
使用linux的dd命令,同时进行拷贝:
[root@odb01 ~]# dd if=/dev/sdb of=/dev/mapper/mpatha bs=8192k
[root@odb01 ~]# dd if=/dev/sdc of=/dev/mapper/mpathb bs=8192k
[root@odb02 ~]# dd if=/dev/sdd of=/dev/mapper/mpathc bs=8192k- 修改ASM实例参数
--使用旧盘启动RAC服务
[root@odb01 ~]# /u01/app/19.3.0/grid/bin/crsctl start cluster -all
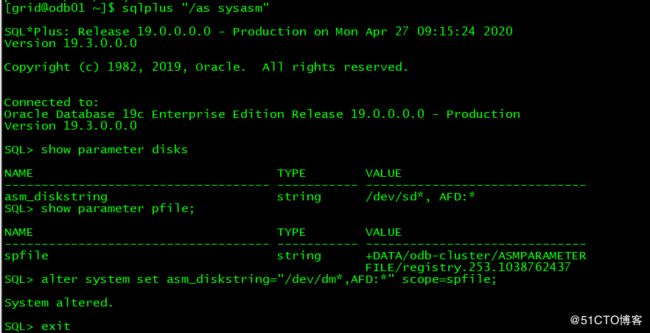
--修改asm的磁盘发现路径
[grid@odb01 ~]$ asmcmd dsget
parameter:/dev/sd*, AFD:*
profile:/dev/sd*,AFD:*
[grid@odb01 ~]$ asmcmd dsset '/dev/dm*','AFD:*'
[grid@odb01 ~]$ asmcmd dsget
parameter:/dev/sd*, AFD:*
profile:/dev/dm*,AFD:*
这里使用了oracle的ASM Filter Driver功能,所以同步完成后,删除旧盘再启动rac服务即可。
[root@odb01 ~]# /u01/app/19.3.0/grid/bin/crsctl stop cluster -all
--RAC各节点使用以下命令,删除旧的共享磁盘
[root@odb01 ~]# iscsiadm -m node -T iqn.2020-04.com.he:lun1 -p 192.168.120.121:3260 -u
[root@odb01 ~]# iscsiadm -m node -T iqn.2020-04.com.he:lun1 -p 192.168.120.121:3260 -o delete
[root@odb02 ~]# iscsiadm -m node -T iqn.2020-04.com.he:lun1 -p 192.168.120.121:3260 -u
[root@odb02 ~]# iscsiadm -m node -T iqn.2020-04.com.he:lun1 -p 192.168.120.121:3260 -o delete
--再次使用新盘启动RAC
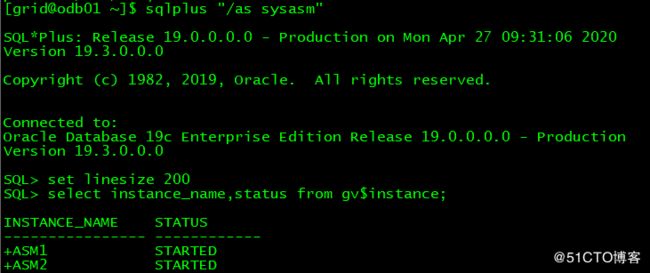
[root@odb01 ~]# /u01/app/19.3.0/grid/bin/crsctl start cluster -all
--启动后,可以验证新磁盘是否正确
[grid@odb01 ~]$ asmcmd afd_lsdsk