2018.9.24----2018.10.31
- confluecn配置指南
https://confluence.atlassian.com/display/CONF56/Database+Setup+For+MySQL - 百度网盘(包括用到的confluence和各种jar包,以及破解包):
链接:https://pan.baidu.com/s/1jHi3eB0aFAi4pzyF8xkbTQ
提取码:c2md
confluence简述:
Wiki是一个Web站点,它使得人们可以容易发布信息并把这些信息链接在一起,Wiki是一种在线交流软件非常适用于在线的信息协作和交流;
近几年,wiki变得越来越流行,人们用wiki作为知识库、在线的百科全书、企业用wiki作为一种简单有效的方式,企业内部以及与外部商业伙伴之间进行内容和信息的分享Confluence作为一个企业wiki软件,它的出现正是为了满足上诉的需求。
Confluenced的特色,就是到底有那些好处?
1、协作方便
wiki很容易学习和使用。它不像其他类型的内容管理系统那么复杂,Wiki页面的结构、内容可以随时修改、演变。可汇聚的,也可以根据内容,整合多个相关内容,也可以通过相应链接,分类去概括
2、增长补充
随着内容的广泛与内容的扩充、可以随意修订内容,补充内容,或者新增扩展新的板块,用wiki,知识和信息不会被隐藏在大量的email、硬盘文件系统、服务器中
3、公正公开
wiki是在线的,因此人们可以随时随地的访问wiki来共享知识和文件、交流。
4、灵活运用
WiKi也是非常的灵活,你能够对wiki进行定制,将wiki于其他的应用系统,数据库和文件系统进行连接。
5、和大部分企业软件相比,wiki的投入成本比较小的
6、可移动性
可以导出各种格式的档案,方便将数据汇成功供公司内部或客户使用的文件。
企业面对的问题:
1、彼此间知识互相传递障碍-为了怕麻烦,80%以上的员工只会将所知留在自己的脑袋。
2、公司知识资产无法积累-随着人员的流动,新员工就必须不断的重新摸索,公司因这些多付出的时间而付出客观的额外成本。
3、缺乏能留下记录的讨论空间-公司不够弹性的系统让员工不习惯于将信息记录在信息系统
4、文件无法集中管理-各部门对于文件的保存各自为政,造成文件的流失或不易查寻。
5、永远找不到想要找的文件-因为缺乏良好的全文检索系统
环境配置:
CentOS7
JDK:jdk-7u75-linux-x64.tar
MYSQL:mysql-community-release-el7-5.noarch(5.6.42)
confluence:atlassian-confluence-5.6.6-x64
(一)安装JDK:
安装目录:/usr/java
1、官网下载jdk-7u75-linux-x64.tar安装包,拉到官网底部,点击DOWNLOAD可以下载历史版本(需要注册一个账号才能下载)
https://www.oracle.com/technetwork/java/javase/downloads
2、在SecureCRT中安装lrzsz
- 作用:通过SecureCRT界面把文件从win10拉到Linux
- 方法:拖拽文件到SecureCRT界面即可
[root@localhost]#yum install lrzsz
3、从本地把jdk-7u75-linux-x64.tar传到Linux的/usr/java目录下(把JDK安装包拖拽到SecureCRT界面即可)
- 拖拽前:先进入/usr/java目录
[root@localhost]#cd /usr/java
4、解压JDK安装包,解压后得到jdk1.7.0_75的目录文件
[root@localhost]#tar -zxvf jdk-8u191-linux-x64.tar
5、在/etc/profile文件中添加以下语句(配置JDK环境变量,使得JDK生效):
- /etc/profile:在登录时,操作系统定制用户环境时使用的第一个文件,此文件为系统的每个用户设置环境信息,当用户第一次登录时,该文件被执行。
[root@localhost]#vi /etc/profile
#java environment
export JAVA_HOME=/usr/java/jdk1.7.0_75
export CLASSPATH=.:$JAVA_HOME/jre/rt.jar:$JAVA_HOME/lib/tools.jar:$JAVA_HOME/lib.bt.jar
export  PATH=$PATH:$JAVA_HOME/bin
[root@localhost]#source  /etc/profile
[root@localhost]#java -version
- source命令用法:
source FileName
作用:在当前bash环境下读取并执行FileName中的命令。 -
检测JDK是否安装成功,出现如下的结果则安装成功:java -version或javac都行
若没成功,检查刚刚在/etc/profile添加的语句的是否正确。
(二)安装Mysql:
[root@localhost ~]# wget http://repo.mysql.com/mysql-community-release-el7-5.noarch.rpm
[root@localhost ~]# rpm -ivh mysql-community-release-el7-5.noarch.rpm
[root@localhost ~]# yum install mysql-server
[root@localhost ~]#service mysqld start
[root@localhost ~]#mysql  -u root
...
mysql>grant all privileges on confluence.* to 'admin'@'localhost'  identified by '123456';
mysql>exit;
[root@localhost ~]#vi /etc/my.cnf
[mysqld]
character-set-server=utf8
collation-server=utf8_bin
default-storage-engine=INNODB
max_allowed-packet=34M
[root@localhost ~]# mysql -u root
Welcome to the MySQL monitor.  Commands end with ; or \g.
Your MySQL connection id is 3
Server version: 5.6.42 MySQL Community Server (GPL)

Copyright (c) 2000, 2018, Oracle and/or its affiliates. All rights reserved.

Oracle is a registered trademark of Oracle Corporation and/or its
affiliates. Other names may be trademarks of their respective
owners.

Type 'help;' or '\h' for help. Type '\c' to clear the current input statement.

mysql> grant all on confluence.* to 'admin'@'localhost' identified by '123456';
Query OK, 0 rows affected (0.04 sec)

mysql> create database confluence character set utf8 collate utf8_bin;
Query OK, 1 row affected (0.00 sec)

mysql>`flush privileges;
Query OK, 0 rows affected (0.01 sec)

mysql> \q
Bye
[root@localhost ~]#
(三)安装vsftp(或者lrzsz):
通过简单安装vsftp把需要破解的jar包传到Win10桌面
[root@localhost ~]# yum install vsftpd
[root@localhost ~]# service vsftpd start
[root@localhost ~]# service firewalld stop
(四)安装confluence:
安装目录:/opt
-
Home目录:/var/atlassian/application-data/confluence
1、在官网下载confluence安装包
https://www.atlassian.com/software/confluence/download-archives2
2、把atlassian-confluence-5.6.6-x64.bin传到Linux(拖拽到SecureCRT界面)
3、赋予atlassian-confluence-5.6.6-x64.bin进行的权限,并安装
[root@localhost ~]#chmod +x atlassian-confluence-5.6.6-x64.bin
[root@localhost ~]#./atlassian-confluence-5.6.6-x64.bin
4、把8090端口添加到防火墙
[root@localhost ~]#firewalld-cmd --add-port=8090/tcp --pernament
[root@localhost ~]#firewalld-cmd --reload
5、完成,即可通过http://IP:8090访问,就可访问到如下的页面
confluence安装过程:需要操作三次键盘
第一步、按 字母(o):表示确认安装、
第二步、数字(1):表示默认设置、
第三步、字母(i):表示开始安装
[root@localhost ~]# rz
rz waiting to receive.
 zmodem trl+C ȡ

  100%  261566 KB 18683 KB/s 00:00:14       0 Errors6.6-x64.bin...

[root@localhost ~]# ls
anaconda-ks.cfg  atlassian-confluence-5.6.6-x64.bin
[root@localhost ~]# chmod +x a
anaconda-ks.cfg                     atlassian-confluence-5.6.6-x64.bin
[root@localhost ~]# chmod +x atlassian-confluence-5.6.6-x64.bin
[root@localhost ~]# ./atlassian-confluence-5.6.6-x64.bin
Unpacking JRE ...
Starting Installer ...
十月 30, 2018 10:06:09 上午 java.util.prefs.FileSystemPreferences$1 run
INFO: Created user preferences directory.
十月 30, 2018 10:06:09 上午 java.util.prefs.FileSystemPreferences$2 run
INFO: Created system preferences directory in java.home.

This will install Confluence 5.6.6 on your computer.
OK [o, Enter], Cancel [c]
o
Choose the appropriate installation or upgrade option.
Please choose one of the following:
Express Install (uses default settings) [1], Custom Install (recommended for advanced users) [2, Enter], Upgrade an existing Confluence installation [3]
1
See where Confluence will be installed and the settings that will be used.
Installation Directory: /opt/atlassian/confluence
Home Directory: /var/atlassian/application-data/confluence
HTTP Port: 8090
RMI Port: 8000
Install as service: Yes
Install [i, Enter], Exit [e]
i

Extracting files ...


Please wait a few moments while Confluence starts up.
Launching Confluence ...
Installation of Confluence 5.6.6 is complete
Your installation of Confluence 5.6.6 is now ready and can be accessed via
your browser.
Confluence 5.6.6 can be accessed at http://localhost:8090
Finishing installation ...
[root@localhost ~]# firewall-cmd --add-port=8090/tcp --permanent
success
[root@localhost ~]# firewall-cmd --reload
success
[root@localhost ~]#
(五)破解confluence
步骤:移除并重命名jar包,破解jar包,上传jar包并改回原名,重启confluence,把Key复制到浏览器。
- 在Linux平台的操作
#安装vsftp把atlassian-extras-decoder-v2-3.2.jar重命名,并移到ftp的/var/ftp/pub目录下,允许win10,下载
[root@localhost ~]# yum install vsftpd
[root@localhost ~]# service vsftpd start
[root@localhost ~]# mv /opt/atlassian/confluence/confluence/WEB-INF/lib/atlassian-extras-decoder-v2-3.2.jar /var/ftp/pub/atlassian-extras-2.4.jar

#把破解的 atlassian-extras-2.4.jar传回Linux
[root@localhost ~]# rz
rz waiting to receive.
  100%       6 KB    6 KB/s 00:00:01       0 Errorsar...
[root@localhost ~]# ls
atlassian-extras-2.4.jar
#把atlassian-extras-2.4.jar移到 /opt/atlassian/confluence/confluence/WEB-INF/lib目录下,并改回原名
[root@localhost ~]# mv atlassian-extras-2.4.jar /opt/atlassian/confluence/confluence/WEB-INF/lib/atlassian-extras-decoder-v2-3.2.jar
[root@localhost ~]# cd /opt/atlassian/confluence/confluence/WEB-INF/lib

#把mysql-connector-java-5.1.39-bin上传到/opt/atlassian/confluence/confluence/WEB-INF/lib
[root@localhost lib]# rz
  100%     966 KB  966 KB/s 00:00:01       0 Errors.1.39-bin.jar...
[root@localhost lib]# service confluence restart
[root@localhost lib]#
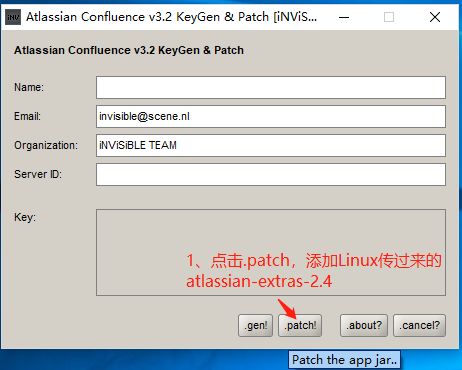
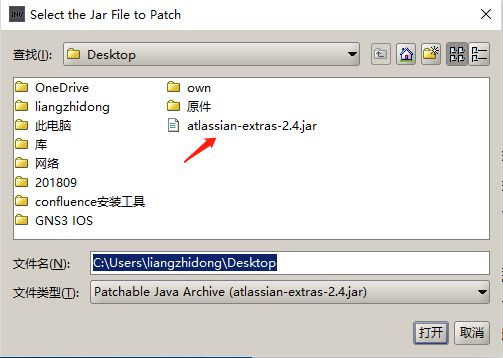
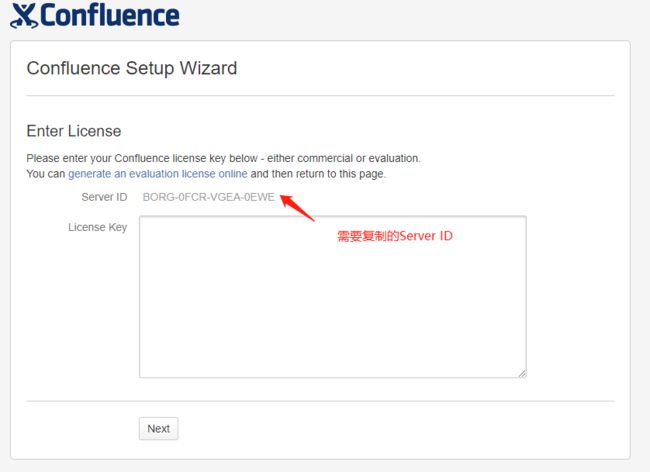
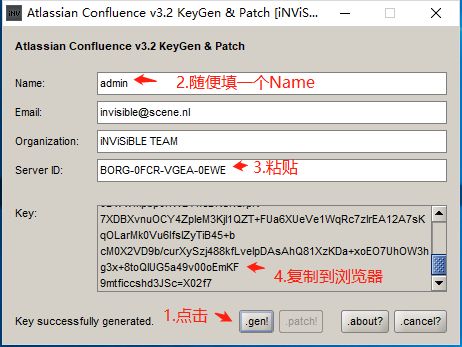
- 在win10平台的操作(打开confluence_keygen)
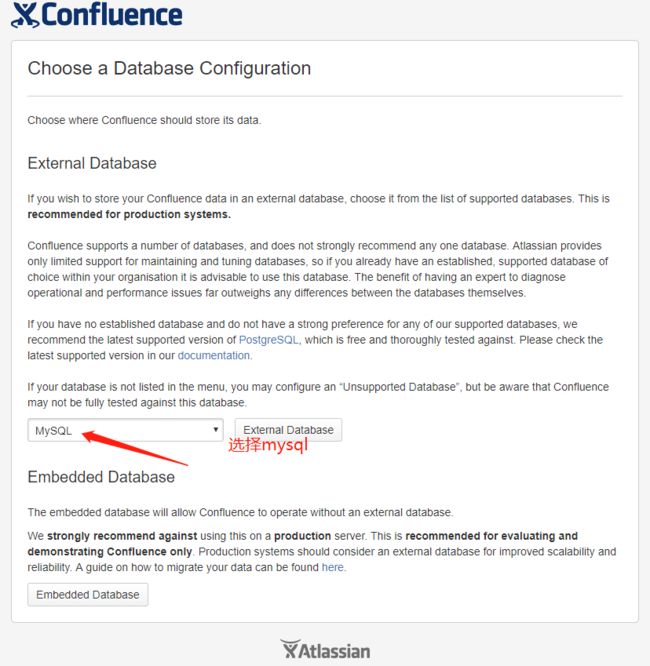
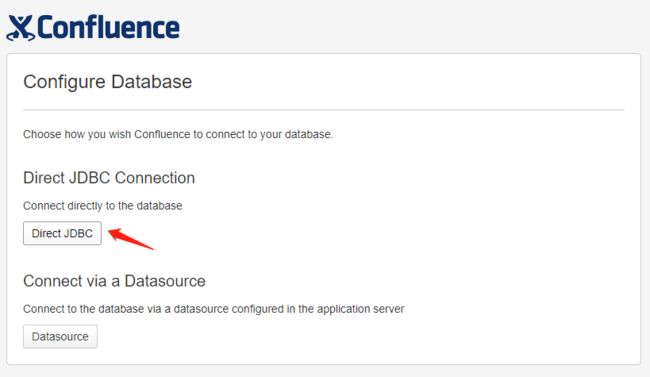
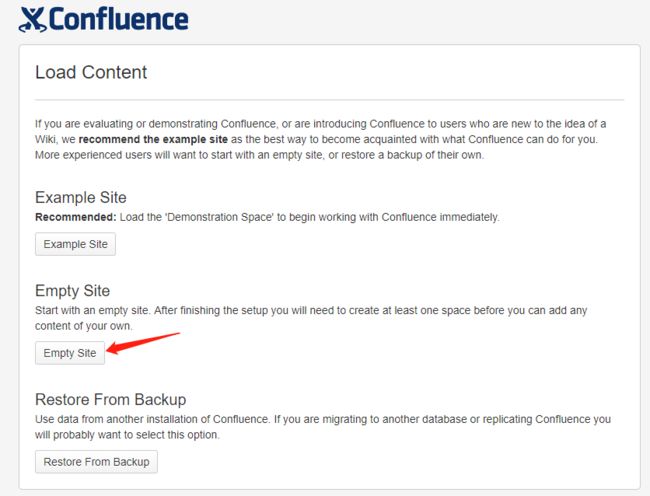
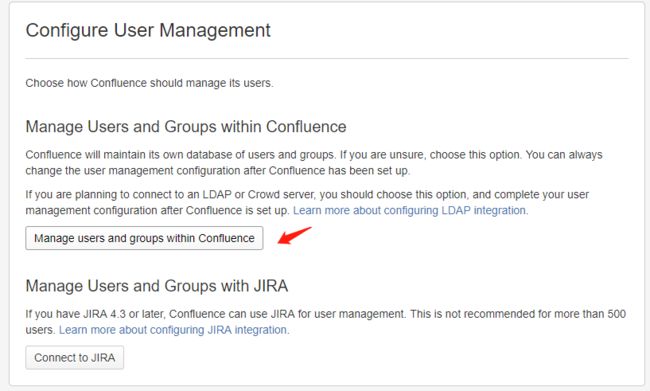
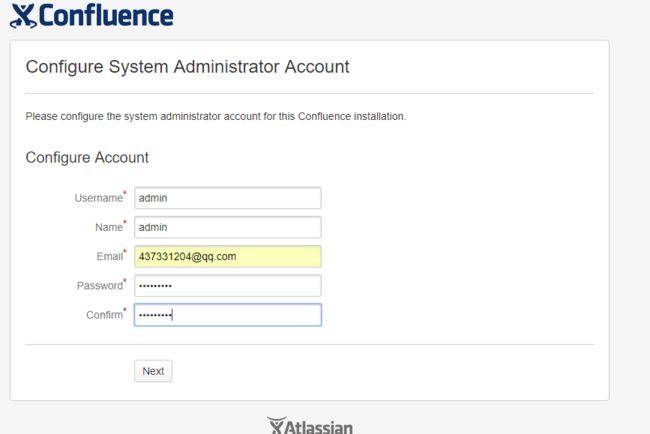
(六)confluence的设置
(七)汉化confluence
atlassian所有产品的中文语言包,都可以通过以下地址下载到:
https://translations.atlassian.com/dashboard/download?lang=zh_CN#/Confluence/5.6.6
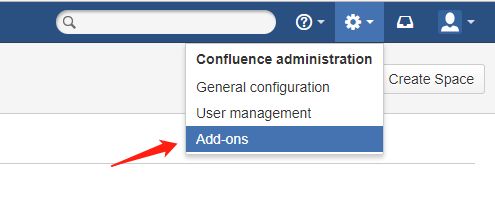
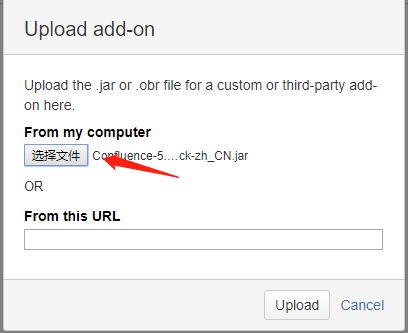
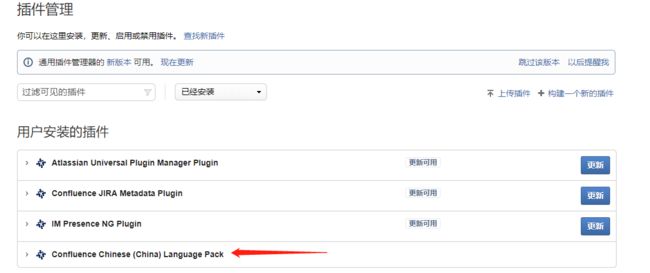
上传Confluence-5.6.6-language-pack-zh_CN包
(八)卸载confluence
在/opt/atlassian/confluence目录下执行uninstall即可卸载confluence


