在日常使用电脑的时候大家可能会遇到这样一种场景,计算机昨天用的好好的,下班关机走人,结果第二天一开机发现起不来了,这是为何?接下来就聊聊系统启动的那些事。
因为是linux与windows在引导系统所用的工具不同(WINDOWS用的ntloader),接下来主要以Linux为主唠叨唠叨(老年痴呆提前了,没辙)。
计算机的开机按电源键接通电源应该算是第一步吧(专业小白三十年,一直被模仿从未被超越),加电以后开始通过BIOS中的设置来先进行硬件的一些自检,其中包括了CPU这家伙在不在啊,他要是在能不能正常工作啊,要是生病了得嘱咐他多喝热水啊(这句话是跟你女朋友说的,什么!没有女票,那就跟别人女朋友说吧,挨打可别来找我O(∩_∩)O~)。
所有硬件检测都没问题了,接下来就会根据bios中的boot sequence设置值来开始查找第一个有引导程序的设备,这个其实就是选定的设备中有没有bootloader这个程序可以帮助我们来启动系统的,下面就进入介绍boot loader这个得力干将阶段。
Boot loader中文名叫引导加载器,他的发展史比较早,初期分成了两个阶段,第一个阶段是称为LILO(Linux loader)这个因为早期的硬件设备都比较简单,他也就随大流简简单单了起来,虽说简单但麻雀虽小五脏俱全,该有的都有了只是因为硬件发展的太快了导致他显得力不从心逐渐的被第二阶段的grub程序所取代。万万没想到,智能手机大爆发,LILO迎来了他的第二春~,此处不表,自己看去吧。
Grub(Grand Uniform BootLoader)的发展从广义上来说也分为两个阶段,即0.X阶段被称为GRUB Legacy,在CentOS7后发展到了第二阶段即1.X,被称为GRUB2。
究竟Boot loader有什么作用呢?一个作用就是我们启动计算机即将进入centos系统时看到的那个交互式的选择菜单;另一个作用就是可以让用户选择的系统加载到内存中启动,当系统安装完成之时,系统的内核文件一般会放置在单独划分的boot分区当中,随之就带来了一个问题,内核放置在硬盘当中,要读取内核文件就要先读取硬盘驱动,然后读取文件系统最后才会读取到内核文件,而驱动程序是放置在硬盘当中,此时就陷入了一个“怪圈”,怎么解决呢?grub程序提出了“三段式”解决方案。
第一阶段被称为stage1,在这一阶段是运行boot loader程序,bootloader程序在MBR中,(MBR空间只有512bytes,bootloader占用了446bytes还有64bytes用来记录硬盘分区表,2bytes来记录bootloader程序是否有效),此时运行的boot loader程序只是最基本的功能,一些配置文件则被放置在stage2中。
第二阶段为stage1_5,他被存放在MBR随后的扇区中,存放了可以让boot loader能成功进入stage2阶段的文件系统的驱动。
第三阶段为stage2,在这个阶段boot loader开始加载所有的配置文件和一些系统启动的环境参数,这些所需的文件被存储在磁盘/boot分区中,第三阶段运行完毕一切正常的情况下,内核即被加载到内存中,引导阶段算是完成了,剩余的工作就移交给内核。
内核开始进行自解压,展开做自身初始化,探测各硬件设备并装载设备的驱动程序,然后以只读方式挂载根文件系统,最后一步则是运行用户空间的第一个程序init,后续的系统初始化工作都移交到init来操作。
而init服务会根据其配置文件/etc/rc.d/rc.sysinit来进行系统初始化,它所设置的内容有以下几点:
1、设置主机名
2、设置欢迎信息
3、激活udev和selinux
4、挂载/etc/fstab文件中定义的文件系统
5、检测根文件系统,并以读写方式重新挂载根文件系统
6、设置系统时钟
7、激活swap交换分区设备
8、根据/etc/sysctl.conf文件设置内核参数
9、激活Lvm及software raid设备
10、加载额外设备例如打印机等的驱动程序
11、清理操作
下面做一些脚本练习
===我是分割线===**===我是分割线===**===我是分割线===**===我是分割线===
1、写一个脚本,完成如下功能
(1) 传递一个磁盘设备文件路径给脚本,判断设备是否存在;
(2) 如果存在,则显示此设备上的所有分区信息;
#!/bin/bash
#
#Program:View disk space information
#History:0.0.1 2017/03/07 22:06
#Author: MG
disk=''
dir="/tmp/"
until [ $disk ];do
    echo "example:/dev/sd[a-z]"
    read -p "input a disk which you want to view: " disk
done
if `fdisk -l $disk >${dir}/success 2>${dir}/error` ;then
    cat ${dir}/success
else
    cat ${dir}/error
fi
2、写一个脚本,完成如下功能
传递一个参数给脚本,此参数为gzip、bzip2或者xz三者之一;
(1) 如果参数1的值为gzip,则使用tar和gzip归档压缩/etc目录至/backups目录中,并命名为/backups/etc-20160613.tar.gz;
(2) 如果参数1的值为bzip2,则使用tar和bzip2归档压缩/etc目录至/backups目录中,并命名为/backups/etc-20160613.tar.bz2;
(3) 如果参数1的值为xz,使用tar和xz归档压缩/etc目录至/backups目录中,并命名为/backups/etc-20160613.tar.xz;
(4) 其他任意值,则显示错误压缩工具,并执行非正常退出;
#!/bin/bash
#
#Program:Three packaging methods
#History:0.0.1 2017/03/07 22:36
#Author: MG
style=("gzip" "bzip2" "xz")
choice=''
sour=/etc
[ -d /backups ] || mkdir /backups
file=/backups/etc-20160603.tar.
function options (){
   echo "compress arguments:"
   echo "=========================="
   for (( i=0;i<${#style[@]};i++)) ;do
     echo -e "${style[$i]}\033[6G)\033[0m"
   done
   echo "=========================="
}
options
until [ $choice ];do
   read -p "select an option which you want to compress: " choice
done
case $choice in
gzip)
   tar -zcf ${file}gz $sour &>/dev/null
   ;;
bzip2)
   tar -jcf ${file}bz2 $sour &>/dev/null
   ;;
xz)
   tar -Jcf ${file}xz $sour &>/dev/null
   ;;
*)
   echo "wrong argument,script exit"
   exit 10 #wrong argument
   ;;
esac
3、 写一个脚本,接受一个路径参数;
(1) 如果为普通文件,则说明其可被正常访问;
(2) 如果是目录文件,则说明是个访问路径;
(3) 如果为符号链接文件,则说明是个访问路径;
(4) 其他为无法判断;
#!/bin/bash
#
#Program:Determine file type
#History:0.0.1 2017/03/08 09:45
#Author: MG
echo "example /tmp/test"
read -p "Please input a file: " File
if [ ! -z $File ];then
    #flag="true" && echo $flag
    if [ -d $File ];then
        echo "${File} is a directory."
    elif [ -f $File ];then
        echo "${File} is a common file."
    elif [ -l $File ];then
        echo "${File} is a symlink file."
    else
        echo "unknown file type ."
    fi
else
    #flag="false" &&echo $flag
    echo "wrong arguments"
    exit 100 #wrong argument
fi
4、 写一个脚本,取得当前主机的主机名,判断
(1) 如果主机名为空或为localhost,或为"(none)",则将其命名为mail.mageedu.com;
(2) 否则,显示现有的主机名即可;
#!/bin/bash
#
#Program:show the hostname for CentOS7
#History:0.0.1 2017/03/08 08:43
#Author: MG
HNAME=`/bin/hostname`
if [ -z $HNAME -o $HNAME == "(none)" -o $HNAME == 'localhost' ];then
    hostnamectl set-hostname "mail.mageedu.com"
else
    echo $HNAME
fi
5、 写一个脚本,完成如下任务
(1) 按顺序分别复制/var/log目录下的每个直接文件或子目录至/tmp/test1-testn目录中;
(2) 复制目录时,才使用cp -r 命令;
(3) 复制文件时使用cp命令;
(4) 复制链接文件时使用cp -d命令;
(5) 余下的所有类型,使用cp -a 命令;
#!/bin/bash
#
#Program:Determine file type
#History:0.0.1 2017/03/08 09:45
#Author: MG
src=/var/log
dsrc=/tmp/test1-testn
[ -d $dsrc ] || mkdir $dsrc
echo "ready to copy file wait a moment please."
for i in ${src}/* ;do
    if [ -d $i ];then
        cp -r $i ${dsrc}/
    elif [ -f $i ];then
        cp -r $i ${dsrc}/
    elif [ -l $i ];then
        cp -d $i ${dsrc}/
    else
        cp -a $i ${dsrc}/
    fi
done
echo -e "Operation completed!"
6、 请详细描述CentOS系统的启动流程(详细到每个过程系统做了哪些事情)
见文章开篇介绍
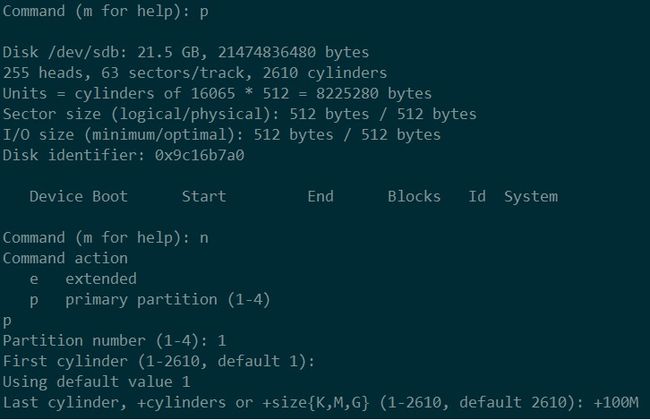
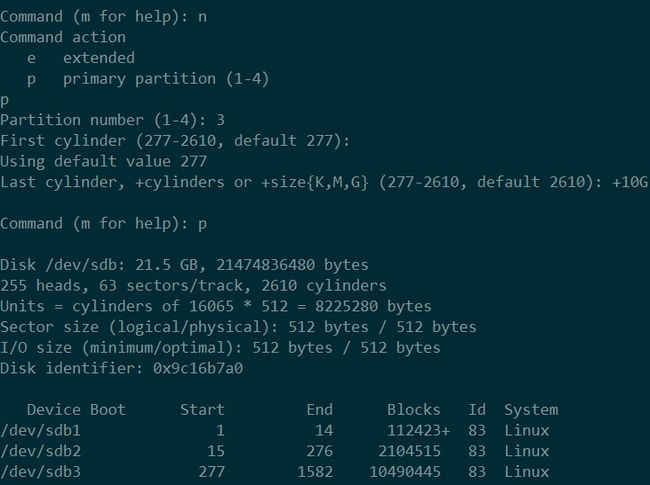
7、为运行于虚拟机上的CentOS6添加一块新硬盘,提供两个主分区;
(1) 为硬盘新建两个主分区;并为其安装grub;
(2) 为硬盘的第一个主分区提供内核和ramdisk文件;为第二个分区提供rootfs;
(3) 为rootfs提供bash、ls、cat程序及所依赖的库文件;
(4) 为grub提供配置文件;
(5) 将新的硬盘设置为第一启动项并能够正常启动目标主机;
[root@localhost ~]# fdisk -l
Disk /dev/sda: 128.8 GB, 128849018880 bytes
255 heads, 63 sectors/track, 15665 cylinders
Units = cylinders of 16065 * 512 = 8225280 bytes
Sector size (logical/physical): 512 bytes / 512 bytes
I/O size (minimum/optimal): 512 bytes / 512 bytes
Disk identifier: 0x0005d62f
   Device Boot      Start         End      Blocks   Id  System
/dev/sda1   *           1          64      512000   83  Linux
Partition 1 does not end on cylinder boundary.
/dev/sda2              64        1339    10240000   83  Linux
/dev/sda3            1339        1594     2048000   82  Linux swap / Solaris
/dev/sda4            1594       15666   113028096    5  Extended
/dev/sda5            1594        4144    20480000   83  Linux
/dev/sda6            4144        5419    10240000   83  Linux
Disk /dev/sdb: 21.5 GB, 21474836480 bytes
255 heads, 63 sectors/track, 2610 cylinders
Units = cylinders of 16065 * 512 = 8225280 bytes
Sector size (logical/physical): 512 bytes / 512 bytes
I/O size (minimum/optimal): 512 bytes / 512 bytes
Disk identifier: 0x00000000
[root@localhost ~]# partx -a /dev/sdb
BLKPG: Device or resource busy
error adding partition 1
BLKPG: Device or resource busy
error adding partition 2
BLKPG: Device or resource busy
error adding partition 3
[root@localhost ~]# cat /proc/partitions
major minor  #blocks  name
   8        0  125829120 sda
   8        1     512000 sda1
   8        2   10240000 sda2
   8        3    2048000 sda3
   8        4          1 sda4
   8        5   20480000 sda5
   8        6   10240000 sda6
   8       16   20971520 sdb
   8       17     112423 sdb1
   8       18    2104515 sdb2
   8       19   10490445 sdb3
[root@localhost ~]# mkfs -t ext4 -L "grubboot" /dev/sdb1
...格式化数据省略
[root@localhost ~]# mkswap /dev/sdb2
Setting up swapspace version 1, size = 2104508 KiB
no label, UUID=b3a5110c-34f5-459a-aa04-48670d8061ca
[root@localhost ~]# mkfs -t ext4  -L "grubrootfs" /dev/sdb3
mke2fs 1.41.12 (17-May-2010)
文件系统标签=grubrootfs
操作系统:Linux
块大小=4096 (log=2)
分块大小=4096 (log=2)
...省略后续数据
[root@localhost ~]# mkdir /mnt/boot   #给sdb安装grub时,grub-install命令必须要指定一个boot目录,否则无法完成操作
[root@localhost ~]# mount /dev/sdb1 /mnt/boot  #将创建的sdb1分区挂载至boot目录
[root@localhost ~]# grub-install --root-directory=/mnt /dev/sdb   #root-directory是指定grub的根,后边的/dev/sdb指定的则是为哪个硬盘安装grub
Probing devices to guess BIOS drives. This may take a long time.
Installation finished. No error reported.
This is the contents of the device map /mnt/boot/grub/device.map.
Check if this is correct or not. If any of the lines is incorrect,
fix it and re-run the script `grub-install'.
(fd0)/dev/fd0
(hd0)/dev/sda
(hd1)/dev/sdb
#此时grub程序已经安装完成,但要想使其可以单独挂载至独立主机上并能成功运行则还需要有内核文件以及所需要的initramdisk,下面将系统的这两个文件复制到/mnt/boot目录中
[root@localhost mnt]# cp /boot/vmlinuz-2.6.32-573.el6.x86_64 /mnt/boot/vmlinuz-2.6.32
[root@localhost mnt]# cp /boot/initramfs-2.6.32-573.el6.x86_64.img /mnt/boot/initrd-2.6.32
#当然系统启动时还需要一个grub的配置文件,来设置启动菜单以及启动时相关参数,可以复制本机的grub.conf也可以自己手动创建一个配置文件
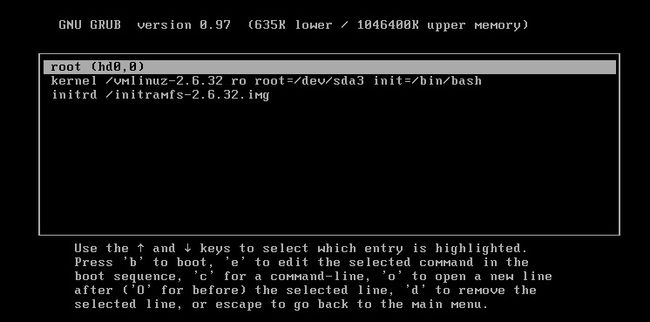
[root@localhost mnt]# vim boot/grub/grub.conf
default=0
timeout=3
hiddenmenu
title Centos6.7 (grub installation test)
    root (hd0,0)
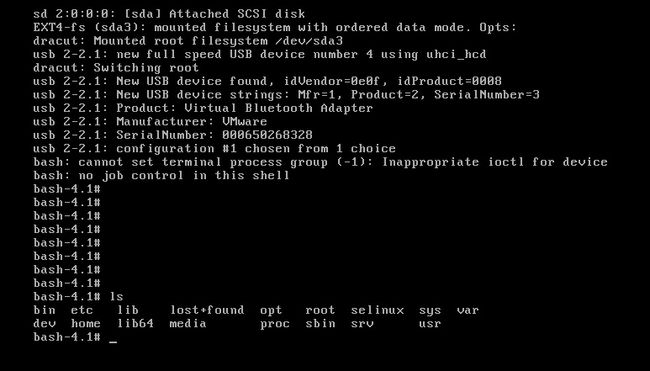
    kernel /vmlinuz-2.6.32 ro root=/dev/sda3 init=/bin/bash  #此版本仅做测试使用,所以系统初始化完成之后启动的第一个用户空间进程不是/sbin/init而是/bin/bash。
    initrd /initramfs-2.6.32
#保存退出,grub配置文件完成
现在就差最后一步了,系统初始化完成之后还需要一个启动终端来跟用户交互,但目前这个简易系统是没有任何工具可用的,现在就来写一个脚本来将当前系统的ls、cat和bash这三个工具复制到简易系统当中来,现在先将系统用到的一些目录创建出来。(脚本参照12题)
[root@localhost mnt]# cd sysroot
[root@localhost sysroot]# mkdir -pv bin sbin lib lib64 home root etc dev sys proc var usr mnt media
8、 写一个脚本
(1) 能够接受四个参数:start,stop,restart,status
start:输出"starting 脚本名finished."
stop:输出"stop 脚本名stopped."
restart:输出"stopping 脚本名 starting 脚本名 finished."
status:输出"脚本名当前状态"
(2) 其他任意参数,均报错退出;
#!/bin/bash # #Program:progscript.sh #History:0.0.1 2017/03/08 21:09 #Author: MG cat <9、写一个脚本,判断给定的用户是否登录了当前系统
(1) 如果登录了,则显示用户登录,脚本终止;
(2) 每3秒钟,查看一个用户是否登录;
#!/bin/bash # #Program:loginuser.sh #History:0.0.1 2017/03/08 21:54 #Author: MG until `who |awk '{print $1}'|grep $1 &>/dev/null`;do sleep 3 done echo "$1 has login."10、写一个脚本,显示用户选定要查看的信息
cpu) display cpu info
mem) display memory info
disk) display disk info
quit) quit
非此四项选择,则提示错误,并要求用户重新选择,直到其给出正确选择为止;
#!/bin/bash # #Program:serverinfo.sh #History:0.0.1 2017/03/08 22:03 #Author: MG choice='null' until [ $choice == 'cpu' -o $choice == 'mem' -o $choice == 'disk' -o $choice == 'quit' ];do cat <
11、 写一个脚本
(1) 用函数实现返回一个用户的UID和SHELL;用户通过参数传递而来
(2) 提示用户输入一个用户名或输入"quit" 退出;
当输入的是用户名,则调用函数显示用户信息;
当用户输入quit,则退出脚本;进一步显示键入的用户相关信息后,再次提醒输出用户名或quit;
#!/bin/bash # #Program:get user ID and shell #History:0.0.1 2017/03/08 23:19 #Author: MG choice='null' until [ $choice == 'quit' ];do echo "input quit could exit this program." read -p "Input one user name: " choice choice=${choice:=null} if [ $choice != 'quit' -a $choice != 'null' ];then id $choice &>/dev/null if [ $? -eq 0 ];then cat /etc/passwd |grep $choice |awk -v FS=: -v OFS=: '{print $1,$3,$6}' fi fi done echo "quit!"12、写一个脚本,完成如下功能(使用函数)
(1) 提示用户输入一个可执行命令的名字;获取此命令依赖的所有库文件;
(2) 复制命令文件至/mnt/sysroot目录下的对应rootfs的路径上,例如,如果复制的文件原路径是/usr/bin/useradd,则复制到/mnt/sysroot/usr/bin/目录中;
(3) 复制此命令依赖的各库文件至/mnt/sysroot目录下的对应的rootfs的路径上;规则同上面命令相关的要求;
#!/bin/bash # #Program:use this program to backup the system command #History:0.0.1 2017/03/08 23:19 #Author: MG declare -i DebugLevel=0 RED="\033[1;31m" GREEN="\033[32m" ORANGE="\033[36m" COL="\033[60G" FLICKER="\033[5m" END="\033[0m" SUCCEED="${COL}[ ${GREEN}succeed${END} ]" ERROR="${COL}[ ${RED}failed${END} ]" Target=/mnt/sysroot function checkQ(){ if [ -n "$1" ];then if [ $1 == 'q' -o $1 == 'Q' ];then echo "Exit the script!" #break 3 exit fi fi } function inputCOM(){ flag=$1 flag=${flag:=newCOM} case $flag in "newCOM") unset Command until [ -n "$Command" ];do read -p "Input a command: " Command done ;; "renewCOM") if [ -z "$Command" ];then until [ -n "$Command" ];do read -p "Input a correct command: " Command done else read -p "Input a correct command: " Command until [ -n "$Command" ];do read -p "Input a correct command: " Command done fi ;; esac } [ -d $Target ] || mkdir -p $Target #ll $Target inputCOM while [ $Command != 'q' -a $Command != 'Q' ];do `which $Command &>/dev/null` Flag=$? #echo "Flag=$?" until [ $Flag -eq 0 ];do echo -e "Wrong command ${RED}$Command${END}" inputCOM "renewCOM" `which $Command &>/dev/null` Flag=$? checkQ $Command done Command=`which $Command|grep -v "^alias.*"|grep -o "[^[:space:]].*"` Comdir=${Command%/*} [ ! -d ${Target}${Comdir} ] && mkdir -p ${Target}${Comdir} && echo -e "${Target}${Comdir} create ${COL}[ ${GREEN}succeed${END} ]${END}" [ ! -f ${Target}${Command} ] && cp $Command ${Target}${Command} && echo -e "${Command} has copied $Target ${COL}[ ${GREEN}succeed${END} ]" [ $DebugLevel -eq 1 ] && echo $Comdir [ $DebugLevel -eq 1 ] && echo $Command for Lib in `ldd $Command |grep -o "[^[:space:]]*/lib.[^[:space:]]*"`;do [ $DebugLevel -eq 1 ] && echo $Lib LibDir=${Lib%/*} [ $DebugLevel -eq 1 ] && echo $LibDir [ ! -d ${Target}${LibDir} ] && mkdir -p ${Target}${LibDir} && echo -e "${Target}${LibDir} create $SUCCEED" [ ! -f ${Target}${Lib} ] && cp $Lib ${Target}${Lib} && echo -e "$Lib has copied ${Target} $SUCCEED" done echo -e "${GREEN}Operation has been completed!${END}${COL}[ ${GREEN}${FLICKER}OK${END} ]" inputCOM done


