- 神经网络中的Adam
化作星辰
神经网络人工智能深度学习
Adam(AdaptiveMomentEstimation)是一种广泛使用的优化算法,结合了RMSprop和动量(Momentum)的优点。它通过计算梯度的一阶矩估计(mean)和二阶矩估计(uncenteredvariance),为每个参数提供自适应学习率。Adam由DiederikP.Kingma和JimmyBa在2014年的论文《Adam:AMethodforStochasticOptimi
- Farm3D- Learning Articulated 3D Animals by Distilling 2D Diffusion论文笔记
Im Bug
3d论文阅读
Farm3D:LearningArticulated3DAnimalsbyDistilling2DDiffusion1.Introduction最近的研究DreamFusion表明,可以通过text-imagegenerator提取高质量的三维模型,尽管该生成模型并未经过三维训练,但它仍然包含足够的信息以恢复三维形状。在本文中,展示了通过文本-图像生成模型可以获取更多信息,并获得关节模型化的三维对
- DeepSeek R1 简单指南:架构、训练、本地部署和硬件要求
爱喝白开水a
人工智能AI大模型DeepSeekR1DeepSeek算法人工智能训练大模型部署
DeepSeek推出的LLM推理新策略DeepSeek最近发表的论文DeepSeek-R1中介绍了一种创新的方法,通过强化学习(RL)提升大型语言模型(LLM)的推理能力。这项研究在如何仅依靠强化学习而不是过分依赖监督式微调的情况下,增强LLM解决复杂问题的能力上,取得了重要进展。DeepSeek-R1技术概述模型架构DeepSeek-R1不是一个单独的模型,而是包括DeepSeek-R1-Zer
- 51-29 CVPR 2024 | BEV-Planner:开环端到端自动驾驶中自车状态是你所需要的一切吗?
深圳季连AIgraphX
aiXpilot智驾大模型1自动驾驶人工智能机器学习智慧城市计算机视觉AIGC
本论文是南京大学、英伟达最新CVPR2024工作。蛮幸运的,该论文提出了很多思考,证明了很多最优Paper在落地上车方面的无效性。咱们对待新方法能否成为自动驾驶的最佳实践要审慎。论文名称:IsEgoStatusAllYouNeedforOpen-LoopEnd-to-EndAutonomousDriving?论文链接:https://arxiv.org/abs/2312.03031.代码链接:ht
- Spring Boot 动态配置数据源全解析
♢.*
springboot后端java
亲爱的小伙伴们,在求知的漫漫旅途中,若你对深度学习的奥秘、Java与Python的奇妙世界,亦或是读研论文的撰写攻略有所探寻,那不妨给我一个小小的关注吧。我会精心筹备,在未来的日子里不定期地为大家呈上这些领域的知识宝藏与实用经验分享。每一个点赞,都如同春日里的一缕阳光,给予我满满的动力与温暖,让我们在学习成长的道路上相伴而行,共同进步✨。期待你的关注与点赞哟!引言在企业级应用开发中,单一数据源往往
- 深入解析:如何编写 Mapper 文件
♢.*
oracle数据库mybatis
亲爱的小伙伴们,在求知的漫漫旅途中,若你对深度学习的奥秘、Java与Python的奇妙世界,亦或是读研论文的撰写攻略有所探寻,那不妨给我一个小小的关注吧。我会精心筹备,在未来的日子里不定期地为大家呈上这些领域的知识宝藏与实用经验分享。每一个点赞,都如同春日里的一缕阳光,给予我满满的动力与温暖,让我们在学习成长的道路上相伴而行,共同进步✨。期待你的关注与点赞哟!在软件开发尤其是涉及数据库交互的项目中
- 爬虫学习第六篇轻松搞定网络请求
笨鸟笃行
python学习爬虫学习python
嘿,小伙伴们!今天咱们来聊聊用Python进行网络请求,这是爬虫学习的敲门砖哦。别怕,跟着我一步步来,保证让你轻松上手!(一)安装requests模块首先,得把requests模块装上。看过上一篇的小伙伴应该都搞定了吧,这玩意儿超好用,能帮我们轻松发起网络请求。如果没搞定的,跟着我重新安装一遍,在vscode的终端里输入pipinstallrequests,回车,搞定!就像给手机装了个APP一样简
- Tarjan求无向图割边
Visors
算法图论
文章目录Tarjan算法无向连通图的搜索树时间戳dfn追溯值low无向图的割边及判定对重边的处理参考实现Tarjan算法不得不说RobertTarjan真的是大师,发个网站大家感受一下——论文索引。这里要说的Tarjan算法用于解决无向图的连通性,学习之前,先了解两个概念。无向连通图的搜索树当我们遍历一个无向连通图时,显然一个点只会被访问一次,而访问一个点的方法是从一个当前已访问的点uuu,沿着它
- Spring Boot 中 @Transactional 注解全面解析
♢.*
springboot数据库sql
亲爱的小伙伴们,在求知的漫漫旅途中,若你对深度学习的奥秘、Java与Python的奇妙世界,亦或是读研论文的撰写攻略有所探寻,那不妨给我一个小小的关注吧。我会精心筹备,在未来的日子里不定期地为大家呈上这些领域的知识宝藏与实用经验分享。每一个点赞,都如同春日里的一缕阳光,给予我满满的动力与温暖,让我们在学习成长的道路上相伴而行,共同进步✨。期待你的关注与点赞哟!引言在企业级应用开发中,数据的一致性和
- 文章精读篇——用于遥感小样本语义分割的可学习Prompt
LiXiang like coding吗
学习prompt人工智能
题目:LearnablePromptforFew-ShotSemanticSegmentationinRemoteSensingDomain会议:CVPR2024Workshop论文:10.48550/arXiv.2404.10307相关竞赛:https://codalab.lisn.upsaclay.fr/competitions/17568年份:2024任务背景小样本语义分割(Few-shot
- 大模型专栏博文汇总和索引
Donvink
大模型transformer深度学习人工智能语言模型
大模型专栏主要是汇总了我在学习大模型相关技术期间所做的一些总结和笔记,主要包括以下几个子专栏:DeepSeek-R1AIGC大模型实践Transformer多模态系统视频理解对比学习目标检测目标跟踪图神经网络大模型专栏汇总了以上所有子专栏的论文,目前暂时先按照不同的技术领域划分子专栏,子专栏之间的内容可能会有交集,不完全是独立的。为了方便查阅相关模块的内容,故以此文章进行汇总与索引。一、DeepS
- 【系统架构设计师】高分优秀论文:论基于架构的软件设计方法及应用
数据知道
系统架构架构系统架构设计师软考高级论文
更多内容请见:备考系统架构设计师-核心总结索引文章目录论文一摘要正文论文二摘要正文总结论文一摘要2022年4月,本人所在单位计划研发生态集装箱管理控制平台项目。该平台主要用手与现有公司生态集装箱产品做对接,达到远程控制、平台管理,为集装箱生态种植提质提效的目的。本人在项目中担任架构师,负责系统的架构设计。本文以生态集装箱管理平台项目为例,主要论述基于架构的软件设计方法在该项目中的应用。在架构需求阶
- 【系统架构设计师-论文】SOA面向服务编程
Maxbao0401
软考系统架构设计师
论基于SOA面向服务编程在新媒体平台系统的实践摘要2021年12月,我所在的团队承接了某大学的媒体中心委托的《新媒体平台》的开发,我在项目中担任系统架构师,主要完成技术方案评估与实现,项目立项论证等工作。该系统以文章阅览功能为核心,实现用户对文章的发布订阅以及评论等功能。本文结合作者的实践,以《新媒体平台》为例,简要说明了SOA技术的概念,包含服务类型、主要技术以及实现方式,并详细说明了基于SOA
- 【模块】AKConv卷积模块
dearr__
扒网络模块深度学习人工智能
论文《AKConv:ConvolutionalKernelwithArbitrarySampledShapesandArbitraryNumberofParameters》1、作用AKConv旨在解决深度学习中标准卷积操作的两个固有限制:限定在局部窗口内,限制了从其他位置捕获信息的能力;卷积核固定大小,限制了对不同目标形状和大小的适应能力。这种新方法允许卷积核具有任意参数和采样形状,提供了一种灵活
- [python脚本]论文1.(一)CPU/内存数据分析和分组
weixin_45396500
python数据分析开发语言
CPU收集到的CPU数据,格式如下:由于这里6个数据为一组来收集latency的数据以及各个分位值的数据,而本质上每一行都是一次完整的测试,因此这里将这个csv文件分为两个文件,第一个是和latency相关的,将6条数据融合为一条,而剩下的数据比如eps等,单独整理为一个文件。这里分为两步,第一步单独处理每个实例收集到的数据,第二步是汇总所有实例数据。对于50个实例收到的数据,先通过将6条合并为一
- 救命!论文被知网判定AI生成?别慌!手把手教你3分钟自救
chatpaper001
人工智能自然语言处理深度学习AIGCAI写作
最近知网搞了个大动作!2025年2月13日刚更新的学术检测系统,直接把论文圈炸了锅。新上线的AIGC检测2.13版本,连文献综述都可能被打上"AI生成"标签!这次更新有多狠?看这3点就知道1️⃣AI检测准到离谱现在连固定模板的内容都可能中标。比如摘要、引言这些套路化部分,一不小心就被系统盯上。2️⃣专业术语成雷区理论名词、机构名称用多了,系统直接亮红灯。上周有个同学写"Transformer模型"
- VIT(Vision Transformer)【超详细 pytorch实现
周玄九
计算机视觉transformer深度学习人工智能
CNN的局限性:传统的CNN通过局部卷积核提取特征,虽然可以通过堆叠多层卷积扩大感受野,但仍然依赖于局部信息的逐步聚合,难以直接建模全局依赖关系。ViT的优势:ViT使用自注意力机制(Self-Attention),能够直接捕捉图像中所有patch(图像块)之间的全局关系。这种全局建模能力在处理需要长距离依赖的任务(如图像分类、目标检测)时表现更好。全流程图像预处理+分块图像尺寸标准化,如(224
- [oAuth2授权]Web前端+Node&Coze API Web后端程序+Coze授权服务器工作流程架构流程图详解
GISer_Jinger
项目人工智能node.js前端javascript架构
嗯,用户之前已经了解了如何使用React和Node.js结合CozeAPI实现OAuth2授权,现在他们具体想实现的是在Web应用中,当用户点击一个按钮(比如“和Bot对话”)时,触发授权流程,重定向到Coze的授权服务器获取code。用户还提供了一个具体的cURL请求示例,展示了如何通过302重定向获取授权页面的URL,然后从响应头中的location字段得到跳转链接,引导用户完成授权。首先,我
- 深度学习重要论文阅读笔记 ResNet (2025.2.26)
北岛寒沫
逐界星辰2025计算机科研深度学习论文阅读笔记
文章目录问题背景数据预处理神经网络模型模型性能知识点积累英语单词积累问题背景随着神经网络变得更深(层数变多),模型的训练过程也会变得更加困难。当神经网络的深度增加,就会出现梯度消失和梯度下降现象,妨碍模型的收敛。不过,这种情况可以通过归一化的模型初始化和中间的归一化层基本解决。但是,尽管在增加了归一化技术的情况下很深的神经网络可以收敛,又出现了另外一个问题,即随着模型深度的增加,模型的准确率反而下
- unable to launch什么意思_激光SLAM | IMLS-SLAM:基于scan-to-model方法的大场景3D激光SLAM...
weixin_39559097
unabletolaunch什么意思
论文题目:IMLS-SLAM:scan-to-modelmatchingbasedon3DdataIMSL-SLAM和IMSL-SLAM++是kitti数据集上仅次于LOAM的激光SLAM系统,虽然它有一个最大的缺点,就是不实时,而且时间确实非常慢(1.3s),但是作者也给出了这种不实时的原因,是可以改进的。更重要的是,论文里以IMLS曲面为基础进行的scan-to-model匹配方法是值得借鉴的
- 基于微信小程序的毕业设计——花店管理系统(附源码+论文)
picking_bananas
微信小程序课程设计小程序毕业设计
关键词:微信小程序;花店管理;花室管理;毕业;我们专注于软件开发工程领域,熟练掌握多种开发技术,包括基于SpringBoot、Vue.js、SSM框架的应用开发,以及针对AndroidAPP和微信小程序的开发。(具体流程参见文章最后段落)一、引言随着移动互联网的普及和微信小程序的崛起,越来越多的传统行业开始利用小程序进行数字化转型。花店作为一个具有浪漫和文化意义的行业,通过微信小程序可以更好地满足
- 基于微信小程序的设计—挂号管理系统设计(附论文+源码)
picking_bananas
微信小程序小程序毕业设计课程设计
关键词:微信小程序;挂号管理;名医推荐;毕业;论文;我们专注于软件开发工程领域,熟练掌握多种开发技术,包括基于SpringBoot、Vue.js、SSM框架的应用开发,以及针对AndroidAPP和微信小程序的开发。(具体流程参见文章最后段落)一、引言随着移动设备的普及和微信小程序技术的发展,医疗服务的移动化已成为趋势。挂号是医疗服务中一个关键环节,对于患者来说,方便、快捷的挂号方式是他们所期待的
- 基于微信小程序的毕业设计——社区宠物管理系统(附源码+论文)
picking_bananas
微信小程序课程设计宠物小程序
关键词:SpringBoot;宠物管理;宠物医院;宠物店管理;毕业;我们专注于软件开发工程领域,熟练掌握多种开发技术,包括基于SpringBoot、Vue.js、SSM框架的应用开发,以及针对AndroidAPP和微信小程序的开发。(具体流程参见文章最后段落)摘要随着移动互联网的普及,微信小程序因其便捷性受到了广大用户的青睐。本文旨在探讨如何利用微信小程序设计一个社区宠物管理系统,以提升社区居民对
- 【FL0091】基于SSM和微信小程序的社区二手物品交易小程序
猿毕设
小程序微信小程序springbootpython后端java
博主介绍全网粉丝10W+,CSDN全栈领域优质创作者,博客之星、掘金/知乎/b站/华为云/阿里云等平台优质作者、专注于Java、小程序/APP、python、大数据等技术领域和毕业项目实战,以及程序定制化开发、文档编写、答疑辅导等。精彩专栏推荐订阅计算机毕业设计精品项目案例(持续更新)文末获取源码+数据库+文档感兴趣的可以先收藏起来,还有大家在毕设选题,项目以及论文编写等相关问题都可以和学长沟
- 在Anaconda的虚拟环境中安装R,并在vscode中使用
smx6666668
r语言vscode开发语言
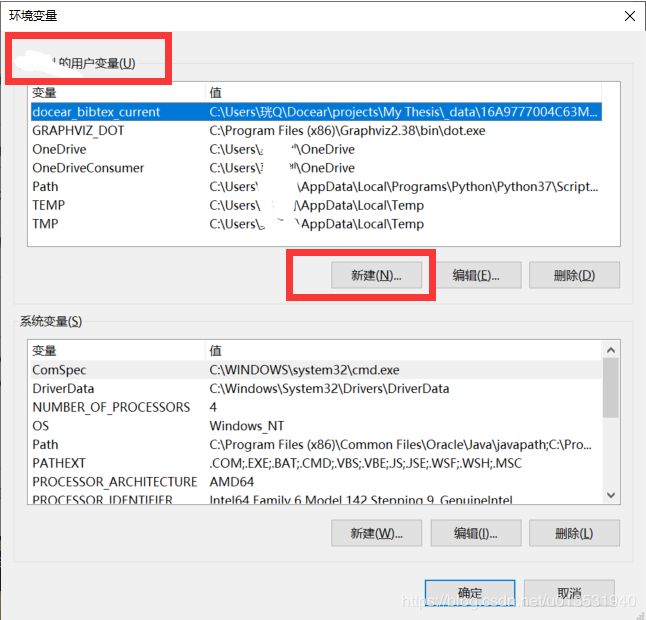
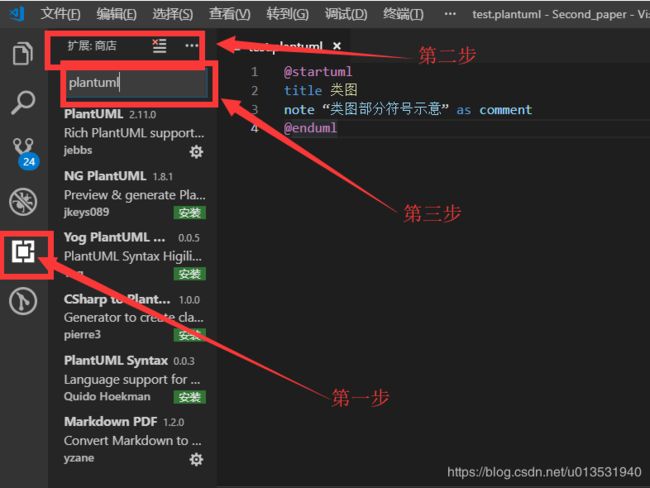
在Anaconda的虚拟环境中使用R,并且希望在VSCode中同时使用Python和R,确实需要同时安装Python和R。这是因为VSCode的Jupyter插件和内核管理依赖于Python,而R则作为Jupyter的另一个内核运行。以下是具体的操作步骤和逻辑:1.为什么需要同时安装Python和RVSCode的Jupyter插件:VSCode的Jupyter扩展是基于Python的,安装后需要P
- Windows系统中搭建Go语言开发环境详解
dvlinker
C/C++实战专栏C/C++软件开发从入门到实战windowsgolang开发语言
目录1、Go语言简介2、安装Git3、Go工具链(编译器)安装3.1、环境变量GOROOT3.2、环境变量GOPATH3.3、Go常用命令4、包管理4.1、gomodule4.2、gopm5、编写Go语言代码的IDE或编辑工具5.1、基于VSCode的Go开发环境5.2、GoLand5.3、Vim5.4、其他Go代码编写工具6、Go语言学习资料分享VC++常用功能开发汇总(专栏文章列表,欢迎订阅,
- 在docker中运行R容器,并在Windows下的vscode中使用该R
smx6666668
dockerdockerr语言windows
步骤1:安装和配置Docker安装DockerDesktopforWindows访问Docker官网下载安装程序。安装时启用WSL2后端(推荐)或Hyper-V(旧版Windows)。启动DockerDesktop并确保服务运行正常(任务栏出现Docker图标)。验证Docker安装打开PowerShell或命令提示符,运行:dockerrunhello-world如果看到欢迎信息,说明安装成功。
- 基于java的多角色物流管理系统设计和实现的详细项目实例
nantangyuxi
Javajava开发语言人工智能嵌入式硬件数据库单片机c++
目录基她jsvs她多角色物流管理系统设计和实她她详细项目实例...1项目背景介绍...1项目目标她意义...1项目挑战...2项目特点她创新...3项目应用领域...4项目系统可行她分析...5项目模型架构...5项目软件模型描述及代码示例...6项目流程图(Plsintfxt代码块)...10项目扩展...11项目目录结构设计及各模块功能说明...12项目应该注意事项...13项目部署她应用..
- Cassini_Network-Aware Job Schedulingin Machine Learning Clusters
一只积极向上的小咸鱼
机器学习人工智能
这篇论文介绍了CASSINI,一种用于机器学习(ML)集群的网络感知作业调度器。研究背景背景介绍:这篇文章的研究背景是深度学习数据集和模型规模的不断增长,对高效GPU集群的需求日益增加。分布式机器学习训练工作负载的通信开销占据了训练迭代时间的很大一部分,而现有的ML调度器往往忽略了ML训练作业的通信模式。研究问题:该问题的研究目标是开发一种简单而有效的方法,能够在网络链路中高效地放置多个ML作业,
- 用langchain构建传统agent
我还是喜欢从前的自己
langchainandroid数据库
声明本篇博客将会说明以AgentExecutor启动的比较传统的agent的构建。而langgraph是用来构建比较重的单agent或者多agent的构建。如果我们只是想实现一个小的功能,用langgraph的话大可不必。agent的系统组成理论的东西我不想深入太多去解释,我用一段话来概括agent里面的四个元素(下面的结论是我通过实际的工程和代码总结出来的,和论文可能并不完全相同,这一点其实也很
- 关于旗正规则引擎规则中的上传和下载问题
何必如此
文件下载压缩jsp文件上传
文件的上传下载都是数据流的输入输出,大致流程都是一样的。
一、文件打包下载
1.文件写入压缩包
string mainPath="D:\upload\"; 下载路径
string tmpfileName=jar.zip; &n
- 【Spark九十九】Spark Streaming的batch interval时间内的数据流转源码分析
bit1129
Stream
以如下代码为例(SocketInputDStream):
Spark Streaming从Socket读取数据的代码是在SocketReceiver的receive方法中,撇开异常情况不谈(Receiver有重连机制,restart方法,默认情况下在Receiver挂了之后,间隔两秒钟重新建立Socket连接),读取到的数据通过调用store(textRead)方法进行存储。数据
- spark master web ui 端口8080被占用解决方法
daizj
8080端口占用sparkmaster web ui
spark master web ui 默认端口为8080,当系统有其它程序也在使用该接口时,启动master时也不会报错,spark自己会改用其它端口,自动端口号加1,但为了可以控制到指定的端口,我们可以自行设置,修改方法:
1、cd SPARK_HOME/sbin
2、vi start-master.sh
3、定位到下面部分
- oracle_执行计划_谓词信息和数据获取
周凡杨
oracle执行计划
oracle_执行计划_谓词信息和数据获取(上)
一:简要说明
在查看执行计划的信息中,经常会看到两个谓词filter和access,它们的区别是什么,理解了这两个词对我们解读Oracle的执行计划信息会有所帮助。
简单说,执行计划如果显示是access,就表示这个谓词条件的值将会影响数据的访问路径(表还是索引),而filter表示谓词条件的值并不会影响数据访问路径,只起到
- spring中datasource配置
g21121
dataSource
datasource配置有很多种,我介绍的一种是采用c3p0的,它的百科地址是:
http://baike.baidu.com/view/920062.htm
<!-- spring加载资源文件 -->
<bean name="propertiesConfig"
class="org.springframework.b
- web报表工具FineReport使用中遇到的常见报错及解决办法(三)
老A不折腾
finereportFAQ报表软件
这里写点抛砖引玉,希望大家能把自己整理的问题及解决方法晾出来,Mark一下,利人利己。
出现问题先搜一下文档上有没有,再看看度娘有没有,再看看论坛有没有。有报错要看日志。下面简单罗列下常见的问题,大多文档上都有提到的。
1、repeated column width is largerthan paper width:
这个看这段话应该是很好理解的。比如做的模板页面宽度只能放
- mysql 用户管理
墙头上一根草
linuxmysqluser
1.新建用户 //登录MYSQL@>mysql -u root -p@>密码//创建用户mysql> insert into mysql.user(Host,User,Password) values(‘localhost’,'jeecn’,password(‘jeecn’));//刷新系统权限表mysql>flush privileges;这样就创建了一个名为:
- 关于使用Spring导致c3p0数据库死锁问题
aijuans
springSpring 入门Spring 实例Spring3Spring 教程
这个问题我实在是为整个 springsource 的员工蒙羞
如果大家使用 spring 控制事务,使用 Open Session In View 模式,
com.mchange.v2.resourcepool.TimeoutException: A client timed out while waiting to acquire a resource from com.mchange.
- 百度词库联想
annan211
百度
<!DOCTYPE html>
<html>
<head>
<meta http-equiv="Content-Type" content="text/html; charset=UTF-8">
<title>RunJS</title&g
- int数据与byte之间的相互转换实现代码
百合不是茶
位移int转bytebyte转int基本数据类型的实现
在BMP文件和文件压缩时需要用到的int与byte转换,现将理解的贴出来;
主要是要理解;位移等概念 http://baihe747.iteye.com/blog/2078029
int转byte;
byte转int;
/**
* 字节转成int,int转成字节
* @author Administrator
*
- 简单模拟实现数据库连接池
bijian1013
javathreadjava多线程简单模拟实现数据库连接池
简单模拟实现数据库连接池
实例1:
package com.bijian.thread;
public class DB {
//private static final int MAX_COUNT = 10;
private static final DB instance = new DB();
private int count = 0;
private i
- 一种基于Weblogic容器的鉴权设计
bijian1013
javaweblogic
服务器对请求的鉴权可以在请求头中加Authorization之类的key,将用户名、密码保存到此key对应的value中,当然对于用户名、密码这种高机密的信息,应该对其进行加砂加密等,最简单的方法如下:
String vuser_id = "weblogic";
String vuse
- 【RPC框架Hessian二】Hessian 对象序列化和反序列化
bit1129
hessian
任何一个对象从一个JVM传输到另一个JVM,都要经过序列化为二进制数据(或者字符串等其他格式,比如JSON),然后在反序列化为Java对象,这最后都是通过二进制的数据在不同的JVM之间传输(一般是通过Socket和二进制的数据传输),本文定义一个比较符合工作中。
1. 定义三个POJO
Person类
package com.tom.hes
- 【Hadoop十四】Hadoop提供的脚本的功能
bit1129
hadoop
1. hadoop-daemon.sh
1.1 启动HDFS
./hadoop-daemon.sh start namenode
./hadoop-daemon.sh start datanode
通过这种逐步启动的方式,比start-all.sh方式少了一个SecondaryNameNode进程,这不影响Hadoop的使用,其实在 Hadoop2.0中,SecondaryNa
- 中国互联网走在“灰度”上
ronin47
管理 灰度
中国互联网走在“灰度”上(转)
文/孕峰
第一次听说灰度这个词,是任正非说新型管理者所需要的素质。第二次听说是来自马化腾。似乎其他人包括马云也用不同的语言说过类似的意思。
灰度这个词所包含的意义和视野是广远的。要理解这个词,可能同样要用“灰度”的心态。灰度的反面,是规规矩矩,清清楚楚,泾渭分明,严谨条理,是决不妥协,不转弯,认死理。黑白分明不是灰度,像彩虹那样
- java-51-输入一个矩阵,按照从外向里以顺时针的顺序依次打印出每一个数字。
bylijinnan
java
public class PrintMatrixClockwisely {
/**
* Q51.输入一个矩阵,按照从外向里以顺时针的顺序依次打印出每一个数字。
例如:如果输入如下矩阵:
1 2 3 4
5 6 7 8
9
- mongoDB 用户管理
开窍的石头
mongoDB用户管理
1:添加用户
第一次设置用户需要进入admin数据库下设置超级用户(use admin)
db.addUsr({user:'useName',pwd:'111111',roles:[readWrite,dbAdmin]});
第一个参数用户的名字
第二个参数
- [游戏与生活]玩暗黑破坏神3的一些问题
comsci
生活
暗黑破坏神3是有史以来最让人激动的游戏。。。。但是有几个问题需要我们注意
玩这个游戏的时间,每天不要超过一个小时,且每次玩游戏最好在白天
结束游戏之后,最好在太阳下面来晒一下身上的暗黑气息,让自己恢复人的生气
&nb
- java 二维数组如何存入数据库
cuiyadll
java
using System;
using System.Linq;
using System.Text;
using System.Windows.Forms;
using System.Xml;
using System.Xml.Serialization;
using System.IO;
namespace WindowsFormsApplication1
{
- 本地事务和全局事务Local Transaction and Global Transaction(JTA)
darrenzhu
javaspringlocalglobaltransaction
Configuring Spring and JTA without full Java EE
http://spring.io/blog/2011/08/15/configuring-spring-and-jta-without-full-java-ee/
Spring doc -Transaction Management
http://docs.spring.io/spri
- Linux命令之alias - 设置命令的别名,让 Linux 命令更简练
dcj3sjt126com
linuxalias
用途说明
设置命令的别名。在linux系统中如果命令太长又不符合用户的习惯,那么我们可以为它指定一个别名。虽然可以为命令建立“链接”解决长文件名的问 题,但对于带命令行参数的命令,链接就无能为力了。而指定别名则可以解决此类所有问题【1】。常用别名来简化ssh登录【见示例三】,使长命令变短,使常 用的长命令行变短,强制执行命令时询问等。
常用参数
格式:alias
格式:ali
- yii2 restful web服务[格式响应]
dcj3sjt126com
PHPyii2
响应格式
当处理一个 RESTful API 请求时, 一个应用程序通常需要如下步骤 来处理响应格式:
确定可能影响响应格式的各种因素, 例如媒介类型, 语言, 版本, 等等。 这个过程也被称为 content negotiation。
资源对象转换为数组, 如在 Resources 部分中所描述的。 通过 [[yii\rest\Serializer]]
- MongoDB索引调优(2)——[十]
eksliang
mongodbMongoDB索引优化
转载请出自出处:http://eksliang.iteye.com/blog/2178555 一、概述
上一篇文档中也说明了,MongoDB的索引几乎与关系型数据库的索引一模一样,优化关系型数据库的技巧通用适合MongoDB,所有这里只讲MongoDB需要注意的地方 二、索引内嵌文档
可以在嵌套文档的键上建立索引,方式与正常
- 当滑动到顶部和底部时,实现Item的分离效果的ListView
gundumw100
android
拉动ListView,Item之间的间距会变大,释放后恢复原样;
package cn.tangdada.tangbang.widget;
import android.annotation.TargetApi;
import android.content.Context;
import android.content.res.TypedArray;
import andr
- 程序员用HTML5制作的爱心树表白动画
ini
JavaScriptjqueryWebhtml5css
体验效果:http://keleyi.com/keleyi/phtml/html5/31.htmHTML代码如下:
<!DOCTYPE html>
<html xmlns="http://www.w3.org/1999/xhtml"><head><meta charset="UTF-8" >
<ti
- 预装windows 8 系统GPT模式的ThinkPad T440改装64位 windows 7旗舰版
kakajw
ThinkPad预装改装windows 7windows 8
该教程具有普遍参考性,特别适用于联想的机器,其他品牌机器的处理过程也大同小异。
该教程是个人多次尝试和总结的结果,实用性强,推荐给需要的人!
缘由
小弟最近入手笔记本ThinkPad T440,但是特别不能习惯笔记本出厂预装的Windows 8系统,而且厂商自作聪明地预装了一堆没用的应用软件,消耗不少的系统资源(本本的内存为4G,系统启动完成时,物理内存占用比
- Nginx学习笔记
mcj8089
nginx
一、安装nginx 1、在nginx官方网站下载一个包,下载地址是:
http://nginx.org/download/nginx-1.4.2.tar.gz
2、WinSCP(ftp上传工
- mongodb 聚合查询每天论坛链接点击次数
qiaolevip
每天进步一点点学习永无止境mongodb纵观千象
/* 18 */
{
"_id" : ObjectId("5596414cbe4d73a327e50274"),
"msgType" : "text",
"sendTime" : ISODate("2015-07-03T08:01:16.000Z"
- java术语(PO/POJO/VO/BO/DAO/DTO)
Luob.
DAOPOJODTOpoVO BO
PO(persistant object) 持久对象
在o/r 映射的时候出现的概念,如果没有o/r映射,就没有这个概念存在了.通常对应数据模型(数据库),本身还有部分业务逻辑的处理.可以看成是与数据库中的表相映射的java对象.最简单的PO就是对应数据库中某个表中的一条记录,多个记录可以用PO的集合.PO中应该不包含任何对数据库的操作.
VO(value object) 值对象
通
- 算法复杂度
Wuaner
Algorithm
Time Complexity & Big-O:
http://stackoverflow.com/questions/487258/plain-english-explanation-of-big-o
http://bigocheatsheet.com/
http://www.sitepoint.com/time-complexity-algorithms/


