用Retinaface_pytorch项目检测人脸+ Python 3 剪切人脸图片并保存
概述
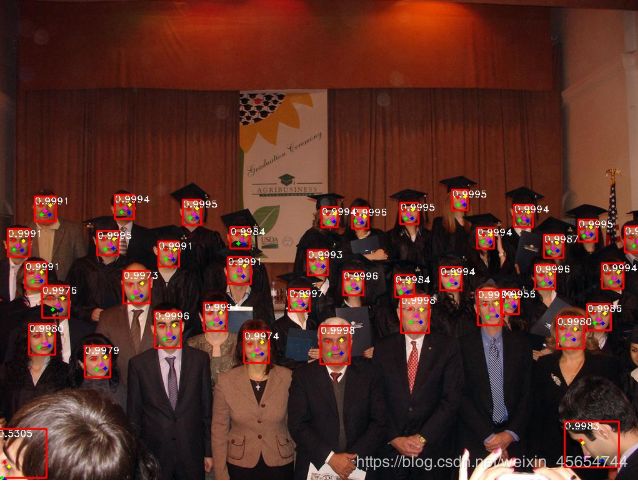
因为我的项目中缺一不可的一部分是提取人脸特征,因为以前并没有接触过人脸的项目,所以想把自己每次的一点点进步和学习都记录下来,这次是记录我学习切割人脸图片并保存,以及将人脸检测框和五个特征点坐标信息保存在.txt文件中。
这篇文档的方法一要稍微复杂一点点,我结合Retinaface_pytorch项目中的detect.py(检测单张图片)来检测人脸,并通过以下方法一成功的剪切出人脸,并保存特征点信息。方法二要更简单一些,相当于我用一行代码代替了方法二中的多行代码,并实现了批量检测并切割人脸图片并保存。
- 首先附上Retinaface_pytorch项目的GitHub链接:
https://github.com/biubug6/Pytorch_Retinaface
一. 复现Retinaface_pytorch
根据Retina_pytorch项目在GitHub上给出的教程来复现Retinaface_pytorch项目的预训练模型。跑通项目中的detect.py,改变程序中的图片路径你可以试一下检测自己的单张照片。确保detect.py可以正常检测人脸。
二.剪切人脸图(方法一)
1. 方法简述
参考:Python 3 利用 Dlib 实现人脸检测和剪切
这一篇博客介绍了利用 Python 开发,借助 Dlib 库进行人脸检测 / face detection 和剪切。里面既讲了将检测到的人脸剪切下来,依次排序平铺显示在新的图像上,也讲了将检测到的人脸存储为单个人脸图像,讲的很清晰明了。主要的大概思路就是根据检测到的人脸框坐标,计算人脸框的大小,根据这个人脸框大小生成空白的图片,接着再将人脸的图的像素点依次填充在空白图上,完成人脸的剪切。
- Retinaface_pytorch的detect.py检测单张图片中的人脸+剪切单个人脸图
#调用相关模块和包
from __future__ import print_function
import os
import argparse
import torch
import torch.backends.cudnn as cudnn
import numpy as np
from data import cfg_mnet, cfg_re50
from layers.functions.prior_box import PriorBox
from utils.nms.py_cpu_nms import py_cpu_nms
import cv2
from models.retinaface import RetinaFace
from utils.box_utils import decode, decode_landm
import time

parser = argparse.ArgumentParser(description='Retinaface')
#设置供选择的参数(基本上保持Retinaface_pytorch中detect.py的代码不变添加或改动了几个参数使得该项目默认在CPU上运行)
parser.add_argument('-m', '--trained_model', default='./weights/Resnet50_Final.pth',
                    type=str, help='Trained state_dict file path to open')
parser.add_argument('--network', default='resnet50', help='Backbone network mobile0.25 or resnet50')
parser.add_argument('--cpu', action="store_true", default=True, help='Use cpu inference')
parser.add_argument('--confidence_threshold', default=0.02, type=float, help='confidence_threshold')
parser.add_argument('--top_k', default=5000, type=int, help='top_k')
parser.add_argument('--nms_threshold', default=0.4, type=float, help='nms_threshold')
parser.add_argument('--keep_top_k', default=750, type=int, help='keep_top_k')
parser.add_argument('-s', '--show_image', action="store_true", default=False, help='show detection results')
parser.add_argument('--vis_thres', default=0.6, type=float, help='visualization_threshold')
parser.add_argument('--show_cutting_image', action ="store_true", default =True, help = 'show_crop_images')
parser.add_argument('--save_folder', default='curve/', type=str, help='Dir to save results')
args = parser.parse_args()

#保持源代码不变
def check_keys(model, pretrained_state_dict):
    ckpt_keys = set(pretrained_state_dict.keys())
    model_keys = set(model.state_dict().keys())
    used_pretrained_keys = model_keys & ckpt_keys
    unused_pretrained_keys = ckpt_keys - model_keys
    missing_keys = model_keys - ckpt_keys
    print('Missing keys:{}'.format(len(missing_keys)))
    print('Unused checkpoint keys:{}'.format(len(unused_pretrained_keys)))
    print('Used keys:{}'.format(len(used_pretrained_keys)))
    assert len(used_pretrained_keys) > 0, 'load NONE from pretrained checkpoint'
    return True

#保持源代码不变
def remove_prefix(state_dict, prefix):
    ''' Old style model is stored with all names of parameters sharing common prefix 'module.' '''
    print('remove prefix \'{}\''.format(prefix))
    f = lambda x: x.split(prefix, 1)[-1] if x.startswith(prefix) else x
    return {f(key): value for key, value in state_dict.items()}

#保持源代码不变
def load_model(model, pretrained_path, load_to_cpu):
    print('Loading pretrained model from {}'.format(pretrained_path))
    if load_to_cpu:
        pretrained_dict = torch.load(pretrained_path, map_location=lambda storage, loc: storage)
    else:
        device = torch.cuda.current_device()
        pretrained_dict = torch.load(pretrained_path, map_location=lambda storage, loc: storage.cuda(device))
    if "state_dict" in pretrained_dict.keys():
        pretrained_dict = remove_prefix(pretrained_dict['state_dict'], 'module.')
    else:
        pretrained_dict = remove_prefix(pretrained_dict, 'module.')
    check_keys(model, pretrained_dict)
    model.load_state_dict(pretrained_dict, strict=False)
    return model

#保持源代码不变
if __name__ == '__main__':
    torch.set_grad_enabled(False)
    cfg = None
    if args.network == "mobile0.25":
        cfg = cfg_mnet
    elif args.network == "resnet50":
        cfg = cfg_re50
    # net and model
    net = RetinaFace(cfg=cfg, phase = 'test')
    net = load_model(net, args.trained_model, args.cpu)
    net.eval()
    print('Finished loading model!')
    print(net)
    cudnn.benchmark = True #提高运行效率
    device = torch.device("cpu" if args.cpu else "cuda")
    net = net.to(device)

    resize = 1

    # testing begin
    for i in range(100):
        image_path = "./curve/test.jpg" #将这里的图片路径换成你自己的图片路径
        img_raw = cv2.imread(image_path, cv2.IMREAD_COLOR) #读取彩色图片
        img = np.float32(img_raw)

        im_height, im_width, _ = img.shape
        scale = torch.Tensor([img.shape[1], img.shape[0], img.shape[1], img.shape[0]])
        img -= (104, 117, 123)
        img = img.transpose(2, 0, 1)  #对图片进行转置处理
        img = torch.from_numpy(img).unsqueeze(0)
        img = img.to(device)
        scale = scale.to(device)

        tic = time.time() #计时
        loc, conf, landms = net(img)  # forward pass
        print('net forward time: {:.4f}'.format(time.time() - tic))

        priorbox = PriorBox(cfg, image_size=(im_height, im_width))
        priors = priorbox.forward()
        priors = priors.to(device)
        prior_data = priors.data
        boxes = decode(loc.data.squeeze(0), prior_data, cfg['variance'])
        boxes = boxes * scale / resize
        boxes = boxes.cpu().numpy()
        scores = conf.squeeze(0).data.cpu().numpy()[:, 1]
        landms = decode_landm(landms.data.squeeze(0), prior_data, cfg['variance'])
        scale1 = torch.Tensor([img.shape[3], img.shape[2], img.shape[3], img.shape[2],
                               img.shape[3], img.shape[2], img.shape[3], img.shape[2],
                               img.shape[3], img.shape[2]])
        scale1 = scale1.to(device)
        landms = landms * scale1 / resize
        landms = landms.cpu().numpy()

        # ignore low scores
        inds = np.where(scores > args.confidence_threshold)[0]
        boxes = boxes[inds]
        landms = landms[inds]
        scores = scores[inds]

        # keep top-K before NMS
        order = scores.argsort()[::-1][:args.top_k]
        boxes = boxes[order]
        landms = landms[order]
        scores = scores[order]

        # do NMS
        dets = np.hstack((boxes, scores[:, np.newaxis])).astype(np.float32, copy=False)
        keep = py_cpu_nms(dets, args.nms_threshold)
        # keep = nms(dets, args.nms_threshold,force_cpu=args.cpu)
        dets = dets[keep, :]
        landms = landms[keep]

        # keep top-K faster NMS
        dets = dets[:args.keep_top_k, :]
        landms = landms[:args.keep_top_k, :]


        dets = np.concatenate((dets, landms), axis=1)
------------------------------------------------------------
        #到这里为止我们已经利用Retinaface_pytorch的预训练模型检测完了人脸,并获得了人脸框和人脸五个特征点的坐标信息,全保存在dets中,接下来为人脸剪切部分
        # 用来储存生成的单张人脸的路径
        path_save = "./curve/faces/" #你可以将这里的路径换成你自己的路径

        #剪切图片
        if args.show_cutting_image:
            for num, b in enumerate(dets): # dets中包含了人脸框和五个特征点的坐标
                if b[4] < args.vis_thres:
                    continue
                b = list(map(int, b))

                # landms,在人脸上画出特征点,要是你想保存不显示特征点的人脸图,你可以把这里注释掉
                cv2.circle(img_raw, (b[5], b[6]), 1, (0, 0, 255), 4)
                cv2.circle(img_raw, (b[7], b[8]), 1, (0, 255, 255), 4)
                cv2.circle(img_raw, (b[9], b[10]), 1, (255, 0, 255), 4)
                cv2.circle(img_raw, (b[11], b[12]), 1, (0, 255, 0), 4)
                cv2.circle(img_raw, (b[13], b[14]), 1, (255, 0, 0), 4)

                #计算人脸框矩形大小
                Height = b[3] - b[1]
                Width = b[2] - b[0]

                # 显示人脸矩阵大小
                print("人脸数 / faces in all:", str(num+1), "\n")
                print("窗口大小 / The size of window:"
                      , '\n', "高度 / height:", Height
                      , '\n', "宽度 / width: ", Width)

                #根据人脸框大小,生成空白的图片
                img_blank = np.zeros((Height, Width, 3), np.uint8)
                # 将人脸填充到空白图片
                for h in range(Height):
                    for w in range(Width):
                        img_blank[h][w] = img_raw[b[1] + h][b[0] + w]

                cv2.namedWindow("img_faces")  # , 2)
                cv2.imshow("img_faces", img_blank)  #显示图片
                cv2.imwrite(path_save + "img_face_4" + str(num + 1) + ".jpg", img_blank)  #将图片保存至你指定的文件夹
                print("Save into:", path_save + "img_face_4" + str(num + 1) + ".jpg")
                cv2.waitKey(0)

#保存人脸框,特征点的坐标信息到txt中
        if not os.path.exists(args.save_folder):
            os.makedirs(args.save_folder)
        fw = open(os.path.join(args.save_folder, '__dets.txt'), 'w')  #在指定的文件夹中生成并打开一个名为__dets的txt文件
        if args.save_folder:
            fw.write('{:s}\n'.format(img_name)) #在txt中写入图片名字
            for k in range(dets.shape[0]): #遍历dets中的坐标信息,dets中的信息包括(人脸框的左上角x,y坐标,人脸框右下角x,y坐标,人脸检测精度scores,五个特征点的x,y坐标,共15个信息)
                xmin = dets[k, 0]
                ymin = dets[k, 1]
                xmax = dets[k, 2]
                ymax = dets[k, 3]
                score = dets[k, 4]
                w = xmax - xmin + 1
                h = ymax - ymin + 1
                landms1_x = dets[k, 5]
                landms1_y = dets[k, 6]
                landms2_x = dets[k, 7]
                landms2_y = dets[k, 8]
                landms3_x = dets[k, 9]
                landms3_y = dets[k, 10]
                landms4_x = dets[k, 11]
                landms4_y = dets[k, 12]
                landms5_x = dets[k, 13]
                landms5_y = dets[k, 14]
                #将人脸框,人脸检测精度,五个特征点的坐标信息写入到txt文件中
                fw.write('{:d} {:d} {:d} {:d} {:.10f} {:d} {:d} {:d} {:d} {:d} {:d} {:d} {:d} {:d} {:d}\n'.format(int(xmin), int(ymin), int(w), int(h), score, int(landms1_x),int(landms1_y),
                                                                                                                  int(landms2_x), int(landms2_y), int(landms3_x), int(landms3_y), int(landms4_x),
                                                                                                                  int(landms4_y), int(landms5_x), int(landms5_y)))
        #写入完毕,关闭txt文件
        fw.close()
通过结合Retinaface_pytorch的detect.py代码和**参考:Python 3 利用 Dlib 实现人脸检测和剪切的代码,我完成了在单张图片中检测人脸的任务。但是我的初衷是想完成批量检测人脸,切割人脸图片并保存,在我想继续将参考:Python 3 利用 Dlib 实现人脸检测和剪切**的剪切人脸的代码和Retina_pytorch的test_fddb.py的代码相结合来批量检测人脸时,总是会报错IndexError: index 368 is out of bounds for axis 0 with size 368,找了好久也找不到解决办法,所以干脆听坤神的换了一种剪切人脸图的简单方法,一行代码就搞定了。如下方法二所示。
三、剪切人脸(方法二)—批量剪切单个人脸图并保存
将上面代码中剪切人脸的这一部分
               #计算人脸框矩形大小
                Height = b[3] - b[1]
                Width = b[2] - b[0]

                # 显示人脸矩阵大小
                print("人脸数 / faces in all:", str(num+1), "\n")
                print("窗口大小 / The size of window:"
                      , '\n', "高度 / height:", Height
                      , '\n', "宽度 / width: ", Width)

                #根据人脸框大小,生成空白的图片
                img_blank = np.zeros((Height, Width, 3), np.uint8)
                # 将人脸填充到空白图片
                for h in range(Height):
                    for w in range(Width):
                        img_blank[h][w] = img_raw[b[1] + h][b[0] + w]
全部用下面这一句代码来代替
img_blank = img_raw[int(b[1]):int(b[3]), int(b[0]):int(b[2])] # height, width
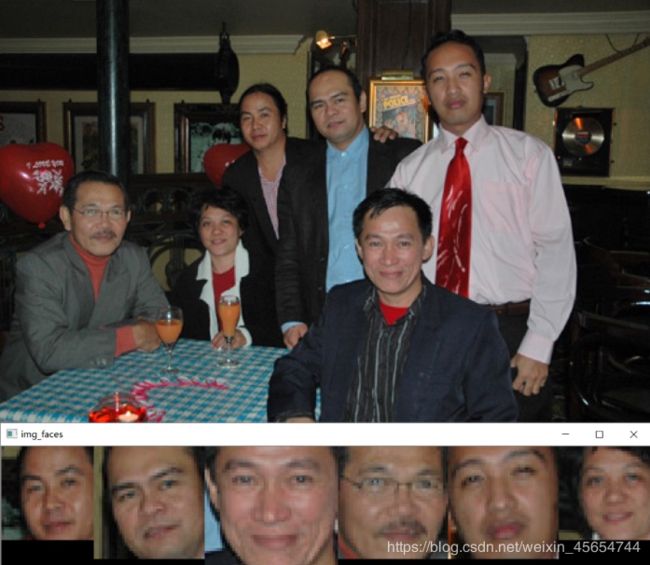
然后你再将人脸剪切部分的代码放在Retinaface_pytorch的test_fddb.py代码的后面,你就可以开始尝试检测批量剪切人脸的效果了,即一次性把一个数据集中的所有图片的人脸都检测,切割,并将每个人脸保存为单张图片,效果如图所示。
本人是初学人脸的小白,只是想利用博客来记录并总结自己的学习进度,如果能帮到同样刚开始学人脸的小白,我会很开心。若有更好的方法,或不太准确的地方,欢迎大家一起讨论指正。


