CentOS 7服务器安全配置(未完待续)
1.问题背景
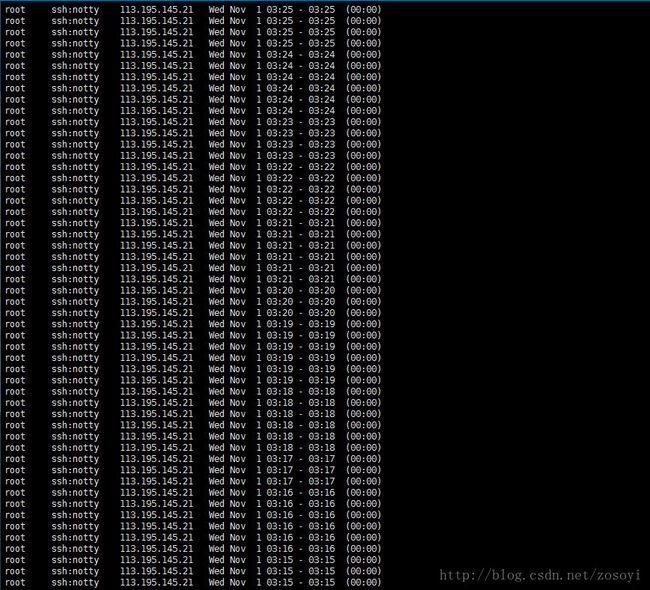
本打算买一个Linux服务器玩玩,系统为CentOS 7,供学习Linux和线上部署网站学习用。没想到买了没几天,啥都没做呢,登录之后发现了近2万条登录失败记录(输入lastb命令即可查看登入系统失败的用户相关信息)。什么?有人想通过暴力破解密码来登录我的服务器?!并且大量的攻击来自同一个ip地址。作为一个Linux小白,差点被吓尿了,网络真危险啊。
不过虽然是小白,也不甘示弱,有攻击就要有防御,现状开始逼迫我去学习关于Linux服务器安全防护的知识,要守住自己在网上的一块领地。
2.安装Fail2ban
在Q群上和小伙伴讨论过程中,发现了fail2ban这个利器。fail2ban能阻止暴力破解,如果fail2ban发现一个ip在暴力攻击,攻击次数达到一定次数时,就会禁止改ip连接服务器,以达到阻止暴力破解密码的目的。之前看登录失败日志,一个ip攻击了我上万次,现在有了fail2ban,它可做不了了,赶紧开始我们的安装。
安装fail2ban
输入以下两条命令即可安装
yum install epel-release
yum install fail2ban
说明:
- yum install epel-release:安装EPEL仓库(Extra Packages for Enterprise Linux)
- yum install fail2ban:从EPEL仓库安装fail2ban
fail2ban配置文件
打开配置文件
nano /etc/fail2ban/jail.conf
开头会见到如下说明
#
# WARNING: heavily refactored in 0.9.0 release.  Please review and
#          customize settings for your setup.
#
# Changes:  in most of the cases you should not modify this
#           file, but provide customizations in jail.local file,
#           or separate .conf files under jail.d/ directory, e.g.:
#
# HOW TO ACTIVATE JAILS:
#
# YOU SHOULD NOT MODIFY THIS FILE.
#
# It will probably be overwritten or improved in a distribution update.
#
# Provide customizations in a jail.local file or a jail.d/customisation.local.
# For example to change the default bantime for all jails and to enable the
# ssh-iptables jail the following (uncommented) would appear in the .local file.
# See man 5 jail.conf for details.
#
# [DEFAULT]
# bantime = 3600
#
# [sshd]
# enabled = true
#
# See jail.conf(5) man page for more information
大意是不要修改这个配置文件,而应该新建一个jail.conf来写用户配置。
先查看配置文件内默认的配置(仅列出前面5项):
[DEFAULT]
#
# MISCELLANEOUS OPTIONS
#
# "ignoreip" can be an IP address, a CIDR mask or a DNS host. Fail2ban will not
# ban a host which matches an address in this list. Several addresses can be
# defined using space (and/or comma) separator.
ignoreip = 127.0.0.1/8
# External command that will take an tagged arguments to ignore, e.g. ,
# and return true if the IP is to be ignored. False otherwise.
#
# ignorecommand = /path/to/command ignoreip不会被ban的ipbantime每秒内访问的最大次数,超过就被banmaxretry最大失败次数
这里只是简单举例,其他一些配置不多做赘述,有需要的可以自己去看英文注释。
于是新建/打开一个jail.conf,写入用户自己的配置
nano /etc/fail2ban/jail.local
把下列代码拷进去
[ssh-iptables]

enabled  = true
filter   = sshd
action   = iptables[name=SSH, port=ssh, protocol=tcp]
#           sendmail-whois[name=SSH, dest=root, [email protected]]
logpath  = /var/log/secure
maxretry = 5
说明:
- enabled: 激活fail2ban。
- filter: 是sshd默认参考这个文件/etc/fail2ban/filter.d/sshd.conf。
- action: 符合/etc/fail2ban/action.d/iptables.conf这个文件的ip将会被fail2ban给ban掉. 如果你之前改过ssh端口,把 port=ssh改成新端口, 比如 port=2222. 如果还在用22,就不用改这里。
- logpath: Fail2Ban的日志文件路径.
- maxretry: 最大尝试登陆失败次数.
启动fail2ban服务
运行这两个命令即可启动
chkconfig --level 23 fail2ban on
service fail2ban start
查看一下iptables是否添加了fail2ban的规则
iptables -L
会看到如下字样f2b-SSH
Chain INPUT (policy ACCEPT)
target prot opt source destination
f2b-SSH tcp -- anywhere anywhere tcp dpt:EtherNet/IP-1

Chain FORWARD (policy ACCEPT)
target prot opt source destination

Chain OUTPUT (policy ACCEPT)
target prot opt source destination

Chain f2b-SSH (1 references)
target prot opt source destination
RETURN all -- anywhere anywhere
查看登录失败日志
输入这条命令
cat /var/log/secure | grep 'Failed password'
会看到类似这样的结果
Dec  6 22:47:12 vultr sshd[7942]: Failed password for root from 43.229.53.67 port 23021 ssh2
Dec  6 22:47:15 vultr sshd[7944]: Failed password for root from 43.229.53.67 port 40996 ssh2
Dec  6 22:47:16 vultr sshd[7944]: Failed password for root from 43.229.53.67 port 40996 ssh2
Dec  6 22:47:18 vultr sshd[7944]: Failed password for root from 43.229.53.67 port 40996 ssh2
Dec  6 22:47:31 vultr sshd[7948]: Failed password for root from 43.229.53.67 port 29907 ssh2
Dec  6 22:47:34 vultr sshd[7948]: Failed password for root from 43.229.53.67 port 29907 ssh2
Dec  6 22:47:36 vultr sshd[7948]: Failed password for root from 43.229.53.67 port 29907 ssh2
Dec  6 22:47:39 vultr sshd[7950]: Failed password for root from 43.229.53.67 port 48386 ssh2
Dec  6 22:47:41 vultr sshd[7950]: Failed password for root from 43.229.53.67 port 48386 ssh2
Dec  6 22:47:43 vultr sshd[7950]: Failed password for root from 43.229.53.67 port 48386 ssh2
Dec  6 22:47:47 vultr sshd[7952]: Failed password for root from 43.229.53.67 port 62846 ssh2
Dec  6 22:47:49 vultr sshd[7952]: Failed password for root from 43.229.53.67 port 62846 ssh2
3.修改22端口并启用
先在sshd_config里面添加新端口
查看sshd_confifg
/etc/ssh/sshd_config可以看到如下片段:
# If you want to change the port on a SELinux system, you have to tell
# SELinux about this change.
# semanage port -a -t ssh_port_t -p tcp #PORTNUMBER
Port 22

#AddressFamily any
#ListenAddress 0.0.0.0
#ListenAddress ::
添加一个新端口,如22222,在Port 22下面添加一行Port 22222,Port 22先不要注释掉,以防新端口登录不上。
再在防火墙里添加新端口
查看防火墙运行状态
systemctl status firewalld.service查看所有打开的端口
firewall-cmd --zone=public --list-ports添加端口
firewall-cmd --zone=public --add-port=22222/tcp --permanent重启防火墙
firewall-cmd --reload查看新端口
firewall-cmd --zone=public --query-port=22222/tcp然后打开一个新窗口,尝试用新端口登录一下。
删除端口
firewall-cmd --zone= public --remove-port=22222/tcp --permanent