elasticsearch的索引操作
1、创建索引(test_index)
curl -XPUT "http://192.168.99.1:9200/test_index"2、创建索引,指定分片和副本的数量
curl -XPUT "http://192.168.99.1:9200/test_index" -d'
{
  "settings": {
    "number_of_shards": 2,
    "number_of_replicas": 1
  }
}'
3、创建索引(test_index)、创建类型(product)、指定mapping的数据
curl -XPUT "http://192.168.99.1:9200/test_index" -d'
{
  "mappings": {
    "product" : {
      "properties": {
        "id" : {
          "type": "text",
          "index": "not_analyzed"
        },
        "userName" : {
          "type": "text",
          "index": "analyzed"
        }
      }
    }
  }
}'
4、已经存在的类型的mapping中的字段的值不可修改,但是可以新增
curl -XPOST "http://192.168.99.1:9200/test_index/_mapping/product" -d'
{
      "properties": {
        "price" : {
          "type": "long"
        }
      }
}'
5、在已经存在的索引下新增加一个类型
curl -XPOST "http://192.168.99.1:9200/test_index/_mapping/add_new_type" -d'
{
  "properties": {
    "field01" : {
      "type": "text"
    }
  }
}'
6、关闭索引
curl -XPOST "http://192.168.99.1:9200/test_index/_close"7、打开索引
curl -XPOST "http://192.168.99.1:9200/test_index/_open"8、获取索引下的信息
curl -XGET "http://192.168.99.1:9200/test_index"9、查看索引的统计信息
curl -XGET "http://192.168.99.1:9200/test_index/_stats"10、获取索引的mappings
curl -XGET "http://192.168.99.1:9200/test_index/_mappings"11、删除索引
curl -XDELETE "http://192.168.99.1:9200/test_index"12、取消es的自动创建索引,修改es的配置文件
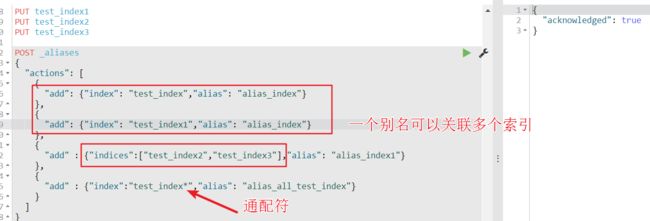
action.auto_create_index: false 13、创建索引的别名 (_alias用于单个操作,而_aliases则是用于多个操作,保持原子性)
方式一:
curl -XPUT "http://192.168.99.1:9200/test_index/_alias/alias_new_index"14、修改索引别名(先删除后增加)
curl -XPOST "http://192.168.99.1:9200/_aliases" -d'
{
  "actions": [
    {
      "remove": {
        "index": "test_index","alias": "alias_index"
      }
    },
    {
      "add": {
        "index": "test_index","alias": "alias_new_index"
      }
    }
  ]
}'
15、删除索引别名
方式一:
curl -XPOST "http://192.168.99.1:9200/_aliases" -d'
{
  "actions": [
    {
      "remove": {
        "index": "test_index","alias": "alias_new_index"
      }
    }
  ]
}'
方式二:(删除索引以test开始并且别名是alias_new_index的这个别名)
curl -XDELETE "http://192.168.99.1:9200/test*/_aliases/alias_new_index"16、查询test_index索引下所有的别名
curl -XGET "http://192.168.99.1:9200/test_index/_alias/*"17、查询别名alias_new_index关联了那些索引
curl -XGET "http://192.168.99.1:9200/_alias/alias_new_index"