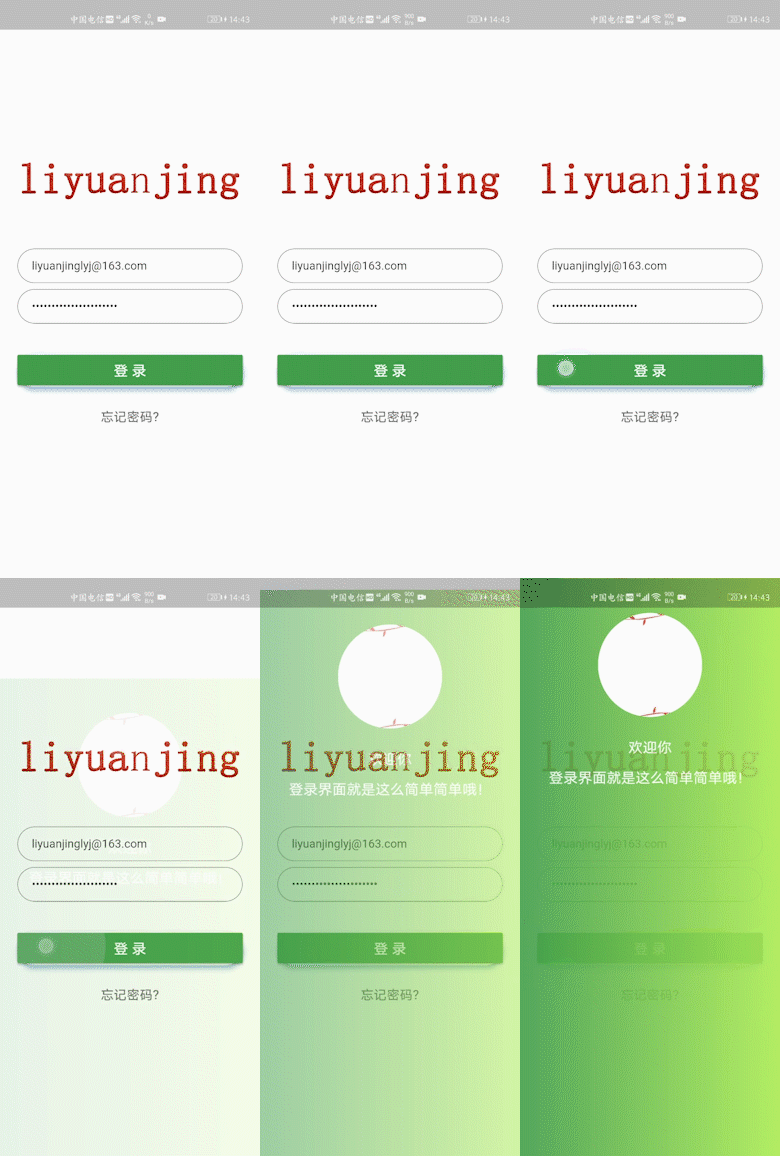
Flutter(十)——登录界面实现
本文目录
- 登录界面设计
- login_page.dart登录页面代码
- home_page.dart主页面代码
- mian.dart程序入口代码
- 3个注意事项
登录界面设计
在手机App的开发过程中,基本App都会有登录界面,所以我们今天将使用Flutter来实现登录界面的效果。
首先,我们需要掌握登录界面有那些元素,比如用户名,密码提示以及输入框,其次可能还有上面的logo,下面的登录按钮,以及忘记密码等显示。
前面博主讲解组件的时候,已经讲过,在Flutter开发中,一切皆组件,也就是说,你可以把界面直接赋值给一个变量,比如前面的操作,那么多return代码,可以直接复制给一个变量,这样方便插入操作,那么多嵌套的写着,要是弄丢一个括号,估计找就得找死,所以赋值变量,然后放置在return中,代码看起来就会简洁很多。
login_page.dart登录页面代码
这里我们先写登录页面,login_page.dart代码如下:
import 'package:flutter/material.dart';
import 'home_page.dart';
//登录界面
class LoginPage extends StatefulWidget {

  static String tag = 'login-page';

  @override
  _LoginPageState createState() => new _LoginPageState();
}

class _LoginPageState extends State<LoginPage> {
  @override
  Widget build(BuildContext context) {
    final logo = Hero(//飞行动画
      tag: 'hero',
      child: CircleAvatar(//圆形图片组件
        backgroundColor: Colors.transparent,//透明
        radius: 48.0,//半径
        child: Image.asset("assets/logo.png"),//图片
      ),
    );

    final email = TextFormField(//用户名
      keyboardType: TextInputType.emailAddress,
      autofocus: false,//是否自动对焦
      initialValue: '[email protected]',//默认输入的类容
      decoration: InputDecoration(
          hintText: '请输入用户名',//提示内容
          contentPadding: EdgeInsets.fromLTRB(20.0, 10.0, 20.0, 10.0),//上下左右边距设置
          border: OutlineInputBorder(
              borderRadius: BorderRadius.circular(32.0)//设置圆角大小
          )
      ),
    );

    final password = TextFormField(//密码
      autofocus: false,
      initialValue: 'ssssssssssssssssssssss',
      obscureText: true,
      decoration: InputDecoration(
          hintText: '请输入密码',
          contentPadding: EdgeInsets.fromLTRB(20.0, 10.0, 20.0, 10.0),
          border: OutlineInputBorder(
              borderRadius: BorderRadius.circular(32.0)
          )
      ),
    );

    final loginButton = Padding(
      padding: EdgeInsets.symmetric(vertical: 16.0),//上下各添加16像素补白
      child: Material(
        borderRadius: BorderRadius.circular(30.0),// 圆角度
        shadowColor: Colors.lightBlueAccent.shade100,//阴影颜色
        elevation: 5.0,//浮动的距离
        child: MaterialButton(
          minWidth: 200.0,
          height: 42.0,
          onPressed: (){
            Navigator.of(context).pushNamed(HomePage.tag);//点击跳转界面
          },
          color: Colors.green,//按钮颜色
          child: Text('登 录', style: TextStyle(color: Colors.white, fontSize: 20.0),),
        ),
      ),
    );

    final forgotLabel = FlatButton(//扁平化的按钮,前面博主已经讲解过
      child: Text('忘记密码?', style: TextStyle(color: Colors.black54, fontSize: 18.0),),
      onPressed: () {},
    );

    return Scaffold(
      backgroundColor: Colors.white,
      body: Center(
        child: ListView(//将这些组件全部放置在ListView中
          shrinkWrap: true,//内容适配
          padding: EdgeInsets.only(left: 24.0, right: 24.0),//左右填充24个像素块
          children: <Widget>[
            logo,
            SizedBox(height: 48.0,),//用来设置两个控件之间的间距
            email,
            SizedBox(height: 8.0,),
            password,
            SizedBox(height: 24.0,),
            loginButton,
            forgotLabel
          ],
        ),
      ),
    );
  }

}
home_page.dart主页面代码
上面注释已经非常详细了,这里就不在赘述,细心的读者应该看到这段代码中有一个登录按钮,点击之后的跳转界面,也就是大多数App的首页,所以我们还需要写一个跳转之后的界面home_page.dart,代码如下:
import 'package:flutter/material.dart';
//登录后的主界面
class HomePage extends StatelessWidget{
  static String tag="home_page";

  @override
  Widget build(BuildContext context) {
    final user=Hero(
      tag: "用户名",
      child: Padding(
        padding: EdgeInsets.all(20.0),//所有方向均填充20像素空白
        child: CircleAvatar(
          radius: 72.0,
          backgroundColor: Colors.transparent,
          backgroundImage: AssetImage("assets/timg.jpg"),
        ),
      ),
    );

    final welcome=Padding(//欢迎文字提示
      padding: EdgeInsets.all(8.0),
      child: Text(
        '欢迎你',
        style: new TextStyle(color: Colors.white, fontSize: 20.0),
      ),
    );

    final info=Padding(//其他文字提示
      padding: EdgeInsets.all(8.0),
      child: Text(
        "登录界面就是这么简单简单哦!",
        style: new TextStyle(color: Colors.white, fontSize: 20.0),
      ),
    );

    final body=Container(//body主要内容
      width: MediaQuery.of(context).size.width,//设置为屏幕宽度
      padding: EdgeInsets.all(28.0),//上下左右各填充28空白像素
      decoration: BoxDecoration(//装饰器,博主前面的渐变色介绍过
          gradient: LinearGradient(//线性渐变
              colors: [
                Colors.green,//蓝
                Colors.lightGreenAccent//绿偏黄的颜色
              ]
          )
      ),
      child: Column(children: <Widget>[//将上面定义的子空间全部添加进去
        user, welcome, info,
      ],),
    );

    return Scaffold(
      body: body,
    );
  }

}
mian.dart程序入口代码
这上面的注释也是非常的详细,而且线性渐变之前介绍组件的时候有讲解过,应该很好理解,两个界面都写完了,现在重要的就是App程序入口代码需要写,mian.dart代码如下:
import 'package:flutter/material.dart';
import 'package:login_flutter_app/page/home_page.dart';
import 'package:login_flutter_app/page/login_page.dart';

void main() => runApp(new MyApp());

class MyApp extends StatelessWidget {
  //routes需要Map<String, WidgetBuilder>类型参数,所以这里定义了一个这个类型的常量,将刚才两个页面添加进去
  final routes = <String, WidgetBuilder> {
    LoginPage.tag: (context) => LoginPage(),
    HomePage.tag: (context) => HomePage(),
  };

  @override
  Widget build(BuildContext context) {
    return new MaterialApp(
      title: '登录Demo',
      debugShowCheckedModeBanner: false,
      theme: new ThemeData(
        primarySwatch: Colors.lightBlue,
      ),
      home: LoginPage(),
      routes: routes,
    );
  }
}
3个注意事项
这段代码有几点需要注意:
第一,我们之前写的所有应用,是不是右上角都有一个debug标签呢?这在实际应用中肯定不会要的,所以这里设置debugShowCheckedModeBanner属性为false,就不会显示debug标签。
第二,前面我们跳转页面用的pop(),然后push(),出栈进栈的方式操作,这里我们定义了一个路由,将使用到的页面全部写在里面,后续需要使用的时候,只要使用如下代码就可以直接跳转:
Navigator.of(context).pushNamed(key);
这就是刚在定义路由routes里面的key值,这种跳转属于静态路由,前面用到的属于动态路由,两种都可以跳转界面,这里提及一样方便大家理解。
第三,home定义App首次进入页面的主页面,其中也可以设置initialRoute属性来达到初始页面的设置,如果没有initialRoute这个属性,那么会去寻找路由表里面的’/’,或者MaterialApp的home属性。但需要特别注意一下,路由表(也就是我们上面代码里面定义的routes变量)里面的’/’(key值) 和MaterialApp的home属性,二者不能同时存在,但是必须有一个存在。
当initialRoute和’/‘或者MaterialApp的home属性同时存在的时候,initialRoute的优先级高于二者。意思就是如果initialRoute定义的页面和’/'或者MaterialApp的home设置的页面不一样,用户看到的是initialRoute定义的页面。
当MaterialApp的home属性定义了主页面,而initialRoute没有定义的时候,用户看到的就是’/'或者MaterialApp的home多对应的页面。
登录界面的代码就讲到这里,显示的效果如博文首图所示。
该博文代码的下载地址:点击下载
