spark2.2.0 kafka 0.10.2.1的createDirectStream第一次尝试
1、这里简单记录一下 kafka的简单操作命令
创建Topic
$ bin/kafka-topics.sh --create --topic make2 --zookeeper make.spark.com:2181/kafka_10 --replication-factor 3 --partitions 3 --config max.message.bytes=12800000 --config flush.messages=1 --config segment.bytes=10240--partitions 5 --replication-factor 3
查看当前kafka集群中Topic的情况
$ bin/kafka-topics.sh --zookeeper make.spark.com:2181/kafka_10 --list
查看Topic的详细信息
$ bin/kafka-topics.sh --zookeeper make.spark.com:2181/kafka_10 --describe --topic make2
修改Topic信息
$ bin/kafka-topics.sh --zookeeper make.spark.com:2181/kafka_10 --alter --topic make1 --config max.message.bytes=128000
$ bin/kafka-topics.sh --zookeeper make.spark.com:2181/kafka_10 --alter --topic make1 --delete-config max.message.bytes
$ bin/kafka-topics.sh --zookeeper make.spark.com:2181/kafka_10 --alter --topic make1 --partitions 10
$ bin/kafka-topics.sh --zookeeper make.spark.com:2181/kafka_10 --alter --topic make1 --partitions 3 ## 分区数量只允许增加,不允许减少
删除Topic(简单的删除,只是标记删除)
$bin/kafka-topics.sh --delete --topic make1 --zookeeper make.spark.com:2181/kafka_10
## Note: This will have no impact if delete.topic.enable is not set to true.## 默认情况下,删除是标记删除,没有实际删除这个Topic;如果运行删除Topic,两种方式:
方式一:通过delete命令删除后,手动将本地磁盘以及zk上的相关topic的信息删除即可 ls /kafka/brokers/topics
方式二:配置server.properties文件,给定参数delete.topic.enable=true,表示允许进行Topic的删除
注意:一般来说,topic创建了之后就不要随意的删除和修改信息
测试Kafka集群的消息传递功能
1. 启动服务
2. 启动数据生产者
$ bin/kafka-console-producer.sh --broker-list make.spark.com:9092,make.spark.com:9093,make.spark.com:9094 --topic make1
3. 启动数据消费者
$ bin/kafka-console-consumer.sh --topic make1 --zookeeper make.spark.com:2181/kafka_10
## 不接收consumer启动前kafka中的数据
$ bin/kafka-console-consumer.sh --topic make1--zookeeper make.spark.com:2181/kafka_10
## 从头开始接收kafka的数据(全部都接收)
$ bin/kafka-console-consumer.sh --topic make1--zookeeper make.spark.com:2181/kafka_10 --from-beginning
2、这里为我创建createDirectStream的具体代码和测试
首先我们创建一个object -> PropertiesUtil_ka_str 放在我们的工具类下面 代码如下
package Utils

import java.util.Properties

/**
  * Properties的工具类
  *
  * Created by make on 2018-08-07 23:30
  */
object PropertiesUtil_ka_str {

  /**
    *
    * 获取配置文件Properties对象
    *
    * @author make
    * @return java.util.Properties
    */
  def getProperties() :Properties = {
    val properties = new Properties()
    //读取源码中resource文件夹下的ka_str.properties配置文件
    val reader = getClass.getResourceAsStream("/ka_str.properties")
    properties.load(reader)
    properties
  }

  /**
    *
    * 获取配置文件中key对应的字符串值
    *
    * @author make
    * @return java.util.Properties
    */
  def getPropString(key : String) : String = {
    getProperties().getProperty(key)
  }

  /**
    *
    * 获取配置文件中key对应的整数值
    *
    * @author make
    * @return java.util.Properties
    */
  def getPropInt(key : String) : Int = {
    getProperties().getProperty(key).toInt
  }

  /**
    *
    * 获取配置文件中key对应的布尔值
    *
    * @author make
    * @return java.util.Properties
    */
  def getPropBoolean(key : String) : Boolean = {
    getProperties().getProperty(key).toBoolean
  }

}
我们的配置文件ka_str.properties如下
# kafka configs
kafka.bootstrap.servers=make.spark.com:9092,make.spark.com:9093,make.spark.com:9094
kafka.topic.source=kafka_stream_01
#kafka.topic.sink=spark-sink-test
kafka.group.id=kafka_stream
然后为我们的 kafka_stream.scala的代码 如下
package spark_stream

import Utils.{PropertiesUtil, PropertiesUtil_ka_str, SparkUtil}
import org.apache.kafka.clients.consumer.ConsumerRecord
import org.apache.kafka.common.serialization.StringDeserializer
import org.apache.spark.streaming.dstream.{DStream, InputDStream}
import org.apache.spark.streaming.kafka010.KafkaUtils
import org.apache.spark.streaming.{Seconds, StreamingContext}

import org.apache.spark.streaming.kafka010.ConsumerStrategies._
import org.apache.spark.streaming.kafka010.LocationStrategies._

object kafka_stream {
  def main(args: Array[String]): Unit = {
    val sc =SparkUtil.createSparkContext(true,"kafka_stream")

    val ssc = new StreamingContext(sc,Seconds(5))


    //设置相关参数

   val  topics: String = PropertiesUtil_ka_str.getPropString("kafka.topic.source")
   val brokers = PropertiesUtil_ka_str.getPropString("kafka.bootstrap.servers")

    //具体写法参照 http://spark.apache.org/docs/2.2.0/streaming-kafka-0-10-integration.html
    val topicarr = topics.split(",")
    val kafkaParams: Map[String, Object] = Map[String,Object](
      "bootstrap.servers" -> brokers,
      "key.deserializer" -> classOf[StringDeserializer],
      "value.deserializer" -> classOf[StringDeserializer],
      "group.id" -> PropertiesUtil.getPropString("kafka.group.id"),
      "auto.offset.reset" -> "latest",
      "enable.auto.commit" -> (false: java.lang.Boolean)
    )

    val kafka_streamDStream: InputDStream[ConsumerRecord[String, String]] = KafkaUtils.createDirectStream(
      ssc,
      PreferConsistent,
      //Subscribe的构造函数为三个参数,但是可以省略offsets 源码可以看到
      Subscribe[String,String](topicarr,kafkaParams))
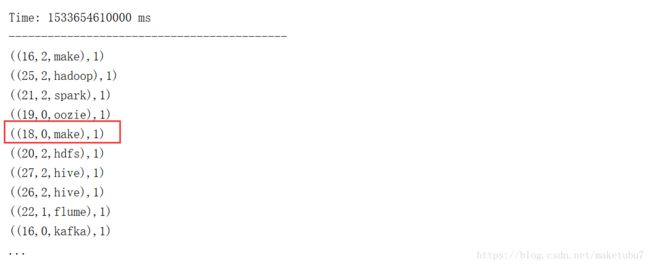
    //最后的格式为((offset,partition,value),1),这样的数据类型
    // 可以看到每条数据的偏移量和所在的分区
    val resDStream: DStream[((Long, Int, String), Int)] = kafka_streamDStream.map(line =>
      (line.offset(), line.partition(), line.value())).flatMap(t =>{
        t._3.split(" ").map(word => (t._1,t._2,word))
    })
      .map(k => ((k._1,k._2,k._3),1))
      .reduceByKey(_ + _)

    resDStream.print()

    ssc.start()
    ssc.awaitTermination()

  }


}
3、我们在kafka 上创建一个和我们配置文件相同的 topic 以及对应的 生产者 如下
bin/kafka-topics.sh --create --topic kafka_stream_01 --zookeeper make.spark.com:2181/kafka_10 --replication-factor 2 --partitions 3
bin/kafka-console-producer.sh --broker-list make.spark.com:9092,make.spark.com:9093,make.spark.com:9094 --topic kafka_stream_01
然后启动我们的程序,可以看到我们的,实时处理的数据结果,达到了我们要求,可以看到偏移量,以及所在的分区
以上,初识kafka
