手动安装Jitsi-Meet音视频
目录
1.安装 prosody(XMPP通信服务器)
2.安装nginx
3.安装Jitsi Videobridge
4.安装Jitsi Conference Focus (jicofo)
5.部署Jitsi Meet
6.配置可以多人(2人以上)会议需要配置NAT
7.尝试开始访问自定义域名
1.安装 prosody(XMPP通信服务器)
(1)执行ubuntu安装命令
apt-get install prosody; (注:提示无法识别该命令,先安装apt)
(2)添加prosody配置文件
在 /etc/prosody/conf.avail/路径下添加配置文件{域名}.cfg.lua,配置示例如下:
(注:ubuntu添加配置文件命令 touch 文件名,{域名}需要修改为当前配置的域名(无大括号),注释可以删除)
VirtualHost "{域名}"
-- enabled = false -- Remove this line to enable this host
authentication = "anonymous"
-- Properties below are modified by jitsi-meet-tokens package config
-- and authentication above is switched to "token"
--app_id="example_app_id"
--app_secret="example_app_secret"
-- Assign this host a certificate for TLS, otherwise it would use the one
-- set in the global section (if any).
-- Note that old-style SSL on port 5223 only supports one certificate, and will always
-- use the global one.
-- 生成的证书路径
ssl = {
key = "/var/lib/prosody/{域名}.key";
certificate = "/var/lib/prosody/{域名}.crt";
}
speakerstats_component = "speakerstats.{域名}"
conference_duration_component = "conferenceduration.{域名}"
-- we need bosh
modules_enabled = {
"bosh";
"pubsub";
"ping"; -- Enable mod_ping
"speakerstats";
"turncredentials";
"conference_duration";
}
c2s_require_encryption = false
VirtualHost "auth.{域名}"
ssl = {
    key = "/var/lib/prosody/auth.{域名}.key";
    certificate = "/var/lib/prosody/auth.{域名}.crt";
}
authentication = "internal_plain"

admins = { "focus@auth.{域名}" }

Component "conference.{域名}" "muc"
Component "jitsi-videobridge.{域名}"
    component_secret = "YOURSECRET1"
Component "focus.{域名}"
    component_secret = "YOURSECRET2"
(3)添加prosody配置文件链接
执行ubuntu命令ln -s /etc/prosody/conf.avail/{域名}.cfg.lua /etc/prosody/conf.d/{域名}.cfg.lua
(4)生成域名证书
(分别执行命令,需要填写的信息可直接跳过)
prosodyctl cert generate {域名}prosodyctl cert generate auth.{域名}
(5)将auth.{域名}添加到本地机器上的可信证书
ln -sf /var/lib/prosody/auth.{域名}.crt /usr/local/share/ca-certificates/auth.{域名}.crt
update-ca-certificates -f
(注意,如果前一次安装留下符号链接,则必须使用-f标志)
(6)创建会议focus用户
(此处的YOURSECRET3可以自定义密码,但需与后边的一致)
prosodyctl register focus auth.{域名} YOURSECRET3
(7)重启prosody XMPP服务使用新的配置
prosodyctl restart
(注:prosodyctl status 可以查看启动状态)
2.安装nginx
(1)执行ubuntu命令
apt-get install nginx
(2)添加nginx配置文件
在路径/etc/nginx/sites-available添加配置文件,文件名{域名},配置示例如下:
(注:配置文件的中的域名需要修改)
server_names_hash_bucket_size 64;
server {
listen 443 ssl http2;
listen [::]:443 ssl http2;
server_name {域名};
ssl_protocols TLSv1 TLSv1.1 TLSv1.2;
ssl_prefer_server_ciphers on;
ssl_ciphers "EECDH+ECDSA+AESGCM:EECDH+aRSA+AESGCM:EECDH+ECDSA+SHA256:EECDH+aRSA+SHA256:EECDH+ECDSA+SHA384:EECDH+ECDSA+SHA256:EECDH+aRSA+SHA384:EDH+aRSA+AESGCM:EDH+aRSA+SHA256:EDH+aRSA:EECDH:!aNULL:!eNULL:!MEDIUM:!LOW:!3DES:!MD5:!EXP:!PSK:!SRP:!DSS:!RC4:!SEED";

add_header Strict-Transport-Security "max-age=31536000";

ssl_certificate /var/lib/prosody/{域名}.crt;
ssl_certificate_key /var/lib/prosody/{域名}.key;
#此处对应jitsi-meet安装路径
root /usr/share/jitsi-meet;

# ssi on with javascript for multidomain variables in config.js
ssi on;
ssi_types application/x-javascript application/javascript;

index index.html index.htm;
error_page 404 /static/404.html;

gzip on;
gzip_types text/plain text/css application/javascript application/json;
gzip_vary on;
#此处对应jitsi-meet安装路径
location = /config.js {
    alias /usr/share/jitsi-meet/config.js;
}
#此处对应jitsi-meet安装路径
location = /external_api.js {
    alias /usr/share/jitsi-meet/libs/external_api.min.js;
}

#ensure all static content can always be found first
#此处对应jitsi-meet安装路径
location ~ ^/(libs|css|static|images|fonts|lang|sounds|connection_optimization|.well-known)/(.*)$
{
    add_header 'Access-Control-Allow-Origin' '*';
    alias /usr/share/jitsi-meet/$1/$2;
}

# BOSH
location = /http-bind {
    proxy_pass      http://localhost:5280/http-bind;
    proxy_set_header X-Forwarded-For $remote_addr;
    proxy_set_header Host $http_host;
}
 # xmpp websockets
location = /xmpp-websocket {
    proxy_pass http://127.0.0.1:5280/xmpp-websocket?prefix=$prefix&$args;
    proxy_http_version 1.1;
    proxy_set_header Upgrade $http_upgrade;
    proxy_set_header Connection "upgrade";
    proxy_set_header Host $http_host;
    tcp_nodelay on;
}

location ~ ^/([^/?&:'"]+)$ {
    try_files $uri @root_path;
}

location @root_path {
    rewrite ^/(.*)$ / break;
}
#此处对应jitsi-meet安装路径
location ~ ^/([^/?&:'"]+)/config.js$
{
   set $subdomain "$1.";
   set $subdir "$1/";

   alias /usr/share/jitsi-meet/config.js;
}

#Anything that didn't match above, and isn't a real file, assume it's a room name and redirect to /
location ~ ^/([^/?&:'"]+)/(.*)$ {
    set $subdomain "$1.";
    set $subdir "$1/";
    rewrite ^/([^/?&:'"]+)/(.*)$ /$2;
}

# BOSH for subdomains
location ~ ^/([^/?&:'"]+)/http-bind {
    set $subdomain "$1.";
    set $subdir "$1/";
    set $prefix "$1";

    rewrite ^/(.*)$ /http-bind;
}

# websockets for subdomains
location ~ ^/([^/?&:'"]+)/xmpp-websocket {
    set $subdomain "$1.";
    set $subdir "$1/";
    set $prefix "$1";

    rewrite ^/(.*)$ /xmpp-websocket;
}
}
(3)给配置文件添加链接
cd /etc/nginx/sites-enabled
ln -s ../sites-available/{域名} {域名}
3.安装Jitsi Videobridge
(1)下载并解压JitsiVideobridge
在网站 https://download.jitsi.org/jitsi-videobridge/linux 查看当前系统所需文件版本,下载并解压
(注:{arch-buildnum}修改为系统版本)
wget https://download.jitsi.org/jitsi-videobridge/linux/jitsi-videobridge-linux-{arch-buildnum}.zip
解压:
unzip jitsi-videobridge-linux-{arch-buildnum}.zip
(注意:如果没有安装jre,需要安装并且版本>=1.7 apt-get install openjdk-8-jre)
(2)添加JitsiVideobridge配置文件
在当前用户home文件夹中创建配置文件夹并创建配置文件
~/.sip-communicator/sip-communicator.properties,执行命令如下:
切换home文件位置 cd ~/
mkdir -p ~/.sip-communicator
cat > ~/.sip-communicator/sip-communicator.properties << EOF
配置文件示例如下:
org.jitsi.impl.neomedia.transform.srtp.SRTPCryptoContext.checkReplay=false
# The videobridge uses 443 by default with 4443 as a fallback, but since we're already
# running nginx on 443 in this example doc, we specify 4443 manually to avoid a race condition
org.jitsi.videobridge.TCP_HARVESTER_PORT=4443
(3)启动Videobridge
(注:此处的domain对应prosody配置文件中的域名,secret同样,替换其中的参数)
启动命令如下:
./jvb.sh --host=localhost --domain={XMPP域名} --port=5347 --secret=YOURSECRET1 &
配置自动启动在/etc/rc.local下添加:
/bin/bash /root/jitsi-videobridge-linux-{arch-buildnum}/jvb.sh --host=localhost --domain=jitsi.example.com --port=5347 --secret=YOURSECRET1 > /var/log/jvb.log 2>&1
4.安装Jitsi Conference Focus (jicofo)
(注:若没有安装jdk和maven,先安装apt-get install openjdk-8-jdk maven jdk版本>=1.7)
(1)官方提示安装如下:
clone官方源码 git clone https://github.com/jitsi/jicofo.git
将源码打包 cd jicofo
mvn package -DskipTests -Dassembly.skipAssembly=false
解压并运行jicofo
(注:其中的域名及密码需替换为自定义的)
unzip target/jicofo-1.1-SNAPSHOT-archive.zip
cd jicofo-1.1-SNAPSHOT-archive'
./jicofo.sh --host=localhost --domain={域名} --secret=YOURSECRET2 --user_domain=auth.{域名} --user_name=focus --user_password=YOURSECRET3
(打包过程会打包失败缺某些依赖,建议自己下载源码配置依赖仓库打包)
5.部署Jitsi Meet
(1)clone jitsi-meet源码
打开nginx配置文件中配置jitsi-meet位置clone源码:
git clone https://github.com/jitsi/jitsi-meet.git
cd jitsi-meet
npm install
make
(注:在旧发行版上安装时,请记住需要Node.js >= 12和npm >= 6)
修改jitsi meet的/jitsi-meet/config.js配置文件,示例如下:
var config = {
hosts: {
domain: '{自定义域名}',
muc: 'conference.{自定义域名}',
bridge: 'jitsi-videobridge.{自定义域名}',
focus: 'focus.{自定义域名}'
},
useNicks: false,
bosh: '//{自定义域名}/http-bind',
};
(2)重新加载nginx配置文件
nginx -t && nginx -s reload
(3)修改webpack.js域名
const devServerProxyTarget
= process.env.WEBPACK_DEV_SERVER_PROXY_TARGET || 'https://{域名}';
6.配置可以多人(2人以上)会议需要配置NAT
打开配置文件~/.sip-communicator/sip-communicator.properties添加:
#本地IP地址 org.ice4j.ice.harvest.NAT_HARVESTER_LOCAL_ADDRESS=#公网IP地址 org.ice4j.ice.harvest.NAT_HARVESTER_PUBLIC_ADDRESS=
7.尝试开始访问自定义域名
(需要配置hosts文件域名映射)示例如下:
配置完成后可通过以下命令验证
ping {域名}
成功之后打开浏览器访问配置的域名如:https://meet.lark.com
本机ip {域名}
附:prosody、nginx、jitsivideobridge、jitsimeet等配置文件Demo。
官方手动部署文档 https://jitsi.github.io/handbook/docs/devops-guide/devops-guide-manual
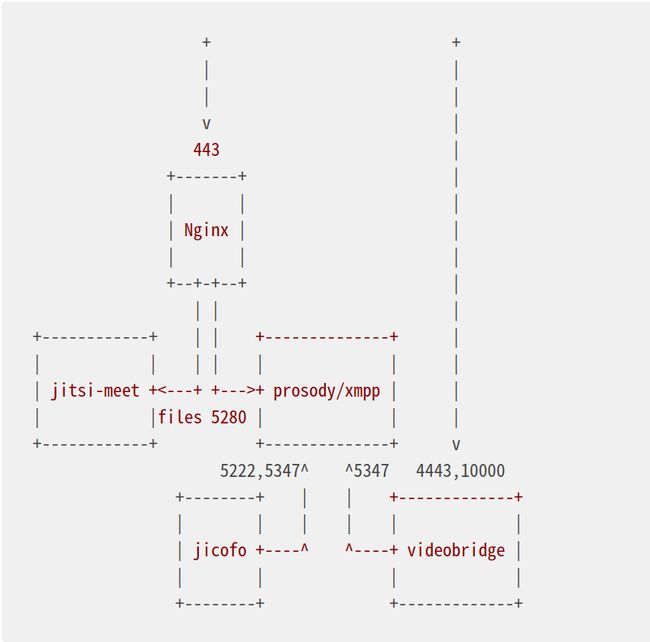
JitsiMeet Network 图:
