PyQt GUI编程——桌面小工具
经常用python写一些小工具,一段时间不用后就不知道放哪儿去了,即使找出来也不记得它是干啥的??@-@
用PyQt把它们集合到一个桌面小工具里,再配上工具说明和应用场景,嗯,这回应该不会弄丢了。
基本知识参见:
QTDesinger 和PyUIC的安装和使用参见前文《从零开始 使用PyQt5》
第一个简单程序《PyQt GUI编程——猜数字》
___________________________________________________________________________________
一、工具设计
第一个小工具:excel 表格转 mysql insert语句
功能:在excel中开发的数据库内容转换为 mysql insert语句,copy+paste就可以更新数据库内容啦。
界面中应包含:工具说明 + 应用场景 + 输入文件(excel)选择 并显示在界面上+ 输出路径选择 并显示在界面上+ 启动按钮+ 成功/失败提示。
二、建立新工程
1、PyCharm中建立新工程:pythonDeskTool,工程设置沿用《PyQt GUI编程——猜数字》的设置。
2、配置interpreter :进入 File/settings/Project:pythonDeskTool/Project Interpreter 右侧点击加号(+)安装pyqt5, pyqt5-sip,pyqt5-tools。
三、生成工具界面
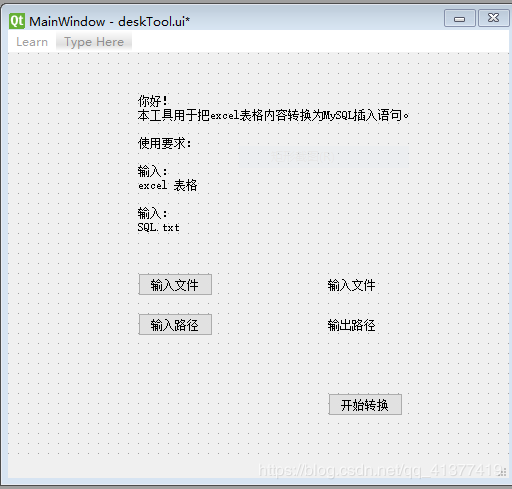
3、工程目录下新建 deskTool目录。选择Tools/External Tools/QTdesigner 进入图形界面编辑器,新建desktool.ui 如下图
4、右键点击desktool.ui ,弹出菜单中选择External Tools->PyUIC 转换生成 desktool.py。desktool.py文件移入deskTool目录。
(由于工具配置问题,desktool.ui 必须位于工程根目录下)
5、deskTool下新建toolMain.py文件
# -*- coding: utf-8 -*-
"""python桌面工具集合"""

from PyQt5 import QtWidgets   # 导入PyQt5部件
import sys
from deskTool import Ui_MainWindow

app = QtWidgets.QApplication(sys.argv)  # 建立application对象

first_window = Ui_MainWindow()  # 建立窗体对象

first_window.show()  # 显示窗体

sys.exit(app.exec())  # 运行程序
6、修改desktool.py文件
from PyQt5 import QtCore, QtGui, QtWidgets
from PyQt5.QtGui import *
from PyQt5.QtCore import *
from PyQt5.QtWidgets import *


class Ui_MainWindow(QMainWindow):

    def __init__(self, parent=None):
        super(Ui_MainWindow, self).__init__(parent)
        self.setupUi(self)
        self.retranslateUi(self)

    def setupUi(self, MainWindow):
7、运行toolMain.py,成功弹出工具界面。
四:选择并显示 输入文件 + 输出路径
使用tkinter库实现文件或目录的选择。tkinter库在安装python时自带,只需import即可。这部分修改全部在desktool.py中
1、引入tkinter库
from PyQt5.QtWidgets import *
import tkinter as tk
from tkinter import filedialog
2、选择并显示输入文件:
1)绑定信号和槽:
def signal_slot(self, MainWindow):
        self.input_button.clicked.connect(self.get_input_file)
def __init__(self, parent=None):
    super(Ui_MainWindow, self).__init__(parent)
    self.setupUi(self)
    self.retranslateUi(self)
    self.signal_slot(self)  # 绑定信号槽
2)选择并显示输入文件
def __init__(self, parent=None):
    super(Ui_MainWindow, self).__init__(parent)
    self.setupUi(self)
    self.retranslateUi(self)
    self.signal_slot(self)  # 绑定信号槽
    root = tk.Tk()
    root.withdraw()
def get_input_file(self, MainWindow):
_translate = QtCore.QCoreApplication.translate
file_path = filedialog.askopenfilename()
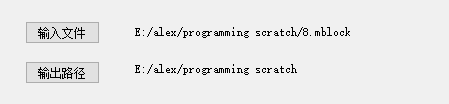
self.input_file_path_label.setText(_translate("MainWindow", file_path))
3、选择并显示输出路径
1)绑定信号和槽:
def signal_slot(self, MainWindow):
        self.input_button.clicked.connect(self.get_input_file)
        self.output_path_button.clicked.connect(self.get_output_dir)
2)选择并显示输出路径
def get_output_dir(self, MainWindow):
    _translate = QtCore.QCoreApplication.translate
    dir_path = filedialog.askdirectory()
    self.output_path_label.setText(_translate("MainWindow", dir_path))
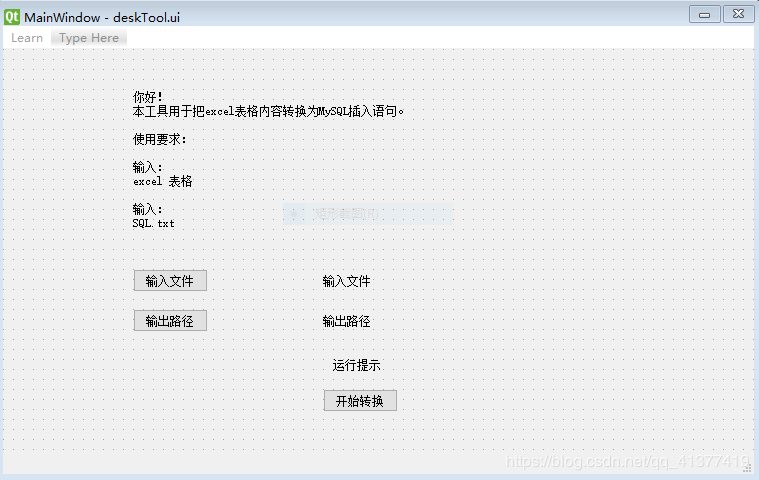
4、实现效果
由于没有进行校验,当前输入文件可以是任何类型的文件。
五、点击开始按钮,开始转换。
1、绑定信号和槽
def signal_slot(self, MainWindow):
        # print('pushButton')
        self.input_button.clicked.connect(self.get_input_file)
        self.output_path_button.clicked.connect(self.get_output_dir)
        self.start_button.clicked.connect(self.transform)
2、实现转换
注意点:
1)工具使用的场景限制目前excel 表格名固定为QuestionList ,SQL表名也是固定的。较好的方式是直接转换excel表格名为MySQL表名。
2)调试过程中发现表格内容为数字时不能直接连接到字符串中,必须 浮点数->整数->字符串 后才能正确转换。
3)生成insert语句时注意为所有的字符串类型 添加" " 或' '。
4)注意符号的转义,否则语句插入可能不成功。
def transform(self, MainWindow):
    _translate = QtCore.QCoreApplication.translate
    input_file = self.input_file_path_label.text()
    output_dir = self.output_path_label.text()
    output_string = 'INSERT INTO level_estimate_recognize_words('
    print("input file = " + input_file)
    data = xlrd.open_workbook(input_file)
    table = data.sheet_by_name('QuestionList')  # 通过名称获取表格
    print("table name = " + table.name)
    nrows = table.nrows  # 行数
    ncols = table.ncols  # 列数
    row0 = table.row_values(0)  # 第0行数据 数据库表格的字段名
    # 插入表字段名
    for i in range(ncols):
        output_string = output_string + row0[i]
        if i != (ncols-1):
            output_string = output_string + ','
        else:
            output_string = output_string + ')'
    # print("output_string = " + output_string)
    # 插入值
    output_string = output_string + ' VALUES'
    # print("output_string = " + output_string)
    for i in range(1, nrows):
        output_string = output_string + '('
        # print("output_string = " + output_string)
        for j in range(ncols):
            cell_value = table.row(i)[j].value
            cell_type = table.cell_type(i,j)
            if cell_type == 2:  # 数字
                cell_value = str(int(cell_value))
            if cell_type == 0:  # 空
                cell_value = '0'
            if cell_type == 1:  # 字符串
                cell_value = '"' + cell_value + '"'
            # print("cell_value = " + cell_value)
            output_string = output_string + cell_value
            # print("output_string = " + output_string)
            if j != (ncols - 1):
                output_string = output_string + ','
        output_string = output_string + ')'
        if i != (nrows - 1):
            output_string = output_string + ','
    localtime = time.strftime('%Y%m%d%H%M%S', time.localtime(time.time()))
    output_file = output_dir + "/mysql_insert" + localtime + ".txt"
    print("output_file = " + output_file)
    f = open(output_file, 'w')
    f.write(output_string)
    f.close()
    self.hint_label.setText(_translate("MainWindow", "完成!"))
六 、发布软件为exe文件
1、安装pyinstaller
进入 File/settings/Project:pythonDeskTool/Project Interpreter 右侧点击加号(+)安装pyinstaller。
2、右键点击要发布的文件,这里是toolMain.py。弹出菜单中选择Open in Terminal
3、在编辑器下面的local 窗口中 输入 pyinstaller -F toolMain.py 运行。运行完毕后,deskTool下出现dist文件夹,其中的toolMain.exe文件就是了。
4、上面方法生成的exe在运行时会弹出一个黑色cmd窗口,为了取消。在local串口中输入pyinstaller -F -w toolMain.py 运行。生成的exe 就不再有cmd窗口。
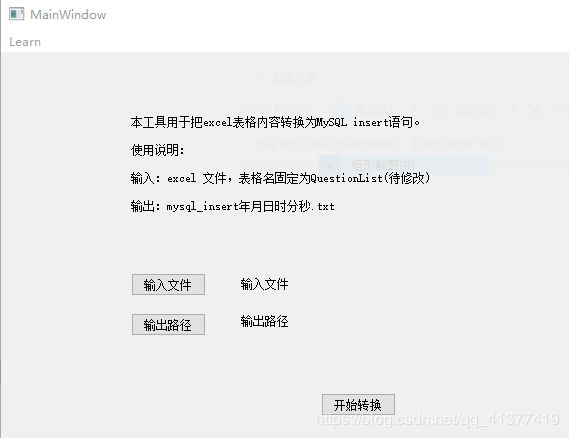
七、最终完成界面
---------------------------------------------------------------------------
That's all.Thank you!