SpringBoot全局异常处理及API规范化
目录
- 开言
- 改造
- 结果
- 附录
开言
在正常的服务开发中,我们往往会涉及大量的API开发。不管是成功还是失败的响应,不同的API总有着不同的返回。这给我们的客户端带来很大的不同性。所以本文将延续《从零搭建SpringBoot脚手架与SpringCloud生态》的课题项目,为我们的服务添加优雅的API返回及统一的全局异常处理。
这里最核心的是两个Spring注解。它们分别是@ControllerAdvice和@ExceptionHandler。大致讲一下这两个注解:
- @ControllerAdvice:从字面上就可以知道他是@Controller的加强版。一般可以用于1.全局异常处理2.全局数据绑定3.全局数据预处理。它是SpringMVC提供的功能,但因为SpringBoot有整合。所以我们不需要引入额外的依赖。
- @ExceptionHandler:主要用这个注解来指定异常处理类。在实际项目中我们可能会有不同的异常,系统异常或业务异常。通过这个注解我们就可以指定这段异常处理代码是用于处理哪一个异常类的。
改造
接下来我们就开始基于上一个工程进行改造。
统一API返回规范
不管是异常返回,还是健康的返回。我们都需要定义一套统一且优雅的response。我们先简单定义我们的对象,以后有需要添加的时候再修改也可以。
这个对象包括:API状态码,API状态详情,实体数据。
而这个对象提供了error和success两个静态方法。主要作用是为了根据不同的情况创建不一样的返回。
/*
 * API统一返回对象
 */
public class APIResultBody {
    // API状态码,成功:0
    private String code;
    // API状态详情
    private String message;
    // API结果,失败则无结果
    private Object result;

    public APIResultBody() {
    }

    public APIResultBody(BaseException ex) {
        this.code = ex.getErrorCode();
        this.message = ex.getErrorMsg();
    }


    public String getCode() {
        return code;
    }

    public void setCode(String code) {
        this.code = code;
    }

    public String getMessage() {
        return message;
    }

    public void setMessage(String message) {
        this.message = message;
    }

    public Object getResult() {
        return result;
    }

    public void setResult(Object result) {
        this.result = result;
    }

    public static APIResultBody success(Object result) {
        APIResultBody rb = new APIResultBody();
        rb.setCode("0");
        rb.setMessage("调用成功!");
        rb.setResult(result);
        return rb;
    }

    public static APIResultBody error(BaseException ex) {
        APIResultBody rb = new APIResultBody();
        rb.setCode(ex.getErrorCode());
        rb.setMessage(ex.getErrorMsg());
        rb.setResult(null);
        return rb;
    }

    public static APIResultBody error(String errorCode,String errorMsg) {
        APIResultBody rb = new APIResultBody();
        rb.setCode(errorCode);
        rb.setMessage(errorMsg);
        rb.setResult(null);
        return rb;
    }
}
定义基础异常接口
通常我们的异常分为异常编码和异常信息两部分。所以我是这么定义基础异常接口的
public interface BaseException {
    String getErrorCode();
    String getErrorMsg();
}
创建自定义异常
有了这个基本的异常接口,我们就开始创建自定义异常。这里采用枚举的方式来创建,并使这个枚举类实现我们的基础异常接口。这里我先定义http通信的异常。若以后如果我们有不同类型的异常,可以如法创建类或添加枚举项。
public enum HttpExceptionCode implements BaseException {
    // 数据操作错误定义
    SUCCESS("200", "成功!"),
    BODY_NOT_MATCH("400","请求的数据格式不符!"),
    SIGNATURE_NOT_MATCH("401","请求的数字签名不匹配!"),
    NOT_FOUND("404", "未找到该资源!"),
    INTERNAL_SERVER_ERROR("500", "服务器内部错误!"),
    SERVER_BUSY("503","服务器正忙,请稍后再试!")
    ;

    // 异常编码
    private String errorCode;
    // 异常详情
    private String errorMsg;

    HttpExceptionCode(String errorCode, String errorMsg) {
        this.errorCode = errorCode;
        this.errorMsg = errorMsg;
    }


    @Override
    public String getErrorCode() {
        return errorCode;
    }

    @Override
    public String getErrorMsg() {
        return errorMsg;
    }
}
定义系统通用异常
这里主要是为了接受系统所有的异常,大家稍微联想一下。第一步我们定义的异常格式,第二步我们枚举了异常类型,而这一步我们将定义属于我们自己的异常。所以这个类的必须是RuntimeException的子类。
public class SysException extends RuntimeException{

    // 异常编码
    protected String errorCode;
    // 异常详情
    protected String errorMsg;

    public SysException() {
        super();
    }

    public SysException(BaseException baseException) {
        super(baseException.getErrorCode());
        this.errorCode = baseException.getErrorCode();
        this.errorMsg = baseException.getErrorMsg();
    }

    public SysException(BaseException baseException, Throwable cause) {
        super(baseException.getErrorCode(), cause);
        this.errorCode = baseException.getErrorCode();
        this.errorMsg = baseException.getErrorMsg();
    }

    public SysException(String errorMsg) {
        super(errorMsg);
        this.errorMsg = errorMsg;
    }

    public SysException(String errorCode, String errorMsg) {
        super(errorCode);
        this.errorCode = errorCode;
        this.errorMsg = errorMsg;
    }

    public SysException(String errorCode, String errorMsg, Throwable cause) {
        super(errorCode, cause);
        this.errorCode = errorCode;
        this.errorMsg = errorMsg;
    }


    public String getErrorCode() {
        return errorCode;
    }

    public void setErrorCode(String errorCode) {
        this.errorCode = errorCode;
    }

    public String getErrorMsg() {
        return errorMsg;
    }

    public void setErrorMsg(String errorMsg) {
        this.errorMsg = errorMsg;
    }

    @Override
    public Throwable fillInStackTrace() {
        return this;
    }

}
创建异常接收器
当完成了上面一系列的准备之后,我们就可以着手做我们的全局异常处理。上面有说过使用了@ControllerAdvice和@ExceptionHandler。这里我暂时先只接受我们上面创建的SysException。当然,如果你需要对空指针异常等常见异常处理的话,也可以再这里添加方法。
@ControllerAdvice
public class SysExceptionHandler {

    /**
     * 全局异常处理
     */
    @ExceptionHandler(value = SysException.class)
    @ResponseBody
    public APIResultBody handleException(SysException e) {
        return APIResultBody.error(e.getErrorCode(),e.getErrorMsg());
    }

}
结果
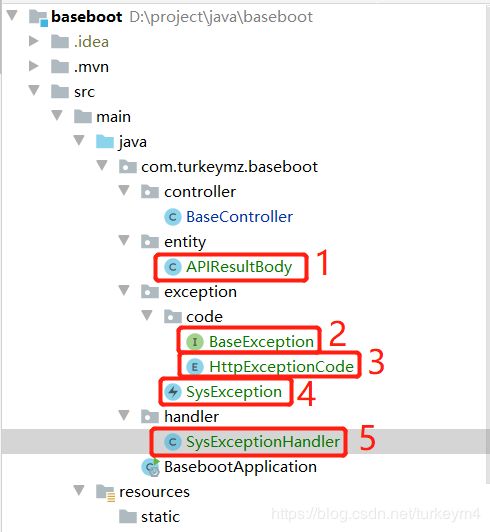
修改完这一切之后,我们大致会得到这种架构。当然包的结构也可以根据自己所决定了。

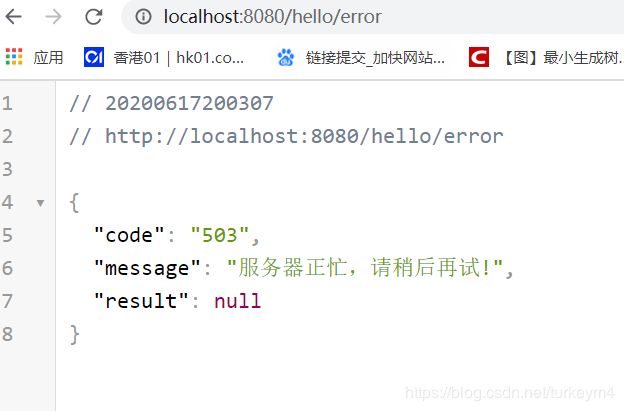
然后我在修改了一下Controller的代码。假如我们传入参数是error的时候,则让程序返回错误的response。
    @GetMapping("/hello/{name}")
    public APIResultBody sayHello(@PathVariable("name") String name){
        String result = "Hello " + name + ", here is base boot.";
        if("error".equals(name)){
            throw new SysException(HttpExceptionCode.SERVER_BUSY);
        }

        return APIResultBody.success(result);
    }
这个是测试的结果
| 正常 | 异常 |
|---|---|
 |
 |
附录
课题目录:https://blog.csdn.net/turkeym4/article/details/106761043
项目地址:https://gitee.com/turkeymz/baseboot