制作一个CentOS7的Vagrant Box
一、相关软件:
折腾过程中需要用到以下内容:
操作系统centos7的镜像,本次使用CentOS-7-x86_64-Minimal-1708.iso
虚拟机软件virtualbox, 本次使用版本VirtualBox 5.2.8
vagrant是一个基于Ruby的工具,用于创建和部署虚拟化开发环境, 本次使用版本vagrant_2.0.2_x86_64.msi
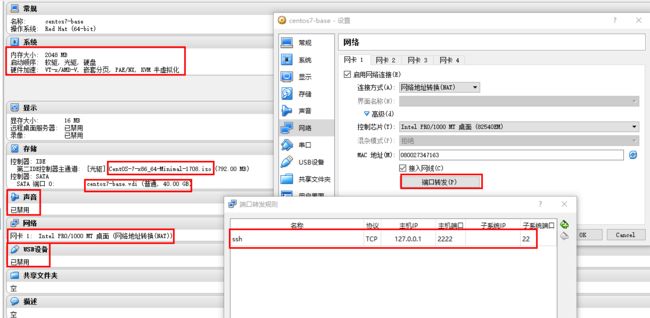
二、 虚拟机配置
- 内存:2G
- 硬盘:40G 动态分配
- 声音、USB: 禁用
- 网络: 网络地址转换(NAT), 端口转发-> ssh 宿主机:127.0.0.1 222 => 虚拟机: (空) 22
三、安装centos7
- 安装centos 7
- 默认分区
- 设置root密码为vagrant
四、配置centos
安装后重启,进入centos配置
1. 更改网络配置,设置开机启动
将ifcfg-enp0s3的ONBOOT=no,改为ONBOOT=yes
vi /etc/sysconfig/network-scripts/ifcfg-enp0s3
以前是传统的命名eth0、eth1等, centos7里网卡代号是enp0s3,或者其他方式如enp4s0,如果觉得ifcfg-enp0s3不习惯,也可以改成ifcfg-eth0:
更改grub
# vi /etc/default/grub
在GRUB_CMDLINE_LINUX的最后,加上 net.ifnames=0 biosdevname=0 的参数
GRUB_CMDLINE_LINUX="crashkernel=auto rd.lvm.lv=centos/root rd.lvm.lv=centos/swap rhgb quiet net.ifnames=0 biosdevname=0"
# grub2-mkconfig -o /boot/grub2/grub.cfg
# mv /etc/sysconfig/network-scripts/ifcfg-enp0s3  /etc/sysconfig/network-scripts/ifcfg-eth0
# reboot
2. 安装ssh-server
a. 安装openssh-server
# yum -y install openssh-server
# systemctl enable sshd.service
# systemctl start sshd.service
# systemctl status sshd.service
b. 配置ssh, 没配的话连不上
备份/etc/ssh/sshd_config
# cp /etc/ssh/sshd_config /etc/ssh/sshd_config.bak
c. 修改sshd_config的GSSAPIAuthentication和UseDNS
# sed -i  -e  's/^GSSAPIAuthentication yes/GSSAPIAuthentication no/' /etc/ssh/sshd_ config
# sed -i  -e  's/^#UseDNS yes/UseDNS no/' /etc/ssh/sshd_ config
# systemctl restart sshd.service
# systemctl status sshd.service
3. 更改成163的yum源
非必须步骤,yum安装慢了可以更改yum源
首先,安装wget,然后,备份CentOS-Base.repo, 下载并保存163的repo成CentOS-Base.repo,然后生成缓存。
# yum -y install wget
# mv /etc/yum.repos.d/CentOS-Base.repo /etc/yum.repos.d/CentOS-Base.repo.backup
# wget http://mirrors.163.com/.help/CentOS7-Base-163.repo
# mv CentOS7-Base-163.repo /etc/yum.repos.d/CentOS-Base.repo
# yum clean all
# yum makecache
- 配置selinux
将SELinux配置成permissive模式
# sed -i -e 's/^SELINUX=.*/SELINUX=permissive/' /etc/selinux/config
5. 关闭防火墙
centos7中默认用的是firewalld做防火墙,iptables如果需要的话要自己装,开发的box可以直接禁用掉firewalld。
# systemctl stop firewalld.service
# systemctl disable firewalld.service
6. 安装ntpd服务及其他服务
ntpd主要用来同步时间, ntpq -p可以验证是否能够同步。
centos7中,默认没有ifconfig, netstat等工具,可以安装net-tools相关工具。
# yum install -y openssh-clients nano ntp  net-tools*
# systemctl enable ntpd.service
# systemctl stop ntpd.service
# ntpdate cn.ntp.org.cn
# systemctl start ntpd.service
# ntpq -p
7. 创建用户vagrant
# useradd vagrant
# passwd vagrant
# groupadd admin
# usermod -G admin vagrant
8. 配置sudoers
将vagrant用户添加到/etc/sudoers中, 免密登录
# echo 'vagrant ALL=(ALL) NOPASSWD: ALL' >> /etc/sudoers
注: 从centos6.8开始,没有Defaults requiretty的配置项目不需要
sed -i ‘s/^(Defaults.*requiretty)/#\1/’ /etc/sudoers
9. 安装virtualbox additions
首先在虚拟机上找到设备的菜单, 设备=>安装增强功能,然后挂载cdrom,执行安装脚本
# yum install gcc bzip2 make kernel-devel-`uname -r` perl
# mkdir /home/vbox
# mount -t auto /dev/cdrom /home/vbox
# cd /home/vbox
# sh ./VBoxLinuxAdditions.run
10. 添加vagrant’s public key
# su vagrant
$ mkdir -m 0700 -p /home/vagrant/.ssh
$ curl https://raw.githubusercontent.com/mitchellh/vagrant/master/keys/vagrant.pub >> /home/vagrant/.ssh/authorized_keys
$ chmod 0600 /home/vagrant/.ssh/authorized_keys
11. 清理centos7
切换回root,然后清理缓存,清理临时文件,清理命令历史,关闭虚拟机
# yum clean all
# rm -rf /var/cache/yum
# rm -rf /tmp/*
# rm -f /var/log/wtmp /var/log/btmp
# history -c
# shutdown -h now
五、 vagrant创建box
创建一个目录,然后打开命令行,打包虚拟机成box,–base的参数必须是安装的centos7的虚拟机名称,本次是centos7-base。
$ vagrant package --output centos7-base.box --base centos7-base
六、测试box
首先将生成的box添加到box list中, 然后用vagrant init当前目录, vagrant up拉起虚拟机,完成后,vagrant ssh链接进入虚拟机就可以操作了。
$ vagrant box add centos7-base centos7-base.box
$ vagrant box list
$ vagrant init centos7-base
$ vagrant up
$ vagrant ssh
