- Cell Insight | 单细胞测序技术又一新发现,可用于HIV-1和Mtb共感染个体诊断
尐尐呅
结核病是艾滋病合并其他疾病中导致患者死亡的主要原因。其中结核病由结核分枝杆菌(Mycobacteriumtuberculosis,Mtb)感染引起,获得性免疫缺陷综合症(艾滋病)由人免疫缺陷病毒(Humanimmunodeficiencyvirustype1,HIV-1)感染引起。国家感染性疾病临床医学研究中心/深圳市第三人民医院张国良团队携手深圳华大生命科学研究院吴靓团队,共同研究得出单细胞测序
- 【一起学Rust | 设计模式】习惯语法——使用借用类型作为参数、格式化拼接字符串、构造函数
广龙宇
一起学Rust#Rust设计模式rust设计模式开发语言
提示:文章写完后,目录可以自动生成,如何生成可参考右边的帮助文档文章目录前言一、使用借用类型作为参数二、格式化拼接字符串三、使用构造函数总结前言Rust不是传统的面向对象编程语言,它的所有特性,使其独一无二。因此,学习特定于Rust的设计模式是必要的。本系列文章为作者学习《Rust设计模式》的学习笔记以及自己的见解。因此,本系列文章的结构也与此书的结构相同(后续可能会调成结构),基本上分为三个部分
- Rust基础知识
GRKF15
rust开发语言后端
1.Rust语言简介1.1基础语法变量声明:let关键字用于声明变量,可以指定或不指定类型,如leta=10;和letmutc=30i32;。函数定义:使用fn关键字定义函数,并指定参数类型及返回类型,如fnadd(i:i32,j:i32)->i32{i+j}。控制流:包括if、else等,控制语句后需要使用;来结束语句。1.2数据类型整数类型:i8、i16、i32、i64、i128,以及无符号的
- 「豆包Marscode体验官」 | 云端 IDE 启动 & Rust 体验
张风捷特烈
iderust开发语言后端
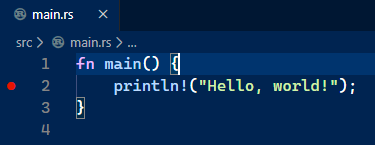
theme:cyanosis我正在参加「豆包MarsCode初体验」征文活动MarsCode可以看作一个运行在服务端的远程VSCode开发环境。对于我这种想要学习体验某些语言,但不想在电脑里装环境的人来说非常友好。本文就来介绍一下在MarsCode里,我的体验rust开发体验。一、MarsCode是什么它的本质是:提供代码助手和云端IDE服务的web网站,可通过下面的链接访问https://www
- Rust是否会取代C/C++?Rust与C/C++的较量
AI与编程之窗
源码编译与开发rustc语言c++内存安全并发编程代码安全性能优化
目录引言第一部分:Rust语言的优势内存安全性并发性性能社区和生态系统的成长第二部分:C/C++语言的优势和地位历史积淀和成熟度广泛的库和工具支持性能优化和硬件控制丰富的行业应用社区和行业支持第三部分:挑战和阻碍学习曲线现有代码库的迁移成本生态系统和工具链的完善度社区和人才培养行业应用和推广法规和标准化第四部分:未来趋势和可能性行业趋势教育和人才培养兼容和共存行业标准化企业支持和应用开源社区和生态
- Rust 所有权 简介
东离与糖宝
rust后端rust开发语言
文章目录发现宝藏1.所有权基本概念2.所有权规则3.变量作用域4.栈与堆4.1栈(Stack)4.2堆(Heap)5.String类型5.1String类型5.2String的内存分配5.3所有权与内存管理5.4String与切片6.变量与数据交互方式6.1移动(Move)6.2.克隆(Clone)7.所有权与函数7.1.传递参数7.2.返回值总结发现宝藏前些天发现了一个巨牛的人工智能学习网站,通
- Python(PyTorch)和MATLAB及Rust和C++结构相似度指数测量导图
亚图跨际
Python交叉知识算法量化检查图像压缩质量低分辨率多光谱峰值信噪比端到端优化图像压缩手术机器人三维实景实时可微分渲染重建三维可视化
要点量化检查图像压缩质量低分辨率多光谱和高分辨率图像实现超分辨率分析图像质量图像索引/多尺度结构相似度指数和光谱角映射器及视觉信息保真度多种指标峰值信噪比和结构相似度指数测量结构相似性图像分类PNG和JPEG图像相似性近似算法图像压缩,视频压缩、端到端优化图像压缩、神经图像压缩、GPU变速图像压缩手术机器人深度估计算法重建三维可视化推理图像超分辨率算法模型三维实景实时可微分渲染算法MATLAB结构
- Rust: duckdb和polars读csv文件比较
songroom
rust开发语言后端
duckdb在数据分析上,有非常多不错的特质。1、快;2、客户体验好,特别是可以同时批量读csv(在一个目录下的csv等文件)。polars的性能比pandas有非常多的超越。但背后的一些基于arrow的技术栈有很多相同之类。今天想比较一下两者在csv数据读写的情况。一、文件准备csv样本内容,是N行9列的csv标准格式,有字符串,有浮点数,有整型。具体如下:本次准备了两个csv文件,一个大约是2
- Rust中的所有权和借用规则详解
代码云1
rust开发语言后端
Rust是一种系统编程语言,其设计目标包括内存安全、并发安全以及性能。为了实现这些目标,Rust引入了一系列独特的编程概念,其中最为核心的就是所有权(Ownership)和借用(Borrowing)规则。本文将详细解释Rust中的所有权和借用规则,以及它们如何确保内存安全和并发安全。一、所有权规则在Rust中,每一个值都有一个与之关联的所有者。这个所有者可以是变量、数据结构或者是其他形式的存储。所
- 2022-12-18
席勒德语
德国闻名遐迩的星级餐厅Ammolite–SternekücheimEuropa-ParkAmmolite——欧洲公园所在地的星级餐厅Ort:Rust地点:卢斯特PREISE(OHNEGETRÄNKE):25€bis65€人均消费(不含酒水):25-65欧EdlesAmbiente,exklusiveAtmosphäreundeineexzellenteKüche–perfekteingebunde
- Rust 函数
lly202406
开发语言
Rust函数Rust是一种系统编程语言,以其安全性、速度和并发性而闻名。在Rust中,函数是一等公民,是组织代码和实现功能的基本单位。本文将深入探讨Rust中的函数,包括其定义、特性、参数、返回值以及高级用法。函数定义在Rust中,函数使用fn关键字定义。函数可以有参数和返回值。下面是一个简单的函数定义示例:fngreet(name:&str)->String{format!("Hello,{}!
- python多线程性能低_如何通过Python多线程提高性能
咯咯哦咯喔
python多线程性能低
我不熟悉Python和多线程,所以请耐心等待。在我正在编写一个脚本,通过信任网(weboftrust)处理列表中的域,这是一个按“可信程度”对网站进行排名的服务,并将它们写入CSV。不幸的是,WebofTrust的服务器可能需要相当长的时间来响应,而处理10万个域可能需要几个小时。在到目前为止,我在多线程处理方面的尝试令人失望——尝试从thisanswer修改脚本会产生线程错误,我相信是因为有些线
- Rust:重塑编程世界的利器,对前端开发的深远影响
大鱼前端
前端
引言:在编程语言的海洋中,有一颗璀璨的明星正在冉冉升起——那就是Rust。它不仅在后端领域展现出强大的实力,更在前端领域带来了颠覆性的变革。本文将带你深入了解Rust的魅力,探讨其独特的优势,以及Rust如何影响前端开发,并通过案例分析展示Rust在前端应用的实力。一、Rust:编程语言的新星Rust,这门由Mozilla主导开发的系统编程语言,自诞生之初就以其独特的设计理念和出色的性能赢得了众多
- Rust 编程语言构建出跨平台应用开源框架 Dioxus
百态老人
rust开源开发语言
是的,Rust编程语言确实构建了一个跨平台应用开源框架Dioxus。Dioxus是一个可移植、高性能的框架,用于在Rust中构建跨平台的用户界面。它支持多种平台的应用开发,包括网页前端、桌面应用、静态网站、移动端应用和TUI程序等。Dioxus的核心特点之一是其声明式编程风格,类似于React框架,但提供了更高效的性能和更好的开发者体验。此外,Dioxus还具有原生桌面支持、强大的状态管理、快速异
- Antimalware Service Executable 高内存高CPU拒绝访问的处理办法解决方案,无脑安全省事轻松,亲测完全有效,最新2024可用长期有效,改文件所有者提权失效后处理办法
醒了不起的盖茨比Z
学习方法科技开源软件经验分享笔记windows系统安全
不废话,别的所有方法都试过了,没一个有效的,包括提TrustedInstaller权限,折腾了一下午一晚上都没有任何效果,还给电脑环境变量污染了,最后发现最简单最有效的方法是直接火绒粉碎,比啥都好使,几分钟搞定了。软件已经上传了大家直接下载把下面这个路径整个文件夹删除。C:\ProgramFiles\WindowsDefender或者怕出问题的可以找到其中的MsMpEng.exe这个给粉碎掉,如果
- golang-阅读雨痕大神的Go语言学习笔记的心得
炒股养惠
golang学习之旅go
golang-阅读雨痕大神的Go语言学习笔记的心得第一章概述1.1go与java中的局部变量初始化问题1.2golang中实现生产者消费者模型,利用管道进行数据通信第二章类型2.1类型推断的使用注意2.2常量与变量的区别2.3常量的值类型省略2.4go的枚举2.5常量和变量到底有什么区别2.6go基本类型2.7go引用类型2.7.1go中new与make的区别第一章概述1.1go与java中的局部
- Rust在Web开发中的并发模型
编程小智星
网络
Rust是一种系统编程语言,以其高效、安全和并发性而著称。随着Web应用规模的不断扩大和复杂性的增加,对并发处理能力的需求也日益突出。Rust作为一种新兴的编程语言,在Web开发中展现出了强大的并发处理能力。本文将深入探讨Rust在Web开发中的并发模型,分析其核心特性以及如何在Web应用中发挥优势。一、Rust并发模型概述Rust的并发模型主要基于其独特的所有权系统和无锁数据结构。所有权系统通过
- Python pip安装报错:Could not find a version that satisfies the requirement
Robots小助手
ERROR:CouldnotfindaversionthatsatisfiestherequirementPillow(fromversions:none)总结:网络的问题,需要使用国内的镜像源来加速,比如豆瓣源解决办法,在命令后添加国内源,如下pip3installpillow-image-ihttp://pypi.douban.com/simple/--trusted-hostpypi.dou
- Rust学习笔记(中)
Fishermen_sail
Rustrust
前言笔记的内容主要参考与《Rust程序设计语言》,一些也参考了《通过例子学Rust》和《Rust语言圣经》。Rust学习笔记分为上中下,其它两个地址在Rust学习笔记(上)和Rust学习笔记(下)。错误处理panic!与不可恢复的错误当执行这个宏时,程序会打印出一个错误信息,展开并清理栈数据(也可以不清理数据就退出程序),然后接着退出。panic!和和其他语言不一样的地方,像下面的代码,这种情况下
- Rust学习笔记(上)
Fishermen_sail
Rustrust
前言笔记的内容主要参考与《Rust程序设计语言》,一些也参考了《通过例子学Rust》和《Rust语言圣经》。Rust学习笔记分为上中下,其它两个地址在Rust学习笔记(中)和Rust学习笔记(下)。编译与运行Rustup(updater)它是一个管理Rust版本和相关工具的命令行工具。Rustc(compiler)Rust是一种预编译静态类型(ahead-of-timecompiled)语言,这意
- Rust编程语言到底是不是炒作的噱头?
极道亦有道
rust开发语言后端
Rust是一种系统编程语言,由于独特的安全、性能和并发性支持,近年来备受关注。作为一名开发人员,你可能想知道Rust是否适合下一个项目。我们在这篇博文中将探讨2024年Rust流行背后的原因以及它如何改善你的开发体验。关于Rust编程语言的几个惊人事实据StackOverflow开发者调查显示,Rust连续第八年被评为最受喜爱的编程语言。据Tiobe公司撰写的IEEESpectrum开发报告显示,
- 解锁前端新潜能:如何使用 Rust 锈化前端工具链
京东零售技术
前端taro前端taro
前言近年来,Rust的受欢迎程度不断上升。首先,在操作系统领域,Rust已成为Linux内核官方认可的开发语言之一,Windows也宣布将使用Rust来重写内核,并重写部分驱动程序。此外,国内手机厂商Vivo也宣布使用Rust开发了名为“蓝河”的操作系统。除此之外,Rust在图形渲染、游戏开发、中间件开发、边缘计算、计算安全等领域也是遍地开花,可以说,Rust正在以惊人的速度重塑着各个领域的发展,
- Linux操作系统:Docker版本更新
Zero_one_ws
Linuxlinuxdockerjava服务器容器算法部署
如不能解决missingsignaturekey问题,可在留言区留言,互助共进!dockerpull拉取镜像遇到如下错误,重试多次依然不能拉取时,很可能就是docker版本太低了。[root@localhost~]#dockerpullmysql--disable-content-trust=trueUsingdefaulttag:latestTryingtopullrepositorydocke
- Android 全力押注 Rust,Linux 却在原地踏步?谷歌:用 Rust 重写固件太简单了!
IT界那些事儿
androidrustlinux
谷歌最近使用Rust编程语言重写了Android虚拟化框架中受到保护的虚拟机固件,并且建议涉及固件处理项目的开发者也同样积极拥抱这种内存安全语言。1、Rust在Linux上遇阻,但在Android上受宠在谷歌发布的博客中,Android工程师IvanLozano和DominikMaier深入研究了使用Rust替换旧版C和C++代码的技术细节。Lozano和Maier介绍称,“大家可以看到,使用Ru
- Linux内核以后会分块逐步用Rust重写吗?
纵然间
linuxrust运维
Linux内核已经积累了大量的代码,包括数百万行的C和C++代码。要想重写这些代码需要巨大的人力和时间投入,且存在很高的风险。这些代码已经过长时间的测试和验证,具有很高的稳定性和可靠性。Rust虽然是一种强调安全性和性能的系统编程语言,但其相对于C和C++来说仍然较新,在Linux内核开发领域的应用还相对较少。用Rust重写Linux内核需要开发者具备深厚的Rust编程技能和经验,以及对Linux
- Rust 语言从入门到实战 唐刚--学习笔记01
zhanglz888
Rust语言从入门到实战唐刚学习笔记rust学习笔记
Rust语言从入门到实战唐刚基础篇(11讲)01|快速入门:Rust的基础语法Rust宣称的安全、高性能、无畏并发这些特点,初次接触的时候都是感受不到的。安装Rust编译器套件MacOS或Linux,执行:curl--proto'=https'--tlsv1.2-sSfhttps://sh.rustup.rs|sh按提示操作Windows系统(WSL中/Windows原生平台)WSL中,curl-
- C语言学习笔记:内存的五大分区
五虎蘸酱
C语言学习笔记c语言开发语言
在C语言中,进程可在内存中分别存入五大分区:1、text:也称为代码段,其中主要用于存放二进制指令、常量、被const修饰过的初始化过的全局变量、静态局部变量;该分区为只读权限,若强制修改将会产生段错误。2、data:也称为数据段,其中主要用于存放初始化过的全局变量、静态局部变量。3、bss:也称为静态数据段,主要用于存放未初始化过的全局变量、静态局部变量。Ps:该段内存在进程运行前自动清理为04
- Rust模块std::thread
夏天又到了
Rust编程与项目实战rustjava算法
【图书介绍】《Rust编程与项目实战》-CSDN博客《Rust编程与项目实战》(朱文伟,李建英)【摘要书评试读】-京东图书(jd.com)Rust到底值不值得学,之一-CSDN博客Rust到底值不值得学,之二-CSDN博客Rust多线程编程概述-CSDN博客12.3.2等待所有线程完成在前面的实例中,主线程没等到派生线程执行完毕就结束了,从而整个进程就会结束。那么怎么让派生线程执行完毕呢?答案是通
- 第二十四章 rust中的运算符重载
余识-
Rust从入门到精通rust开发语言后端
注意本系列文章已升级、转移至我的自建站点中,本章原文为:rust中的运算符重载目录注意一、前言二、基本使用三、常用运算符四、通用约束一、前言C/C++中有运算符重载这一概念,它的目的是让即使含不相干的内容也能通过我们自定义的方法进行运算符操作运算。比如字符串本身是不能相加的,但由于C++中的String重载了运算符+,所以我们就可以将两个字符串进行相加、但实际的含义其实是拼接。而rust中同样存在
- 第二十一章 rust与动静态库的结合使用
余识-
Rust从入门到精通rust开发语言后端
注意本系列文章已升级、转移至我的自建站点中,本章原文为:rust与动静态库的结合使用目录注意一、前言二、库生成三、库使用四、总结一、前言rust中多了很多类型的库,比如前面章节中我们提到基本的bin与lib这两种crate类型库。如果你在命令行执行下列语句:rustc--help那么你将能找到这样的内容:--crate-type[bin|lib|rlib|dylib|cdylib|staticli
- 集合框架
天子之骄
java数据结构集合框架
集合框架
集合框架可以理解为一个容器,该容器主要指映射(map)、集合(set)、数组(array)和列表(list)等抽象数据结构。
从本质上来说,Java集合框架的主要组成是用来操作对象的接口。不同接口描述不同的数据类型。
简单介绍:
Collection接口是最基本的接口,它定义了List和Set,List又定义了LinkLi
- Table Driven(表驱动)方法实例
bijian1013
javaenumTable Driven表驱动
实例一:
/**
* 驾驶人年龄段
* 保险行业,会对驾驶人的年龄做年龄段的区分判断
* 驾驶人年龄段:01-[18,25);02-[25,30);03-[30-35);04-[35,40);05-[40,45);06-[45,50);07-[50-55);08-[55,+∞)
*/
public class AgePeriodTest {
//if...el
- Jquery 总结
cuishikuan
javajqueryAjaxWebjquery方法
1.$.trim方法用于移除字符串头部和尾部多余的空格。如:$.trim(' Hello ') // Hello2.$.contains方法返回一个布尔值,表示某个DOM元素(第二个参数)是否为另一个DOM元素(第一个参数)的下级元素。如:$.contains(document.documentElement, document.body); 3.$
- 面向对象概念的提出
麦田的设计者
java面向对象面向过程
面向对象中,一切都是由对象展开的,组织代码,封装数据。
在台湾面向对象被翻译为了面向物件编程,这充分说明了,这种编程强调实体。
下面就结合编程语言的发展史,聊一聊面向过程和面向对象。
c语言由贝尔实
- linux网口绑定
被触发
linux
刚在一台IBM Xserver服务器上装了RedHat Linux Enterprise AS 4,为了提高网络的可靠性配置双网卡绑定。
一、环境描述
我的RedHat Linux Enterprise AS 4安装双口的Intel千兆网卡,通过ifconfig -a命令看到eth0和eth1两张网卡。
二、双网卡绑定步骤:
2.1 修改/etc/sysconfig/network
- XML基础语法
肆无忌惮_
xml
一、什么是XML?
XML全称是Extensible Markup Language,可扩展标记语言。很类似HTML。XML的目的是传输数据而非显示数据。XML的标签没有被预定义,你需要自行定义标签。XML被设计为具有自我描述性。是W3C的推荐标准。
二、为什么学习XML?
用来解决程序间数据传输的格式问题
做配置文件
充当小型数据库
三、XML与HTM
- 为网页添加自己喜欢的字体
知了ing
字体 秒表 css
@font-face {
font-family: miaobiao;//定义字体名字
font-style: normal;
font-weight: 400;
src: url('font/DS-DIGI-e.eot');//字体文件
}
使用:
<label style="font-size:18px;font-famil
- redis范围查询应用-查找IP所在城市
矮蛋蛋
redis
原文地址:
http://www.tuicool.com/articles/BrURbqV
需求
根据IP找到对应的城市
原来的解决方案
oracle表(ip_country):
查询IP对应的城市:
1.把a.b.c.d这样格式的IP转为一个数字,例如为把210.21.224.34转为3524648994
2. select city from ip_
- 输入两个整数, 计算百分比
alleni123
java
public static String getPercent(int x, int total){
double result=(x*1.0)/(total*1.0);
System.out.println(result);
DecimalFormat df1=new DecimalFormat("0.0000%");
- 百合——————>怎么学习计算机语言
百合不是茶
java 移动开发
对于一个从没有接触过计算机语言的人来说,一上来就学面向对象,就算是心里上面接受的了,灵魂我觉得也应该是跟不上的,学不好是很正常的现象,计算机语言老师讲的再多,你在课堂上面跟着老师听的再多,我觉得你应该还是学不会的,最主要的原因是你根本没有想过该怎么来学习计算机编程语言,记得大一的时候金山网络公司在湖大招聘我们学校一个才来大学几天的被金山网络录取,一个刚到大学的就能够去和
- linux下tomcat开机自启动
bijian1013
tomcat
方法一:
修改Tomcat/bin/startup.sh 为:
export JAVA_HOME=/home/java1.6.0_27
export CLASSPATH=$CLASSPATH:$JAVA_HOME/lib/tools.jar:$JAVA_HOME/lib/dt.jar:.
export PATH=$JAVA_HOME/bin:$PATH
export CATALINA_H
- spring aop实例
bijian1013
javaspringAOP
1.AdviceMethods.java
package com.bijian.study.spring.aop.schema;
public class AdviceMethods {
public void preGreeting() {
System.out.println("--how are you!--");
}
}
2.beans.x
- [Gson八]GsonBuilder序列化和反序列化选项enableComplexMapKeySerialization
bit1129
serialization
enableComplexMapKeySerialization配置项的含义
Gson在序列化Map时,默认情况下,是调用Key的toString方法得到它的JSON字符串的Key,对于简单类型和字符串类型,这没有问题,但是对于复杂数据对象,如果对象没有覆写toString方法,那么默认的toString方法将得到这个对象的Hash地址。
GsonBuilder用于
- 【Spark九十一】Spark Streaming整合Kafka一些值得关注的问题
bit1129
Stream
包括Spark Streaming在内的实时计算数据可靠性指的是三种级别:
1. At most once,数据最多只能接受一次,有可能接收不到
2. At least once, 数据至少接受一次,有可能重复接收
3. Exactly once 数据保证被处理并且只被处理一次,
具体的多读几遍http://spark.apache.org/docs/lates
- shell脚本批量检测端口是否被占用脚本
ronin47
#!/bin/bash
cat ports |while read line
do#nc -z -w 10 $line
nc -z -w 2 $line 58422>/dev/null2>&1if[ $?-eq 0]then
echo $line:ok
else
echo $line:fail
fi
done
这里的ports 既可以是文件
- java-2.设计包含min函数的栈
bylijinnan
java
具体思路参见:http://zhedahht.blog.163.com/blog/static/25411174200712895228171/
import java.util.ArrayList;
import java.util.List;
public class MinStack {
//maybe we can use origin array rathe
- Netty源码学习-ChannelHandler
bylijinnan
javanetty
一般来说,“有状态”的ChannelHandler不应该是“共享”的,“无状态”的ChannelHandler则可“共享”
例如ObjectEncoder是“共享”的, 但 ObjectDecoder 不是
因为每一次调用decode方法时,可能数据未接收完全(incomplete),
它与上一次decode时接收到的数据“累计”起来才有可能是完整的数据,是“有状态”的
p
- java生成随机数
cngolon
java
方法一:
/**
* 生成随机数
* @author
[email protected]
* @return
*/
public synchronized static String getChargeSequenceNum(String pre){
StringBuffer sequenceNum = new StringBuffer();
Date dateTime = new D
- POI读写海量数据
ctrain
海量数据
import java.io.FileOutputStream;
import java.io.OutputStream;
import org.apache.poi.xssf.streaming.SXSSFRow;
import org.apache.poi.xssf.streaming.SXSSFSheet;
import org.apache.poi.xssf.streaming
- mysql 日期格式化date_format详细使用
daizj
mysqldate_format日期格式转换日期格式化
日期转换函数的详细使用说明
DATE_FORMAT(date,format) Formats the date value according to the format string. The following specifiers may be used in the format string. The&n
- 一个程序员分享8年的开发经验
dcj3sjt126com
程序员
在中国有很多人都认为IT行为是吃青春饭的,如果过了30岁就很难有机会再发展下去!其实现实并不是这样子的,在下从事.NET及JAVA方面的开发的也有8年的时间了,在这里在下想凭借自己的亲身经历,与大家一起探讨一下。
明确入行的目的
很多人干IT这一行都冲着“收入高”这一点的,因为只要学会一点HTML, DIV+CSS,要做一个页面开发人员并不是一件难事,而且做一个页面开发人员更容
- android欢迎界面淡入淡出效果
dcj3sjt126com
android
很多Android应用一开始都会有一个欢迎界面,淡入淡出效果也是用得非常多的,下面来实现一下。
主要代码如下:
package com.myaibang.activity;
import android.app.Activity;import android.content.Intent;import android.os.Bundle;import android.os.CountDown
- linux 复习笔记之常见压缩命令
eksliang
tar解压linux系统常见压缩命令linux压缩命令tar压缩
转载请出自出处:http://eksliang.iteye.com/blog/2109693
linux中常见压缩文件的拓展名
*.gz gzip程序压缩的文件
*.bz2 bzip程序压缩的文件
*.tar tar程序打包的数据,没有经过压缩
*.tar.gz tar程序打包后,并经过gzip程序压缩
*.tar.bz2 tar程序打包后,并经过bzip程序压缩
*.zi
- Android 应用程序发送shell命令
gqdy365
android
项目中需要直接在APP中通过发送shell指令来控制lcd灯,其实按理说应该是方案公司在调好lcd灯驱动之后直接通过service送接口上来给APP,APP调用就可以控制了,这是正规流程,但我们项目的方案商用的mtk方案,方案公司又没人会改,只调好了驱动,让应用程序自己实现灯的控制,这不蛋疼嘛!!!!
发就发吧!
一、关于shell指令:
我们知道,shell指令是Linux里面带的
- java 无损读取文本文件
hw1287789687
读取文件无损读取读取文本文件charset
java 如何无损读取文本文件呢?
以下是有损的
@Deprecated
public static String getFullContent(File file, String charset) {
BufferedReader reader = null;
if (!file.exists()) {
System.out.println("getFull
- Firebase 相关文章索引
justjavac
firebase
Awesome Firebase
最近谷歌收购Firebase的新闻又将Firebase拉入了人们的视野,于是我做了这个 github 项目。
Firebase 是一个数据同步的云服务,不同于 Dropbox 的「文件」,Firebase 同步的是「数据」,服务对象是网站开发者,帮助他们开发具有「实时」(Real-Time)特性的应用。
开发者只需引用一个 API 库文件就可以使用标准 RE
- C++学习重点
lx.asymmetric
C++笔记
1.c++面向对象的三个特性:封装性,继承性以及多态性。
2.标识符的命名规则:由字母和下划线开头,同时由字母、数字或下划线组成;不能与系统关键字重名。
3.c++语言常量包括整型常量、浮点型常量、布尔常量、字符型常量和字符串性常量。
4.运算符按其功能开以分为六类:算术运算符、位运算符、关系运算符、逻辑运算符、赋值运算符和条件运算符。
&n
- java bean和xml相互转换
q821424508
javabeanxmlxml和bean转换java bean和xml转换
这几天在做微信公众号
做的过程中想找个java bean转xml的工具,找了几个用着不知道是配置不好还是怎么回事,都会有一些问题,
然后脑子一热谢了一个javabean和xml的转换的工具里,自己用着还行,虽然有一些约束吧 ,
还是贴出来记录一下
顺便你提一下下,这个转换工具支持属性为集合、数组和非基本属性的对象。
packag
- C 语言初级 位运算
1140566087
位运算c
第十章 位运算 1、位运算对象只能是整形或字符型数据,在VC6.0中int型数据占4个字节 2、位运算符: 运算符 作用 ~ 按位求反 << 左移 >> 右移 & 按位与 ^ 按位异或 | 按位或 他们的优先级从高到低; 3、位运算符的运算功能: a、按位取反: ~01001101 = 101
- 14点睛Spring4.1-脚本编程
wiselyman
spring4
14.1 Scripting脚本编程
脚本语言和java这类静态的语言的主要区别是:脚本语言无需编译,源码直接可运行;
如果我们经常需要修改的某些代码,每一次我们至少要进行编译,打包,重新部署的操作,步骤相当麻烦;
如果我们的应用不允许重启,这在现实的情况中也是很常见的;
在spring中使用脚本编程给上述的应用场景提供了解决方案,即动态加载bean;
spring支持脚本