Service启动流程总结-start和stop service
文章目录
- 回顾
- 概述
- 源码探究
- startService过程
- onCreate阶段
- onStartCommand阶段
- Service超时机制
- 设置超时
- 移除超时
- 触发超时
- 当目标Service进程未启动时
- stopService过程
- 总结
回顾
Activity启动系列总结:
Activity启动流程总结-ActivityThread
Activity启动流程总结-生命周期
Activity启动流程总结-超时判定机制
在Activity启动流程中对APP进程和ActivityManagerService的交互过程以及应用进程启动初始化过程做了简单总结。Service作为四大组件之一,它的启动过程大体相似。
概述
在开发中我们使用context.startService(intent)和context.stopService(intent)来启动和停止Service,Service的启动和停止也是由ActivityManagerService来进行调度,本文通过跟踪源码来看看它的启动和停止过程。
源码探究
文中源码基于 Android 10.0
startService过程
当执行context.startService(intent),将开始Service的启动过程:
[ContextImpl#startService]
public ComponentName startService(Intent service) {
    warnIfCallingFromSystemProcess();
    return startServiceCommon(service, false, mUser);
}

public ComponentName startForegroundService(Intent service) {
    warnIfCallingFromSystemProcess();
    return startServiceCommon(service, true, mUser);
}

private ComponentName startServiceCommon(Intent service, boolean requireForeground,
        UserHandle user) {
    try {
        // ···
        // 请求AMS启动Service
        ComponentName cn = ActivityManager.getService().startService(
            mMainThread.getApplicationThread(), service, service.resolveTypeIfNeeded(
                        getContentResolver()), requireForeground,
                        getOpPackageName(), user.getIdentifier());
        if (cn != null) {
            // 省略检查异常部分 ···
        }
        return cn;
    } catch (RemoteException e) {
        throw e.rethrowFromSystemServer();
    }
}
可以看到通过IActivityManager调用ActivityManagerService进行startService。
接下来从APP进程来到ActivityManagerService:
[ActivityManagerService#startService]
public ComponentName startService(IApplicationThread caller, Intent service,
        String resolvedType, boolean requireForeground, String callingPackage, int userId)
        throws TransactionTooLargeException {
    enforceNotIsolatedCaller("startService");
    // Refuse possible leaked file descriptors
    // 省略参数异常检查 ···
    synchronized(this) {
        final int callingPid = Binder.getCallingPid();
        final int callingUid = Binder.getCallingUid();
        final long origId = Binder.clearCallingIdentity();
        ComponentName res;
        try {
            // mServices实例是ActiveServices
            res = mServices.startServiceLocked(caller, service,
                    resolvedType, callingPid, callingUid,
                    requireForeground, callingPackage, userId);
        } finally {
            Binder.restoreCallingIdentity(origId);
        }
        return res;
    }
}
该方法中调用ActiveServices的startServiceLocked方法进一步处理。
ActiveServices的startServiceLocked方法中又调用了另一个重载方法:
[ActiveServices#startServiceLocked]
ComponentName startServiceLocked(IApplicationThread caller, Intent service, String resolvedType,
        int callingPid, int callingUid, boolean fgRequired, String callingPackage,
        final int userId, boolean allowBackgroundActivityStarts)
        throws TransactionTooLargeException {
    // 省略变量callerFg部分(用于标记调用方进程是否属于前台)···

    // 查找或新建可用ServiceRecord
    ServiceLookupResult res =
        retrieveServiceLocked(service, null, resolvedType, callingPackage,
                callingPid, callingUid, userId, true, callerFg, false, false);
    // 省略对res结果检查部分 ···

    ServiceRecord r = res.record;

    // 省略后台启动检查和启动权限检查部分 ···

    // 创建startCommand参数添加到pendingStarts集合中保存
    r.pendingStarts.add(new ServiceRecord.StartItem(r, false, r.makeNextStartId(),
        service, neededGrants, callingUid));

    // 调用startServiceInnerLocked进一步处理
    ComponentName cmp = startServiceInnerLocked(smap, service, r, callerFg, addToStarting);
    return cmp;
这里获取一个ServiceRecord(被包装在ServiceLookupResult中),ServiceRecord用于保存Service信息,一个ServiceRecord对应一个运行Service。然后调用startServiceInnerLocked方法进一步执行启动流程。
retrieveServiceLocked方法中,首先获取userId对应的ServiceMap缓存集合,根据ComponentName(显式意图)或IntentFilter(隐式意图)查找ServiceRecord。不存在的话,则从PackageManagerService查找匹配的ServiceInfo,之后创建ServiceRecord并保存在集合中。在返回结果前还会判断是否允许不同应用和不同userId间的调用和启动权限检查。
接下来进入startServiceInnerLocked方法:
[ActiveServices#startServiceInnerLocked]
ComponentName startServiceInnerLocked(ServiceMap smap, Intent service, ServiceRecord r,
        boolean callerFg, boolean addToStarting) throws TransactionTooLargeException {
    // ···
    // 进一步执行启动
    String error = bringUpServiceLocked(r, service.getFlags(), callerFg, false, false);
    if (error != null) {
        return new ComponentName("!!", error);
    }

    // 省略添加后台启动服务集合和启动前台服务判断部分 ···

    return r.name;
}
进入bringUpServiceLocked方法:
[ActiveServices#bringUpServiceLocked]
private String bringUpServiceLocked(ServiceRecord r, int intentFlags, boolean execInFg,
        boolean whileRestarting, boolean permissionsReviewRequired)
        throws TransactionTooLargeException {
    // 判断目标Service是否已启动,首次将要启动时ServiceRecord中还未设置IApplicationThread
    if (r.app != null && r.app.thread != null) {
        // 调度应用进程触发onStartCommand回调
        sendServiceArgsLocked(r, execInFg, false);
        return null;
    }

    // 判断目标Service是否等待重启
    if (!whileRestarting && mRestartingServices.contains(r)) {
        // If waiting for a restart, then do nothing.
        return null;
    }

    // ···

    // 重置目标Service的延迟启动标识 ···
    // 检查目标Service的userId对应用户是否已启动 ···
    // ···

    final boolean isolated = (r.serviceInfo.flags&ServiceInfo.FLAG_ISOLATED_PROCESS) != 0;
    final String procName = r.processName;
    HostingRecord hostingRecord = new HostingRecord("service", r.instanceName);
    ProcessRecord app;

    if (!isolated) {
        // 查找对应进程的ProcessRecord
        app = mAm.getProcessRecordLocked(procName, r.appInfo.uid, false);
        if (DEBUG_MU) Slog.v(TAG_MU, "bringUpServiceLocked: appInfo.uid=" + r.appInfo.uid
                    + " app=" + app);
        // 通过ProcessRecord的的IApplicationThread判断进程是否启动
        if (app != null && app.thread != null) {
            try {
                app.addPackage(r.appInfo.packageName, r.appInfo.longVersionCode, mAm.mProcessStats);
                // 进一步执行启动
                realStartServiceLocked(r, app, execInFg);
                return null;
            } catch (TransactionTooLargeException e) {
                throw e;
            } catch (RemoteException e) {
                Slog.w(TAG, "Exception when starting service " + r.shortInstanceName, e);
            }

            // If a dead object exception was thrown -- fall through to
            // restart the application.
        }
    } else {
        // 省略ISOLATED PROCESS SERVICE部分 ···
    }

    // Not running -- get it started, and enqueue this service record
    // to be executed when the app comes up.
    if (app == null && !permissionsReviewRequired) {
        // 省略启动进程部分,会调用mAm.startProcessLocked方法 ···
    }

    // ···

    // 将ServiceRecord添加至待启动集合缓存,等待进场启动后再执行启动流程
    if (!mPendingServices.contains(r)) {
        mPendingServices.add(r);
    }

    // 省略延迟启动但是Service又被要求停止,会调用stopServiceLocked方法 ···

    return null;
}
该方法中首先判断目标Service是否已启动,如果已经启动则会调度onStartCommand回调。接着判断目标Service所属进程是否启动,如果已经启动则进一步执行Service启动流程,否则将ServiceRecord添加到待启动集合,等待目标进程启动完成后再执行启动流程。
PS:这里通过ProcessRecord是否持有IApplicationThread来判断目标Service和目标进程是否启动。当目标Service启动后,会为对应ServiceRecord设置ProcessRecord和IApplicationThread。当目标进程启动后,会为对应ProcessRecord设置IApplicationThread。可参考《Activity启动流程总结-ActivityThread》。
接下来进入关键方法realStartServiceLocked:
[ActiveServices#realStartServiceLocked]
private final void realStartServiceLocked(ServiceRecord r,
        ProcessRecord app, boolean execInFg) throws RemoteException {
    // ···
    // 这里给ServiceRecord设置了ProcessRecord,便可通过ServiceRecord判断目标Service是否已启动
    r.setProcess(app);
    // ···
    // ProcessRecord的services集合保存对应进程中所有运行的Service信息
    final boolean newService = app.services.add(r);
    // 超时设置相关
    bumpServiceExecutingLocked(r, execInFg, "create");
    // ···

    boolean created = false;
    try {
        // 调度应用进程启动Service
        app.thread.scheduleCreateService(r, r.serviceInfo,
                mAm.compatibilityInfoForPackage(r.serviceInfo.applicationInfo),
                app.getReportedProcState());
        // 前台Service前台通知相关
        r.postNotification();
        created = true;
    } catch (DeadObjectException e) {
        Slog.w(TAG, "Application dead when creating service " + r);
        mAm.appDiedLocked(app);
        throw e;
    } finally {
        if (!created) {
            // 省略Service启动失败异常处理部分 ···
        }
    }

    // ···
    // 省略bind Service相关流程部分 ···
    // ···

    // 发送参数到应用进程,将触发onStartCommand回调
    sendServiceArgsLocked(r, execInFg, true);

    // ···
}
这里会先后两次调度应用进程,应用侧会先后往应用主进程消息队列添加两条任务消息,AMS侧继续往下执行它的其余逻辑,下面需要到应用侧看创建Service的过程。
在看create Service流程前,先看看sendServiceArgsLocked方法:
[ActiveServices#sendServiceArgsLocked]
private final void sendServiceArgsLocked(ServiceRecord r, boolean execInFg,
        boolean oomAdjusted) throws TransactionTooLargeException {
    // pendingStarts保存待派发执行startCommand的命令参数
    final int N = r.pendingStarts.size();
    if (N == 0) {
        return;
    }

    ArrayList<ServiceStartArgs> args = new ArrayList<>();

    while (r.pendingStarts.size() > 0) {
        // 封装参数保存在args中 ···
    }

    // ParceledListSlice用于跨IPC传输大量Parcelable对象,可拆分为多个binder_transact事务传输。
    ParceledListSlice<ServiceStartArgs> slice = new ParceledListSlice<>(args);
    slice.setInlineCountLimit(4);
    Exception caughtException = null;
    try {
        // 调度应用进程执行onStartCommand回调
        r.app.thread.scheduleServiceArgs(r, slice);
    } catch (TransactionTooLargeException e) {
        if (DEBUG_SERVICE) Slog.v(TAG_SERVICE, "Transaction too large for " + args.size()
                + " args, first: " + args.get(0).args);
        Slog.w(TAG, "Failed delivering service starts", e);
        caughtException = e;
    } catch (RemoteException e) {
        // Remote process gone...  we'll let the normal cleanup take care of this.
        if (DEBUG_SERVICE) Slog.v(TAG_SERVICE, "Crashed while sending args: " + r);
        Slog.w(TAG, "Failed delivering service starts", e);
        caughtException = e;
    } catch (Exception e) {
        Slog.w(TAG, "Unexpected exception", e);
        caughtException = e;
    }

    if (caughtException != null) {
        // Keep nesting count correct
        // 省略异常处理部分 ···
    }
}
该方法中进行封装批量StartCommand参数,然后调度应用进程执行scheduleServiceArgs方法。
接下来在应用侧将会先后执行Service的create和start两个消息任务。
onCreate阶段
app.thread.scheduleCreateService将执行应用进程ActivityThread的scheduleCreateService方法,该方法中会发生H.CREATE_SERVICE消息至主线程,将执行handleCreateService方法。
[ActivityThread#handleCreateService]
private void handleCreateService(CreateServiceData data) {
    // If we are getting ready to gc after going to the background, well
    // we are back active so skip it.
    // 移除请求GC的消息
    unscheduleGcIdler();

    LoadedApk packageInfo = getPackageInfoNoCheck(
            data.info.applicationInfo, data.compatInfo);
    Service service = null;
    try {
        // 通过反射实例化目标Service
        java.lang.ClassLoader cl = packageInfo.getClassLoader();
        service = packageInfo.getAppFactory()
                .instantiateService(cl, data.info.name, data.intent);
    } catch (Exception e) {
        // 省略异常处理 ···
    }

    try {
        if (localLOGV) Slog.v(TAG, "Creating service " + data.info.name);

        // 创建上下文ContextImpl
        ContextImpl context = ContextImpl.createAppContext(this, packageInfo);
        // context持有service实例
        context.setOuterContext(service);

        // 获取应用进程Application实例
        Application app = packageInfo.makeApplication(false, mInstrumentation);
        // service中保存传入的参数,会调用attachBaseContext方法使mBase持有ContextImpl
        service.attach(context, this, data.info.name, data.token, app,
                ActivityManager.getService());
        // 调用Service的onCreate生命周期回调方法
        service.onCreate();
        // 以token为key,添加service实例至集合缓存(token是AMS传来的ServiceRecord客户端代理,ServiceRecord继承自Binder)
        mServices.put(data.token, service);
        try {
            // 通知AMS创建完成
            ActivityManager.getService().serviceDoneExecuting(
                    data.token, SERVICE_DONE_EXECUTING_ANON, 0, 0);
        } catch (RemoteException e) {
            throw e.rethrowFromSystemServer();
        }
    } catch (Exception e) {
        // 省略异常处理 ···
    }
}
首先通过反射创建目标Service,之后创建ContextImpl并使ContextImpl和Service互相持有对方引用,获取应用Application实例并使Service持有其引用。接着便调用onCreate生命周期回调方法。最后再通知AMS创建完成。
再来到ActivityManagerService,在它的serviceDoneExecuting方法中又调用了ActiveServices的serviceDoneExecutingLocked方法:
[ActiveServices#serviceDoneExecutingLocked]
void serviceDoneExecutingLocked(ServiceRecord r, int type, int startId, int res) {
    // mDestroyingServices保存执行销毁的Service
    boolean inDestroying = mDestroyingServices.contains(r);
    if (r != null) {
        // 判断type类型。
        // 刚create时是SERVICE_DONE_EXECUTING_ANON,startCommand时是SERVICE_DONE_EXECUTING_START,stop时是SERVICE_DONE_EXECUTING_STOP。
        if (type == ActivityThread.SERVICE_DONE_EXECUTING_START) {
            // 设置ServiceRecord相关参数,主要设置stopIfKilled(异常杀死是否不能够重启) ···
        } else if (type == ActivityThread.SERVICE_DONE_EXECUTING_STOP) {
            // ···
        }
        final long origId = Binder.clearCallingIdentity();
        // 更新ServiceRecord中的状态,移除超时消息
        serviceDoneExecutingLocked(r, inDestroying, inDestroying);
        Binder.restoreCallingIdentity(origId);
    } else {
        Slog.w(TAG, "Done executing unknown service from pid "
                + Binder.getCallingPid());
    }
该方法主要是处理ServiceRecord中的参数和状态更新设置,以及移除超时消息。
onStartCommand阶段
app.thread.scheduleServiceArgs将会执行ActivityThread的scheduleServiceArgs方法:
[ActivityThread#scheduleServiceArgs]
public final void scheduleServiceArgs(IBinder token, ParceledListSlice args) {
    List<ServiceStartArgs> list = args.getList();

    for (int i = 0; i < list.size(); i++) {
        // 依次取出参数,发送到主线程执行
        ServiceStartArgs ssa = list.get(i);
        ServiceArgsData s = new ServiceArgsData();
        s.token = token;
        s.taskRemoved = ssa.taskRemoved;
        s.startId = ssa.startId;
        s.flags = ssa.flags;
        s.args = ssa.args;

        sendMessage(H.SERVICE_ARGS, s);
    }
}
H.SERVICE_ARGS消息将会执行handleServiceArgs方法:
[ActivityThread#handleServiceArgs]
private void handleServiceArgs(ServiceArgsData data) {
    // 取出create阶段创建并缓存的Service实例
    Service s = mServices.get(data.token);
    if (s != null) {
        try {
            if (data.args != null) {
                // 给Intent设置ClassLoader
                data.args.setExtrasClassLoader(s.getClassLoader());
                data.args.prepareToEnterProcess();
            }
            int res;
            if (!data.taskRemoved) {
                // 触发Service的onStartCommand生命周期回调
                res = s.onStartCommand(data.args, data.flags, data.startId);
            } else {
                s.onTaskRemoved(data.args);
                res = Service.START_TASK_REMOVED_COMPLETE;
            }

            // 这里会阻塞当前线程,直到QueuedWork中的Runnable执行完毕。(SharedPreference会用到)
            QueuedWork.waitToFinish();

            try {
                // 通知AMS执行完成
                ActivityManager.getService().serviceDoneExecuting(
                        data.token, SERVICE_DONE_EXECUTING_START, data.startId, res);
            } catch (RemoteException e) {
                throw e.rethrowFromSystemServer();
            }
        } catch (Exception e) {
            if (!mInstrumentation.onException(s, e)) {
                throw new RuntimeException(
                        "Unable to start service " + s
                        + " with " + data.args + ": " + e.toString(), e);
            }
        }
    }
}
这里取出缓存的Service实例,然后便调用其onStartCommand生命周期回调方法。最后也会通知AMS进行状态更新操作。
到这里,Service的启动流程便完成,先后经过了onCreate和onStartCommand生命周期回调。
Service超时机制
在Service启动过程中,AMS会进行超时机制相关设置,包括设置超时时间、触发超时处理、移除超时处理。
设置超时
回到ActiveServices#realStartServiceLocked方法中,在调度应用进程创建Service前,会先执行bumpServiceExecutingLocked方法,在该方法中会调用scheduleServiceTimeoutLocked方法进行超时监听的设置。
[ActiveServices#scheduleServiceTimeoutLocked]
void scheduleServiceTimeoutLocked(ProcessRecord proc) {
    if (proc.executingServices.size() == 0 || proc.thread == null) {
        return;
    }
    // 获取SERVICE_TIMEOUT_MSG消息
    Message msg = mAm.mHandler.obtainMessage(
            ActivityManagerService.SERVICE_TIMEOUT_MSG);
    msg.obj = proc;
    // 发送延迟消息
    mAm.mHandler.sendMessageDelayed(msg,
            proc.execServicesFg ? SERVICE_TIMEOUT : SERVICE_BACKGROUND_TIMEOUT);
}
该方法中发送一个延迟消息SERVICE_TIMEOUT_MSG,当20s(启动前台服务)或200s(启动后台服务)后仍没有执行完,则会触发超时处理。
移除超时
当应用进程侧完成Service启动后,便会调用AMS侧的ActiveServices#serviceDoneExecutingLocked方法,其中会进行超时消息的移除:
[ActiveServices#serviceDoneExecutingLocked]
private void serviceDoneExecutingLocked(ServiceRecord r, boolean inDestroying,
        boolean finishing) {
    // ···
    // 移除SERVICE_TIMEOUT_MSG消息
    mAm.mHandler.removeMessages(ActivityManagerService.SERVICE_TIMEOUT_MSG, r.app);
    // ···
}
触发超时
若在规定时间内,应用侧没有及时完成启动流程和通知AMS,则会触发超时逻辑,将会执行ActiveServices的serviceTimeout方法。
[ActiveServices#serviceTimeout]
void serviceTimeout(ProcessRecord proc) {
    // ···
    if (anrMessage != null) {
        // dump ANR信息和触发ANR弹窗
        proc.appNotResponding(null, null, null, null, false, anrMessage);
    }
}
当触发超时后,将会触发ANR。
当目标Service进程未启动时
在前面的ActiveServices#bringUpServiceLocked方法中,会首先判断若目标Service进程尚未已经启动,则会先启动应用进程,然后将ServiceRecord保存在mPendingServices集合中。
当应用进程启动后,会调用ActivityManagerService的attachApplicationLocked方法,在该方法中会执行待启动的Service。
[ActivityManagerService#attachApplicationLocked]
private final boolean attachApplicationLocked(IApplicationThread thread,
        int pid, int callingUid, long startSeq) {
    // ···
    // thread.bindApplication
    // ···
    // Find any services that should be running in this process...
    if (!badApp) {
        try {
            // 启动等待对应进程启动的Service
            didSomething |= mServices.attachApplicationLocked(app, processName);
            checkTime(startTime, "attachApplicationLocked: after mServices.attachApplicationLocked");
        } catch (Exception e) {
            Slog.wtf(TAG, "Exception thrown starting services in " + app, e);
            badApp = true;
        }
    }
    // ···
}
调用了ActiveServices的attachApplicationLocked方法:
[ActiveServices#attachApplicationLocked]
boolean attachApplicationLocked(ProcessRecord proc, String processName)
        throws RemoteException {
    boolean didSomething = false;
    // Collect any services that are waiting for this process to come up.
    if (mPendingServices.size() > 0) {
        ServiceRecord sr = null;
        try {
            // 遍历待启动ServiceRecord
            for (int i=0; i<mPendingServices.size(); i++) {
                sr = mPendingServices.get(i);
                if (proc != sr.isolatedProc && (proc.uid != sr.appInfo.uid
                        || !processName.equals(sr.processName))) {
                    continue;
                }

                mPendingServices.remove(i);
                i--;
                proc.addPackage(sr.appInfo.packageName, sr.appInfo.longVersionCode,
                        mAm.mProcessStats);
                // 执行realStartServiceLocked进行启动流程
                realStartServiceLocked(sr, proc, sr.createdFromFg);
                didSomething = true;
                if (!isServiceNeededLocked(sr, false, false)) {
                    // We were waiting for this service to start, but it is actually no
                    // longer needed.  This could happen because bringDownServiceIfNeeded
                    // won't bring down a service that is pending...  so now the pending
                    // is done, so let's drop it.
                    bringDownServiceLocked(sr);
                }
            }
        } catch (RemoteException e) {
            Slog.w(TAG, "Exception in new application when starting service "
                    + sr.shortInstanceName, e);
            throw e;
        }
    }
    // Also, if there are any services that are waiting to restart and
    // would run in this process, now is a good time to start them.  It would
    // be weird to bring up the process but arbitrarily not let the services
    // run at this point just because their restart time hasn't come up.
    if (mRestartingServices.size() > 0) {
        // 省略待重启Service部分 ···
    }
    return didSomething;
}
可以看到,当应用进程启动完成通知AMS后,会再进行Service启动流程。
stopService过程
停止Service通过调用context.stopService方法:
[ContextImpl#stopService]
public boolean stopService(Intent service) {
    warnIfCallingFromSystemProcess();
    return stopServiceCommon(service, mUser);
}

private boolean stopServiceCommon(Intent service, UserHandle user) {
    try {
        // ···
        // 请求AMS执行stopService调度
        int res = ActivityManager.getService().stopService(
            mMainThread.getApplicationThread(), service,
            service.resolveTypeIfNeeded(getContentResolver()), user.getIdentifier());
        // ···
    } catch (RemoteException e) {
        throw e.rethrowFromSystemServer();
    }
}
和startService一样,也是调用ActivityManagerService的方法,在stopService中又会调用ActiveServices的stopServiceLocked方法:
[ActiveServices#stopServiceLocked]
int stopServiceLocked(IApplicationThread caller, Intent service,
        String resolvedType, int userId) {
    // ···
    // If this service is active, make sure it is stopped.
    ServiceLookupResult r = retrieveServiceLocked(service, null, resolvedType, null,
            Binder.getCallingPid(), Binder.getCallingUid(), userId, false, false, false, false);
    if (r != null) {
        if (r.record != null) {
            final long origId = Binder.clearCallingIdentity();
            try {
                stopServiceLocked(r.record);
            } finally {
                Binder.restoreCallingIdentity(origId);
            }
            return 1;
        }
        return -1;
    }

    return 0;
}
首先查找目标ServiceRecord,然后调用stopServiceLocked方法。
stopServiceLocked方法最终会调用bringDownServiceLocked方法:
[ActiveServices#bringDownServiceLocked]
private final void bringDownServiceLocked(ServiceRecord r) {
    // ···

    if (r.app != null) {
        if (r.app.thread != null) {
            try {
                // ···
                r.app.thread.scheduleStopService(r);
            } catch (Exception e) {
                // ···
            }
        } else {
            // ···
        }
    } else {
        // ···
    }

    // ···
}
调度应用进程执行stop操作。
scheduleStopService将发送H.STOP_SERVICE消息,最终将执行handleStopService方法:
[ActivityThread#handleStopService]
private void handleStopService(IBinder token) {
    // 获取缓存的Service实例
    Service s = mServices.remove(token);
    if (s != null) {
        try {
            if (localLOGV) Slog.v(TAG, "Destroying service " + s);
            // 执行onDestroy回调
            s.onDestroy();
            s.detachAndCleanUp();
            Context context = s.getBaseContext();
            if (context instanceof ContextImpl) {
                final String who = s.getClassName();
                ((ContextImpl) context).scheduleFinalCleanup(who, "Service");
            }

            QueuedWork.waitToFinish();

            try {
                // 通知AMS
                ActivityManager.getService().serviceDoneExecuting(
                        token, SERVICE_DONE_EXECUTING_STOP, 0, 0);
            } catch (RemoteException e) {
                throw e.rethrowFromSystemServer();
            }
        } catch (Exception e) {
            // ···
        }
    } else {
        Slog.i(TAG, "handleStopService: token=" + token + " not found.");
    }
    //Slog.i(TAG, "Running services: " + mServices);
}
应用侧stopService就是从mServices集合中移除Service实例,并执行它的onDestroy生命周期回调方法,最后通知AMS。
总结
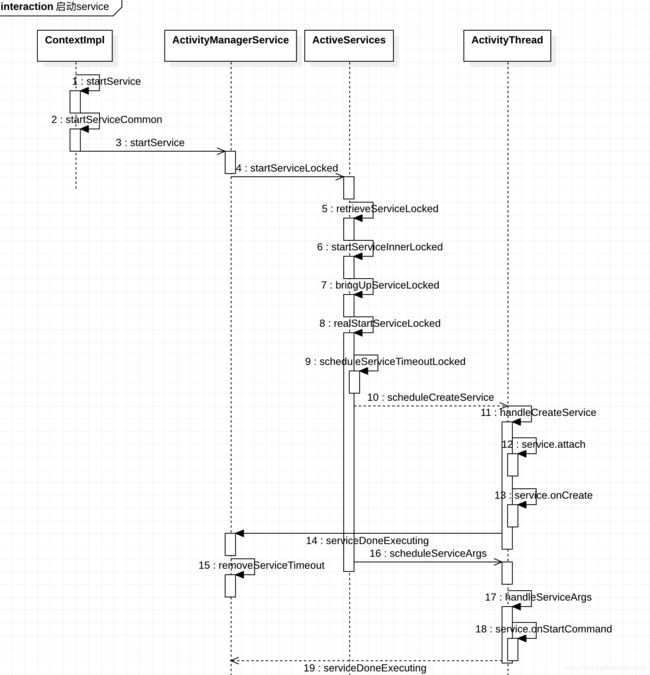
Service的启动和停止都是通过发请求给ActivityManagerService,由AMS来进行调度分发。AMS侧通过ServiceRecord记录运行Service的信息,应用侧通过mServices集合保存反射创建的Service实例。AMS发送启动或停止指令到应用侧后,由应用侧对Service实例执行对应的生命周期回调。
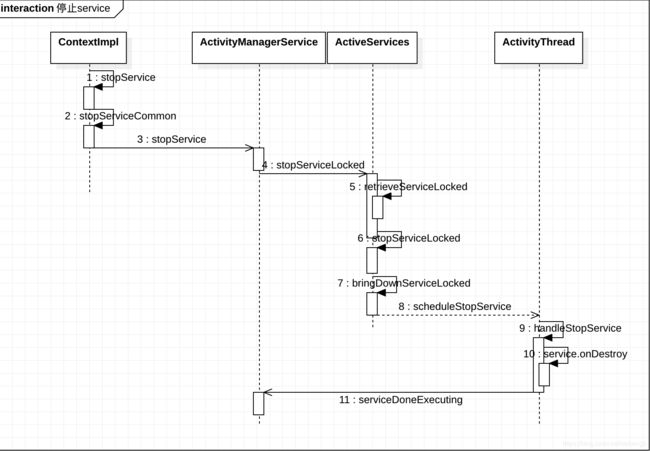
下面用时序图总结这两个流程。
启动流程:
停止流程: