ELK+Beats日志分析系统部署
阅读目录
- 1.集群部署
- 2. 安装JDK 1.8
- 3. 搭建ElasticSearch
- 4. 搭建Logstash
- 5. 搭建Kibana
- 6.搭建FileBeat
一、名词介绍:
- Elasticsearch:分布式搜索和分析引擎,具有高可伸缩、高可靠和易管理等特点。基于 Apache Lucene 构建,能对大容量的数据进行接近实时的存储、搜索和分析操作。通常被用作某些应用的基础搜索引擎,使其具有复杂的搜索功能;
- Logstash:数据处理引擎,它支持动态的从各种数据源搜集数据,并对数据进行过滤、分析、丰富、统一格式等操作,然后存储到 ES;
- Kibana:数据分析和可视化平台。与 Elasticsearch 配合使用,对数据进行搜索、分析和以统计图表的方式展示;
- Filebeat:ELK 协议栈的新成员,一个轻量级开源日志文件数据搜集器,使用 golang 基于 Logstash-Forwarder 源代码开发,是对它的替代。在需要采集日志数据的 server 上安装 Filebeat,并指定日志目录或日志文件后,Filebeat 就能读取数据,迅速发送到 Logstash 进行解析。
二、应用包准备
elasticsearch-7.2.0.tar.gz
logstash-7.2.0.tar.gz
kibana-7.2.0-linux-x86_64.tar.gz
filebeat-7.2.0-linux-x86_64.tar.gz
jdk-7 以上
三、部署安装:
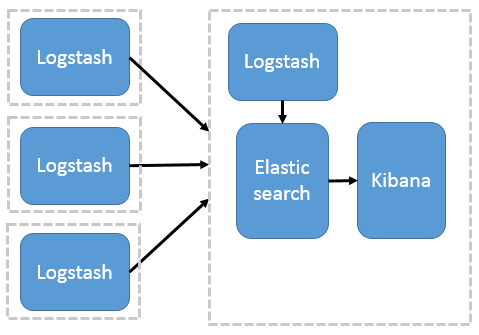
Logstash 分布式采集
这种架构是对上面架构的扩展,把一个 Logstash 数据搜集节点扩展到多个,分布于多台机器,将解析好的数据发送到 Elasticsearch server 进行存储,最后在 Kibana 查询、生成日志报表等
这种结构因为需要在各个服务器上部署 Logstash,而它比较消耗 CPU 和内存资源,所以比较适合计算资源丰富的服务器,否则容易造成服务器性能下降,甚至可能导致无法正常工作。
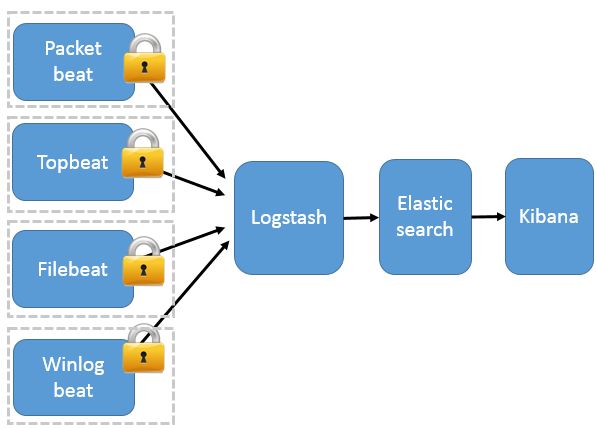
Beats 分布式采集
这种架构引入 Beats 作为日志搜集器。目前 Beats 包括四种:
- Packetbeat(搜集网络流量数据);
- Topbeat(搜集系统、进程和文件系统级别的 CPU 和内存使用情况等数据);
- Filebeat(搜集文件数据);
- Winlogbeat(搜集 Windows 事件日志数据)。
Beats 将搜集到的数据发送到 Logstash,经 Logstash 解析、过滤后,将其发送到 Elasticsearch 存储,并由 Kibana 呈现给用户
这种架构解决了 Logstash 在各服务器节点上占用系统资源高的问题。相比 Logstash,Beats 所占系统的 CPU 和内存几乎可以忽略不计。另外,Beats 和 Logstash 之间支持 SSL/TLS 加密传输,客户端和服务器双向认证,保证了通信安全。
因此这种架构适合对数据安全性要求较高,同时各服务器性能比较敏感的场景。
如果logstash 压力很大,那么可以考虑filebeat 和logstash 之间引入redis或kafka作为缓冲。
1、jdk安装
一.安装java
解压到当前目录:
tar -xzvf jdk-8u144-linux-x64.tar.gz -C /usr/local/临时配置 jdk 环境:(重启之后失效)
export JAVA_HOME=/usr/local/w0624/jdk1.8.0_144
export PATH=$JAVA_HOME/bin:$PATH
export CLASSPATH=.
配置在环境变量中
vim ~/.bashrc


export JAVA_HOME=/usr/local/jdk1.8.0_144
export JRE_HOME=${JAVA_HOME}/jre
export CLASSPATH=.:${JAVA_HOME}/lib:${JRE_HOME}/lib
export PATH=${JAVA_HOME}/bin:$PATH


source ~/.bashrc
2、搭建ElasticSearch集群
- 三台机器
kaikai1 192.168.210.40
kaikai2 192.168.210.44
kaikai3 192.168.210.45
- 环境配置
sudo vim /etc/security/limits.conf
* soft nproc 65536
* hard nproc 65536
* soft nofile 65536
* hard nofile 65536

sudo vim /etc/sysctl.conf
vm.max_map_count=655360

sudo vim /etc/security/limits.d/90-nproc.conf
* soft nproc 4096

sysctl -p- ElasticSearch配置
mkdir -p /data/es-data
mkdir -p /var/log/elasticsearch

chown -R user:user /data/es-data
chown -R user:user /var/log/elasticsearch- 解压准备好的安装包
tar -zxvf elasticsearch-7.2.0-linux-x86_64.tar.gz- 192.168.210.40 机器配置
vim elasticsearch-7.2.0/config/elasticsearch.yml

# 节点和集群名
cluster.name: es-ELK   # 三台机器集群名必须一样
node.name: node-1      # 节点名
node.master: true      # 是否设置为主节点
node.data: true        # 是否设置为数据节点
# 日志和数据目录
path.data: /data/es-data/  # 数据目录
path.logs: /var/log/elasticsearch/  # 日志目录

# 访问的host和port设置
network.host: 0.0.0.0
http.port: 9200

# 设置跨域请求,为后面的界面化展示使用
http.cors.enabled: true
http.cors.allow-origin: "*"

# 节点挂载
discovery.seed_hosts: ["192.168.210.40", "192.168.210.44","192.168.210.45"]
discovery.zen.minimum_master_nodes: 2


# 使用初始的一组符合主节点条件的节点引导集群 一般与node.name相同
cluster.initial_master_nodes: ["node-1"]- 192.168.210.44 机器配置
vim elasticsearch-7.2.0/config/elasticsearch.yml

# 节点和集群名
cluster.name: es-ELK   # 三台机器集群名必须一样
node.name: node-2      # 节点名
node.master: false      # 是否设置为主节点
node.data: true        # 是否设置为数据节点
# 日志和数据目录
path.data: /data/es-data/  # 数据目录
path.logs: /var/log/elasticsearch/  # 日志目录

# 访问的host和port设置
network.host: 0.0.0.0
http.port: 9200

# 设置跨域请求,为后面的界面化展示使用
http.cors.enabled: true
http.cors.allow-origin: "*"

# 节点挂载
discovery.seed_hosts: ["192.168.210.40", "192.168.210.44","192.168.210.45"]
discovery.zen.minimum_master_nodes: 2


# 使用初始的一组符合主节点条件的节点引导集群 一般与node.name相同
cluster.initial_master_nodes: ["node-2"]- 192.168.210.45 机器配置
vim elasticsearch-7.2.0/config/elasticsearch.yml

# 节点和集群名
cluster.name: es-ELK   # 三台机器集群名必须一样
node.name: node-3      # 节点名
node.master: false      # 是否设置为主节点
node.data: true        # 是否设置为数据节点
# 日志和数据目录
path.data: /data/es-data/  # 数据目录
path.logs: /var/log/elasticsearch/  # 日志目录

# 访问的host和port设置
network.host: 0.0.0.0
http.port: 9200

# 设置跨域请求,为后面的界面化展示使用
http.cors.enabled: true
http.cors.allow-origin: "*"

# 节点挂载
discovery.seed_hosts: ["192.168.210.40", "192.168.210.44","192.168.210.45"]
discovery.zen.minimum_master_nodes: 2


# 使用初始的一组符合主节点条件的节点引导集群 一般与node.name相同
cluster.initial_master_nodes: ["node-3"]- 三台机器分别启动
nohup ./bin/elasticsearch &- 执行 curl -X GET http://192.168.210.40:9200 出现以下结果表示安装成功
{
  "name" : "node-1",
  "cluster_name" : "AI-ELK",
  "cluster_uuid" : "pOTpS1cwRRGqiRU4BCY4Qg",
  "version" : {
    "number" : "7.2.0",
    "build_flavor" : "default",
    "build_type" : "tar",
    "build_hash" : "508c38a",
    "build_date" : "2019-06-20T15:54:18.811730Z",
    "build_snapshot" : false,
    "lucene_version" : "8.0.0",
    "minimum_wire_compatibility_version" : "6.8.0",
    "minimum_index_compatibility_version" : "6.0.0-beta1"
  },
  "tagline" : "You Know, for Search"
}- 常用的命令
- 查询所有数据:curl http://192.168.210.40:9200/_search?pretty
- 集群健康状态:curl -XGET http://192.168.210.40:9200/_cluster/health?pretty
- 删除所有数据:curl -X DELETE 'http://192.168.210.40:9200/_all'
- 删除指定索引:curl -X DELETE 'http://192.168.210.40:9200/索引名称'
注: 这里最好不要使用localhost,因为我们需要远程访问,所以,我们应该直接使用对应服务器的ip地址
到此就安装成功了
- 下面提供一个安装elasticsearch界面展示在192.168.210.40上安装即可
git clone git://github.com/mobz/elasticsearch-head.git
- node安装
1.安装
$ sudo apt-get install nodejs
$ sudo apt-get install npm
2.升级
$ sudo npm install npm -g
$ npm install –g n
$ n latest(升级node.js到最新版) or $ n stable(升级node.js到最新稳定版)
n后面也可以跟随版本号比如:$ n v0.10.26 或者 $ n 0.10.26
3.npm镜像替换为淘宝镜像
$ npm config set registry http://registry.npm.taobao.org/
$ npm get registry
- 启动elaticsearch界面项目
npm install
npm run start
访问http://192.168.210.40:9100/
OK 搜索集群已经搭建好了,一路向前,莫问前程!!!
3、搭建Logstash
- 解压准备好的安装包
tar -zxvf logstash-7.2.0.tar.gz- 编写 采集多个日志互相隔离 并进行对标准的日志进行分词
普通启动方式:
nohup bin/logstash -f config/app.yml &多配置文件启动方式:
nohup bin/logstash -f config/yml/ &注意:yml是个文件夹下面可以有很多个.yml文件
vim log1.yml


input {
    file {
       type => "log1"
       path => "/var/log/tdsp/t.log"
       discover_interval => 10 # 监听间隔
       start_position => "beginning"
    }
    #beats{
           # port => "5045"
      # }
}
filter {
    mutate {
       split => {"message" => "|"}
    }

    mutate {
        add_field => {
           "date" => "%{[message][0]}"
           "grade" => "%{[message][1]}"
           "infosource" => "%{[message][2]}"
           "msg" => "%{[message][3]}"
           "ip2long" => "%{[message][4]}"
        }
    }
    mutate {
       convert => {
           "date" => "string"
           "grade" => "string"
           "infosource" => "string"
           "msg" => "string"
           "ip2long" => "string"
       }
    }
}


output {
   if [type] == "log1" {
       elasticsearch {
           hosts => ["192.168.210.40:9200","192.168.210.44:9200","192.168.210.45:9200"]
           index => "kaikai-%{+YYYY-MM-dd}"
       }
   }
}
# 输出在控制台进行调试时候使用
#output {
#   if [type] == "log1" {
#       stdout {codec => rubydebug}
#   }
#}
vim log2.yml


input {
    file {
       type => "log2"
       path => "/var/log/tdsp/w.log"
       discover_interval => 10 # 监听间隔
       start_position => "beginning"
    }
    #beats{
           # port => "5045"
      # }
}
filter {
    mutate {
       split => {"message" => "|"}
    }

    mutate {
        add_field => {
           "date" => "%{[message][0]}"
           "grade" => "%{[message][1]}"
           "infosource" => "%{[message][2]}"
           "msg" => "%{[message][3]}"
           "ip2long" => "%{[message][4]}"
        }
    }
    mutate {
       convert => {
           "date" => "string"
           "grade" => "string"
           "infosource" => "string"
           "msg" => "string"
           "ip2long" => "string"
       }
    }
}


output {
   if [type] == "log2" {
       elasticsearch {
           hosts => ["192.168.210.40:9200","192.168.210.44:9200","192.168.210.45:9200"]
           index => "test-%{+YYYY-MM-dd}"
       }
   }
}

#output {
#   if [type] == "log2" {
#       stdout {codec => rubydebug}
#   }
#}
多个日志互相隔离方法二模板
input {
    file {
       type => "log1"
       path => "/xxx/xxx/*.log"
       discover_interval => 10
       start_position => "beginning"
    }
    file {
      type => "log2"
      path => "/xxx/xxx/*.log"
      discover_interval => 10
      start_position => "beginning"
    }
    file {
      type => "log3"
      path => "/xxx/xxx/*.log"
      discover_interval => 10
      start_position => "beginning"
    }
    #beats{
           # port => "5045"
      # }
}


filter {
    if [type] == "log1" {
        mutate {
           split => {"message" => "|"}  # 分割日志
        }
        mutate {
            add_field => {
               "x1" => "%{[message][0]}"
               "x2" => "%{[message][1]}"
               "x3" => "%{[message][2]}"
            }

        }
        mutate {
            convert => {
               "x1" => "string"
               "x2" => "string"
               "x3" => "string"
            }
        }

        json {
            source => "xxx"
            target => "xxx"
        }
        mutate {
           remove_field => ["xxx","xxx","xxx","xxx"]  # 删除字段
        }
    }
    else if [type] == "log2" {
        mutate {
           split => {"message" => "|"}
        }

        mutate {
            add_field => {
               "x1" => "%{[message][0]}"
               "x2" => "%{[message][1]}"
               "x3" => "%{[message][2]}"

            }
        }
        mutate {
           convert => {
               "x1" => "string"
               "x2" => "string"
               "x3" => "string"
           }
        }
        json {
            source => "xxx"
            target => "xxx"
        }
        mutate {
           remove_field => ["xxx","xxx","xxx","xxx"]
        }
    }
}

output {
   if [type] == "log1" {
       elasticsearch {
           hosts => ["192.168.210.40:9200","192.168.210.44:9200","192.168.210.45:9200"]
           index => "log1-%{+YYYY-MM-dd}"
      }
   }
   else if [type] == "log2" {
       elasticsearch {
           hosts => ["192.168.210.40:9200","192.168.210.44:9200","192.168.210.45:9200"]
           index => "log2-%{+YYYY-MM-dd}"
      }
   }
}
#output {
#   stdout {codec => rubydebug}
#}
启动测试
写入两条日志,在es集群中进行查看是否收集到日志
echo "2019-11-18 13:53:35|ERROR|MQTT connected error|错1|2130708993" >> /var/log/tdsp/t.log
echo "2019-11-18 13:53:35|ERROR|MQTT connected error|错1|2130708993" >> /var/log/tdsp/w.log
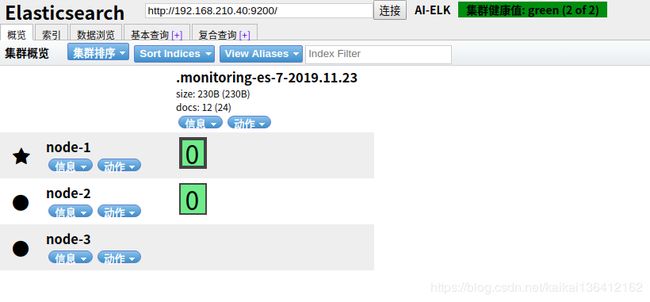
生成test-2019-11-23 和 kaikai-2019-11-23两个切片表示已经收集成功
OK logstash 部署成功,我住长江头,君住长江尾,日日思君不见君,共饮长江水。。。
4.搭建kibana
部署机器192.168.210.42
tar -zxvf kibana-7.2.0-linux-x86_64.tar.gz更改配置
kibana-7.2.0-linux-x86_64/config/kibana.yml


server.port: 5602
server.host: "0.0.0.0"
elasticsearch.hosts: ["http://192.168.210.40:9200"]
# 设置语言
i18n.locale: "zh-CN"
启动
nohup ./bin/kibana &
访问:http://192.168.210.42:5602/
OK 部署成功 具体操作后面在介绍 我只是敢和别人不一样
5.搭建FileBeat
- fileBeat 为轻量级采集日志工具
tar -zxvf filebeat-7.2.0-linux-x86_64.tar.gz介绍一个filebeat采集日志,发送到logstash进行日志分词处理,在推送到elasticsearch集群中收集,最后在kibana中进行生成日志报表,进行分析
- filebeat 日志采集配置 和产生日志的机器上进行部署
vim aap.yml

filebeat.inputs:
- type: log
  enabled: true
  paths:
    - /var/log/tdsp/*.log
#  tags: ["nginx"] # 添加自定义的tag
setup.template.settings:
  index.number_of_shards: 3
#output.console:
#  pretty: true
#  enable: true


output.logstash:
  hosts: ["192.168.210.41:5044"]
#filebeat.config.modules:
#  path: ${path.config}/modules.d/*.yml
#  reload.enabled: false

#setup.kibana:
#  host: "192.168.210.42:5602"

#output.elasticsearch:
#  hosts: ["192.168.210.40","192.168.210.44","192.168.210.45"]

# 测试控制台输入输出
#filebeat.inputs:
#- type: stdin
#  enabled: true
#setup.template.settings:
#  index.number_of_shards: 3
#output.console:
#  pretty: true
# enable: true- logstash 设置配置接受frlebeat采集的日志,并处理分词 192.168.210.41 机器
nput {
   beats{
      port => "5044"
   }
}
filter {
    mutate {
       split => {"message" => "|"}
    }

    mutate {
        add_field => {
           "date" => "%{[message][0]}"
           "grade" => "%{[message][1]}"
           "infosource" => "%{[message][2]}"
           "msg" => "%{[message][3]}"
           "ip2long" => "%{[message][4]}"
        }
    }
    mutate {
       convert => {
           "date" => "string"
           "grade" => "string"
           "infosource" => "string"
           "msg" => "string"
           "ip2long" => "string"
       }
    }
}


output {
        elasticsearch {
                hosts => ["192.168.210.40:9200","192.168.210.44:9200","192.168.210.45:9200"]
                index => "kaikai-%{+YYYY-MM-dd}"
        }
}

#output {
#   stdout {codec => rubydebug}
#}- logstash启动 日志过滤
./bin/logstash -f app.yml- 启动filebeat 采集日志
./filebeat -e -c app.yml- 输入日志到/var/log/tdsp/
echo '2019-11-18 13:53:35|ERROR|MQTT connected error|错1|2130708993' >> /var/log/tdsp/a.log- 在es集群中查看数据 http://192.168.210.40:9100/
在集群中生成了filebeat所采集的日志,最后在kibana中进行日志索引,进行生成日志报表即可
官方文档及下载https://www.elastic.co/
Elasticsearch集群详细介绍https://blog.csdn.net/kaikai136412162/article/details/103219650
Filebeat工作原理https://blog.csdn.net/kaikai136412162/article/details/103220225
日志采集工具Metricbeathttps://blog.csdn.net/kaikai136412162/article/details/103220303
Kibana介绍https://blog.csdn.net/kaikai136412162/article/details/103220370
Logstash介绍https://blog.csdn.net/kaikai136412162/article/details/103220397


