机器学习之使用plt绘制评价指标
目录
1绘制点状图
2.绘制某一列数据的分布图
3.绘制柱状图
4.绘制两两特征相关性热力图
5.箱线图
6.绘制AUC或者正确率等曲线
7seaborn中pairplot函数可视化探索数据特征间的关系
8热力图
9.绘制特征与分类标签之间的分布图
1绘制点状图
import numpy as np # linear algebra
import pandas as pd # data processing, CSV file I/O (e.g. pd.read_csv)
%matplotlib inline
import matplotlib.pyplot as plt  # Matlab-style plotting
import seaborn as sns
color = sns.color_palette()
sns.set_style('darkgrid')
import warnings
def ignore_warn(*args, **kwargs):
    pass
warnings.warn = ignore_warn #ignore annoying warning (from sklearn and seaborn)


from scipy import stats
from scipy.stats import norm, skew #for some statistics


pd.set_option('display.float_format', lambda x: '{:.3f}'.format(x)) #Limiting floats output to 3 decimal points


fig, ax = plt.subplots()
ax.scatter(x = train['GrLivArea'], y = train['SalePrice'])
plt.ylabel('SalePrice', fontsize=13)
plt.xlabel('GrLivArea', fontsize=13)
plt.show()
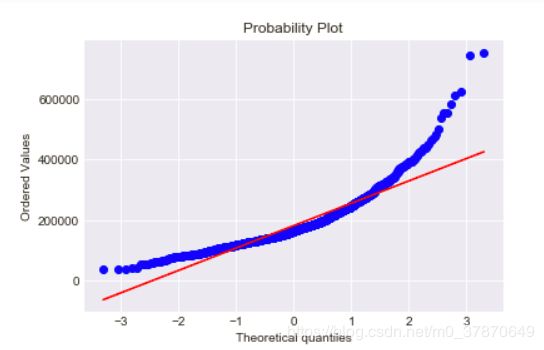
2.绘制某一列数据的分布图
sns.distplot(train['SalePrice'] , fit=norm);

# Get the fitted parameters used by the function
(mu, sigma) = norm.fit(train['SalePrice'])
print( '\n mu = {:.2f} and sigma = {:.2f}\n'.format(mu, sigma))

#Now plot the distribution
plt.legend(['Normal dist. ($\mu=$ {:.2f} and $\sigma=$ {:.2f} )'.format(mu, sigma)],
            loc='best')
plt.ylabel('Frequency')
plt.title('SalePrice distribution')

#Get also the QQ-plot
fig = plt.figure()
res = stats.probplot(train['SalePrice'], plot=plt)
plt.show()
mu = 180932.92 and sigma = 79467.79
#We use the numpy fuction log1p which  applies log(1+x) to all elements of the column
train["SalePrice"] = np.log1p(train["SalePrice"])

#Check the new distribution
sns.distplot(train['SalePrice'] , fit=norm);

# Get the fitted parameters used by the function
(mu, sigma) = norm.fit(train['SalePrice'])
print( '\n mu = {:.2f} and sigma = {:.2f}\n'.format(mu, sigma))

#Now plot the distribution
plt.legend(['Normal dist. ($\mu=$ {:.2f} and $\sigma=$ {:.2f} )'.format(mu, sigma)],
            loc='best')
plt.ylabel('Frequency')
plt.title('SalePrice distribution')

#Get also the QQ-plot
fig = plt.figure()
res = stats.probplot(train['SalePrice'], plot=plt)
plt.show()
mu = 12.02 and sigma = 0.403.绘制柱状图
f, ax = plt.subplots(figsize=(15, 12))
plt.xticks(rotation='90')
sns.barplot(x=all_data_na.index, y=all_data_na)
plt.xlabel('Features', fontsize=15)
plt.ylabel('Percent of missing values', fontsize=15)
plt.title('Percent missing data by feature', fontsize=15)
4.绘制两两特征相关性热力图
corrmat = train.corr()
plt.subplots(figsize=(12,9))
sns.heatmap(corrmat, vmax=0.9, square=True)
5.箱线图
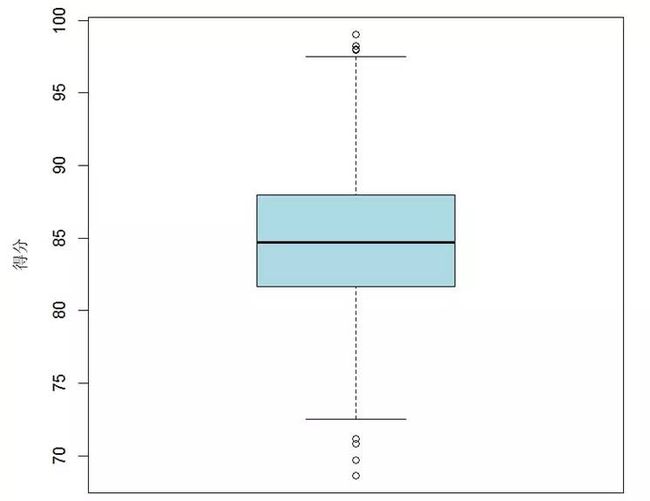
首先看一个长相标致的箱线图。水妈模拟了一个样本数据,是学生期末考试得分,箱线图如图1所示。
图1 学生期末考试成绩箱线图
看图说话,注意以下几个点:
箱子的中间一条线,是数据的中位数,代表了样本数据的平均水平。
箱子的上下限,分别是数据的上四分位数和下四分位数。这意味着箱子包含了50%的数据。因此,箱子的宽度在一定程度上反映了数据的波动程度。
在箱子的上方和下方,又各有一条线。有时候代表着最大最小值,有时候会有一些点“冒出去”。请千万不要纠结,不要纠结,不要纠结(重要的事情说三遍),如果有点冒出去,理解成“异常值”就好。
以上是解读箱线图最基本的三要素。虽然箱线图也能看分布的形态,但人们更习惯从直方图去解读分布的形态,而非箱线图。在了解了箱线图之后,我们今天着重讲两个事情。
第一件事情,不是所有的数据都适合画箱线图,不信,请看学生画的丑图。
图2 丑图示例
这几组箱线图看着不舒服,主要原因是,箱子被压得很扁,甚至只剩下一条线,同时还存在着很多刺眼的异常值。这种情况的出现,有两个常见的原因。第一是,样本数据中,存在特别大或者特别小的异常值,这种离群的表现,导致箱子整体被压缩,反而凸显出来这些异常;第二是,样本数据特别少,数据一少,就有可能出现各种诡异的情况,导致统计图长得对不起观众。
如果你画出的箱线图是这样的,那么有两个解决办法。第一,如果数据取值为正数,那么可以尝试做对数变换。对数变换水妈必须墙裂推荐,称得上画图界的整容神器,专治各种不对称分布、非正态分布和异方差现象等。图3就是整容前后的一组箱线图。你说我不想做变换,那么可以采取第二种解决办法,那就是,不画箱线图。
图3 对数变换前后的箱线图
以上是第一点要说明的,不是所有数据都适合画箱线图。第二点要说明的,更加重要的,那就是箱线图应该怎么用。答案是,配合着定性变量画分组箱线图,作比较!分组箱线图是水妈最喜欢的统计画图工具,没有之一。
如果只有一个定量变量,很少用一个箱线图去展示其分布,而是更多的选择直方图。箱线图更有效的使用方法,是作比较。我们举两个栗子。
第一个例子,我上课经常讲。假设我现在要比较男女教师的教学评估得分,用什么工具最好。答案是箱线图。没有比较就没有伤害,大家看图4能够明显感觉到箱线图是更有效的工具,能够从平均水平(中位数),波动程度(箱子宽度)以及异常值对男女教师的教学评估得分进行比较,而直方图却做不到。
图4 进行比较时,箱线图是更有效的工具
代码:
sns.boxplot(y = target)
Out[8]:
target.skew() #target数据的分布偏差较大
Out[10]:
1.88287575976821296.绘制AUC或者正确率等曲线
auc=np.array([0.63,0.65,0.67,0.68,0.70,0.73,0.733])
auc=list(auc)
%matplotlib inline
%config InlineBackend.figure_format = 'retina'
import matplotlib.pyplot as plt
plt.plot(auc, label='pred')
plt.legend()
_ = plt.ylim()
print(auc)
[0.63, 0.65, 0.67, 0.68, 0.7, 0.73, 0.733]7seaborn中pairplot函数可视化探索数据特征间的关系
seaborn中pairplot函数可视化探索数据特征间的关系,案例使用数据集为波士顿房价数据集。
import matplotlib.pyplot as plt
import seaborn as sns
import pandas as pd
import numpy as np

# 读取数据
df = pd.read_csv('boston.csv', sep=',')
df.columns = ['CRIM', 'ZN', 'INDUS', 'CHAS',
              'NOX', 'RM', 'AGE', 'DIS', 'RAD',
              'TAX', 'PTRATIO', 'LSTAT', 'MEDV']
print(df.head())

# 利用探索新数据分析工具可视化特征两两间的广西
sns.set(style='whitegrid', context='notebook')
cols = ['LSTAT', 'INDUS', 'NOX', 'RM', 'MEDV']
sns.pairplot(df[cols], size=2.5)
plt.show()
可视化效果图:
8热力图
数据接7中的数据
# 可视化相关系数矩阵,理论:皮尔逊相关系数
cm = np.corrcoef(df[cols].values.T)
sns.set(font_scale=1.5)
hm = sns.heatmap(cm,
                 cbar=True,
                 annot=True,
                 square=True,
                 fmt='.2f',
                 annot_kws={'size':15},
                 yticklabels=cols,
                 xticklabels=cols)
plt.show()
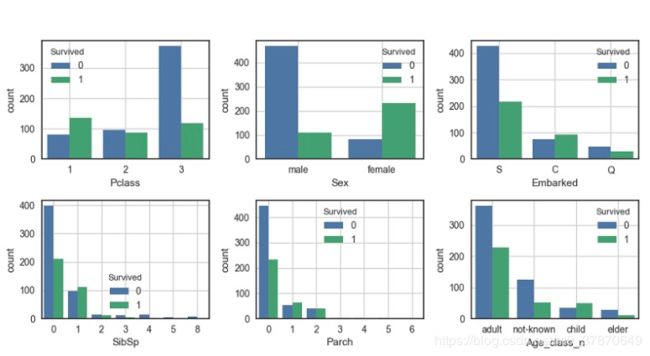
9.绘制特征与分类标签之间的分布图
#---------- analysis the mapping feature to result  ----------#
sns.set(style = 'white')
fig = plt.figure()

# Pclass
plt.subplot2grid((3,3),(0,0))
ax = sns.countplot(x = 'Pclass', hue = 'Survived', data = df_train)
# plt.title('Pclass')
# plt.xlabel('Pclass')
# plt.ylabel('count')
plt.grid(True)
# plt.show()

# Sex
plt.subplot2grid((3,3),(0,1))
ax = sns.countplot(x = 'Sex', hue = 'Survived', data = df_train)
# plt.title('Sex')
# plt.xlabel('Sex')
# plt.ylabel('count')
plt.grid(True)
# plt.show()

# Embarked
plt.subplot2grid((3,3),(0,2))
ax = sns.countplot(x = 'Embarked', hue = 'Survived', data = df_train)
# plt.title('Embarked')
# plt.xlabel('Embarked')
# plt.ylabel('count')
plt.grid(True)
# plt.show()

# SibSp
plt.subplot2grid((3,3),(1,0))
ax = sns.countplot(x = 'SibSp', hue = 'Survived', data = df_train)
# plt.title('SibSp')
# plt.xlabel('SibSp')
# plt.ylabel('count')
plt.grid(True)
# plt.show()

# Parch
plt.subplot2grid((3,3),(1,1))
ax = sns.countplot(x = 'Parch', hue = 'Survived', data = df_train)
# plt.title('Parch')
# plt.xlabel('Parch')
# plt.ylabel('count')
plt.grid(True)
# plt.show()


