thrift与avro RPC使用对比与总结
一、Avro:
1、简介
Avro是Hadoop中的一个子项目,也是Apache中一个独立的项目, Avro是一个数据序列化的系统。Avro 可以将数据结构或对象转化成便于存储或传输的格式。Avro设计之初就用来支持数据密集型应用,适合于远程或本地大规模数据的存储和交换。
2、特点
Avro依赖于模式(Schema)。通过模式定义各种数据结构,只有确定了模式才能对数据进行解释,所以在数据的序列化和反序列化之前,必须先确定模式的结构。正是模式的引入,使得数据具有了自描述的功能,同时能够实现动态加载,另外与其他的数据序列化系统如Thrift相比,数据之间不存在其他的任何标识,有利于提高数据处理的效率。
Avro的模式主要由JSON对象来表示,Avro支持8种基本类型(Primitive Type)和6种复杂类型(ComplexType:records、enums、arrays、maps、unions 和fixed),基本类型可以由JSON字符串来表示。
Avro支持两种序列化编码方式:二进制编码和JSON编码,使用二进制编码会高效序列化,并且序列化后得到的结果会比较小。
Avro和动态语言结合后,读/写数据文件和使用RPC协议都不需要生成代码,而代码生成作为一种可选的优化只需要在静态类型语言中实现。
3、与Thrift, Protocol buffer区别在几方面:
1.Dynamic typing: 不必需生成中间代码(生成代码只是优化选项)
2.Untagged data: 因为schema已经有了,所以数据中只需较少类型信息.
3.No mannually-assigned field ids:因为schema是按field name描述的,不是按field id描述
4、经过实际测试,发现AVRO能够支持多种语言的序列化和反序列化,但是支持的RPC实现语言目前只包括三类:Java,python,ruby,对于c,c#,c++等目前还没有提供Rpc的实现。
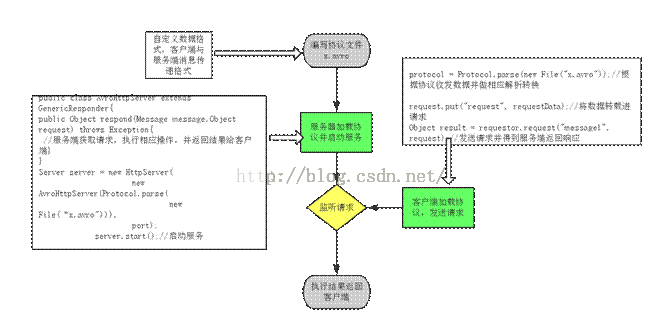
以Java为例说明RPC实现流程:
对于协议文件:重点是要定义自定义数据格式和客户端与服务端的消息格式message
{
"namespace":"avro",//命名空间
"doc":"This is a message.",//对协议的描叙
"protocol":"messageProtocol",
"name":"HelloWorld",
"types":[
{//定义一个数据类型
"name":"responseType",
"type":"record",
"fields":[ {"name":"responseName", "type":"string"} ]
}
],
"messages":{
"message1":{
"doc":"the standardmessage ",
"request":[{"name":"request", "type":"requestType"}],//请求类型
"response":"responseType"//方法返回的数据类型为responseType
}
}
type可定义的参考类型:
avro type jsontype example
null null null
boolean boolean true
int,long integer 1
float,double number 1.1
bytes string "\u00FF"
string string "foo"
record object {"a": 1}
enum string "FOO"
array array [1]
map object {"a": 1}
fixed string "\u00ff"
对于服务器端:需要编写服务类,向类的构造函数传入协议文件,并实现服务响应方法
public AvroHttpServer(Protocol protocol) {
super(protocol);
}
public Object respond(Message message, Object request) throws Exception{
//dosomething.....
}
启动服务时候Server server = newHttpServer(
new AvroHttpServer(Protocol.parse(new File("protocol"))),port);
server.start();便可以启动服务,监听请求。
对于客户端:
构造GenericRequestor 对象,执行该对象的request方法就可以向服务端发送请求,request方法中需要传入客户指定调用的message名字和相应的请求数据。
protocol = Protocol.parse(new File("protocol"));
Transceiver t = new HttpTransceiver(newURL("服务端URL地址"));
GenericRequestor requestor = newGenericRequestor(protocol, t);
request.put("request", requestData);
Object result =requestor.request("message1", request);//返回服务器处理结果
二、Thrift:
Thrift是一个跨语言的服务部署框架,最初由Facebook于2007年开发,2008年进入Apache开源项目。Thrift通过一个中间语言(IDL, 接口定义语言)来定义RPC的接口和数据类型,然后通过一个编译器生成不同语言的代码(目前支持C++,Java, Python, PHP, Ruby, Erlang, Perl, Haskell, C#, Cocoa, Smalltalk和OCaml,最新版0.92才开始支持C),并由生成的代码负责RPC协议层和传输层的实现。。
Thrift实际上是实现了C/S模式,通过代码生成工具将接口定义文件生成服务器端和客户端代码(可以为不同语言),从而实现服务端和客户端跨语言的支持。用户在Thirft描述文件中声明自己的服务,这些服务经过编译后会生成相应语言的代码文件,然后用户实现服务(客户端调用服务,服务器端提服务)便可以了。其中protocol(协议层, 定义数据传输格式,可以为二进制或者XML等)和transport(传输层,定义数据传输方式,可以为TCP/IP传输,内存共享或者文件共享等)被用作运行时库。
缺点是:Thrift适用于程序对程序静态的数据交换,需要先确定好他的数据结构,他是完全静态化的,当数据结构发生变化时,必须重新编辑IDL文件,代码生成,再编译载入的流程,跟其他IDL工具相比较可以视为是Thrift的弱项
优点是:Thrift适用于搭建大型数据交换及存储的通用工具,对于大型系统中的内部数据传输相对于JSON和xml无论在性能、传输大小上有明显的优势。
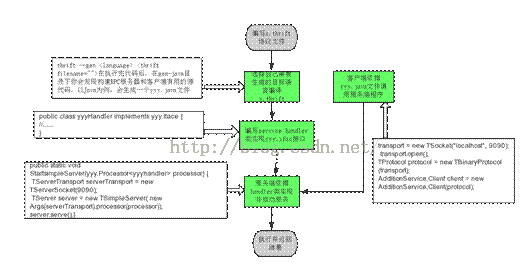
以Java语言实现RPC为例:
首先要编写协议文件,然后根据协议文件手动生成指定语言的代码,再把生成的代码文件嵌入到服务端与客户端的代码中去。
对于协议文件:主要需要定义自己的数据类型,以及相应的服务
namespace java com.eviac.blog.samples.thrift.server // defines the namespace
typedef i32 int //typedefs to get convenient names for yourtypes
service AdditionService { // defines the service to add two numbers
int add(1:int n1, 2:int n2), //defines a method
}
根据协议文件生成Java代码:thrift --gen java protocolName.thrift
在执行完代码后,在gen-java目录下你会发现构建RPC服务器和客户端有用的源代码。
Thrift 脚本可定义的数据类型包括以下几种类型:
- 基本类型:
-
- bool:布尔值,true 或 false,对应 Java 的 boolean
- byte:8 位有符号整数,对应 Java 的 byte
- i16:16 位有符号整数,对应 Java 的 short
- i32:32 位有符号整数,对应 Java 的 int
- i64:64 位有符号整数,对应 Java 的 long
- double:64 位浮点数,对应 Java 的 double
- string:未知编码文本或二进制字符串,对应 Java 的 String
- 结构体类型:
- struct:定义公共的对象,类似于 C 语言中的结构体定义,在 Java 中是一个 JavaBean
- 容器类型:
- list:对应 Java 的 ArrayList
- set:对应 Java 的 HashSet
- map:对应 Java 的 HashMap
- 异常类型:
- exception:对应 Java 的 Exception
- 服务类型:service:对应服务的类
其次对于生成的java文件(例子中我将创建一个叫做AddtionService.java的java文件),写一个 service handler,Service handler 类必须实现 AdditionService.Iface接口。实现接口中定义的方法:
public class AdditionServiceHandlerimplements AdditionService.Iface {
@Override
public int add(int n1, int n2) throwsTException {
return n1 + n2;
}
}
然后对于服务器端代码:
先根据servicehandler生成一个服务业务处理对象,然后传入服务类的构造函数中去
然后需要指定服务端口号,并获得一个服务类对象,以启动服务
AdditionService.Processor
TServerTransport serverTransport = newTServerSocket(9090);
TServer server = new TSimpleServer( newArgs(serverTransport).processor(processor));
server.serve();
最后对于客户端:
把之前生成的AddtionService.java嵌入到代码中去,构造一个客户端对象,然后调用对象中的方法,从而向服务端发送请求,得到执行结果
transport = newTSocket("localhost", 9090);
transport.open();
TProtocol protocol = newTBinaryProtocol(transport);
AdditionService.Client client = newAdditionService.Client(protocol);
client.Method(参数...);//向服务端发送请求,调用服务端的对应方法,获取执行结果。
三、其它
如果不需要很多语言相互调用,希望保持清晰的java接口代码(无任何业务不相关的接口继承和方法,属性定义),减少开放工作量,推荐Hessian。
如果需要支持大数据量的传输,多语言调用,极高的并发支持,推荐使用thrift。发现thrift在开发方面相当简单,相比hessian,有将近80%的效率提高。
另外,Protocol Buffer的序列化效率比thrift高,但是只提供了接口,不能直接使用RPC,而相对来说Thrift具有完整的rpc功能。
附实现详细代码:(Java语言)
1、AVRO
{
    "namespace":"avro",
    "doc":"This is a message.",
    "protocol":"messageProtocol",
    "name":"HelloWorld",
    "types":[
        {
            "name":"requestType",//自定义要用到的模式(schema)
            "type":"record",//是record类型
            "fields":[ //把要传输的数据存放到属性(field)中,根据实际需要增删field的个数和类型
			基本类型
			{"name":"int","type":"int"},
			{"name":"null","type":"null"},
			{"name":"boolean","type":"boolean"},
			{"name":"long","type":"long"},
			{"name":"float","type":"float"},
			{"name":"double","type":"double"},
			{"name":"bytes","type":"bytes"},
			{"name":"string","type":"string"},

			复杂类型
	{"name":"record","type":{"type":"record","name":"fieldrecord","fields":[{"name":"rf","type":"string"}]}},
			{"name":"enum","type":{"name":"enum","type":"enum","symbols":["a","b","c","d"]}},
			{"name":"array","type":{"type":"array","items":"string"}},
			{"name":"map","type":{"type":"map","values":"int"}}
			]
        },
		{//定义另外一个模式
            "name":"responseType",
            "type":"record",
            "fields":[ {"name":"responseName", "type":"string"} ]
        }
    ],
    "messages":{
        "message1":{//相当于可在客户端调用的方法名,类似还可增加message2等多个方法定义
            "doc":"the standard message ",
            "request":[{"name":"request", "type":"requestType"}],//相当于message1方法要传入的参数,avro默认此参数是一个record类型,协议定义了此参数有一个属性,名为request,需要放入requestType类型的数据。
            "response":"responseType"//方法返回的数据类型为responseType
        }
    }

服务端代码:
  private static Log log = LogFactory.getLog(AvroHttpServer.class);
    public AvroHttpServer(Protocol protocol) {
        super(protocol);
    }

    public Object respond(Message message, Object request) throws Exception {
	//得到客户端请求的数据,并作出相应的响应
		if(message.getName().equals("message1"){//判断调用的方法是否是message1或者其它,这样就可以区分客户端调用的是什么方法
        GenericRecord requestData =(GenericRecord)((GenericRecord) request).get("request");
//得到客户端requestor.request("message1", request)中的request,再把request中名为request的属性field值提取出来,这样requestData中的属性就保存了各种客户端要传输的数据
        GenericRecord reMessage = null;
	//requesData中的属性(fields)保存了我们要传输的数据,取出需要的属性值数据,并转化为对应的java类型,进行进一步操作
		double doubleData = (double)requestData.get("double");
		Collection carray =(Collection) requestData.get("array");
		//....调用算法处理客户端传输过来的数据etc....

               reMessage = new
GenericData.Record(super.getLocal().getType("responseType")); //根据协议构造返回数据类型
        reMessage.put("responseName", "Hello, ");//初始化返回数据
        return reMessage;
    }

    public static void main(String[] args) throws Exception {
        int port = 8088;
        try {
            Server server = new HttpServer(
                    new AvroHttpServer(Protocol.parse(
                            new File("d:/zzzzz/t1222.avro"))),
                    port);
            server.start();
            server.join();
        } catch (Exception e) {
            e.printStackTrace();
        }
    }
}


然后客户端代码:

private Protocol protocol;

	private GenericRequestor requestor = null;

	@Before
	public void setUp() throws Exception {
		protocol = Protocol.parse(new File("d:/zzzzz/t1222.avro"));
		Transceiver t = new HttpTransceiver(new URL("http://localhost:8088"));
		requestor = new GenericRequestor(protocol, t);
	}

	@Test
	public void testSendMessage() throws Exception {
//	1、	构造客户端要发送的请求数据requestData,对应协议中requestType类型
		GenericRecord requestData = new GenericData.Record(protocol
				.getType("requestType"));//也可以是自定义的其它模式名
		// 根据协议定义初始化 requestData的field
//基础数据类型的属性赋值
		requestData.put("boolean", true);
		requestData.put("null", null);
		requestData.put("int",1);
		requestData.put("long",456l );
		requestData.put("float",232.2f );
		requestData.put("double",1554.3);
		ByteBuffer bytes = ByteBuffer.allocate(3);
		requestData.put("bytes",bytes);//ByteBuffer类型????
		requestData.put("string","this is a string" );
//复杂数据类型
		//	record类型:java代码中对应GenericRecord类型
		GenericRecord fieldRecord = new GenericData.Record(protocol.getType("requestType").getField("record").schema());
		fieldRecord.put("rf", "fieldRecord");
		requestData.put("record",fieldRecord);

//		array类型:对应java中Collection/GenericArray类型数据,如果要传数组类型的数据,必须先转换成List类型或者是Json格式
		ArrayList al = new ArrayList();al.add(123+"");
		al.add(321+"");
		requestData.put("array", al);//直接传集合类型

//		map类型:对应java中map类型数据
		HashMap map = new HashMap();
		map.put("key1", 11);
		requestData.put("map", map);

//		enum类型:对应java中GenericEnumSymbol或者字符串,只能是protocol中定义过了的a,b,c,d四种String,否则报错
		requestData.put("enum", "b");//put"f"不行


		//以下发送数据
//2、	构造message1中规定的请求数据格式request,也就是把requestData存放在request的属性“request”中,然后把request发送到服务端
		GenericRecord request = new GenericData.Record(protocol.getMessages()
				.get("message1").getRequest());
		request.put("request", requestData);
		System.out.println(request);
		//发送请求(相当于调用message1方法,并且传入对应的参数类型request),得到响应result(record类型)
		Object result = requestor.request("message1", request);//根据协议中定义的方法名message1传入对应类型的参数,并且获得返回结果
		if (result instanceof GenericData.Record) {
			GenericData.Record record = (GenericData.Record) result;//根据协议把返回结果转成相应类型进行下一步处理........
			System.out.println(record.get("responseName"));
		}
			}

2、thrift 实现代码:
示例定义文件(add.thrift)
namespace java com.eviac.blog.samples.thrift.server  // defines the namespace

typedef i32 int  //typedefs to get convenient names for your types
service AdditionService {  // defines the service to add two numbers
        int add(1:int n1, 2:int n2), //defines a method
}
编译Thrift定义文件
下面的命令编译.thrift文件
thrift --gen
对于我的例子来讲,命令是:
thrift --gen java add.thrift
在执行完代码后,在gen-java目录下你会发现构建RPC服务器和客户端有用的源代码。在我的例子中我将创建一个叫做AddtionService.java的java文件。
写一个 service handler
Service handler 类必须实现 AdditionService.Iface接口。
示例Service handler(AdditionServiceHandler.java)
package com.eviac.blog.samples.thrift.server;
import org.apache.thrift.TException;
public class AdditionServiceHandler implements AdditionService.Iface {
@Override
 public int add(int n1, int n2) throws TException {
  return n1 + n2;
 }
}
写一个简单的服务器
下面的示例代码是一个简单的Thrift服务器。可以看到下面的代码中有一段是注释了的,可以去掉注释来启用多线程服务器。
示例服务器(MyServer.java)
package com.eviac.blog.samples.thrift.server;
import org.apache.thrift.transport.TServerSocket;
import org.apache.thrift.transport.TServerTransport;
import org.apache.thrift.server.TServer;
import org.apache.thrift.server.TServer.Args;
import org.apache.thrift.server.TSimpleServer;
public class MyServer {
public static void StartsimpleServer(AdditionService.Processor processor) {
  try {
   TServerTransport serverTransport = new TServerSocket(9090);
   TServer server = new TSimpleServer(
     new Args(serverTransport).processor(processor));
   // Use this for a multithreaded server
   // TServer server = new TThreadPoolServer(new
   // TThreadPoolServer.Args(serverTransport).processor(processor));
   System.out.println("Starting the simple server...");
   server.serve();
  } catch (Exception e) {
   e.printStackTrace();
  }
 }
public static void main(String[] args) {
  StartsimpleServer(new AdditionService.Processor(new AdditionServiceHandler()));
 }
}
写一个客户端
下面的例子是一个使用Java写的客户端短使用AdditionService的服务。
package com.eviac.blog.samples.thrift.client;
import org.apache.thrift.TException;
import org.apache.thrift.protocol.TBinaryProtocol;
import org.apache.thrift.protocol.TProtocol;
import org.apache.thrift.transport.TSocket;
import org.apache.thrift.transport.TTransport;
import org.apache.thrift.transport.TTransportException;
public class AdditionClient {
public static void main(String[] args) {
  try {
   transport = new TSocket("localhost", 9090);
   transport.open();
   TProtocol protocol = new TBinaryProtocol(transport);
   AdditionService.Client client = new AdditionService.Client(protocol);
   System.out.println(client.add(100, 200));

   transport.close();
  } catch (TTransportException e) {
   e.printStackTrace();
  } catch (TException x) {
   x.printStackTrace();
  }
 }
}
运行服务端代码(MyServer.java)将会看到下面的输出。
Starting the simple server...
然后运行客户端代码(AdditionClient.java),将会看到如下输出。
300
