Web高可用负载均衡+动静分离+session会话共享
总体架构:
lvs+keepalived+nginx+tomcat+redis
也是对之前实验的总结
实验环境:
主机名        IP                系统            应用
lvs1      192.168.14.211    centos7.6    lvs+keepalived(高可用)
lvs2      192.168.14.212    centos7.6    lvs+keepalived(高可用)
          192.168.14.216                    VIP(虚拟IP)
nginx1    192.168.14.213    centos7.6    nginx(处理静态页面)
nginx2    192.168.14.214    centos7.6    nginx(处理静态页面)
tomcat1   192.168.14.217    centos7.6    tomcat(处理动态页面)
tomcat2   192.168.14.218    centos7.6    tomcat(处理动态页面)
redis     192.168.14.219    centos7.6    redis(session会话共享)
一、lvs+keepalived部署
1、实验环境关闭防火墙和selinux
#lvs1主机
[root@localhost ~]# hostnamectl set-hostname lvs1
[root@lvs1 ~]# systemctl stop firewalld
[root@lvs1 ~]# systemctl disable  firewalld
[root@lvs1 ~]# sed -i '/^SELINUX=/ s/enforcing/disabled/g' /etc/selinux/config
[root@lvs1 ~]# setenforce 0

#lvs2主机
[root@localhost ~]# hostnamectl set-hostname lvs2
[root@lvs2 ~]# systemctl stop firewalld
[root@lvs2 ~]# systemctl disable firewalld
[root@lvs2 ~]# sed -i '/^SELINUX=/ s/enforcing/disabled/g' /etc/selinux/config
[root@lvs2 ~]# setenforce 0
2、安装ipvs
[root@lvs1 ~]# yum -y install ipvsadm
[root@lvs2 ~]# yum -y install ipvsadm
3、安装keepalived
[root@lvs1 ~]# yum install -y keepalived
[root@lvs2 ~]# yum install -y keepalived
4、修改keepalived配置文件
[root@lvs1 ~]# cp /etc/keepalived/keepalived.conf /etc/keepalived/keepalived.conf.bak
[root@lvs1 ~]# vi /etc/keepalived/keepalived.conf
! Configuration File for keepalived
global_defs {
   router_id lvs1
}
vrrp_instance VI_1 {
    state MASTER
    interface ens32
    virtual_router_id 100
    priority 100
    advert_int 1
    authentication {
        auth_type PASS
        auth_pass 1111
    }
    virtual_ipaddress {
        192.168.14.216
    }
}
virtual_server 192.168.14.216 80 {
    delay_loop 6
    lb_algo rr
    lb_kind DR
    persistence_timeout 5
    protocol TCP
    real_server 192.168.14.213 80 {
    weight 1
    TCP_CHECK {
       connect_timeout 10
       retry 3
       delay_before_retry 3
       connect_port 80
       }
    }
     real_server 192.168.14.214 80 {
     weight 1
     TCP_CHECK {
       connect_timeout 10
       retry 3
       delay_before_retry 3
       connect_port 80
       }
     }
}
[root@lvs2 ~]# cp /etc/keepalived/keepalived.conf /etc/keepalived/keepalived.conf.bak
[root@lvs2 ~]# vi /etc/keepalived/keepalived.conf
! Configuration File for keepalived
global_defs {
router_id lvs2
}
vrrp_instance VI_1 {
state BACKUP
interface ens32
virtual_router_id 100
priority 99
advert_int 1
authentication {
auth_type PASS
auth_pass 1111
}
virtual_ipaddress {
192.168.14.216
}
}
virtual_server 192.168.14.216 80 {
delay_loop 6
lb_algo rr
lb_kind DR
persistence_timeout 5
protocol TCP
real_server 192.168.14.213 80 {
weight 1
TCP_CHECK {
connect_timeout 10
retry 3
delay_before_retry 3
connect_port 80
}
}
real_server 192.168.14.214 80 {
weight 1
TCP_CHECK {
connect_timeout 10
retry 3
delay_before_retry 3
connect_port 80
}
}
}5、启动服务
[root@lvs1 ~]# systemctl start keepalived
[root@lvs1 ~]# systemctl enable keepalived

[root@lvs2 ~]# systemctl start keepalived
[root@lvs2 ~]# systemctl enable keepalived
6、查看vip,master节点才有,backup节点没有
二、nginx部署
1、实验环境关闭防火墙和selinux
#nginx1主机
[root@localhost ~]# hostnamectl set-hostname nginx1
[root@nginx1 ~]# systemctl stop firewalld
[root@nginx1 ~]# systemctl disable firewalld
[root@nginx1 ~]# sed -i '/^SELINUX=/ s/enforcing/disabled/g' /etc/selinux/config
[root@nginx1 ~]# setenforce 0

#nginx2主机
[root@localhost ~]# hostnamectl set-hostname nginx2
[root@nginx2 ~]# systemctl stop firewalld
[root@nginx2 ~]# systemctl disable firewalld
[root@nginx2 ~]# sed -i '/^SELINUX=/ s/enforcing/disabled/g' /etc/selinux/config
[root@nginx2 ~]# setenforce 0
2、yum安装
#添加yum源
cat  <> /etc/yum.repos.d/nginx.repo
[aliyun]
name=aliyun epel
baseurl=http://mirrors.aliyun.com/epel/7Server/x86_64/
gpgcheck=0
EOF

#net-tools是ifconfig使用需要
[root@nginx1 ~]# yum install -y nginx net-tools
[root@nginx2 ~]# yum install -y nginx net-tools
3、配置realserver.sh
打开Nginx所在服务器的“路由”功能、关闭“ARP查询”功能并设置回环ip,nginx01和nginx02配置如下
[root@nginx1 ~]# vi /etc/rc.d/init.d/realserver.sh
#!/bin/bash
    SNS_VIP=192.168.14.216
    /etc/rc.d/init.d/functions
    case "$1" in
    start)
        ifconfig lo:0 $SNS_VIP netmask 255.255.255.255 broadcast $SNS_VIP
        /sbin/route add -host $SNS_VIP dev lo:0
        echo "1" >/proc/sys/net/ipv4/conf/lo/arp_ignore
        echo "2" >/proc/sys/net/ipv4/conf/lo/arp_announce
        echo "1" >/proc/sys/net/ipv4/conf/all/arp_ignore
        echo "2" >/proc/sys/net/ipv4/conf/all/arp_announce
        sysctl -p >/dev/null 2>&1
        echo "RealServer Start OK"
        ;;
    stop)
        ifconfig lo:0 down
        route del $SNS_VIP >/dev/null 2>&1
        echo "0" >/proc/sys/net/ipv4/conf/lo/arp_ignore
        echo "0" >/proc/sys/net/ipv4/conf/lo/arp_announce
        echo "0" >/proc/sys/net/ipv4/conf/all/arp_ignore
        echo "0" >/proc/sys/net/ipv4/conf/all/arp_announce
        echo "RealServer Stoped"
        ;;
    *)
        echo "Usage: $0 {start|stop}"
        exit 1
    esac
    exit 0
此脚本用于节点服务器绑定 VIP ,并抑制响应 VIP 的 ARP 请求。这样做的目的是为了不让关于 VIP 的 ARP 广播时,节点服务器应答( 因为节点服务器都绑定了 VIP ,如果不做设置它们会应答,就会乱套 )。
4、realserver.sh脚本授予执行权限
[root@nginx1 ~]# chmod u+x /etc/rc.d/init.d/realserver.sh
[root@nginx2 ~]# chmod u+x /etc/rc.d/init.d/realserver.sh
5、启动服务
#不想看到第三行报错删除即可,不影响
[root@nginx1 ~]# /etc/rc.d/init.d/realserver.sh start
/etc/rc.d/init.d/realserver.sh: line 3: /etc/rc.d/init.d/functions: Permission denied
RealServer Start OK

[root@nginx2 ~]# /etc/rc.d/init.d/realserver.sh start
/etc/rc.d/init.d/realserver.sh: line 3: /etc/rc.d/init.d/functions: Permission denied
RealServer Start OK
6、查看vip
7、修改一下网页显示,并重启服务
[root@nginx1 ~]# echo "nginx1 web" > /usr/share/doc/HTML/index.html
[root@nginx1 ~]# systemctl restart nginx

[root@nginx2 ~]# echo "nginx2 web" > /usr/share/doc/HTML/index.html
[root@nginx2 ~]# systemctl restart nginx
8、压力测试访问vip
#使用AB工具压力测试访问
[root@localhost ~]# ab -c1000 -n1000 http://192.168.14.216/index.html
This is ApacheBench, Version 2.3 <$Revision: 1430300 $>
Copyright 1996 Adam Twiss, Zeus Technology Ltd, http://www.zeustech.net/
Licensed to The Apache Software Foundation, http://www.apache.org/

Benchmarking 192.168.14.216 (be patient)
Completed 100 requests
Completed 200 requests
Completed 300 requests
Completed 400 requests
Completed 500 requests
Completed 600 requests
Completed 700 requests
Completed 800 requests
Completed 900 requests
Completed 1000 requests
Finished 1000 requests


Server Software:        nginx/1.16.1
Server Hostname:        192.168.14.216
Server Port:            80

Document Path:          /index.html
Document Length:        11 bytes

Concurrency Level:      1000
Time taken for tests:   0.365 seconds
Complete requests:      1000
Failed requests:        0
Write errors:           0
Total transferred:      241000 bytes
HTML transferred:       11000 bytes
Requests per second:    2737.57 [#/sec] (mean)
Time per request:       365.287 [ms] (mean)
Time per request:       0.365 [ms] (mean, across all concurrent requests)
Transfer rate:          644.29 [Kbytes/sec] received

Connection Times (ms)
              min  mean[+/-sd] median   max
Connect:        1  134  11.5    134     154
Processing:    93  118  12.5    120     155
Waiting:        1   70  27.9     71     116
Total:        156  252  23.2    254     290

Percentage of the requests served within a certain time (ms)
  50%    254
  66%    266
  75%    273
  80%    275
  90%    283
  95%    286
  98%    288
  99%    289
 100%    290 (longest request)
9、查看服务器master节点(因为是rr轮询)
10、修改两台nginx配置文件,实现负载均衡和动静分离。再重启服务
    upstream tomcat {
        server 192.168.14.217:8080 max_fails=3 fail_timeout=20s weight=2;
        server 192.168.14.218:8080 max_fails=3 fail_timeout=20s weight=2;
    }

        location ~ \.(jsp|do)$ {
         proxy_pass http://tomcat;
        }
三、tomcat部署
1、实验环境关闭防火墙和selinux
[root@localhost ~]# hostnamectl set-hostname tomcat1
[root@tomcat1 ~]# systemctl stop firewalld
[root@tomcat1 ~]# systemctl disable firewalld
[root@tomcat1 ~]# sed -i '/^SELINUX=/ s/enforcing/disabled/g' /etc/selinux/config
[root@tomcat1 ~]# setenforce 0


[root@localhost ~]# hostnamectl set-hostname tomcat2
[root@tomcat2 ~]# systemctl stop  firewalld
[root@tomcat2 ~]# systemctl disable firewalld
[root@tomcat2 ~]# sed -i '/^SELINUX=/ s/enforcing/disabled/g' /etc/selinux/config
[root@tomcat2 ~]# setenforce 0
2、配置java环境变量
[root@tomcat1 ~]# tar -zxvf jdk-8u141-linux-x64.tar.gz -C /usr/local/
[root@tomcat1 ~]# vi  /etc/profile
export JAVA_HOME=/usr/local/jdk1.8.0_141/
export PATH=$PATH:$JAVA_HOME/bin
export CLASSPATH=.:$JAVA_HOME/lib/tools.jar:$JAVA_HOME/lib/dt.jar:$CLASSPATH
[root@tomcat1 ~]# source  /etc/profile


[root@tomcat2 ~]# tar -zxvf jdk-8u141-linux-x64.tar.gz -C /usr/local/
export JAVA_HOME=/usr/local/jdk1.8.0_141/
export PATH=$PATH:$JAVA_HOME/bin
export CLASSPATH=.:$JAVA_HOME/lib/tools.jar:$JAVA_HOME/lib/dt.jar:$CLASSPATH
[root@tomcat2 ~]# source /etc/profile
验证
[root@tomcat1 ~]# java -version
java version "1.8.0_141"
Java(TM) SE Runtime Environment (build 1.8.0_141-b15)
Java HotSpot(TM) 64-Bit Server VM (build 25.141-b15, mixed mode)
3、下载tomcat(注意版本链接会更新)
[root@tomcat1 ~]# wget https://mirror.bit.edu.cn/apache/tomcat/tomcat-7/v7.0.104/bin/apache-tomcat-7.0.104.tar.gz4、解压并重命名
[root@tomcat1 ~]# tar -zxvf apache-tomcat-7.0.104.tar.gz -C /usr/local/
[root@tomcat1 ~]# mv /usr/local/apache-tomcat-7.0.104 /usr/local/tomcat7.0.104

[root@tomcat2 ~]# tar -zxvf apache-tomcat-7.0.104.tar.gz -C /usr/local/
[root@tomcat2 ~]# mv /usr/local/apache-tomcat-7.0.104 /usr/local/tomcat7.0.104
5、设置tomcat虚拟主机(两台都修改)
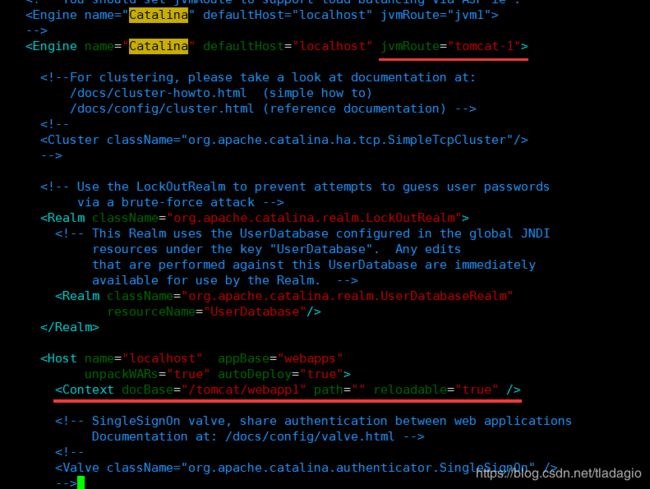
添加jvmRoute内容
修改默认虚拟主机,并将网站文件路径指向/web/webapp1,在host段增加context段
[root@tomcat1 ~]# vim /usr/local/tomcat7.0.104/conf/server.xml6、增加文档目录与测试文件
[root@tomcat1 ~]# mkdir -p /tomcat/webapp1
[root@tomcat1 ~]# vim /tomcat/webapp1/index.jsp
<%@page language="java" import="java.util.*" pageEncoding="UTF-8"%>


tomcat-1


Session serviced by tomcat


Session ID
<%=session.getId() %>
<% session.setAttribute("abc","abc");%>


Created on
<%= session.getCreationTime() %>
[root@tomcat2 ~]# mkdir -p /tomcat/webapp2
[root@tomcat2 ~]# vim /tomcat/webapp2/index.jsp
<%@page language="java" import="java.util.*" pageEncoding="UTF-8"%>


tomcat-2


Session serviced by tomcat


Session ID
<%=session.getId() %>
<% session.setAttribute("abc","abc");%>


Created on
<%= session.getCreationTime() %>
7、启动tomcat
[root@tomcat1 ~]# /usr/local/tomcat7.0.104/bin/startup.sh
[root@tomcat2 ~]# /usr/local/tomcat7.0.104/bin/startup.sh
8、客户端访问VIP,验证负载均衡
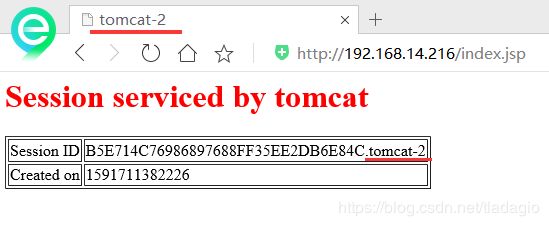
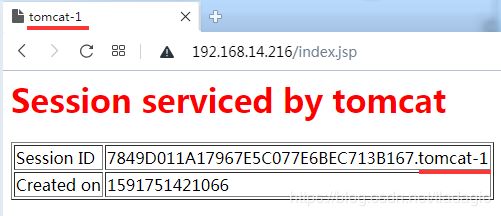
从上面的结果能看出两次访问,nginx把访问请求分别分发给了后端的tomcat1和tomcat2,客户端的访问请求实现了负载均衡,但session id不一样(即:没有实现session保持),这样的话,会给后端服务器造成很大的压力。
四、redis部署
1、实验环境关闭防火墙和selinux
[root@localhost ~]# hostnamectl set-hostname redis
[root@redis ~]# systemctl stop firewalld
[root@redis ~]# systemctl disable  firewalld
[root@redis ~]# sed -i 's/SELINUX=enforcing/SELINUX=disabled/g' /etc/selinux/config
[root@redis ~]# setenforce 0
2、下载redis源码
[root@redis ~]# wget http://download.redis.io/releases/redis-3.2.3.tar.gz3、解压,编译安装
[root@redis ~]# tar  -zxvf redis-3.2.3.tar.gz
[root@redis ~]# yum install -y gcc gcc-c++ make
[root@redis ~]# cd redis-3.2.3
[root@redis redis-3.2.3]# make && make install
4、初始化redis,全部默认直接回车
[root@redis redis-3.2.3]# cd utils/
[root@redis utils]# ./install_server.sh
通过上面的安装过程,我们可以看出redis初始化后redis配置文件为
/etc/redis/6379.conf,日志文件为/var/log/redis_6379.log,数据文件dump.rdb存放到/var/lib/redis/6379目录下,启动脚本为/etc/init.d/redis_6379。
5、现在我们要使用systemd,所以在 /etc/systems/system 下创建一个单位文件名字为 redis_6379.service
[root@redis ~]# vi /etc/systemd/system/redis_6379.service
[Unit]
Description=Redison port 6379
[Service]
Type=forking
ExecStart=/etc/init.d/redis_6379 start
ExecStop=/etc/init.d/redis_6379 stop
[Install]
WantedBy=multi-user.target
6、启动redis
[root@redis ~]# systemctl daemon-reload
[root@redis ~]# systemctl start  redis_6379.service
[root@redis ~]# systemctl enable   redis_6379.service
7、修改配置文件
[root@redis ~]# vim /etc/redis/6379.conf
[root@redis ~]# cat /etc/redis/6379.conf |grep -E 'bind|requirepass' |grep -v '#'
bind 127.0.0.1 192.168.14.219
requirepass pwd@123
8、重启服务
[root@redis ~]# systemctl restart redis_6379.service五、配置tomcat通过redis实现session同步
1、下载tomcat-redis-session-manager相应的jar包,主要有三个:
jedis-2.5.2.jar
commons-pool2-2.7.0.jar
tomcat7-redis-session-manager-2.0.0.jar
提供下载:https://download.csdn.net/download/tladagio/11727840
2、下载完成后拷贝到$TOMCAT_HOME/lib中
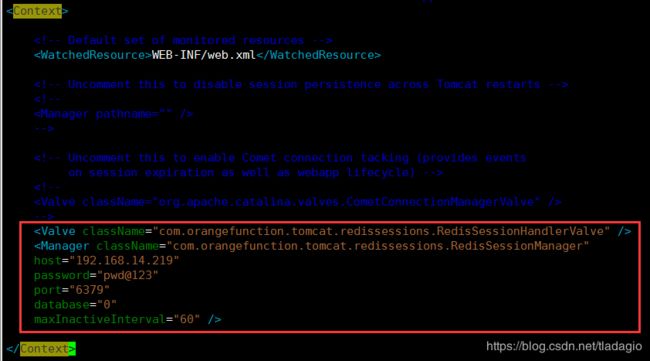
3、修改tomcat的context.xml
[root@tomcat1 ~]# vim /usr/local/tomcat7.0.104/conf/context.xml 4、重启tomcat
[root@tomcat1 ~]# /usr/local/tomcat7.0.104/bin/shutdown.sh
Using CATALINA_BASE:   /usr/local/tomcat7.0.104
Using CATALINA_HOME:   /usr/local/tomcat7.0.104
Using CATALINA_TMPDIR: /usr/local/tomcat7.0.104/temp
Using JRE_HOME:        /usr/local/jdk1.8.0_141/
Using CLASSPATH:       /usr/local/tomcat7.0.104/bin/bootstrap.jar:/usr/local/tomcat7.0.104/bin/tomcat-juli.jar
[root@tomcat1 ~]# /usr/local/tomcat7.0.104/bin/startup.sh
Using CATALINA_BASE:   /usr/local/tomcat7.0.104
Using CATALINA_HOME:   /usr/local/tomcat7.0.104
Using CATALINA_TMPDIR: /usr/local/tomcat7.0.104/temp
Using JRE_HOME:        /usr/local/jdk1.8.0_141/
Using CLASSPATH:       /usr/local/tomcat7.0.104/bin/bootstrap.jar:/usr/local/tomcat7.0.104/bin/tomcat-juli.jar
Tomcat started.
[root@tomcat1 ~]#
5、tomcat2重复1-4步骤
六、查看动静分离和session会话共享
1、访问vip今天页面
2、访问vip动态页面
3、查看redis缓存
至此,lvs+keepalived+nginx+tomcat+redis完成


