封装一个日期时间选择器
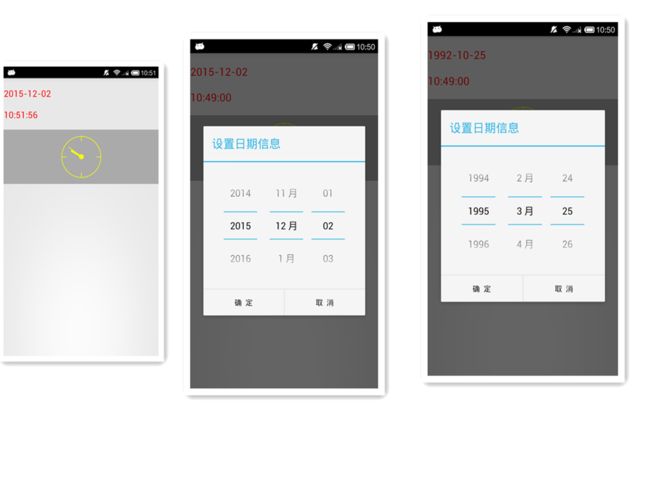
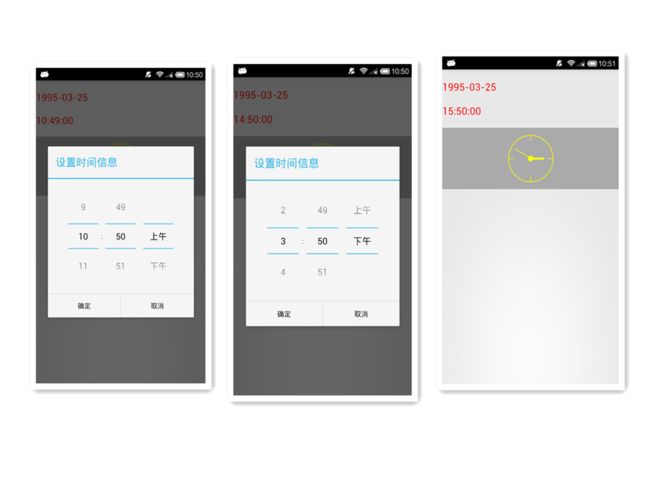
最近公司项目需要,需要做日期以及时间的选择器,查看Android自带的日期时间选择器,感觉不是很好看,然后上网找了一些相关的资料,自己封装成了工具类,使用起来很方便。先看效果图:
首先是日期选择器,默认显示当前日期,点击以后,出现日期选择对话框,上下滑动选择日期 
然后是时间选择器,默认显示当前时间,点击以后,出现时间选择对话框,上下滑动选择时间 
最后注意的是,自定义的时钟组件首先显示的是当前的时间,当点击时间选择器,设置好时间以后,时钟组件会显示重新设置的时间。
1.界面布局:
<LinearLayout xmlns:android="http://schemas.android.com/apk/res/android"
    xmlns:tools="http://schemas.android.com/tools"
    android:layout_width="match_parent"
    android:layout_height="match_parent"
    android:orientation="vertical" >

    <TextView
        android:id="@+id/date_txt"
        android:layout_width="fill_parent"
        android:layout_height="wrap_content"
        android:layout_marginTop="20dp"
        android:text="点击设置日期"
        android:textSize="20dp"
        android:textColor="#ff0000" />

    <TextView
        android:id="@+id/time_txt"
        android:layout_width="fill_parent"
        android:layout_height="wrap_content"
        android:layout_marginTop="20dp"
        android:textSize="20dp"
        android:textColor="#ff0000"
        android:text="点击设置时间" />

    <RelativeLayout
        android:layout_width="fill_parent"
         android:layout_marginTop="20dp"
         android:background="@android:color/darker_gray"
        android:layout_height="120dp" >

        <ImageView
            android:layout_width="fill_parent"
            android:layout_height="fill_parent"
            android:adjustViewBounds="true"
            android:scaleType="centerInside"
            android:src="@drawable/time_panel" />

        <ImageView
            android:id="@+id/time_minute"
            android:layout_width="fill_parent"
            android:layout_height="fill_parent"
            android:adjustViewBounds="true"
            android:scaleType="centerInside"
            android:src="@drawable/time_minute" />

        <ImageView
            android:id="@+id/time_hour"
            android:layout_width="fill_parent"
            android:layout_height="fill_parent"
            android:adjustViewBounds="true"
            android:scaleType="centerInside"
            android:src="@drawable/time_hour" />
    RelativeLayout>

LinearLayout>
这里需要注意的是,自定义的时钟组件其实就是三张图片,一个表盘,一个时针,一个分针,然后根据时间来显示旋转的角度
2.代码实现
首先向大家推荐的是三个很实用的工具类,可以直接在自己的项目当中引用
自定义的日期选择对话框
public class DateDialog {
    private Calendar calendar; // 通过Calendar获取系统时间
    private Context context;

    public DateDialog(Context context) {
        this.context = context;


    }

    @SuppressLint("NewApi")
    public void setDate(final TextView text) {
        calendar = Calendar.getInstance();
        // 通过自定义控件AlertDialog实现
        AlertDialog.Builder builder = new AlertDialog.Builder(context);
        View view = (LinearLayout) LayoutInflater.from(context).inflate(
                R.layout.dialog_date, null);
        final DatePicker datePicker = (DatePicker) view
                .findViewById(R.id.date_picker);
        // 设置日期简略显示 否则详细显示 包括:星期周
        datePicker.setCalendarViewShown(false);
        // 初始化当前日期
        calendar.setTimeInMillis(System.currentTimeMillis());
        datePicker.init(calendar.get(Calendar.YEAR),
                calendar.get(Calendar.MONTH),
                calendar.get(Calendar.DAY_OF_MONTH), null);
        // 设置date布局
        builder.setView(view);
        builder.setTitle("设置日期信息");
        builder.setNegativeButton("确  定",
                new DialogInterface.OnClickListener() {
                    @Override
                    public void onClick(DialogInterface dialog, int which) {
                        // 日期格式
                        StringBuffer sb = new StringBuffer();
                        sb.append(String.format("%d-%02d-%02d",
                                datePicker.getYear(),
                                datePicker.getMonth() + 1,
                                datePicker.getDayOfMonth()));
                        text.setText(sb);
                        dialog.cancel();
                    }
                });

        builder.setPositiveButton("取  消",
                new DialogInterface.OnClickListener() {
                    @Override
                    public void onClick(DialogInterface dialog, int which) {
                        dialog.cancel();
                    }
                });
        builder.create().show();
    }
}
自定义的时间选择对话框
public class TimeDialog {
    private Calendar calendar; // 通过Calendar获取系统时间
    private int hour;
    private int minute;
    private Context context;

    public TimeDialog(Context context) {
        this.context = context;

    }

    @SuppressLint("NewApi")
    public void setTime(final TextView text) {
        calendar = Calendar.getInstance();
        // 自定义控件
        AlertDialog.Builder builder = new AlertDialog.Builder(context);
        View view = (LinearLayout) LayoutInflater.from(context).inflate(
                R.layout.dialog_time, null);
        final TimePicker timePicker = (TimePicker) view
                .findViewById(R.id.time_picker);
        // 初始化时间
        calendar.setTimeInMillis(System.currentTimeMillis());
        timePicker.setIs24HourView(false);
        timePicker.setCurrentHour(calendar.get(Calendar.HOUR_OF_DAY));
        timePicker.setCurrentMinute(calendar.get(Calendar.MINUTE));
        // 设置time布局
        builder.setView(view);
        builder.setTitle("设置时间信息");
        builder.setNegativeButton("确定",
                new DialogInterface.OnClickListener() {
                    @Override
                    public void onClick(DialogInterface dialog, int which) {
                        hour = timePicker.getCurrentHour();
                        minute = timePicker.getCurrentMinute();
                        // 时间小于10的数字 前面补0 如01:12:00
                        text.setText(new StringBuilder()
                                .append(hour < 10 ? "0" + hour : hour)
                                .append(":")
                                .append(minute < 10 ? "0" + minute : minute)
                                .append(":00"));
                        dialog.cancel();

                        MainActivity.instance.setTimeClock(text.getText().toString().trim());
                    }
                });
        builder.setPositiveButton("取消",
                new DialogInterface.OnClickListener() {
                    @Override
                    public void onClick(DialogInterface dialog, int which) {
                        dialog.cancel();
                    }
                });
        builder.create().show();
    }
}
实用的时间工具类
public class GetDate {
    // n天前的日期
    public static String getDateBefore(int day) {
        Date date = new Date();
        Calendar now = Calendar.getInstance();
        now.setTime(date);
        now.set(Calendar.DATE, now.get(Calendar.DATE) - day);
        String dateString = new SimpleDateFormat("yyyy-MM-dd").format(now
                .getTime());
        return dateString;
    }

    public static String currentTime() {
        String dateString = new SimpleDateFormat("yyyy-MM-dd HH:mm:ss")
                .format(new Date());
        return dateString;
    }
    public static String currentDayTime() {
        String dateString = new SimpleDateFormat("HH:mm:ss")
                .format(new Date());
        return dateString;
    }

    public static String lastDay() {
        String dateString = new SimpleDateFormat("yyyy-MM-dd")
                .format(new Date());
        return dateString;
    }


    public static String lastWeek() {
        Date date = new Date();

        int year = Integer.parseInt(new SimpleDateFormat("yyyy").format(date));
        int month = Integer.parseInt(new SimpleDateFormat("MM").format(date));
        int day = Integer.parseInt(new SimpleDateFormat("dd").format(date)) - 6;

        if (day < 1) {
            month -= 1;
            if (month == 0) {
                year -= 1;
                month = 12;
            }
            if (month == 4 || month == 6 || month == 9 || month == 11) {
                day = 30 + day;
            } else if (month == 1 || month == 3 || month == 5 || month == 7
                    || month == 8 || month == 10 || month == 12) {
                day = 31 + day;
            } else if (month == 2) {
                if (year % 400 == 0 || (year % 4 == 0 && year % 100 != 0))
                    day = 29 + day;
                else
                    day = 28 + day;
            }
        }
        String y = year + "";
        String m = "";
        String d = "";
        if (month < 10)
            m = "0" + month;
        else
            m = month + "";
        if (day < 10)
            d = "0" + day;
        else
            d = day + "";

        return y + "-" + m + "-" + d;
    }


    public static String lastMonth() {
        Date date = new Date();

        int year = Integer.parseInt(new SimpleDateFormat("yyyy").format(date));
        int month = Integer.parseInt(new SimpleDateFormat("MM").format(date)) - 1;
        int day = Integer.parseInt(new SimpleDateFormat("dd").format(date));
        if (month == 0) {
            year -= 1;
            month = 12;
        } else if (day > 28) {
            if (month == 2) {
                if (year % 400 == 0 || (year % 4 == 0 && year % 100 != 0)) {
                    day = 29;
                } else
                    day = 28;
            } else if ((month == 4 || month == 6 || month == 9 || month == 11)
                    && day == 31) {
                day = 30;
            }
        }
        String y = year + "";
        String m = "";
        String d = "";
        if (month < 10)
            m = "0" + month;
        else
            m = month + "";
        if (day < 10)
            d = "0" + day;
        else
            d = day + "";

        return y + "-" + m + "-" + d;
    }
然后就是在项目中引用他们了:
public class MainActivity extends Activity {

    TextView dateTxt;
    TextView timeTxt;
    Context context;
    ImageView hourImg, minuteImg;
    public static MainActivity instance =null;

    @Override
    protected void onCreate(Bundle savedInstanceState) {
        super.onCreate(savedInstanceState);
        requestWindowFeature(Window.FEATURE_NO_TITLE);
        setContentView(R.layout.activity_main);
        initviews();
        context = this;
        instance=this;
}组件的申明与初始化,需要注意的是,设置一个静态的变量instance,初始化为this,为的是在别的类中能够引用当前activity的方法
private void initviews() {
        hourImg = (ImageView) findViewById(R.id.time_hour);
        minuteImg = (ImageView) findViewById(R.id.time_minute);

        dateTxt = (TextView) findViewById(R.id.date_txt);
        dateTxt.setText(GetDate.lastDay());
        dateTxt.setOnClickListener(new OnClickListener() {

            @Override
            public void onClick(View arg0) {
                DateDialog dialog = new DateDialog(context);
                dialog.setDate(dateTxt);
            }
        });
        timeTxt = (TextView) findViewById(R.id.time_txt);
        timeTxt.setText(GetDate.currentDayTime());
        timeTxt.setOnClickListener(new OnClickListener() {

            @Override
            public void onClick(View arg0) {
                TimeDialog dialog = new TimeDialog(context);
                dialog.setTime(timeTxt);
            }
        });
        setTimeClock(timeTxt.getText().toString().trim());

    }
获取组件,设置初始日期,时间,绑定监听器,弹出日期时间选择对话框,设置完毕。简单的代码可以看到这些工具类的作用,使用起来很方便。然后就是时钟组件的实现:
// 设置显示的时钟,值与设置的时间一致
    public void setTimeClock(String time) {
        int hour = Integer.parseInt(timeTxt.getText().toString().trim()
                .substring(0, 2));
        int minute = Integer.parseInt(timeTxt.getText().toString().trim()
                .substring(3, 5));
        // 根据时间来设置偏转的度数
        int hourDegree = (hour % 12) * 30;
        int minuteDegree = minute * 6;
        RotateAnimation animationHour = new RotateAnimation(hourDegree,
                hourDegree, Animation.RELATIVE_TO_SELF, 0.5f,
                Animation.RELATIVE_TO_SELF, 0.5f);

        animationHour.setDuration(1000);// 设置动画持续时间
        animationHour.setFillAfter(true);// 动画执行完后是否停留在执行完的状态
        hourImg.startAnimation(animationHour);
        RotateAnimation animationMinute = new RotateAnimation(minuteDegree,
                minuteDegree, Animation.RELATIVE_TO_SELF, 0.5f,
                Animation.RELATIVE_TO_SELF, 0.5f);

        animationMinute.setDuration(1000);// 设置动画持续时间
        animationMinute.setFillAfter(true);// 动画执行完后是否停留在执行完的状态
        minuteImg.setAnimation(animationMinute);
    }
这里就是自定义时钟的实现过程,获取当前小时,分钟,然后根据时间来设置偏转的度数。
旋转用的是Android自带的动画RotateAnimation:
android:fromDegrees 开始旋转的角度位置,正值代表顺时针方向度数,负值代码逆时针方向度数
android:toDegrees 结束时旋转到的角度位置,正值代表顺时针方向度数,负值代码逆时针方向度数
android:pivotX 缩放起点X轴坐标,可以是数值、百分数、百分数p 三种样式,比如 50、50%、50%p,具体意义已在scale标签中讲述,这里就不再重讲
android:pivotY 缩放起点Y轴坐标,可以是数值、百分数、百分数p 三种样式,比如 50、50%、50%p
pivotXType:X轴的伸缩模式,可以取值为ABSOLUTE、RELATIVE_TO_SELF、RELATIVE_TO_PARENT。
pivotYType:Y轴的伸缩模式,可以取值为ABSOLUTE、RELATIVE_TO_SELF、RELATIVE_TO_PARENT。
然后就是一些属性的设置:
android:duration setDuration(long) 动画持续时间,以毫秒为单位
android:fillAfter setFillAfter(boolean) 如果设置为true,控件动画结束时,将保持动画最后时的状态
android:fillBefore setFillBefore(boolean) 如果设置为true,控件动画结束时,还原到开始动画前的状态
android:fillEnabled setFillEnabled(boolean) 与android:fillBefore 效果相同,都是在动画结束时,将控件还原到初始化状态
android:repeatCount setRepeatCount(int) 重复次数
android:repeatMode setRepeatMode(int) 重复类型,有reverse和restart两个值,取值为RESTART或 REVERSE,必须与repeatCount一起使用才能看到效果。因为这里的意义是重复的类型,即回放时的动作。
android:interpolator setInterpolator(Interpolator) 设定插值器,其实就是指定的动作效果
在需要的控件里面加入动画即可。
最后注意的是,刚开始我设置完时间以后,时钟不旋转,只有在初始化的时候才旋转。最后才知道应该在timedialog里面设置监听,执行旋转的方法
MainActivity.instance.setTimeClock(text.getText().toString().trim());
加入这句话以后,设置完时间,时钟也会旋转。
欧了~~效果还不错`(∩_∩)′