Spring Boot整合 数据库连接池 HikariCP Druid 阿里巴巴Druid
HikariCP (希卡利)数据库连接池部分(默认的连接池)
简介:
- HiKariCP(xi ka li)
- 1.HiKariCP是数据库连接池的一个后起之秀,号称性能最好,速度最快,可以完美地PK掉其他连接池。
- 2.Hikari来自日文,是“光”(阳光的光,不是光秃秃的光)的意思 速度极快
- 3.这个产品的口号是“快速、简单、可靠”
- 4.快到SpringBoot2.0已经采用HikariCP作为默认连接池配置
数据库连接池的对比表格
这个 PSCache 就是 PreparedStatement Cache SQL缓存
| 功能 | dbcp | druid | c3p0 | tomcat-jdbc | HikariCP |
|---|---|---|---|---|---|
| 是否支持PSCache | 是 | 是 | 是 | 否 | 否 |
| 监控 | jmx | jmx/log/http | jmx,log | jmx | jmx |
| 扩展性 | 弱 | 好 | 弱 | 弱 | 弱 |
| sql拦截及解析 | 无 | 支持 | 无 | 无 | 无 |
| 代码 | 简单 | 中等 | 复杂 | 简单 | 简单 |
| 更新时间 | 2015.8.6 | 2015.10.10 | 2015.12.09 | 2015.12.3 | |
| 特点 | 依赖于common-pool | 阿里开源,功能全面 | 历史久远,代码逻辑复杂,且不易维护 | 优化力度大,功能简单,起源于boneCP | |
| 连接池管理 | LinkedBlockingDeque | 数组 | FairBlockingQue |
只需要导入spring-boot-starter-jdbc依赖springboot就默认使用HikariCP作为数据库连接池了。
application.yml配置文件
HikarICP的配置
datasource:
  type: com.zaxxer.hikari.HikariDataSource  #数据源的实现类
  driverClassName: com.mysql.cj.jdbc.Driver    #mysql驱动 8.0版本以上需要使用 com.mysql.cj.jdbc.Driver
  url: jdbc:mysql://你的数据库地址:3306/ssm?useUnicode=true&characterEncoding=utf-8&useSSL=false
  username: root    # 用户名
  password: root    # 密码
  # Hikari 连接池配置
  # 最小空闲连接数量
  hikari:
    minimum-idle: 5
    # 空闲连接存活最大时间,默认600000(10分钟)
    idle-timeout: 180000
    # 连接池最大连接数,默认是10
    maximum-pool-size: 10
    # 此属性控制从池返回的连接的默认自动提交行为,默认值:true
    auto-commit: true
    # 连接池名称
    pool-name: MyHikariCP
    # 此属性控制池中连接的最长生命周期,值0表示无限生命周期,默认1800000即30分钟
    max-lifetime: 1800000
    # 数据库连接超时时间,默认30秒,即30000
    connection-timeout: 30000
    connection-test-query: SELECT 1
Alibaba Druid连接池
- 简介
Druid是阿里巴巴开源平台上一个数据库连接池实现,结合了C3P0、DBCP、PROXOOL等DB池的优点,同时加入了日志监控。 - 可以说
Hikari与Driud都是当前 Java Web 上最优秀的数据源 HikariCP重速度Druid重安全和监控
使用Druid数据源
- 首先导入依赖
    com.alibaba
    druid
    1.1.12
查看项目依赖
![]()
- 去application.yml切换数据源
- 之前已经说过 Spring Boot 2.0 以上默认使用 com.zaxxer.hikari.HikariDataSource 数据源,但可以 通过 spring.datasource.type 指定数据源。
- 更换完之后可以去test目录在测试以下现在的数据源是否已经切换到了Druid数据源了
- 切换成功!既然切换成功,就可以设置数据源连接初始化大小、最大连接数、等待时间、最小连接数 等设置项;
- 我们可以配置一些参数来测试一下;
spring:
  datasource:
    driver-class-name: com.mysql.cj.jdbc.Driver
    url: jdbc:mysql://你的数据库地址:3306/smbms?useUnicode=true&characterEncoding=utf-8&useSSL=false&serverTimezone=GMT
    username: root
    password: root
    # 更换数据源为Druid
    type: com.alibaba.druid.pool.DruidDataSource

    #Spring Boot 默认是不注入这些属性值的,需要自己绑定
    #druid 数据源专有配置
    initialSize: 5
    minIdle: 5
    maxActive: 20
    maxWait: 60000
    timeBetweenEvictionRunsMillis: 60000
    minEvictableIdleTimeMillis: 300000
    validationQuery: SELECT 1 FROM DUAL
    testWhileIdle: true
    testOnBorrow: false
    testOnReturn: false
    poolPreparedStatements: true

    #配置监控统计拦截的filters,stat:监控统计、log4j:日志记录、wall:防御sql注入
    #如果允许时报错  java.lang.ClassNotFoundException: org.apache.log4j.Priority
    #则导入 log4j 依赖即可,Maven 地址: https://mvnrepository.com/artifact/log4j/log4j
    filters: stat,wall,log4j
    maxPoolPreparedStatementPerConnectionSize: 20
    useGlobalDataSourceStat: true
    connectionProperties: druid.stat.mergeSql=true;druid.stat.slowSqlMillis=500
- 由于上方的配置使用到了log4j 所以需要引入log4j的依赖 否则 En…
<dependency>
    <groupId>log4jgroupId>
    <artifactId>log4jartifactId>
    <version>1.2.17version>
dependency>
- 现在需要我们自己为
com.alibaba.druid.pool.DruidDataSource绑定全局配置文件中的参数,再添加到容器中,而不再使用Spring Boot的自动生成了;我们需要 自己添加DruidDataSource组件到容器中,并绑定属性; - 创建 Druid的
配置类config.DruidConfig - 完整的代码
package com.yufire.springboot.config;

import com.alibaba.druid.pool.DruidDataSource;
import org.springframework.boot.context.properties.ConfigurationProperties;
import org.springframework.context.annotation.Bean;
import org.springframework.context.annotation.Configuration;

import javax.sql.DataSource;

@Configuration
public class DruidConfig {

    /*
       将自定义的 Druid数据源添加到容器中,不再让 Spring Boot 自动创建
       绑定全局配置文件中的 druid 数据源属性到 com.alibaba.druid.pool.DruidDataSource从而让它们生效
       @ConfigurationProperties(prefix = "spring.datasource"):作用就是将 全局配置文件中
       前缀为 spring.datasource的属性值注入到 com.alibaba.druid.pool.DruidDataSource 的同名参数中
     */
    @ConfigurationProperties(prefix = "spring.datasource")
    @Bean
    public DataSource druidDataSource() {
        return new DruidDataSource();
    }

}
- OK 配置完成去测试下吧
public class SpringbootDemoDataApplicationTests {

    //注入数据源
    @Autowired
    DataSource dataSource;

    @Test
    public void contextLoads() throws SQLException {
        //看一下默认数据源
        System.out.println(dataSource.getClass());
        //获得连接
        Connection connection =   dataSource.getConnection();
        System.out.println(connection);

        DruidDataSource druidDataSource = (DruidDataSource) dataSource;
        System.out.println("druidDataSource 数据源最大连接数:" + druidDataSource.getMaxActive());
        System.out.println("druidDataSource 数据源初始化连接数:" + druidDataSource.getInitialSize());

        //关闭连接
        connection.close();
    }

}
配置 Druid 数据源监控 重头戏
- Druid 数据源具有监控的功能,并提供了一个 web 界面方便用户查看,类似安装 路由器 时,人家也提供了一个默认的 web 页面。
- 所以第一步需要设置 Druid 的后台管理页面,比如 登录账号、密码 等;配置后台管理;
在刚才创建的Druid配置里里边添加以下代码
 /**
     * 配置 Druid 监控管理后台的Servlet;
     * 内置 Servler 容器时没有web.xml文件,所以使用 Spring Boot 的注册 Servlet 方式
     * @return
     */
    @Bean
    public ServletRegistrationBean statViewServlet() {
        //配置Durid管理界面访问地址
        ServletRegistrationBean bean = new ServletRegistrationBean(new StatViewServlet(), "/druid/*");

        Map<String, String> initParams = new HashMap<>();
        //后台管理界面的登录账号  initParams初始化配置需要的key都是死配置并且不能写错
        initParams.put("loginUsername", "admin");
        //后台管理界面的登录密码
        initParams.put("loginPassword", "123456");

        //后台允许谁可以访问
        //initParams.put("allow", "localhost"):表示只有本机可以访问
        //initParams.put("allow", ""):为空或者为null时,表示允许所有访问
        initParams.put("allow", "");
        //deny:Druid 后台拒绝谁访问
        //initParams.put("yufire", "192.168.1.20");表示禁止此ip访问

        //设置初始化参数
        bean.setInitParameters(initParams);
        return bean;
        //这些参数可以在 com.alibaba.druid.support.http.StatViewServlet 的父类 com.alibaba.druid.support.http.ResourceServlet 中找到
    }


    /**
     * 配置 Druid 监控 之  web 监控的 filter
     * WebStatFilter:用于配置Web和Druid数据源之间的管理关联监控统计
     * @return
     */
    @Bean
    public FilterRegistrationBean webStatFilter() {
        FilterRegistrationBean bean = new FilterRegistrationBean();
        bean.setFilter(new WebStatFilter());

        //exclusions:设置哪些请求进行过滤排除掉,从而不进行统计
        Map<String, String> initParams = new HashMap<>();
        initParams.put("exclusions", "*.js,*.css,/druid/*");
        bean.setInitParameters(initParams);

        //"/*" 表示过滤所有请求
        bean.setUrlPatterns(Arrays.asList("/*"));
        return bean;
    }
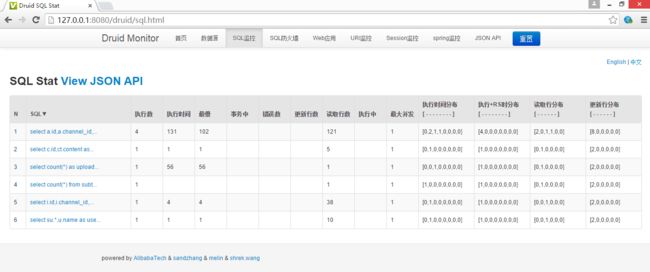
- 配置完毕后,我们可以选择访问 : http://localhost:8080/druid/login.html
登陆成功之后你将看到以下页面
整合完毕 可以使用 持久层框架 (MyBatis-Plus tk.mybatis 等等) 愉快的玩耍了~~~
本文未授权禁止转载!编辑不易 , 转发请注明出处! 作者qq:2867874665


