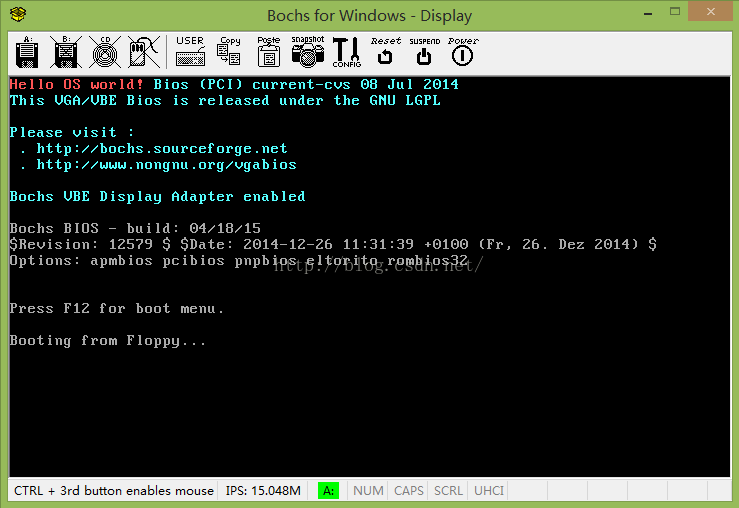
实现一个简单的Boot loader
为了更好了解系统内核加载过程,写了一个简单的boot loader。
一、准备工作
1.NASM汇编器
2.bochs虚拟机
3.dd for Windows
二、编写boot代码
我们知道当BISO完成自检后,会查找硬件设备,并把MBR的内容拷贝到0x7C00位置,然后转到此处继续执行
;**
nasm boot.asm -o boot.bin
;**
org 0x07C00

mov ax,	cs
mov es, ax
mov ds, ax
call DispStr
jmp $

DispStr:
	mov ax, BootMessage
	mov bp, ax
	mov cx, 16
	mov ax, 0x1301
	mov bx, 0x0c
	mov dl, 0
	int 10h/*BIOS显示中断服务*/
	ret

BootMessage:    db "Hello OS world!"
times    510-($-$$)  db  0
dw	0xaa55
将nasm.exe 加入环境变量。
用命令 nasm boot.asm -o boot.bin 编译成二进制文件
三、安装bochs并更改配置文件
1、完全安装bochs后,可以再bochs安装目录下找到bximage.exe,运行此程序可以制作一个空的boot.img的映像文件。
bximage -> 1(create new floppy ..) -> fd (floppy) -> [1.44M](enter) -> boot.img
2、用dd命令把boot.bin拷贝进boot.img,模拟将boot loader拷贝进软盘。
dd if=boot.bin of=boot.img bs=512 count=1 (windos下的dd命令与Linux下略有不同, Linux下需要增加conv = notrunc)
3、修改bochs配置文件bochsrc.bxrc
###############################################################

# bochsrc.txt file for DLX Linux disk image.

###############################################################

# how much memory the emulated machine will have
megs: 32

# filename of ROM images
romimage: file=BIOS-bochs-latest
vgaromimage: file=VGABIOS-lgpl-latest

# what disk images will be used
floppya: 1_44=boot.img, status=inserted
##floppyb: 1_44=floppyb.img, status=inserted

# hard disk
##ata0: enabled=1, ioaddr1=0x1f0, ioaddr2=0x3f0, irq=14
##ata0-master: type=disk, path="hd10meg.img", cylinders=306, heads=4, spt=17

# choose the boot disk.
boot: a

# default config interface is textconfig.
#config_interface: textconfig
#config_interface: wx

#display_library: x
# other choices: win32 sdl wx carbon amigaos beos macintosh nogui rfb term svga

# where do we send log messages?
log: bochsout.txt

# disable the mouse, since DLX is text only
mouse: enabled=0

# set up IPS value and clock sync
cpu: ips=15000000
clock: sync=both

# enable key mapping, using US layout as default.
# NOTE: In Bochs 1.4, keyboard mapping is only 100% implemented on X windows.

# However, the key mapping tables are used in the paste function, so
# in the DLX Linux example I'm enabling keyboard_mapping so that paste
# will work.  Cut&Paste is currently implemented on win32 and X windows only.

keyboard: keymap=keymaps/x11-pc-us.map

#keyboard: keymap=keymaps/x11-pc-fr.map
#keyboard: keymap=keymaps/x11-pc-de.map
#keyboard: keymap=keymaps/x11-pc-es.map
由于在windows下编写boot loader,采用兼容性好的NASM汇编编译器,以便与以后移植到Linux系统下。
参考:《 自己动手写操作系统》 于渊
