Jupyter 常见可视化框架的选择
![]()
文末有福利!
对于以Python作为技术栈的数据科学工作者,Jupyter是不得不提的数据报告工具。可能对于R社区而言,鼎鼎大名的ggplot2是常见的可视化框架,而大家对于Python,以及Jupyter为核心的交互式报告的可个视化方案就并没有那么熟悉。本文试图比较几个常用的解决方案,方便大家选择。
选择标准
称述式还是命令式
数据工作者使用的图的类别,常见的就三类:GIS可视化、网络可视化和统计图。因此,大多数场景下,我们并不想接触非常底层的基于点、线、面的命令,所以,选择一个好的封装的框架相当重要。
当然,公认较好的封装是基于《The Grammar of Graphics (Statistics and Computing)》一书,R中的ggplot2基本上就是一个很好的实现。我们基本上可以像用「自然语言」(Natural Language)一样使用这些绘图命令。我们姑且采用计算机科学领域的「陈述式」来表达这种绘图方式。
相反,有时候,以下情形时,我们可能对于这种绘图命令可能并不在意:
出图相当简单,要求绘制速度,一般大的框架较重(当然只是相对而言);
想要对细节做非常详尽的微调,一般大框架在微调方面会相对复杂或者退缩成一句句命令;
是统计作图可视化的创新者,想要尝试做出新的可视化实践。
这些情况下,显然,简单操作式并提供底层绘制命令的框架更让人愉快,与上面类似,我们借用「命令式」描述这类框架。
是否交互
与传统的交付静态图标不同,基于Web端的Jupter的一大好处就是可以绘制交互的图标(最近的RNotebook也有实现),因此,是否选择交互式,也是一个需要权衡的地方。
交互图的优势:
可以提供更多的数据维度和信息;
用户端可以做更多诸如放大、选取、转存的操作;
可以交付BI工程师相应的JavaScript代码用以工程化;
效果上比较炫酷,考虑到报告接受者的特征可以选择。
非交互图的优势:
报告文件直接导出成静态文件时相对问题,不会因为转换而损失信息;
图片可以与报告分离,必要时作为其他工作的成果;
不需要在运行Notebook时花很多世界载入各类前端框架。
是非内核交互
Jupyter上大多数命令通过以下方式获取数据,而大多数绘图方式事实上只是通过Notebook内的代码在Notebook与内核交互后展示出输出结果。但ipywidgets框架则可以实现Code Cell中的代码与Notebook中的前端控件(比如按钮等)绑定来进行操作内核,提供不同的绘图结果,甚至某些绘图框架的每个元素都可以直接和内核进行交互。
用这些框架,可以搭建更复杂的Notebook的可视化应用,但缺点是因为基于内核,所以在呈递、展示报告时如果使用离线文件时,这些交互就会无效。
框架罗列
matplotlib
最家喻户晓的绘图框架是matplotlib,它提供了几乎所有python内静态绘图框架的底层命令。如果按照上面对可视化框架的分法,matplotlib属于非交互式的的「命令式」作图框架。
## matplotlib代码示例
from pylab import *
X = np.linspace(-np.pi, np.pi, 256,endpoint=True)
C,S = np.cos(X), np.sin(X)
plot(X,C)
plot(X,S)
show()
优点是相对较快,底层操作较多。缺点是语言繁琐,内置默认风格不够美观。
matplotlib在jupyter中需要一些配置,可以展现更好的效果,详情参见这篇文章.
ggplot和plotnine
值得一说,对于R迁移过来的人来说,ggplot和plotnine简直是福音,基本克隆了ggplot2所有语法。横向比较的话,plotnine的效果更好。这两个绘图包的底层依旧是matplotlib,因此,在引用时别忘了使用%matplotlib inline语句。值得一说的是plotnine也移植了ggplot2中良好的配置语法和逻辑。
## plotnine示例
(ggplot(mtcars, aes('wt', 'mpg', color='factor(gear)'))
+ geom_point()
+ stat_smooth(method='lm')
+ facet_wrap('~gear'))
Seaborn
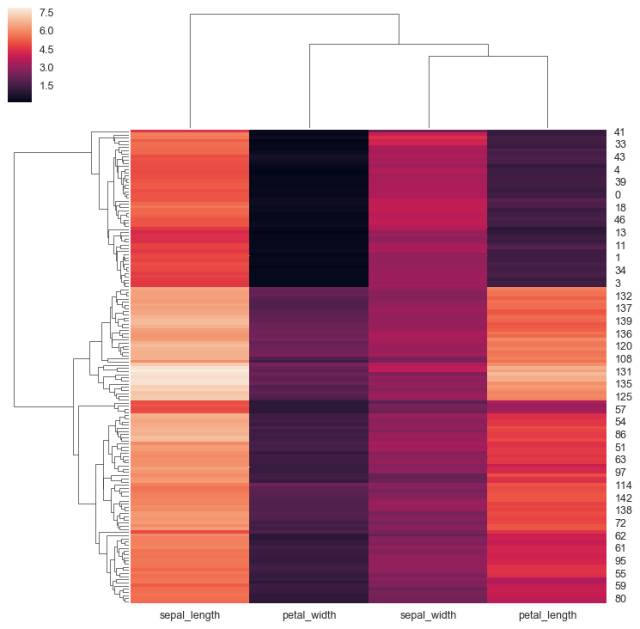
seaborn准确上说属于matplotlib的扩展包,在其上做了许多非常有用的封装,基本上可以满足大部分统计作图的需求,以matplotlib+seaborn基本可以满足大部分业务场景,语法也更加「陈述式」。
缺点是封装较高,基本上API不提供的图就完全不可绘制,对于各类图的拼合也不适合;此外配置语句语法又回归「命令式」,相对复杂且不一致。
## seaborn示例
import seaborn as sns; sns.set(color_codes=True)
iris = sns.load_dataset("iris")
species = iris.pop("species")
g = sns.clustermap(iris)
plotly
plotly是跨平台JavaScript交互式绘图包,由于开发者的核心是javascript,所以整个语法类似于写json配置,语法特质也介于「陈述式」和「命令式」之间,无服务版本是免费的。
有点是学习成本不高,可以很快将语句移植到javascript版本;缺点是语言相对繁琐。
##plotly示例
import plotly.plotly as py
import plotly.graph_objs as go
# Add data
month = ['January', 'February', 'March', 'April', 'May', 'June', 'July',
'August', 'September', 'October', 'November', 'December']
high_2000 = [32.5, 37.6, 49.9, 53.0, 69.1, 75.4, 76.5, 76.6, 70.7, 60.6, 45.1, 29.3]
low_2000 = [13.8, 22.3, 32.5, 37.2, 49.9, 56.1, 57.7, 58.3, 51.2, 42.8, 31.6, 15.9]
high_2007 = [36.5, 26.6, 43.6, 52.3, 71.5, 81.4, 80.5, 82.2, 76.0, 67.3, 46.1, 35.0]
low_2007 = [23.6, 14.0, 27.0, 36.8, 47.6, 57.7, 58.9, 61.2, 53.3, 48.5, 31.0, 23.6]
high_2014 = [28.8, 28.5, 37.0, 56.8, 69.7, 79.7, 78.5, 77.8, 74.1, 62.6, 45.3, 39.9]
low_2014 = [12.7, 14.3, 18.6, 35.5, 49.9, 58.0, 60.0, 58.6, 51.7, 45.2, 32.2, 29.1]
# Create and style traces
trace0 = go.Scatter(
x = month,
y = high_2014,
name = 'High 2014',
line = dict(
color = ('rgb(205, 12, 24)'),
width = 4)
)
trace1 = go.Scatter(
x = month,
y = low_2014,
name = 'Low 2014',
line = dict(
color = ('rgb(22, 96, 167)'),
width = 4,)
)
trace2 = go.Scatter(
x = month,
y = high_2007,
name = 'High 2007',
line = dict(
color = ('rgb(205, 12, 24)'),
width = 4,
dash = 'dash') # dash options include 'dash', 'dot', and 'dashdot'
)
trace3 = go.Scatter(
x = month,
y = low_2007,
name = 'Low 2007',
line = dict(
color = ('rgb(22, 96, 167)'),
width = 4,
dash = 'dash')
)
trace4 = go.Scatter(
x = month,
y = high_2000,
name = 'High 2000',
line = dict(
color = ('rgb(205, 12, 24)'),
width = 4,
dash = 'dot')
)
trace5 = go.Scatter(
x = month,
y = low_2000,
name = 'Low 2000',
line = dict(
color = ('rgb(22, 96, 167)'),
width = 4,
dash = 'dot')
)
data = [trace0, trace1, trace2, trace3, trace4, trace5]
# Edit the layout
layout = dict(title = 'Average High and Low Temperatures in New York',
xaxis = dict(title = 'Month'),
yaxis = dict(title = 'Temperature (degrees F)'),
)
fig = dict(data=data, layout=layout)
py.iplot(fig, filename='styled-line')
注意:此框架在jupyter中使用需要使用init_notebook_mode()加载JavaScript框架。
bokeh
bokeh是pydata维护的比较具有潜力的开源交互可视化框架。
值得一说的是,该框架同时提供底层语句和「陈述式」绘图命令。相对来说语法也比较清楚,但其配置语句依旧有很多可视化框架的问题,就是与「陈述式」命令不符,没有合理的结构。此外,一些常见的交互效果都是以底层命令的方式使用的,因此如果要快速实现Dashboard或者作图时就显得较为不便了。
## Bokeh示例
import numpy as np
import scipy.special
from bokeh.layouts import gridplot
from bokeh.plotting import figure, show, output_file
p1 = figure(title="Normal Distribution (μ=0, σ=0.5)",tools="save",
background_fill_color="#E8DDCB")
mu, sigma = 0, 0.5
measured = np.random.normal(mu, sigma, 1000)
hist, edges = np.histogram(measured, density=True, bins=50)
x = np.linspace(-2, 2, 1000)
pdf = 1/(sigma * np.sqrt(2*np.pi)) * np.exp(-(x-mu)**2 / (2*sigma**2))
cdf = (1+scipy.special.erf((x-mu)/np.sqrt(2*sigma**2)))/2
p1.quad(top=hist, bottom=0, left=edges[:-1], right=edges[1:],
fill_color="#036564", line_color="#033649")
p1.line(x, pdf, line_color="#D95B43", line_width=8, alpha=0.7, legend="PDF")
p1.line(x, cdf, line_color="white", line_width=2, alpha=0.7, legend="CDF")
p1.legend.location = "center_right"
p1.legend.background_fill_color = "darkgrey"
p1.xaxis.axis_label = 'x'
p1.yaxis.axis_label = 'Pr(x)'
p2 = figure(title="Log Normal Distribution (μ=0, σ=0.5)", tools="save",
background_fill_color="#E8DDCB")
mu, sigma = 0, 0.5
measured = np.random.lognormal(mu, sigma, 1000)
hist, edges = np.histogram(measured, density=True, bins=50)
x = np.linspace(0.0001, 8.0, 1000)
pdf = 1/(x* sigma * np.sqrt(2*np.pi)) * np.exp(-(np.log(x)-mu)**2 / (2*sigma**2))
cdf = (1+scipy.special.erf((np.log(x)-mu)/(np.sqrt(2)*sigma)))/2
p2.quad(top=hist, bottom=0, left=edges[:-1], right=edges[1:],
fill_color="#036564", line_color="#033649")
p2.line(x, pdf, line_color="#D95B43", line_width=8, alpha=0.7, legend="PDF")
p2.line(x, cdf, line_color="white", line_width=2, alpha=0.7, legend="CDF")
p2.legend.location = "center_right"
p2.legend.background_fill_color = "darkgrey"
p2.xaxis.axis_label = 'x'
p2.yaxis.axis_label = 'Pr(x)'
p3 = figure(title="Gamma Distribution (k=1, θ=2)", tools="save",
background_fill_color="#E8DDCB")
k, theta = 1.0, 2.0
measured = np.random.gamma(k, theta, 1000)
hist, edges = np.histogram(measured, density=True, bins=50)
x = np.linspace(0.0001, 20.0, 1000)
pdf = x**(k-1) * np.exp(-x/theta) / (theta**k * scipy.special.gamma(k))
cdf = scipy.special.gammainc(k, x/theta) / scipy.special.gamma(k)
p3.quad(top=hist, bottom=0, left=edges[:-1], right=edges[1:],
fill_color="#036564", line_color="#033649")
p3.line(x, pdf, line_color="#D95B43", line_width=8, alpha=0.7, legend="PDF")
p3.line(x, cdf, line_color="white", line_width=2, alpha=0.7, legend="CDF")
p3.legend.location = "center_right"
p3.legend.background_fill_color = "darkgrey"
p3.xaxis.axis_label = 'x'
p3.yaxis.axis_label = 'Pr(x)'
p4 = figure(title="Weibull Distribution (λ=1, k=1.25)", tools="save",
background_fill_color="#E8DDCB")
lam, k = 1, 1.25
measured = lam*(-np.log(np.random.uniform(0, 1, 1000)))**(1/k)
hist, edges = np.histogram(measured, density=True, bins=50)
x = np.linspace(0.0001, 8, 1000)
pdf = (k/lam)*(x/lam)**(k-1) * np.exp(-(x/lam)**k)
cdf = 1 - np.exp(-(x/lam)**k)
p4.quad(top=hist, bottom=0, left=edges[:-1], right=edges[1:],
fill_color="#036564", line_color="#033649")
p4.line(x, pdf, line_color="#D95B43", line_width=8, alpha=0.7, legend="PDF")
p4.line(x, cdf, line_color="white", line_width=2, alpha=0.7, legend="CDF")
p4.legend.location = "center_right"
p4.legend.background_fill_color = "darkgrey"
p4.xaxis.axis_label = 'x'
p4.yaxis.axis_label = 'Pr(x)'
output_file('histogram.html', title="histogram.py example")
show(gridplot(p1,p2,p3,p4, ncols=2, plot_width=400, plot_height=400, toolbar_location=None))
其他特殊需求的作图
除了统计作图,网络可视化和GIS可视化也是很常用的,在此只做一个简单的罗列:
GIS类:
gmap:交互,使用google maps接口
ipyleaflet:交互,使用leaflet接口
网络类:
networkx:底层为matplotlib
plotly
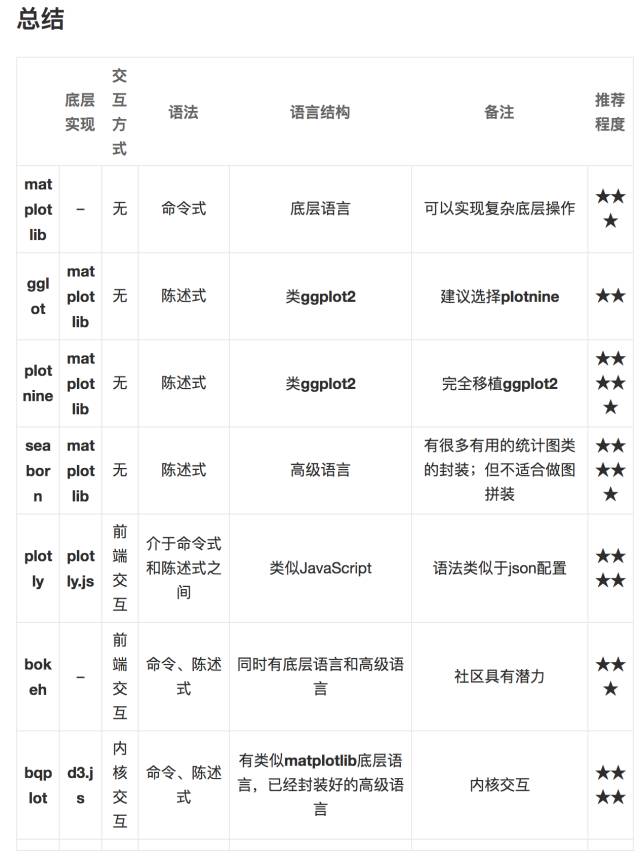
总结
来源:三次方根
segmentfault.com/a/1190000011831228


