【何之源-21个项目玩转深度学习】——Chapter2-2.1.4 CIFAR-10二进制数据集保存为图片形式
关于CIFAR-10数据集下载请参考:
由于下载解压得到的数据集是二进制形式的,本文讲的是将bin形式数据转为tensorflow能识别的tensor形式的,以及保存成可视化的图像文件;
主函数cifar10_extract.py的内容如下:
#coding: utf-8
# 导入当前目录的cifar10_input,这个模块负责读入cifar10数据
import cifar10_input
# 导入TensorFlow和其他一些可能用到的模块。
import tensorflow as tf
import os
import scipy.misc


def inputs_origin(data_dir):
  # filenames一共5个,从data_batch_1.bin到data_batch_5.bin
  # 读入的都是训练图像
  filenames = [os.path.join(data_dir, 'data_batch_%d.bin' % i)
               for i in xrange(1, 6)]
  # 判断文件是否存在
  for f in filenames:
    if not tf.gfile.Exists(f):
      raise ValueError('Failed to find file: ' + f)
  # 将文件名的list包装成TensorFlow中queue的形式
  filename_queue = tf.train.string_input_producer(filenames)
  # cifar10_input.read_cifar10是事先写好的从queue中读取文件的函数
  # 返回的结果read_input的属性uint8image就是图像的Tensor
  read_input = cifar10_input.read_cifar10(filename_queue)
  # 将图片转换为实数形式
  reshaped_image = tf.cast(read_input.uint8image, tf.float32)
  # 返回的reshaped_image是一张图片的tensor
  # 我们应当这样理解reshaped_image:每次使用sess.run(reshaped_image),就会取出一张图片
  return reshaped_image

if __name__ == '__main__':
  # 创建一个会话sess
  with tf.Session() as sess:
    # 调用inputs_origin。cifar10_data/cifar-10-batches-bin是我们下载的数据的文件夹位置
    reshaped_image = inputs_origin('cifar10_data/cifar-10-batches-bin')
    # 这一步start_queue_runner很重要。
    # 我们之前有filename_queue = tf.train.string_input_producer(filenames)
    # 这个queue必须通过start_queue_runners才能启动
    # 缺少start_queue_runners程序将不能执行
    threads = tf.train.start_queue_runners(sess=sess)
    # 变量初始化
    sess.run(tf.global_variables_initializer())
    # 创建文件夹cifar10_data/raw/
    if not os.path.exists('cifar10_data/raw/'):
      os.makedirs('cifar10_data/raw/')
    # 保存30张图片
    for i in range(30):
      # 每次sess.run(reshaped_image),都会取出一张图片
      image_array = sess.run(reshaped_image)
      # 将图片保存
      scipy.misc.toimage(image_array).save('cifar10_data/raw/%d.jpg' % i)
讲解从main函数切入,定义会话,调用定义的inputs_origin函数将cifar10_data/cifar-10-batches-bin目录下的data_batch_1.bin到data_batch_5.bin这5个二进制文件存入filenames列表中;通过tf.gfile.Exists()判断列表中是否有文件;
用tf.train.string_input_producer()将文件列表中的文件存入队列filename_queue中;
然后调用cifar10_input中的read_cifar10()函数对队列中的数据进行读取,返回的结果read_input的属性unit8image是图像的Tensor;
下面针对read_cifar10()函数进行分析(函数代码如下):
def read_cifar10(filename_queue):
  """Reads and parses examples from CIFAR10 data files.

  Recommendation: if you want N-way read parallelism, call this function
  N times.  This will give you N independent Readers reading different
  files & positions within those files, which will give better mixing of
  examples.

  Args:
    filename_queue: A queue of strings with the filenames to read from.

  Returns:
    An object representing a single example, with the following fields:
      height: number of rows in the result (32)
      width: number of columns in the result (32)
      depth: number of color channels in the result (3)
      key: a scalar string Tensor describing the filename & record number
        for this example.
      label: an int32 Tensor with the label in the range 0..9.
      uint8image: a [height, width, depth] uint8 Tensor with the image data
  """

  class CIFAR10Record(object):
    pass
  result = CIFAR10Record()

  # Dimensions of the images in the CIFAR-10 dataset.
  # See http://www.cs.toronto.edu/~kriz/cifar.html for a description of the
  # input format.
  label_bytes = 1  # 2 for CIFAR-100
  result.height = 32
  result.width = 32
  result.depth = 3
  image_bytes = result.height * result.width * result.depth
  # Every record consists of a label followed by the image, with a
  # fixed number of bytes for each.
  record_bytes = label_bytes + image_bytes

  # Read a record, getting filenames from the filename_queue.  No
  # header or footer in the CIFAR-10 format, so we leave header_bytes
  # and footer_bytes at their default of 0.
  reader = tf.FixedLengthRecordReader(record_bytes=record_bytes)
  result.key, value = reader.read(filename_queue)

  # Convert from a string to a vector of uint8 that is record_bytes long.
  record_bytes = tf.decode_raw(value, tf.uint8)

  # The first bytes represent the label, which we convert from uint8->int32.
  result.label = tf.cast(
      tf.strided_slice(record_bytes, [0], [label_bytes]), tf.int32)

  # The remaining bytes after the label represent the image, which we reshape
  # from [depth * height * width] to [depth, height, width].
  depth_major = tf.reshape(
      tf.strided_slice(record_bytes, [label_bytes],
                       [label_bytes + image_bytes]),
      [result.depth, result.height, result.width])
  # Convert from [depth, height, width] to [height, width, depth].
  result.uint8image = tf.transpose(depth_major, [1, 2, 0])

  return result
函数读取文件名队列中的bin文件,首先分析下,每张cifar-10图像的label占1个字节,图像占37x37x3=3072个字节,那么一张图像对应的字节占用是3073个字节(即record_bytes),其排序是先label,再图像;tf.FixedLengthRecordReader()函数用于读取固定字节数的数据,意思是每3073个字节为一张图像信息截断;
下图展示的是打开的测试集bin文件后的内容,里面存储的是图像的bin形式:
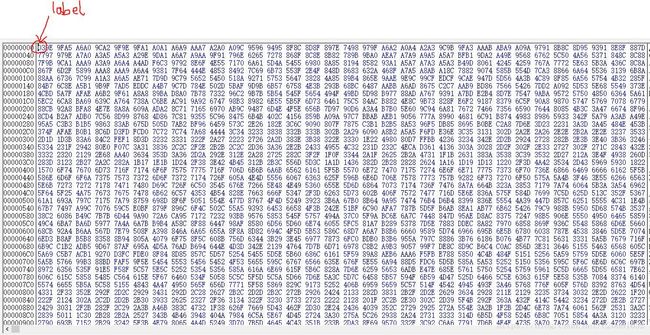
这个bin文件中共有30730000(3073字节/每张图x10000张图)个字节,第一个字节代表的label信息;
然后将读取的3073个字节存在value中,之后用tf.decode_raw()函数将value的内容转换为tf.uint8形式的数据;tf.decode_raw定义如下:
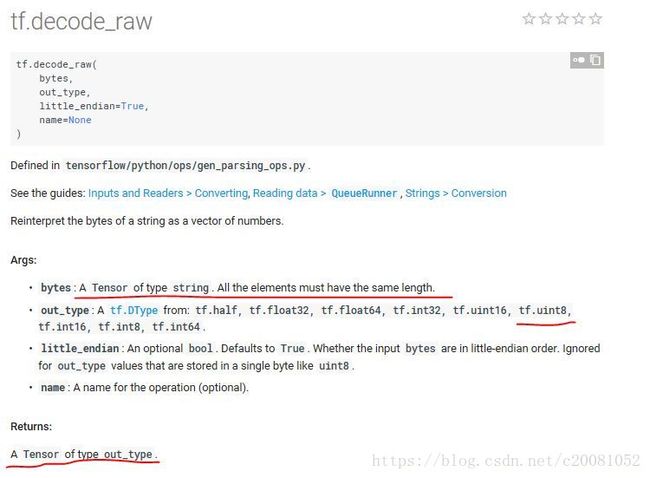
返回uint8形式的tensor数据record_bytes(个人理解就是将bin中的二进制表示的数转为无符号8位整型的数,如039E变为3和156,就是像素值)那么一个3073字节长的value变为3073长的uint8形式数的向量(tensor形式)。
之后将label的数据类型由uint8转为int32;其中用到的tf.strided_slice()函数原型如下:
tf.strided_slice(
input_,
begin,
end,
strides=None,
begin_mask=0,
end_mask=0,
ellipsis_mask=0,
new_axis_mask=0,
shrink_axis_mask=0,
var=None,
name=None
)
参数含义解析:
Args:
input_: ATensor.begin: Anint32orint64Tensor.end: Anint32orint64Tensor.strides: Anint32orint64Tensor.begin_mask: Anint32mask.end_mask: Anint32mask.ellipsis_mask: Anint32mask.new_axis_mask: Anint32mask.shrink_axis_mask: Anint32mask.var: The variable corresponding toinput_or Nonename: A name for the operation (optional).
Returns:
A Tensor the same type as input.
同样截取得到图像数据信息,将图像向量1x3072维度的vector做变形,reshape成[3,32,32]维度的tensor——depth_major;不过其数据形式还是uint8;为什么一开始是[3,32,32]而不直接是[32,32,3],这是由于record_bytes中的图像数据排布是一个点位置的BGR排了后再排另一个像素的BGR;so先reshape到[3,32,32],然后再用tf.transpose调整维度结构,最后result.uint8image的维度是[32,32,3]
回到cifar10_extract.py 返回的结果read_input的属性unit8image是图像的Tensor;利用tf.cast将其转为实数形tf.float32的图像reshaped_image;上面提到label是int32类型的;OK 到这里就得到了int32类型的label和维度为[32,32,3]数据类型为float32类型的图像;
threads = tf.train.start_queue_runners(sess=sess) 这行代码主要是执行数据读入队列操作;
接下来就是生成一个cifar10_data/raw/目录用来存放原始图像;
这些原始图像需要由array形式的图像转为jpg格式图像,用到了scipy.misc.toimage()这个函数(函数解析参考:数组保存为图像的若干方法)。
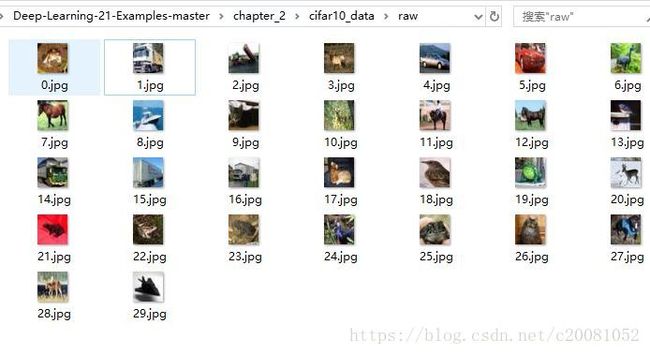
主函数运行结果如下: