首先找到File-new-Project找到Spring Initializr

然后点击next,填写好后继续next

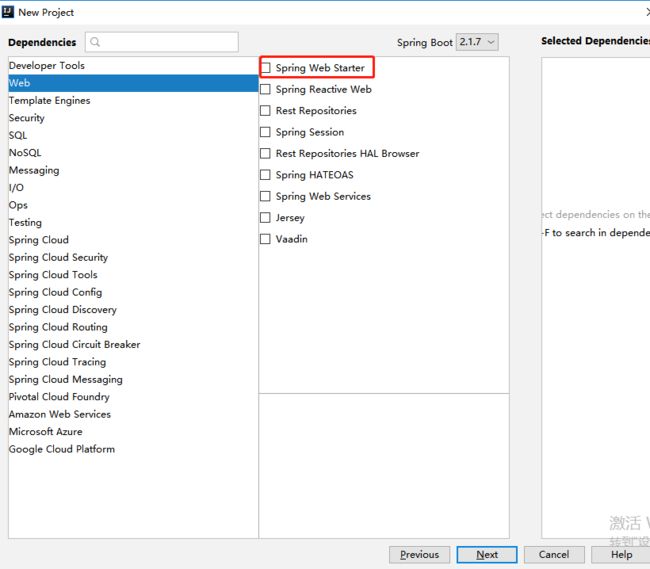
选择左边的列web,右边列勾选web框
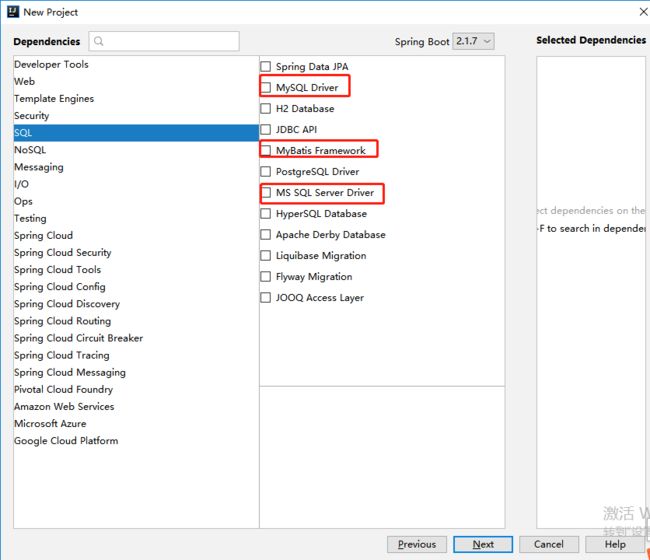
然后勾选需要的mysql mybatis等
如果前面没有修改工程名称,可以在这一界面更改,然后点击finish。

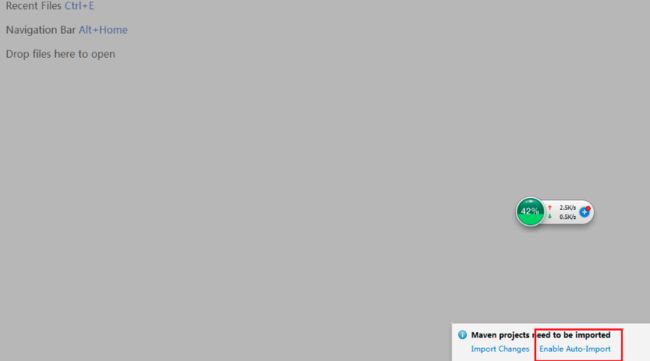
项目开始生成,界面右下角回弹出一个小方框,点击Enable Autop-Import ,idea 会自动下载jar包,时间比较长 (5分钟左右)
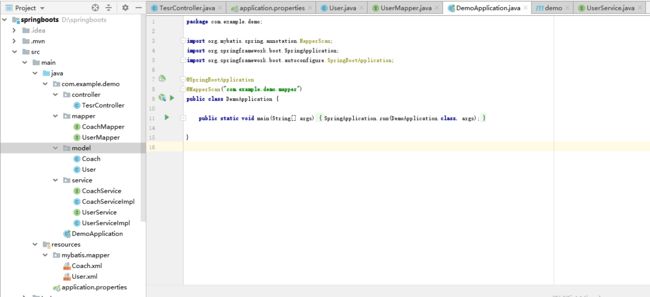
6、等待片刻后,项目格式如下图。controller,mapper,model,service是后来我新建的。

构建pom
    4.0.0

        org.springframework.boot
        spring-boot-starter-parent
        2.1.7.RELEASE


    com.example
    demo
    0.0.1-SNAPSHOT
    demo
    Demo project for Spring Boot


        1.8


            org.springframework.boot
            spring-boot-starter-web


            org.mybatis.spring.boot
            mybatis-spring-boot-starter
            1.3.1


            mysql
            mysql-connector-java
            runtime


            org.springframework.boot
            spring-boot-starter-test
            test


                org.springframework.boot
                spring-boot-maven-plugin
创建application.properties文件
#基本配置
spring.datasource.url=jdbc:mysql://127.0.0.1:3306/liujilu?useUnicode=true&characterEncoding=utf-8&useJDBCCompliantTimezoneShift=true&useLegacyDatetimeCode=false&serverTimezone=UTC
spring.datasource.username=用户名
spring.datasource.password=密码
spring.datasource.driverClassName=com.mysql.cj.jdbc.Driver
#使用mysql
spring.jpa.database = mysql
#是否显示sql语句
spring.jpa.show-sql=true
#mybatis配置 mybatis.config-location=classpath:mybatis-config.xml // 配置文件位置
mybatis.typeAliasesPackage=com.example.demo.model
mybatis.mapper-locations=classpath:mybatis/mapper/*.xml
user实体类
package com.example.demo.model;

public class User {

    private String  id;
    private String name;

    public String getId() {
        return id;
    }

    public void setId(String id) {
        this.id = id;
    }

    public String getName() {
        return name;
    }

    public void setName(String name) {
        this.name = name;
    }
}
创建Usermapper 接口
package com.example.demo.mapper;


import com.example.demo.model.User;
import org.apache.ibatis.annotations.Mapper;

import java.util.List;

@Mapper
public interface UserMapper {

    public List selectList();
}
创建接口 UserService
package com.example.demo.service;

import com.example.demo.model.User;

import java.util.List;

public interface UserService {
    public List selectList();
}
创建UserServiceImpl
package com.example.demo.service;

import com.example.demo.mapper.CoachMapper;
import com.example.demo.mapper.UserMapper;
import com.example.demo.model.Coach;
import com.example.demo.model.User;
import org.springframework.beans.factory.annotation.Autowired;
import org.springframework.stereotype.Service;

import java.util.List;

@Service
public class UserServiceImpl implements  UserService{
    @Autowired
    private UserMapper uMapper;

    @Override
    public List selectList() {
        return uMapper.selectList();
    }


}
在resource目录下创建mybatis文件下、在该文件下创建mapper文件夹、然后在该文件夹下创建User.xml

创建controller
package com.example.demo.controller;

import com.example.demo.model.User;
import com.example.demo.service.UserService;
import org.springframework.beans.factory.annotation.Autowired;
import org.springframework.web.bind.annotation.RequestMapping;
import org.springframework.web.bind.annotation.RestController;

import java.util.List;


@RestController
public class TesrController {

   @Autowired
   private CoachService coachService;
   @Autowired
   private UserService userService;


   @RequestMapping("/hello")
   public String hello() {
      return "hello world3";
   }

   @RequestMapping("/selectList")
    public List selectList() {
        return userService.selectList();
    }
}
最后附上启动器的代码
package com.example.demo;

import org.mybatis.spring.annotation.MapperScan;
import org.springframework.boot.SpringApplication;
import org.springframework.boot.autoconfigure.SpringBootApplication;

@SpringBootApplication
@MapperScan("com.example.demo.mapper")
public class DemoApplication {

    public static void main(String[] args) {
        SpringApplication.run(DemoApplication.class, args);
    }

}
项目结构图

启动项目在浏览器输入:http://localhost:8080/selectList ,如下图
