win10+tensorflow+python3.6+opencv3.4.1+C++调用tf模型
一、总体思路
标注数据,为了生产tf的record格式数据文件,提供给python的工程训练出ckpt模型文件,然后转成.pb文件,最后通过cv::dnn::readNetFromTensorflow(weights, prototxt)接口进行c++调用tensorflow的模型进行ssd的检测。
Detail:
二、配置
1.tensorflow 1.12.0 (tf的版本不同有时能引起一些间接的编译错误,出问题时适当分析下是否版本问题)
2.opencv3.4.1
3.python36
4.qt5.9.2
5.tensorflow object detection api
6.opencv_extra
7. LabelImg
三、利用tensorflow object detection api训练SSD模型
1、先准备两个文件夹train和test,分别存放训练集和测试集。
2、下载 LabelImg 这款小软件对图片进行标注。(这个下载和使用方法网上太多了,我就不罗嗦了,主要是为了生产.xml文件)
3、然后使用xml_to_csv.py转化成csv文件(记得训练集和测试集都需要生成一次哦)
import os
import glob
import pandas as pd
import xml.etree.ElementTree as ET
def xml_to_csv(path):
xml_list = []
for xml_file in glob.glob(path + ‘/*.xml’):
tree = ET.parse(xml_file)
root = tree.getroot()
for member in root.findall(‘object’):
value = (root.find(‘filename’).text,
int(root.find(‘size’)[0].text),
int(root.find(‘size’)[1].text),
member[0].text,
int(member[4][0].text),
int(member[4][1].text),
int(member[4][2].text),
int(member[4][3].text)
)
xml_list.append(value)
column_name = [‘filename’, ‘width’, ‘height’, ‘class’, ‘xmin’, ‘ymin’, ‘xmax’, ‘ymax’]
xml_df = pd.DataFrame(xml_list, columns=column_name)
return xml_df
def main():
image_path = os.path.join(os.getcwd(), (‘train_file/’))
xml_df = xml_to_csv(image_path)
xml_df.to_csv((‘train_file/’ + ‘train_labels.csv’), index=None)
print(‘Successfully converted xml to csv.’)
4、使用generate_tfrecord.py把csv文件转化成训练用的record文件(记得训练集和测试集都需要生成一次哦)
from future import division
from future import print_function
from future import absolute_import
import os
import io
import pandas as pd
import tensorflow as tf
from PIL import Image
from object_detection.utils import dataset_util
from collections import namedtuple, OrderedDict
flags = tf.app.flags
flags.DEFINE_string(‘csv_input’, ‘’, ‘Path to the CSV input’)
flags.DEFINE_string(‘image_dir’, ‘’, ‘Path to the image directory’)
flags.DEFINE_string(‘output_path’, ‘’, ‘Path to output TFRecord’)
FLAGS = flags.FLAGS
def class_text_to_int(row_label):
if row_label == ‘这里填写你标注数据时label的名称’: #根据你Label数量适当添加
return 1
else:
None
def split(df, group):
data = namedtuple(‘data’, [‘filename’, ‘object’])
gb = df.groupby(group)
return [data(filename, gb.get_group(x)) for filename, x in zip(gb.groups.keys(), gb.groups)]
def create_tf_example(group, path):
with tf.gfile.GFile(os.path.join(path, ‘{}’.format(group.filename)), ‘rb’) as fid:
encoded_jpg = fid.read()
encoded_jpg_io = io.BytesIO(encoded_jpg)
image = Image.open(encoded_jpg_io)
width, height = image.size
filename = group.filename.encode('utf8')
image_format = b'jpg'
xmins = []
xmaxs = []
ymins = []
ymaxs = []
classes_text = []
classes = []

for index, row in group.object.iterrows():
    xmins.append(row['xmin'] / width)
    xmaxs.append(row['xmax'] / width)
    ymins.append(row['ymin'] / height)
    ymaxs.append(row['ymax'] / height)
    classes_text.append(row['class'].encode('utf8'))
    classes.append(class_text_to_int(row['class']))

tf_example = tf.train.Example(features=tf.train.Features(feature={
    'image/height': dataset_util.int64_feature(height),
    'image/width': dataset_util.int64_feature(width),
    'image/filename': dataset_util.bytes_feature(filename),
    'image/source_id': dataset_util.bytes_feature(filename),
    'image/encoded': dataset_util.bytes_feature(encoded_jpg),
    'image/format': dataset_util.bytes_feature(image_format),
    'image/object/bbox/xmin': dataset_util.float_list_feature(xmins),
    'image/object/bbox/xmax': dataset_util.float_list_feature(xmaxs),
    'image/object/bbox/ymin': dataset_util.float_list_feature(ymins),
    'image/object/bbox/ymax': dataset_util.float_list_feature(ymaxs),
    'image/object/class/text': dataset_util.bytes_list_feature(classes_text),
    'image/object/class/label': dataset_util.int64_list_feature(classes),
}))
return tf_example
def main():
writer = tf.python_io.TFRecordWriter("D:/my_work/ssd/SSD-Tensorflow-master/voc2007/tfrecords/train.record") #填写生成的训练集/测试集数据文件
path = os.path.join(os.getcwd(), “D:/my_work/ssd/SSD-Tensorflow-master/voc2007/train_file/”) #填写训练集/测试集数据文件*
examples = pd.read_csv(“D:/my_work/ssd/SSD-Tensorflow-master/voc2007/train_labels.csv”) #*填写上一步生成的训练集/测试集csv文件
grouped = split(examples, ‘filename’)
i = 0
for group in grouped:
print (“i is:”,group)
tf_example = create_tf_example(group, path)
writer.write(tf_example.SerializeToString())
writer.close()
output_path = os.path.join(os.getcwd(), "D:/my_work/ssd/SSD-Tensorflow-master/voc2007/tfrecords_/train.record") #填写生成的训练集/测试集数据文件*
print('Successfully created the TFRecords: {}'.format(output_path))
if name == ‘main’:
tf.app.run()
5、根据本机配置ssd_mobilenet_v1_coco.config文件
这个config文件特别要留意版本,要与opencv_extra提供的ssd_mobilenet_v1_coco.pbtxt版本对应,如果不对,训练出来的模型无法使用。
这是我使用的.config和.pbtxthttps://pan.baidu.com/s/1dlImNPHVuaCEVwLjIiN9Kg
提取码:nai4
ssd_mobilenet_v1_coco.config文件需要修改的地方:
1.num_classes: 4
2.input_path:#这个根据你的训练集和测试集.record文件的存放位置填写,我填的是绝对地址
3.label_map_path:#着自己写具体格式如下(举例,并不是我本人的文件)
item {
id: 1
name: ‘human’
}
item {
id: 2
name: ‘animal’
}
有多少label如此类推地添加
4.fine_tune_checkpoint:https://github.com/tensorflow/models/blob/master/research/object_detection/g3doc/detection_model_zoo.md 通过链接下载对应的ssd_mobilenet_v1_coco checkpoint
6、开始训练
cmd命令行进入到models-master\research\object_detection目录下运行python legacy/train.py --logtostderr --train_dir=training/ --pipeline_config_path=training/ssd_mobilenet_v1_coco.config
进行模型的训练:
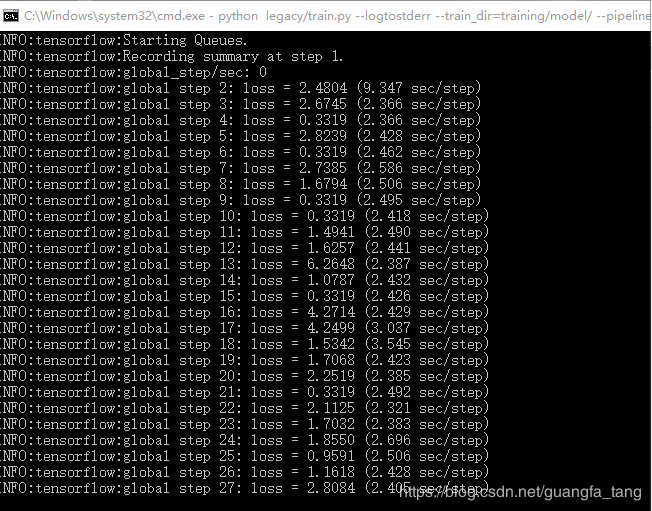
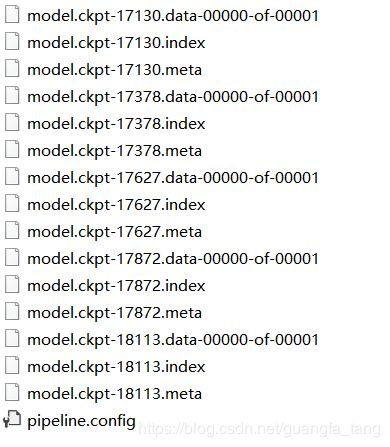
当loss值足够低可以自行结束,模型生成如下:
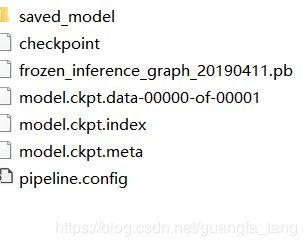
7、把ckpt文件转化成pb文件
cmd依旧停在models-master\research\object_detection目录下,然后执行python export_inference_graph.py \ --input_type image_tensor \ --pipeline_config_path training/ssd_mobilenet_v1_coco.config \ --trained_checkpoint_prefix training/model.ckpt-18113 \ --output_directory frozen_inference_grap
最后生成
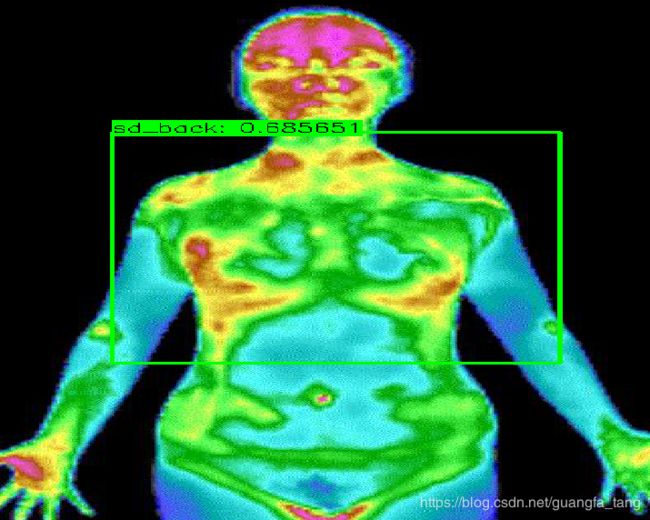
8、通过opencv C++ API调用pb文件进行定位(Qt根据错误提示适当改一些变量名就好)
C++代码如下
#include “stdafx.h”
#include “stdlib.h”
#include
#include
#include
#include
#include
#include
#include
#include
#include
#include
#include
using namespace std;
const size_t inWidth = 300;
const size_t inHeight = 300;
const float WHRatio = inWidth / (float)inHeight;
const char* classNames[] = { “sd_front”, “sd_back”, “sd_left”, “sd_right” };
int main()
{
clock_t start, finish;
double totaltime;
cv::Mat frame;
string weights = “frozen_inference_graph.pb”;
string prototxt = “ssd_mobilenet_v1_coco.pbtxt”;
cv::dnn::Net net = cv::dnn::readNetFromTensorflow(weights, prototxt);
frame = cv::imread(“person.jpg”);
	if (1)
	{
	    //for (int i = 0; i < 3; i++)
		//{

		start = clock();
		cv::Size frame_size = frame.size();

		cv::Size cropSize;
		if (frame_size.width / (float)frame_size.height > WHRatio)
		{
			cropSize = cv::Size(static_cast(frame_size.height * WHRatio),
				frame_size.height);
		}
		else
		{
			cropSize = cv::Size(frame_size.width,
				static_cast(frame_size.width / WHRatio));
		}

		cv::Rect crop(cv::Point((frame_size.width - cropSize.width) / 2,
			(frame_size.height - cropSize.height) / 2),
			cropSize);


		cv::Mat blob = cv::dnn::blobFromImage(frame, 1. / 255, cv::Size(300, 300));
		//cout << "blob size: " << blob.size << endl;

		net.setInput(blob);
		cv::Mat output = net.forward();
		//cout << "output size: " << output.size << endl;

		cv::Mat detectionMat(output.size[2], output.size[3], CV_32F, output.ptr());

		frame = frame(crop);
		float confidenceThreshold = 0.50;
		for (int i = 0; i < detectionMat.rows; i++)
		{
			float confidence = detectionMat.at(i, 2);

			if (confidence > confidenceThreshold)
			{
				size_t objectClass = (size_t)(detectionMat.at(i, 1));

				int xLeftBottom = static_cast(detectionMat.at(i, 3) * frame.cols);
				int yLeftBottom = static_cast(detectionMat.at(i, 4) * frame.rows);
				int xRightTop = static_cast(detectionMat.at(i, 5) * frame.cols);
				int yRightTop = static_cast(detectionMat.at(i, 6) * frame.rows);

				ostringstream ss;
				ss << confidence;
				string conf(ss.str());

				//cout << "coordinate:" << "xLeftBottom: " << xLeftBottom << "yLeftBottom: " << yLeftBottom << "xRightTop: " << xRightTop << "yRightTop: " << yRightTop << endl;
				cout << "label:" << string(classNames[objectClass]) << "conf:" << confidence << endl;

				cv::Rect object((int)xLeftBottom, (int)yLeftBottom,
					(int)(xRightTop - xLeftBottom),
					(int)(yRightTop - yLeftBottom));

				rectangle(frame, object, cv::Scalar(0, 255, 0), 2);
				//cout << "objectClass:" << objectClass << endl;
				string label = string(classNames[objectClass]) + ": " + conf;
				//cout << "label"<
}
我做的是一个定位人体的模型,准确率还有待提高,欢迎调参大师交流
四、总结
由于时间紧迫,文章写得有点仓促,没有写得很详细,其实C++调用tensorflow ssd模型还可以用调用python的方式简介调用模型,除了速度慢点还有一个问题不知道为啥我的工程第一次调用还能好,二次调用Python的工程就崩,错误提示跟sougou有关的错误,但我知道这是内存崩了的原因,希望有大神能提供解决方案。