五、Flink入门--客户端操作
客户端操作
- 1.客户端操作总体概览
- 2. Flink命令行模式
- 2.1 stand-alone模式
- 2.3 yarn模式
- 2.3.1 单任务模式
- 2.3.2 yarn-session模式
- 3. scala-shell模式
- 4.sql-client模式
- 5.Restful模式
- 6.界面模式
1.客户端操作总体概览
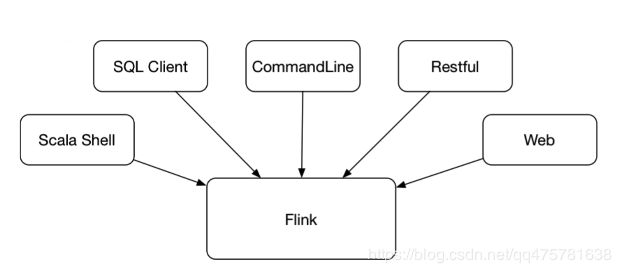
Flink提供了丰富的客户端操作来提交任务或与任务交互,我们从五个方面介绍Flink客户端的具体操作,分别是Flink命令行模式,scala-shell模式, sql-client 模式,restful模式,界面模式.

2. Flink命令行模式
2.1 stand-alone模式
首先启动stand-alone模式的集群
bin/start-cluster.sh
提交一个example任务,-d 表示detached模式,即提交了后会退出shell,如果不加-d shell会一直在运行不退出。
bin/flink run -d examples/streaming/TopSpeedWindowing.jar
查看当前集群所有的任务列表:
a.默认模式下-m表示jm的地址
bin/flink list -m localhost:8081

b.ha模式下用-z表示zk地址查看
bin/flink list -z localhost:2181

------------------ Running/Restarting Jobs -------------------
20.05.2019 16:04:11 : 5f1a16394dc207969a0cff904ca57726 : CarTopSpeedWindowingExample (RUNNING)
--------------------------------------------------------------
停止任务,并设置savepoint 路径
bin/flink cancel -m locahost:8081 -s /tmp/savepoint 5f1a16394dc207969a0cff904ca57726

Cancelling job 5f1a16394dc207969a0cff904ca57726 with savepoint to /tmp/savepoint.
Cancelled job 5f1a16394dc207969a0cff904ca57726. Savepoint stored in file:/tmp/savepoint/savepoint-5f1a16-26cd0491e260.
查看savepoint:
ll /tmp/savepoint/

drwxrwxr-x 2 hadoopuser hadoopuser 4096 May 20 16:20 savepoint-5f1a16-26cd0491e260
从savepoint恢复执行任务:
bin/flink run -d -s /tmp/savepoint/savepoint-5f1a16-26cd0491e260/ examples/streaming/TopSpeedWindowing.jar
Job has been submitted with JobID 9e9a1bab6256175706ffaa0e0f4f6535

可以在jm的日志中发现如下内容,证明任务是从checkpoint启动的
Starting job 9e9a1bab6256175706ffaa0e0f4f6535 from savepoint /tmp/savepoint/savepoint-5f1a16-26cd0491e260/
手动触发savepoint:
bin/flink savepoint -m localhost:2181 9e9a1bab6256175706ffaa0e0f4f6535 /tmp/savepoint/

Triggering savepoint for job 9e9a1bab6256175706ffaa0e0f4f6535.
Waiting for response...
Savepoint completed. Path: file:/tmp/savepoint/savepoint-9e9a1b-bbfb61c5013e
You can resume your program from this savepoint with the run command.

ll /tmp/savepoint/
total 8
drwxrwxr-x 2 hadoopuser hadoopuser 4096 May 20 16:20 savepoint-5f1a16-26cd0491e260
drwxrwxr-x 2 hadoopuser hadoopuser 4096 May 20 16:29 savepoint-9e9a1b-bbfb61c5013e
修改任务的并行度,修改并行度的前提是集群设置了 state.savepoints.dir 属性,因为每次modify会触发一次savepoint操作。
bin/flink modify -p 2 9e9a1bab6256175706ffaa0e0f4f6535
查看任务的执行信息,可以将json粘贴到https://flink.apache.org/visualizer/ 查看执行计划
bin/flink info examples/streaming/TopSpeedWindowing.jar

----------------------- Execution Plan -----------------------
{"nodes":[{"id":1,"type":"Source: Custom Source","pact":"Data Source","contents":"Source: Custom Source","parallelism":1},{"id":2,"type":"Timestamps/Watermarks","pact":"Operator","contents":"Timestamps/Watermarks","parallelism":1,"predecessors":[{"id":1,"ship_strategy":"FORWARD","side":"second"}]},{"id":4,"type":"Window(GlobalWindows(), DeltaTrigger, TimeEvictor, ComparableAggregator, PassThroughWindowFunction)","pact":"Operator","contents":"Window(GlobalWindows(), DeltaTrigger, TimeEvictor, ComparableAggregator, PassThroughWindowFunction)","parallelism":1,"predecessors":[{"id":2,"ship_strategy":"HASH","side":"second"}]},{"id":5,"type":"Sink: Print to Std. Out","pact":"Data Sink","contents":"Sink: Print to Std. Out","parallelism":1,"predecessors":[{"id":4,"ship_strategy":"FORWARD","side":"second"}]}]}
--------------------------------------------------------------
关闭任务stop任务,需要source实现StopalbeFunction,可以保证优雅的退出任务,用户调用时所有source都关闭作业才正常介绍,即可以保证作业正常处理完毕。
bin/flink stop -m localhost:2181 9e9a1bab6256175706ffaa0e0f4f6535
2.3 yarn模式
2.3.1 单任务模式
提交任务: -m表示yarn-cluster模式,-yqu表示队列,-yd表示detached模式,不加的话默认是attach模式
bin/flink run -m yarn-cluster -yqu root.up -yd examples/streaming/TopSpeedWindowing.jar

2019-05-20 17:17:00,719 INFO  org.apache.flink.yarn.AbstractYarnClusterDescriptor           - The Flink YARN client has been started in detached mode. In order to stop Flink on YARN, use the following command or a YARN web interface to stop it:
yarn application -kill application_1558187257311_0010
Please also note that the temporary files of the YARN session in the home directory will not be removed.
Job has been submitted with JobID 14ca15c60c5bc641ab5774bc7c1e69eb
job name为显示 Flink per-job Cluster。
![]()
2.3.2 yarn-session模式
启动yarn-session: -n 表示2个tm,-jm 表示1024mb内存,-tm 表示1024mb内存,-qu 表示队列,需要主要的是此模式下tm进程并不会提前启动
bin/yarn-session.sh -n 2 -jm 1024 -tm 1024 -qu root.up

2019-05-20 17:25:12,446 INFO  org.apache.flink.shaded.curator.org.apache.curator.framework.state.ConnectionStateManager  - State change: CONNECTED
2019-05-20 17:25:12,694 INFO  org.apache.flink.runtime.rest.RestClient                      - Rest client endpoint started.
Flink JobManager is now running on dn2:21667 with leader id 0e57fedd-6030-4c12-b455-638f7db4a65c.
JobManager Web Interface: http://dn2:17269
![]()
jobname显示为flink session cluster。上述方式是attach模式启动,命令行不会自动退出,也可以在启动时加上-d 表示detached模式启动,如果ctrl+c退出attach模式或者想进入detached模式的命令行,可以使用
bin/yarn-session.sh -id application_1558187257311_0012
重新进入连接。
此时会在本地/tmp/.yarn-properties-{username}记录yarn-session的appid,后续本机提交的任务都会在该app中运行
cat /tmp/.yarn-properties-hadoopuser
#Generated YARN properties file
#Mon May 20 17:25:12 CST 2019
parallelism=2
dynamicPropertiesString=
applicationID=application_1558187257311_0012
提交一个任务,
bin/flink run examples/batch/WordCount.jar


2019-05-20 17:40:25,796 INFO  org.apache.flink.yarn.cli.FlinkYarnSessionCli                 - Found Yarn properties file under /tmp/.yarn-properties-hadoopuser.
2019-05-20 17:40:25,796 INFO  org.apache.flink.yarn.cli.FlinkYarnSessionCli                 - Found Yarn properties file under /tmp/.yarn-properties-hadoopuser.
2019-05-20 17:40:26,113 INFO  org.apache.flink.yarn.cli.FlinkYarnSessionCli                 - YARN properties set default parallelism to 2
2019-05-20 17:40:26,113 INFO  org.apache.flink.yarn.cli.FlinkYarnSessionCli                 - YARN properties set default parallelism to 2
YARN properties set default parallelism to 2
2019-05-20 17:40:26,267 INFO  org.apache.flink.yarn.cli.FlinkYarnSessionCli                 - No path for the flink jar passed. Using the location of class org.apache.flink.yarn.YarnClusterDescriptor to locate the jar
2019-05-20 17:40:26,267 INFO  org.apache.flink.yarn.cli.FlinkYarnSessionCli                 - No path for the flink jar passed. Using the location of class org.apache.flink.yarn.YarnClusterDescriptor to locate the jar
2019-05-20 17:40:26,276 WARN  org.apache.flink.yarn.AbstractYarnClusterDescriptor           - Neither the HADOOP_CONF_DIR nor the YARN_CONF_DIR environment variable is set.The Flink YARN Client needs one of these to be set to properly load the Hadoop configuration for accessing YARN.
2019-05-20 17:40:26,347 INFO  org.apache.flink.yarn.AbstractYarnClusterDescriptor           - Found application JobManager host name 'dn2' and port '17269' from supplied application id 'application_1558187257311_0012'
Starting execution of program
Executing WordCount example with default input data set.
Use --input to specify file input.
Printing result to stdout. Use --output to specify output path.
(a,5)
(action,1)
(after,1)
(against,1)
点击ApplicationMaster ui地址进去查看:

任务已经运行完成,并且资源也已经释放。
注意⚠️:当有多个yarn session时 可以在提交任务时指定 -yid ${appid} 参数提交到具体指定的yarn-session中。
3. scala-shell模式
启动scala-shell本地模式,远程模式,或yarn模式:
bin/start-scala-shell.sh local

bin/start-scala-shell.sh remote dn2 17269

bin/start-scala-shell.sh yarn -n 1 -jm 1024 -tm 1024 -nm scala-shell-yarn -qu root.up
对于scala-shell
- batch模式内置了benv变量
- streaming模式内置了senv变量
执行一个batch任务:dateset中print会触发任务的执行
scala> val text = benv.fromElements("hello word hi word thanks word hello")
text: org.apache.flink.api.scala.DataSet[String] = org.apache.flink.api.scala.DataSet@6764201e

scala> val counts = text.flatMap{_.split("\\W+")}.map{(_,1)}.groupBy(0).sum(1)
counts: org.apache.flink.api.scala.AggregateDataSet[(String, Int)] = org.apache.flink.api.scala.AggregateDataSet@76b49d0

scala> counts.print()
(hello,2)
(hi,1)
(thanks,1)
(word,3)
执行一个datastream任务:在datastream中print不会触发任务执行,只有显示调用senv.execute()才会触发执行
scala> val text = senv.fromElements("hello word hi word thanks word hello")
scala   scalaNothingTypeInfo   scopt   senv   seqToCharSequence   short2Short   shortArrayOps   shortWrapper   specialized   statistics   sun   sys

scala> val text = senv.fromElements("hello word hi word thanks word hello")
text: org.apache.flink.streaming.api.scala.DataStream[String] = org.apache.flink.streaming.api.scala.DataStream@7e24d565

scala> val counts = text.flatMap{_.split("\\W+")}.map{(_,1)}.keyBy(0).sum(1)
counts: org.apache.flink.streaming.api.scala.DataStream[(String, Int)] = org.apache.flink.streaming.api.scala.DataStream@43b5274e

scala> counts.print()
res1: org.apache.flink.streaming.api.datastream.DataStreamSink[(String, Int)] = org.apache.flink.streaming.api.datastream.DataStreamSink@79832158

scala> senv.execute("Stream Word Count")
(hello,1)
(word,1)
(hi,1)
(word,2)
(thanks,1)
(word,3)
(hello,2)
res2: org.apache.flink.api.common.JobExecutionResult = org.apache.flink.api.common.JobExecutionResult@6514666f
4.sql-client模式
启动sql-client模式:
bin/sql-client.sh embedded
可以输入help 查看相关帮助说明
help;

The following commands are available:

QUIT		Quits the SQL CLI client.
CLEAR		Clears the current terminal.
HELP		Prints the available commands.
SHOW TABLES		Shows all registered tables.
SHOW FUNCTIONS		Shows all registered user-defined functions.
DESCRIBE		Describes the schema of a table with the given name.
EXPLAIN		Describes the execution plan of a query or table with the given name.
SELECT		Executes a SQL SELECT query on the Flink cluster.
INSERT INTO		Inserts the results of a SQL SELECT query into a declared table sink.
SOURCE		Reads a SQL SELECT query from a file and executes it on the Flink cluster.
SET		Sets a session configuration property. Syntax: 'SET ='. Use 'SET' for listing all properties.
RESET		Resets all session configuration properties.
执行一个简单的sql
select "hello word"
可以查看sql执行计划:
explain select 'a';

== Abstract Syntax Tree ==
LogicalProject(EXPR$0=[_UTF-16LE'a'])
  LogicalValues(tuples=[[{ 0 }]])

== Optimized Logical Plan ==
DataStreamCalc(select=[_UTF-16LE'a' AS EXPR$0])
  DataStreamValues(tuples=[[{ 0 }]])

== Physical Execution Plan ==
Stage 5 : Data Source
	content : collect elements with CollectionInputFormat

	Stage 6 : Operator
		content : select: (_UTF-16LE'a' AS EXPR$0)
		ship_strategy : FORWARD
sql有2种模式:
- table mode 在内存中物化查询结果,分页展示
- changed mode 不物化查询结果,持续展示最新结果
可以用 set execution.result-mode = table/changlog 进行设置。
5.Restful模式
restApi可以参考官网文档:https://ci.apache.org/projects/flink/flink-docs-release-1.6/monitoring/rest_api.html
写的很详细。restAPi 目前用处最多的还是用于监控。
6.界面模式
界面模式就是在8081端口的节目,手动添加jar,设置参数然后执行就OK了。