写在前面:
如果你在看本文之前没有对Android消息机制作过了解,可能会比较吃力,关于源码,不需要全部看懂,能看懂其中关键的几句代码就行了。如果在阅读过程中感到吃力,请直接跳到结尾部分看概述。
最近在看《Android开发艺术探索》,感觉真的是一本好书,恩,让我非常有读完欲望的一本书。话不多说,分享一下我的读书收获。
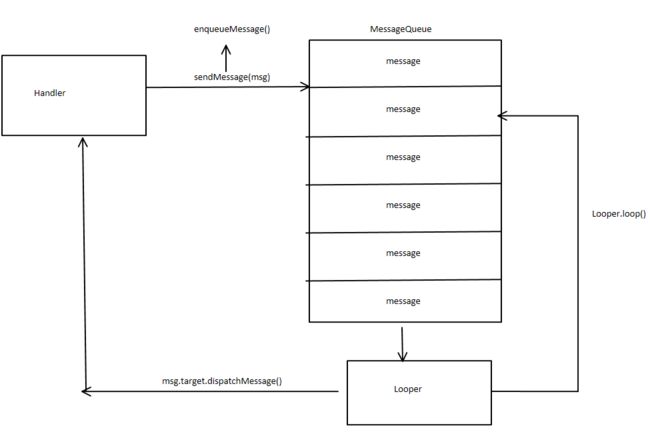
Android中的耗时操作需要在子线程中完成,当这些操作完成后可能会需要对UI进行相应的更新。但是Android中的UI不是线程安全的,在多线程中并发访问可能会导致UI控件处于不可预期的状态。Google没有用上锁机制来解决这个问题,而是让开发者通过Handler切换线程来达到更新UI的目的。Handler是Android消息机制的上层接口,想要解析Android消息机制还需要了解Looper和消息队列(MessageQueue)。
在具体的了解Handler、Looper和MessageQueue之前,先让我们把我们平时切换线程的流程过一遍。首先我们在主线程中创建Handler,然后在子线程中通过handler的sendMessage方法将携带子线程操作结果的数据传出,通过handler的handleMessage方法进行UI的更新,代码如下:
public class MainActivity extends AppCompatActivity {
    //注1
    private Handler handler = new Handler(){
        @Override
        public void handleMessage(Message msg) {
            tvContent.setText((String)msg.obj);
        }
    };
    private TextView tvContent;

    @Override
    protected void onCreate(Bundle savedInstanceState) {
        super.onCreate(savedInstanceState);
        setContentView(R.layout.activity_main);

        tvContent = (TextView) findViewById(R.id.tv_content);

        new Thread(new Runnable() {
            @Override
            public void run() {
                //...一些耗时操作

                //耗时操作的结果
                String result = "我是结果";

                Message msg = Message.obtain();
                msg.obj = result;
                handler.sendMessage(msg);
            }
        }).start();
    }
}
注1:这篇算是挺久之前的文了吧,现在看来有一个比较致命的东西,private Handler handler;这个东西是一个内部类,在Java中内部类都会隐含的持有一个外部类的引用,一般来说这个外部类的引用就是Activity。如果因为Handler持有了Activity的引用而导致Activity无法被销毁,则会导致内存泄露,解决方法就是用static修饰,static修饰的内部类不会持有外部类的引用。但是很快你就会发现因为他是静态的,所以无法使用外部类的成员了,这对我们更新UI又是个阻碍,你可以考虑采用SoftReference的技术,在Handler内部持有一个activity的软引用,在软引用不为空的情况下通过这个弱引用去访问外部类的成员。
因为代码比较简单,就不上结果图了。接下来解析一下以上简单的代码。
    private Handler handler = new Handler(){
        @Override
        public void handleMessage(Message msg) {
            tvContent.setText((String)msg.obj);
        }
    };
首先是构造一个Handler对象,用的是默认的构造方法,看一下源码是如何实例化的
public Handler() {
    this(null, false);
}
再追踪一下源码,发现最终是用的如下的构造方法
    public Handler(Callback callback, boolean async) {
        if (FIND_POTENTIAL_LEAKS) {
            final Class klass = getClass();
            if ((klass.isAnonymousClass() || klass.isMemberClass() || klass.isLocalClass()) &&
                    (klass.getModifiers() & Modifier.STATIC) == 0) {
                Log.w(TAG, "The following Handler class should be static or leaks might occur: " +
                    klass.getCanonicalName());
            }
        }

        mLooper = Looper.myLooper();
        if (mLooper == null) {
            throw new RuntimeException(
                "Can't create handler inside thread that has not called Looper.prepare()");
        }
        mQueue = mLooper.mQueue;
        mCallback = callback;
        mAsynchronous = async;
    }
说实话大部分代码我也是看不懂的,但是mLooper = Looper.myLooper()和mQueue = mLooper.mQueue,可以看出Handler得到了一个Looper和一个“队列”。查看myLooper方法的注释
/**
* Return the Looper object associated with the current thread.  Returns
* null if the calling thread is not associated with a Looper.
 */
返回的是当前线程的Looper,如果当前线程没有Looper就返回null。所以在Handler的构造方法中,会有
 if (mLooper == null) {
    throw new RuntimeException(
        "Can't create handler inside thread that has not called Looper.prepare()");
}
所以在没有Looper的线程中创建Handler对象会抛以上异常。我们可以为没有Looper的线程创建一个Looper不过这里先不谈。看完了如何创建Handler之后,继续我们的流程,在子线程中我们使用handler的sendMessage()方法发送了一个Message对象,让我们看看这背后隐藏了怎样的py交……,不,怎样的操作。
    public final boolean sendMessage(Message msg)
    {
        return sendMessageDelayed(msg, 0);
    }
通过追踪源码发现最终执行了如下代码:
    public boolean sendMessageAtTime(Message msg, long uptimeMillis) {
        MessageQueue queue = mQueue;
        if (queue == null) {
            RuntimeException e = new RuntimeException(
                    this + " sendMessageAtTime() called with no mQueue");
            Log.w("Looper", e.getMessage(), e);
            return false;
        }
        return enqueueMessage(queue, msg, uptimeMillis);
    }
最后一句代码是向queue中插入msg的意思,也就是说handler.sendMessage()这个方法所执行的操作就是向消息队列插入了一条message,那么这条消息又是经历了怎样的辗转才切换到了当前线程呢?显然这其中有Looper的参与,不过在了解Looper之前,需要先了解一下MessageQueue。
MessageQueue#
MessageQueue虽然叫消息队列,但实际上他是通过一个单链表的数据结构来维护消息列表。至于为什么采用单链表的数据结构,因为MessageQueue主要操作是插入和读取,而读取包含着删除操作,而单链表在插入和删除上比较有优势。关于MessageQueue还需要知道enqueueMessage()是插入操作,next()是读取并且删除的操作。需要了解的暂时就这么多了。
Looper
Looper会不停地从MessageQueue中查看是否有新消息,如果有新消息就会立刻处理,否则就一直阻塞在那里。Looper最重要的方法便是loop()方法,让我们看一下loop()方法是怎样的:
    public static void loop() {
        final Looper me = myLooper();
        if (me == null) {
            throw new RuntimeException("No Looper; Looper.prepare() wasn't called on this thread.");
        }
        final MessageQueue queue = me.mQueue;

        // Make sure the identity of this thread is that of the local process,
        // and keep track of what that identity token actually is.
        Binder.clearCallingIdentity();
        final long ident = Binder.clearCallingIdentity();

        for (;;) {
            Message msg = queue.next(); // might block
            if (msg == null) {
                // No message indicates that the message queue is quitting.
                return;
            }

            // This must be in a local variable, in case a UI event sets the logger
            Printer logging = me.mLogging;
            if (logging != null) {
                logging.println(">>>>> Dispatching to " + msg.target + " " +
                        msg.callback + ": " + msg.what);
            }

            msg.target.dispatchMessage(msg);

            if (logging != null) {
                logging.println("<<<<< Finished to " + msg.target + " " + msg.callback);
            }

            // Make sure that during the course of dispatching the
            // identity of the thread wasn't corrupted.
            final long newIdent = Binder.clearCallingIdentity();
            if (ident != newIdent) {
                Log.wtf(TAG, "Thread identity changed from 0x"
                        + Long.toHexString(ident) + " to 0x"
                        + Long.toHexString(newIdent) + " while dispatching to "
                        + msg.target.getClass().getName() + " "
                        + msg.callback + " what=" + msg.what);
            }

            msg.recycleUnchecked();
        }
    }
如果MessageQueue的next方法返回了新的消息,Looper就会处理这条消息
msg.target.dispatchMessage(msg);
msg.target就是发送这条消息的Handler对象,这样Handler发送的消息最终又交给它的dispatchMessage方法来处理了。查看dispatchMessage方法源码会发现,我们之前使用的Handler的构造方法和得到Message对象的方法,最终会导致dispatchMessage方法调用handleMessage方法。
总结与拓展
总的来说,我们平常使用Handler所经历的流程就是:
1.使用当前线程的Looper对象创建Handler。
2.handler.sendMessage()向Looper中的消息队列插入消息。
3.Looper通过loop方法获取消息队列的新消息,通过msg.target(发送消息的Handler)调用dispatchMessage方法处理消息。而该方法在loop方法中被调用,loop被当前线程Looper调用,所以该消息被切换到当前线程中执行。
在了解了Android的消息机制之后,我们可以尝试使用Handler和Looper实现两个子线程之间的消息传递。通过new Thread()创建的线程并没有Looper,为他创建一个Looper就可以使用Handler了。Looper可以通过prepare方法来创建,好了说明就到这,直接上代码!
import android.os.Handler;
import android.os.Looper;
import android.os.Message;
import android.support.v7.app.AppCompatActivity;
import android.os.Bundle;
import android.util.Log;

public class MainActivity extends AppCompatActivity {

    private final String TAG = "MainActivity";
    private Handler mhandler;
    @Override
    protected void onCreate(Bundle savedInstanceState) {
        super.onCreate(savedInstanceState);
        setContentView(R.layout.activity_main);

        Thread1 thread1 = new Thread1();
        thread1.setName("Thread#1");
        thread1.start();

        mhandler = thread1.getHandler();
        while(mhandler == null){
            mhandler = thread1.getHandler();
        }

        new Thread(new Runnable() {
            @Override
            public void run() {
                for (int i = 0; i < 5; i++) {
                    Message msg = Message.obtain();
                    msg.obj = System.currentTimeMillis();
                    mhandler.sendMessage(msg);
                }
            }
        }, "Thread#2").start();


    }


    class Thread1 extends Thread {
        private Handler mhandler;

        public Handler getHandler() {
            return mhandler;
        }

        @Override
        public void run() {
            //为该线程创建Looper
            Looper.prepare();
            //初始化handler
            mhandler = new Handler() {
                @Override
                public void handleMessage(Message msg) {
                    Log.i(TAG, Thread.currentThread().getName() + " the message is:" + msg.obj);
                }
            };
            Looper.loop();
        }
    }

}

很明显,Thread#2成功地将消息传递到了Thread#1的handler中。其实关于Looper.prepare()也值得深究,涉及到了ThreadLocal,不过我这里就不管了。
最后再安排一下今后一段时间内要做的事,从第一篇文章到这第二篇,中间隔了很久了。倒是没有偷懒,一直在敲代码,不过最近算是把一直想做的东西做了,是时候来一波学习总结了。
资料来源:《Android开发艺术探索》