Spring初学小结(看官里面请)
Spring初学小结
我看耦合:
设计程序要采用的原则:如果模块间必须存在耦合,就尽量使用数据耦合,少用控制耦合,限制公共耦合的范围,尽量避免使用内容耦合。
那么什么是内容耦合呢?当我再构建一个模块的时候,直接使用另一个模块作为支持,这就是内容耦合,一旦使用的那个模块没有了,或是被破坏,那么这个模块也跟着失效了。因此为了写出优美的程序必须避免使用内容耦合。
公共耦合:当我这模块操作使用了公共的数据另一模块也使用操作了这公共变量的数据,当这公共数据被太多的模块使用时将会造成很难定位哪个模块使用了这数据。所以要限制公共耦合的范围。
控制耦合:一个模块命令另一个模块做出要求的行动,这就是控制耦合,当命令模块被删除会造成一系列的模块失效,所以要少用控制耦合。
数据耦合:最理想的状态,耦合度最低的一种耦合,一个模块输入的数据为另一个模块输出的数据,这就是数据耦合。当一个模块失效了,只需要再建立一个可以输出同样数据的模块即可正常运行。
我看内聚
内聚是指我模块之间的功能配合紧密,是隐蔽和局部化概念的衍生。优秀的程序应该有高内聚地低耦合的特点。
怎么解决耦合?
使用全限定类名来映射出对象,通过读取配置文件来获取全限定类名。
如工厂模式,提前写好一个类,程序开始时会去读取配置文件创建好类,然后需要用的时候直接拿过来用就看可以了
以前需要对象的时候使用new的方法主动获取,这样就属于内容耦合了,要尽量避免。所以使用工厂模式:读取配置文件获取对象并储存,当要用到的时候只要在工厂获得。这就属于被动获取对象。
单例和多例的生命周期:
单例:
容器创建的时候对象就出生,直到容器销毁的时候对象就死亡。
多例:
当被创建的时候对象就出生了,很久不用或是程序销毁的时候对象就会死亡。
AOP概述:
AOP是指面对切面编程,意思是把重复的代码抽出来,在需要执行的时候使用动态代理技术在不修改源代码的情况下对已有的方法进行增强。
传统解决耦合的方法:
以正常的使用数据库查询
先使用加载一个驱动,在设置一个dao接口和方法,然后使用dao接口的方法来实现功能如下图:
可以看出很多代码都已经写死了,一个环节出错都可能导致程序错误,且编译成软件,因为源码错误无法逆转导致软件并不完美。
使用工厂模式解决耦合:
创建一个配置文件,使用全限定类名赋值给对象名。读取配置文件的时候只需要名字就可以获得对象的全限定类名如下图
设置一个工厂类
public class BeanFactory {
    private static Properties props;
    private static Map<String, Object> beans;
    static {
        try {
//            设置一个配置类
            props = new Properties();
//            当前类的类加载器读取配置文件的输入流,为配置类读入配置做准备
            InputStream in =
                    BeanFactory.class.getClassLoader().getResourceAsStream("bean.properties");
//            加载配置
            props.load(in);
//            设置一个存对象的hashmap(使用hashMap主要是为了快速查询)
            beans = new HashMap<String, Object>();

//            Enumeration这个接口有枚举的方法,不过现在一般不用他来枚举数组的元素
            Enumeration<Object> keys = props.keys();
//            一个一个枚举出来直到枚举完毕为止
            while (keys.hasMoreElements()) {

                String key = keys.nextElement().toString();
                String beanPath = props.getProperty(key);
//                使用类加载器通过路径把实例创建出来
                Object value = Class.forName(beanPath).newInstance();
//                实例出来的对象和名字bing放到beans里面进去
                beans.put(key, value);
            }
        } catch (Exception e) {
            throw new ExceptionInInitializerError("初始化properties失败");
        }
    }
    /*根据bean名称获取对象*/
    public static Object getBean(String BeanName) {
        return beans.get(BeanName);
    }


}
客户端:
    public static void main(String[] args) {
        for (int i = 0; i < 5; i++) {
//            客户端使用名字通过bean工厂获取到对应的对象
            AccountService ser = (AccountService) BeanFactory.getBean("accountService");
            System.out.println(ser);
        }

//        ser.saveAccount();
    }
至此工厂类的解耦操作就完成了
接下来来看看Spring给我们带来了什么方便吧
IOC解耦
什么是IOC?Inversion Of Control (IOC)它是指控制反转,那什么是控制反转呢?当我们获取到一个对象的时候都是用new的方式,这是主动控制,而IOC的概念是把主动控制变成被动控制,使用工厂把对象都实例出来然后存到map容器中,等到要用的时候直接向工厂获取即可这就是被动控制。这一过程就是控制反转也就是IOC。
Spring的IOC怎么使用呢?
开始说明前先说一下依赖、约束和配置说明
<dependency>
    <groupId>org.springframeworkgroupId>
    <artifactId>spring-contextartifactId>
    <version>5.0.2.RELEASEversion>
dependency>
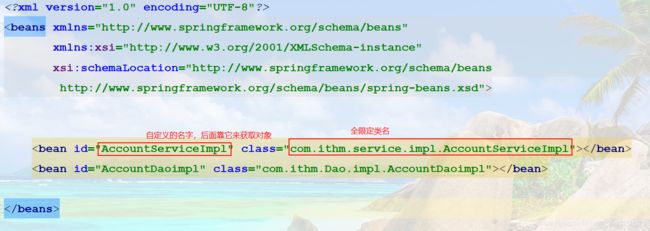
<beans xmlns="http://www.springframework.org/schema/beans"
       xmlns:xsi="http://www.w3.org/2001/XMLSchema-instance"
       xsi:schemaLocation="http://www.springframework.org/schema/beans
        http://www.springframework.org/schema/beans/spring-beans.xsd">
下面这个是客户端直接运用的过程
public class Client {
    public static void main(String[] args) {
//        new一个类路径应用环境(ClassPathXmlApplicationContext)的对象出来来读取Spring的配置文件生成一个应用环境
        ApplicationContext ac = new ClassPathXmlApplicationContext("bean.xml");
//        通过应用环境来获取需要的对象
        AccountServiceImpl ser = (AccountServiceImpl) ac.getBean("AccountServiceImpl");
        ser.saveAccount();
    }
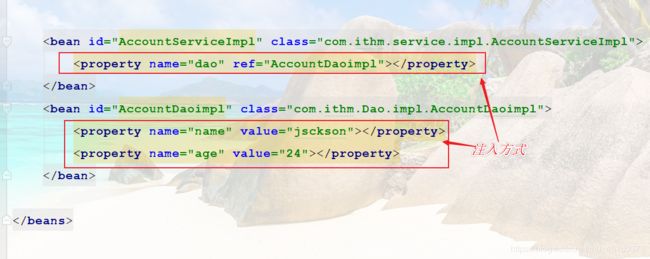
Spring的依赖注入是什么?
依赖注入是SpringIOC的具体体现
当我这个bean需要一些元素或者对象来支持的时候就可以用依赖注入的方法给它需要的元素
SpringIOC的注解配置:
1、@Autowired
在一个类需要使用依赖注入一个bean对象的时候使用该注释可以不用set,它会在ioc容器查找,如果找到的话直接注入没有找到的话就报错。
2、@Component
相当于:,如上面的bean配置,但是节省了很多细节什么类被他注释了直接进IOC容器。
3、@Controller @Service @Repository
这三个注解都是Component的衍生注解,一样的功能不一样的名字,为了在三层架构上发挥作用
4、@Qualifier(@Resource)
它是根据名称对方法参数进行注入的(当用Autowired报错就用它)
5、@Value
注入基本数据类型的数据加上String类型
6、@Scope
改变作用范围
7、@PostConstruct
用于指定初始化方法
8、@PreDestroy
用于指定销毁方法。
以上一共11个注解,这些就是Spring常用的注解了
SpringIOC新注释
虽然11注解解决了很多事但是还是需要bean.xml的配置文件支持的
所以新注解也是为了解决这个问题出现的
如上,有一些配置是必备品不可缺少的,那我们把哪些配置转移到类里面进去如下
@Configuration
@ComponentScan("com.itheima")
public class SpringConfiguration {
}
@Configuration
有了这个注释的类就说明这个类是配置类
@ComponentScan(“com.itheima”)
这个注释表示要扫描的包的途径为com.itheima
配置好了配置类和要扫描的包,那么dataSource去哪搞呢?
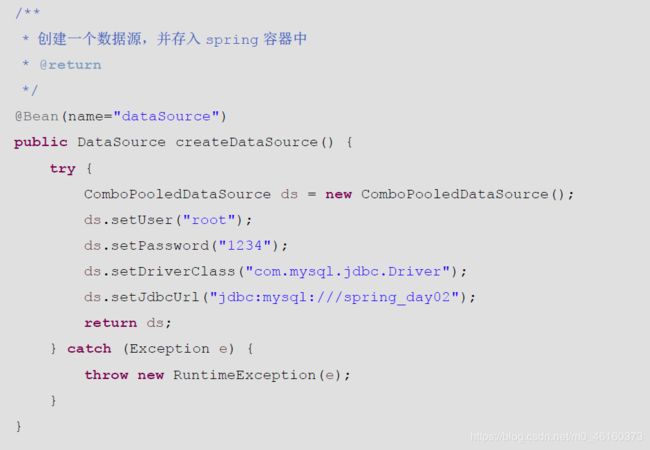
@Bean
该注解只能写在方法上,表明使用此方法创建一个对象,并且放入spring容器。这里可能会有疑问,这方法看起来和@Component一样欸?其实不是的,@Bean是告诉Spring需要这么搞才能搞出这个bean,创建的过程是Spring做的,而@Component它的创建过程是程序员来创建,创建好了再放入IOC进去相当于直接告诉Spring这个是Bean直接把它放入到IOC进去。
dataSource也创建完毕了,那么bean.xml就可以删除掉了。此时我们已经有了两个配置类,但是他们还没有关系。如何建立他们的关系呢? 请看下一个注解。
@Import
用于导入其他的配置类如上面的俩个配置类就可以通过此注解来连接
通过注解获取容器:
既然没有了配置文件那么以前获取容器的方法也就不能用了,需要使用注解的专属获取容器方法:
ApplicationContext ac = new AnnotationConfigApplicationContext(SpringConfiguration.class);
至此SpringIOC的操作就简要的介绍到这里了。
SpringAOP机制
什么是AOP?AOP:全称是Aspect Oriented Programming即:面向切面编程。
通俗的讲它就是把我们重复的代码抽取出来然后使用动态代理技术再不修改源码的方式来加强方法
在没接触过AOP的时候,事务控制基本流程如下(数据库提交事务):
1、设置和事务需要用到的方法的类
//和事务管理相关的工具类(开始,回滚,提交和释放连接)
public class transactionManager {
    private connectionUtil connectionUtil;

    public void setConnectionUtil(com.ithm.util.connectionUtil connectionUtil) {
        this.connectionUtil = connectionUtil;
    }

    //开始事务
    public void beginTransaction(){
        try {
            connectionUtil.getThreadConnection().setAutoCommit(false);
        } catch (SQLException e) {
            System.out.println(e);
        }
    }//提交事务
    public void commit(){
        try {
            connectionUtil.getThreadConnection().commit();
        } catch (SQLException e) {
            System.out.println(e);
        }
    }//回滚事务
    public void rollback(){
        try {
            connectionUtil.getThreadConnection().rollback();
        } catch (SQLException e) {
            System.out.println(e);
        }
    }//释放连接
    public void release(){
        try {
            connectionUtil.getThreadConnection().close();//还回连接池中
            connectionUtil.remove_connection();//解除绑定
        } catch (SQLException e) {
            System.out.println(e);
        }
    }
}
使用工厂代理模式:
public class BeanFactory {
   private AccountServiceImpl accountService;

    public void setAccountService(AccountServiceImpl accountService) {
        this.accountService = accountService;
    }
//spring自动注入下面那个事务工具类
    private transactionManager TrManager;

    public void setTrManager(transactionManager trManager) {
        TrManager = trManager;
    }

     public Object getService(){
//        accountService.getClass().getClassLoader(), accountService.getClass().getInterfaces(),:获取需要加强类的类加载器和接口
         return  Proxy.newProxyInstance(accountService.getClass().getClassLoader(), accountService.getClass().getInterfaces(),
//                 new一个代理切口,加入增强方法。
                 new InvocationHandler() {
                     public Object invoke(Object proxy, Method method, Object[] args) throws Throwable {
                         Object service=null;
                         try {
                             //开启事务
                             TrManager.beginTransaction();
                             //执行操作
                             service =  method.invoke(accountService, args);
                             //提交事务
                             TrManager.commit();
                             return service;
                         } catch (Exception e) {
                             //回滚操作
                             TrManager.rollback();
                             throw new RuntimeException(e);
                         } finally {
                             //释放连接
                             TrManager.release();
                         }

                     }
                 });
     }
}
3、设置好配置文件
<beans xmlns="http://www.springframework.org/schema/beans"
       xmlns:xsi="http://www.w3.org/2001/XMLSchema-instance"
       xmlns:aop="http://www.springframework.org/schema/aop"
       xsi:schemaLocation="http://www.springframework.org/schema/beans
        http://www.springframework.org/schema/beans/spring-beans.xsd
        http://www.springframework.org/schema/aop
        http://www.springframework.org/schema/aop/spring-aop.xsd">
    <bean id="accountService" class="com.ithm.service.impl.accountService">bean>
    <bean id="Logger" class="com.ithm.util.Logger">bean>


    <aop:config>
        <aop:aspect id="logAdvice" ref="Logger">


            <aop:before method="printlog" pointcut="execution( * com.ithm.service.impl.*.*(..))">aop:before>
        aop:aspect>
    aop:config>
beans>
SpringAOP的执行方法:
首先先了解一些AOP的术语:
Joinpoint(连接点): 指的就是要加强的方法。
Pointcut(切入点):指的就是一个被我们拦截的类中哪些连接点就是这个类的切入点
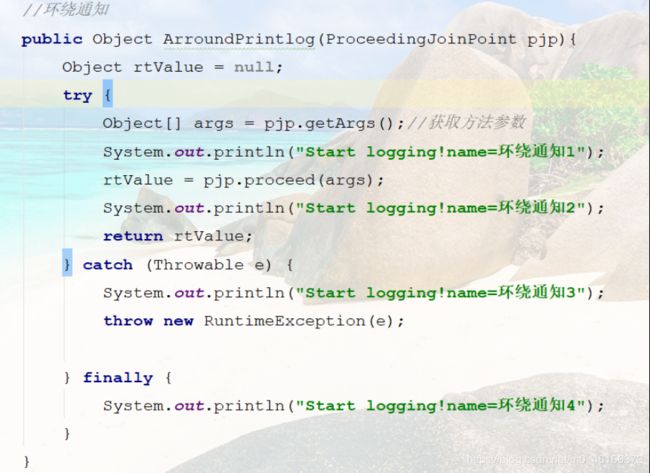
Advice(通知/增强):分为:前置通知(方法前。。。其他通知以此类推),后置通知,异常通知,最终通知,环绕通知(综合其他4大通知)。
Introduction(引介): 引介是一种特殊的通知在不修改类代码的前提下, Introduction可以在运行期为类动态地添加一些方法或Field。
Target(目标对象): 指的就是被代理的那个类(对象)
Weaving(织入):指的就是代理对象的过程
Proxy(代理):指的就是类被代理完毕后的那个加强版的类
Aspect(切面):是切入点和通知(引介)的结合。
AOP配置文件的约束:
<beans xmlns="http://www.springframework.org/schema/beans"
       xmlns:xsi="http://www.w3.org/2001/XMLSchema-instance"
       xmlns:aop="http://www.springframework.org/schema/aop"
       xsi:schemaLocation="http://www.springframework.org/schema/beans
        http://www.springframework.org/schema/beans/spring-beans.xsd
        http://www.springframework.org/schema/aop
        http://www.springframework.org/schema/aop/spring-aop.xsd">
    <bean id="accountService" class="com.ithm.service.impl.accountService">bean>
    <bean id="Logger" class="com.ithm.util.Logger">bean>
开启AOP配置
<aop:config>
    <aop:aspect id="logAdvice" ref="Logger">

        <aop:before method="beforePrintlog" pointcut-ref="pt1">aop:before>

        <aop:after-returning method="afterReturnPrintlog" pointcut-ref="pt1">aop:after-returning>

        <aop:after-throwing method="throwingPrintlog" pointcut-ref="pt1">aop:after-throwing>

        <aop:after method="finalPrintlog" pointcut-ref="pt1">aop:after>


        <aop:around method="ArroundPrintlog" pointcut-ref="pt1">aop:around>

        <aop:pointcut id="pt1" expression="execution( * com.ithm.service.impl.*.*(..))">aop:pointcut>

    aop:aspect>
aop:config>
然后直接就可以开始用了
public class aopTest {
    public static void main(String[] args) {
        ApplicationContext ac = new ClassPathXmlApplicationContext("bean.xml");
        IaccountService service = (IaccountService) ac.getBean("accountService");
        service.saveAccount();

    }
}
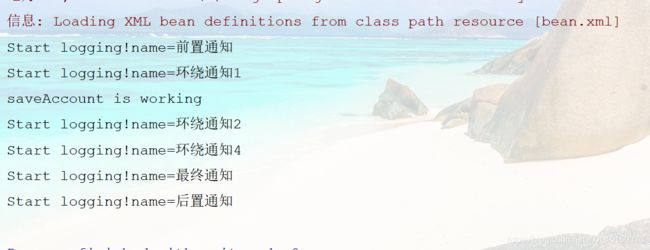
启动后:
至此Spring的俩大核心之一AOP就介绍完毕了
