此篇文章会不断更新,添加一些自己项目中发现的小知识点,与君共勉.
文章同步在 个人主页,阅读体验可能好点~
==目录==
修改UISearchBar的cancel按钮为”取消”
Present一个可以调整大小的视图
iOS 8下设置cell的分割线缩进separatorInset
weakSelf, strongSelf写法
关于iOS9的定位
iOS开发中的四舍五入、进位、摸位 方法
scrollView中有两个协议方法,之前一直没在意,今天用的时候,发现有问题了,挺有意思的;
[NSDate date]返回年份错误
将视图添加到导航栏之上
Xcode调试技巧之lldb中导入UIKit
如何写一个参数不定的函数
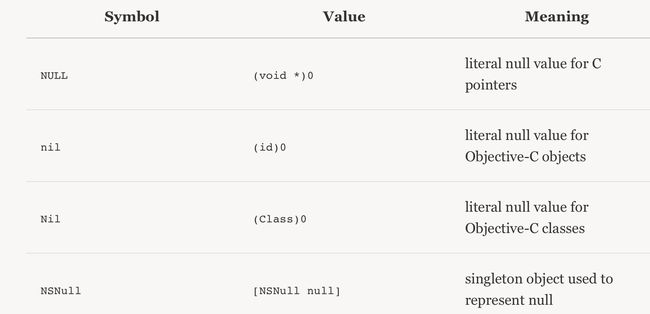
NULL/NSNull/nil/Nil的区别与联系
修改UISearchBar的cancel按钮为"取消"
- (void)searchBarTextDidBeginEditing:(UISearchBar *)searchBar
{
    searchBar.showsCancelButton = YES;
    UIView *topView = searchBar.subviews[0];
    for (id searchButtons in topView.subviews)
    {
        if ([searchButtons isKindOfClass:[UIButton class]])
        {
            UIButton *cancelButton = (UIButton *)searchButtons;
            [cancelButton setTitle:@"取消" forState:UIControlStateNormal];
            cancelButton.titleLabel.font = [UIFont systemFontOfSize:15];
            [cancelButton setTitleColor:[UIColor blackColor] forState:UIControlStateNormal];
            break;
        }
    }
    [self.tableView reloadData];
}
Present一个可以调整大小的视图
    XSetupViewController *setupVC = [[XSetupViewController alloc] init];
    UINavigationController *nav = [[UINavigationController alloc] initWithRootViewController:setupVC];
    nav.modalPresentationStyle = UIModalPresentationFormSheet;
    nav.view.backgroundColor = [UIColor clearColor];
    nav.navigationBarHidden = YES;
    [self presentViewController:nav animated:YES completion:nil];
    setupVC.preferredContentSize = CGSizeMake(522, 502);
**延伸:关于模态视图的一些属性 **
** -弹出风格UIModalPresentationStyle**
1.UIModalPresentationFullScreen:
充满全屏,对于IOS7以后版本,如果弹出视图控制器的wantsFullScreenLayout设置为YES的,则会填充到状态栏下边,否则不会填充到状态栏之下。
2.UIModalPresentationPageSheet:
高度和当前屏幕高度相同,宽度和竖屏模式下屏幕宽度相同,剩余未覆盖区域将会变暗并阻止用户点击,这种弹出模式下,竖屏时跟 UIModalPresentationFullScreen的效果一样,横屏时候两边则会留下变暗的区域。
++ UIModalPresentationFormSheet风格的模态窗口,它的大小是可以进行调整的,而且它会随着键盘的弹起进行移动++
3.UIModalPresentationFormSheet:
高度和宽度均会小于屏幕尺寸,居中显示,四周留下变暗区域.
4.UIModalPresentationCurrentContext:
弹出视图控制器的弹出方式和它的父VC的方式相同.
说明:对于iphone,只有UIModalPresentationFullScreen一种风格,即使设置成其它风格也没起作用
** -弹出时的动画风格UIModalTransitionStyle**
1.UIModalTransitionStyleCoverVertical // 底部滑入。
2.UIModalTransitionStyleFlipHorizontal // 水平翻转。
3.UIModalTransitionStyleCrossDissolve // 交叉溶解。
4.UIModalTransitionStylePartialCurl // 翻页。
iOS 8下设置cell的分割线缩进separatorInset
iOS 7下, 想要设置cell的分割线缩进为0,在iOS7中只用简单的设置cell的separatorInset = UIEdgeInsetZero;
iOS 8下, 在iOS8下,上面的方法就不行啦,经过查阅资料, 终于在stackoverflow上查到了详细的说明,源地址戳这里stackoverflow;
This property isn't available on iOS 7.0 so you need to make sure you check before assigning it!
Additionally, Apple has added a property to your cell that will prevent it from inheriting your Table View's margin settings. When this property is set, your cells are allowed to configure their own margins independently of the table view. Think of it as an override.
This property is called preservesSuperviewLayoutMargins, and setting it to NO will allow the cell's layoutMargin setting to override whatever layoutMargin is set on your TableView. It both saves time (you don't have to modify the Table View's settings), and is more concise. Please refer to Mike Abdullah's answer for a detailed explanation.
什么意思呢,就让我这个英语四级的战五渣来试着翻译一下吧.
iOS8中,新加入了一个属性:preservesSuperviewLayoutMargins,呐,这个属性的加入,可以避免你的cell的外边继承自你的tableView,当你设置这个属性的时候,你可以自由的设置你的cell的外边距,而不必担心tableView和cell两者的相互影响.(翻译的好渣,你们自己去看英文吧...)
代码实现
//Setup your cell margins:
-(void)tableView:(UITableView *)tableView willDisplayCell:(UITableViewCell *)cell forRowAtIndexPath:(NSIndexPath *)indexPath {
     // Remove seperator inset
     if ([cell respondsToSelector:@selector(setSeparatorInset:)]) {
         [cell setSeparatorInset:UIEdgeInsetsZero];
     }
     // Prevent the cell from inheriting the Table View's margin settings
     if ([cell respondsToSelector:@selector(setPreservesSuperviewLayoutMargins:)]) {
         [cell setPreservesSuperviewLayoutMargins:NO];
      }
     // Explictly set your cell's layout margins
    if ([cell respondsToSelector:@selector(setLayoutMargins:)]) {
         [cell setLayoutMargins:UIEdgeInsetsZero];
    }
}
weakSelf, strongSele写法
__weak __typeof(self)weakSelf = self;
__strong __typeof(weakSelf)strongSelf = weakSelf;
关于iOS9的定位
如果你的APP不适配iOS9,就不能偷偷在后台定位,iOS9中的CLLocation新增了一个属性:allowsBackgroundLocationUpdates,而且默认值为NO
If your app uses location in the background (without showing the blue status bar) you have to set allowsBackgroundLocationUpdates to YES in addition to setting the background mode capability in Info.plist. Otherwise location updates are only delivered in foreground. The advantage is that you can now have location managers with background location updates and other location managers with only foreground location updates in the same app. You can also reset the value to NO to change the behavior.
你的代码需需要变成这样了:
_locationManager = [[CLLocationManager alloc] init];
_locationManager.delegate = self;
[_locationManager setDesiredAccuracy:kCLLocationAccuracyBest];
if ([[[UIDevice currentDevice] systemVersion] floatValue] >= 8) {
    [_locationManager requestAlwaysAuthorization];
}
if ([[[UIDevice currentDevice] systemVersion] floatValue] >= 9) {
    _locationManager.allowsBackgroundLocationUpdates = YES;
}
[_locationManager startUpdatingLocation];
iOS开发中的四舍五入、进位、摸位 方法
1.四舍五入比较简单:
double number;
float result1 = rounding(number, 2);//保留两位
int result2 = (int)roundf(number);
2.进位方法:
float numberToRound;
int result;
numberToRound = 5.41;
result = (int)ceilf(numberToRound);
NSLog(@"ceilf(%.2f) = %d", numberToRound, result);//输出 ceilf(5.61) = 6
3.摸位方法:
numberToRound;
int result;
numberToRound = 5.61;
result = (int)floorf(numberToRound);
NSLog(@"floorf(%.2f) = %d", numberToRound, result);//输出 floorf(5.61) = 5
scrollView中有两个协议方法,之前一直没在意,今天用的时候,发现有问题了,挺有意思的;
//本来想在tableView停止滚动之后做一些事情,就调用了方法①,可是发现不会执行,就看了一下文档,恍然大悟!
①-scrollViewDidEndScrollingAnimation: //is called when a programmatic-generated scroll finishes.意思就是这个事系统级的动画执行完毕触发的
②-scrollViewDidEndDecelerating: //is called when a user-swipe scroll finishes.这个是用户自己滑动之后停止触发的
还有一点自己之前也没有注意到,** 有时候我们在拖拽的时候,手慢慢松开,这时候scrollView是跟随拖拽立即停止,注意这时候scrollViewDidEndScroll是不会触发的,我们要调用③**
③- (void)scrollViewDidEndDragging:(UIScrollView *)scrollView willDecelerate:(BOOL)decelerate:
// called on finger up if the user dragged. decelerate is true if it will continue moving afterwards
//这个方法就适用于拖拽停止的场景,可以利用参数decelerate来作为判断是否拖拽之后停止OR继续减速滚动了;
[NSDate date]返回年份错误
    NSDate *date = [NSDate date];
    NSDateFormatter *formater = [[NSDateFormatter alloc] init];
    [formater setDateFormat:@"YYYY-MM-dd"];
    NSString *tempStr = [formater stringFromDate:date];
假如现在的时间是2015.12.28,以上这段代码返回值是什么?
你估计有一些人心里会想,这个二货,这么简单的问题简直是在侮辱我的智商啊!然后脱口而出:2015-12-28;
但是我想说的是,一开始我也这么想的,而且郁闷了很久,没错,返回的是2016-12-28,年份大了一年,如果想返回正确的时间,你需要把YYYY改成yyyy...虽然这个错误改正过来了,但是很纳闷,为什么会返回给我个年份大于一年的时间呢?查阅了很多资料,最后得出了答案 - ISO 8601.国际数据存储交换标准,叫做week year,以星期来规划年份,关于这个怎么个规划法,我就不说了,有点晦涩难理解,这里只说一点:
这个标准日历日期中,一年当中的最后一周有以下两个要求:
Its last day is the Sunday nearest to 31 December.
It has 28 December in it. Hence the latest possible dates are 28 December through 3 January, the earliest 21 through 28 December.
即:
If 31 December is on a Monday, Tuesday or Wednesday, it is in week 01 of the next year. If it is on a Thursday, it is in week 53 of the year just ending; if on a Friday it is in week 52 (or 53 if the year just ending is a leap year); if on a Saturday or Sunday, it is in week 52 of the year just ending.
最后一年的最后一周必须是最靠近12月31号的那个周日,如果31号是周一周二周三或者周四,那它就是下一年的第一周,如果是周五周六周日,那它是当年的最后一周
再回过头来看看我这个问题,还真是赶得巧,正好28号是周一,意味着这要算到下一年的第一周了,所以返回的年份是2016,这里也要庆幸出问题了,涨了姿势了~
将视图添加到导航栏之上
如果你有一个子视图subVC(继承自UIVIewController),它只是作为临时出现,把它添加到当前控制器CorrentViewConteoller之上并且要覆盖CorrentVC的导航栏,改如何添加呢?
这里介绍几种方法以及说明一下优缺点:
//第一种:直接添加到keyWindow上
UIWIndow *keyWindow = [[[UIApplication shareApplication] delegate] window];
[keyWindow addSubView:subVC.view];
优缺点:简单直接暴力,直接添加到最顶层的window上,但是有一个问题:首先,它会一直在最顶层,如果你需要present一个视图,而且当前subVC不能立即释放,那么在转场的时候你会发现这个烦人的subVC总是会出现在你的顶层视图;其次,这种方法添加的subVC,在屏幕发生旋转的时候,它并不会跟随旋转,自己在项目中就遇到过:程序启动的时候就去搜索蓝牙,当前屏幕还是竖屏,随后马上转为横屏,这时候弹出的提示框还是竖屏状态下的...当然这种也是有解决方案的:查看
//第二种:隐藏导航栏
[currentVC.navigationController.navigationBar setNavigationBarHidder:YES animation:YES];
[currentVC.view addSubView:subVC];
[currentVC addChildViewController:subVC];
优缺点:也比较简单直接,但是可能会对你的correntVC产生不好的影响:导致你的correntVC向上偏移64个单位,当然你可以通过重新修改它的frame解决
//第三种:添加到NavigationController的view上
[self.navigationController addChildViewController:subVC];
subVC.view.frame = self.navigationController.bounds;
[self.navigationController.view addSubjvew:subVC.view];
subVC.view.alpha = 0.0;
[subVC beginAppearanceTransition:YES animated:YES];//下面会说为何要实现这个方法
[UIView animatedWithDuration:0.4f delay:0.f option:UIViewAnimationOptionCurveEaseOut animations:^(void){
    subVC.view.alpha = 0.f;
}compation:^(BOOL finished) {
    [subVC endAppearanceTransition];
    [subVC didMoveToParentViewController:self.navigationController];
}];
优缺点:对于subVC的界面布局,需要在init方法中设置完成,同时不要忘了手动设置frame
//第四种:设置NavigationBar的zPosition达到目的
直接添加到当前View上,不需要设置导航栏隐藏,而是直接设置导航栏的zPosition为-1,默认为0,这样,我们的subVC就可以完整的显示了;
[self.view addSubView:subVC.view];
self.navigationController.navigationBar.layer.zPosition = -1;
[self addChildViewController:subVC];
优缺点:你可能注意到了,这个zPosition属性是在layer层上的,那说明什么呢?说明我们只是在渲染层面将navigation这一层隐藏了,但是它的触摸事件还是存在的,是会截断subVC在这个地方的响应的,所以这个方法并不好...
意外发现之延伸:假如我们上文提到的subVC是一个继承自UINavigationController的子视图的话,你想把它通过addSubView的方法添加到correntVC上,用来管理后面的一些视图tempVC,那么会有一个问题:在push或者pop的过程中,子视图(tempVC)的viewWillAppera,willDidAppera,viewWillDisappera等方法都不会被吊起,你需要在navigationVC的容器中手动吊起这里有一篇说明
_ _ _

>####Xcode调试技巧之lldb中导入UIKit

有时候想在断点的时候打印一下UIView的bounds,但是会出现这样的提示:
```language
(lldb) p [self bounds]
error: 'bounds' has unknown return type; cast the call to its declared return type
error: 1 errors parsing expression
这时候有计重解决办法:
//1.导入UIkit或者Foundation框架
(lldb) p @import UIKit
(lldb) po [UIScreen mainScreen].bounds
(origin = (x = 0, y = 0), size = (width = 1024, height = 768))
(origin = (x = 0, y = 0), size = (width = 1024, height = 768))

//2.使用layer打印
p view.layer.bounds
或者
p (CGRect)[view bounds]这样
如何写一个参数不定的函数
先来看一下Foundation中创建一个数组的写法
NSArray *arr = [NSArray arrayWithObjects:id , nil];
这其中最后一个nil是告诉函数参数已经没了.我们自己在自定义的时候有时候也会遇到这样的需求,那么怎么定义一个这样的函数呢?这时候我们有一个概念叫做哨兵参数
C中,使用attribute((sentinel))可以创建一个哨兵参数
在OC中,可以使用NS_REQUIRES_NIL_TERMINATION
@interface
-(void)functionAddtionWithParmater:(NSInteger)par,...NS_REQUIRES_NIL_TERMINATION;

@implementation
-(void)functionAddtionWithParmater:(NSInteger)par,...NS_REQUIRES_NIL_TERMINATION {
  va_list args;
  va_start(args, format);

  id arg = nil;
  while ((arg = va_arg(args,id))) {
  // Do your thing with arg here
  }

  va_end(args);

}
NULL/NSNull/nil/Nil的区别与联系
首先我们来看一下苹果文档中对于这几种概念的说明:
1.NULL:由于OC来源于C,所以保留了这一标示,用0表示nothing的原始值,用NULL表示nothing的指针,所以我们可以这样理解0和NULL所表达的字面意思是完全一样的,只不过一个是值,一个是指针,适应不同的需求;
C represents nothing as 0 for primitive values, and NULL for pointers (which is equivalent to 0 in a pointer context).
2.nil:刚才我们说了NSNULL是C中的,表示nothing,那OC在这个基础上又增加了一个nil,OC是面向对象的一门语言,万物皆对象,nil就是用来表示nothing的一个对象,它与NSNULL的区别在于我们强调它是一个OC中的对象,两者的字面意思是一样的;
Objective-C builds on C’s representation of nothing by adding nil. nil is an object pointer to nothing. Although semantically distinct from NULL, they are technically equivalent to one another.
There’s Something About nil
当一个对象刚被alloc的时候,它的指针是指向0的(0x00),也就是说是从nil开始的;有一点要注意的是即便是nil,依然是可以接受消息的,在C++中可能会奔溃,但OC中会返回zero,这也更加说明了下面的写法没有必要:
// For example, this expression...
if (name != nil && [name isEqualToString:@"Steve"]) { ... }

// ...can be simplified to:
if ([name isEqualToString:@"Steve"]) { ... }
3.NSNull:苹果官方对它的解释是:Something for Nothing很是形象.这是一个基于OC的framework定义的(Foundation框架中),它以一个类方法出现(+null),返回一个实实在在的对象,而并非是和nil一样表示nothing或者0值,尽管在我们看来他依然表示一个空的对象,但是技术上来说是不一样的;我们知道,在集合中是不允许插入一个不存在的值的,那如果我们有时候非要在集合中存储一个空值但是又不使程序报错呢?NSNull就是为了适应这样的需求的:
NSMutableDictionary *mutableDictionary = [NSMutableDictionary dictionary];
mutableDictionary[@"someKey"] = [NSNull null];
4.Nil:Nil被定义为一个类的指针,表示一个nothing的类,我们并不常用,但是要知道;
参考文档:NSHipster
待续

