Android 入门第六讲02-JSON(JSON数据结构简介,JSON 表示一个对象,JSON 格式表示数组,JSON嵌套,JSON 解析实战项目(源码免费))
Android 入门第六讲02-JSON(JSON数据结构简介,JSON 表示一个对象,JSON 格式表示数组,JSON嵌套,JSON 解析实战项目(源码免费))
- 1.JSON数据结构简介
- 2.JSON 表示一个对象
- 1.JSON格式特点1
- 2.java解析方法
- 3.JSON 格式表示数组
- 1.JSON格式特点2
- 2.Java解析方法
- 4.JSON嵌套
- 1.JSON数据嵌套1-json对象+json对象
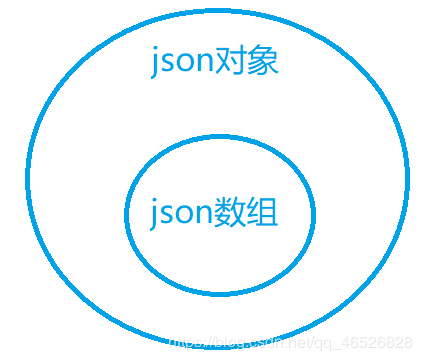
- 2.JSON数据嵌套2-json对象+json数组
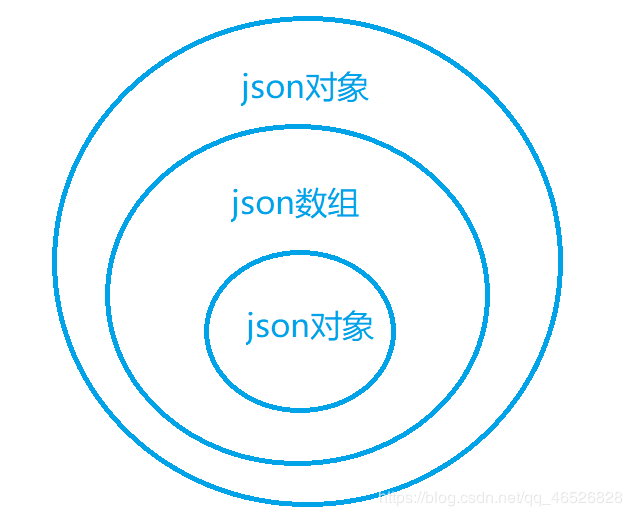
- 3.JSON数据嵌套3-json对象+json数组+json对象
- 5.JSON 解析实战
- 1.关于线程问题
- 2.免费源码
Android 入门第六讲01-网络编程(网络访问概述,通过HTTP访问网络(创建线程的两种方法),网络获取多个值的方法)
1.JSON数据结构简介
json数据结构一种与开发语言无关的、轻量级的数据存储格式,全称JavaScript Object Notation,一种数据格式的标准规范,起初来源于JavaScript这门语言,后来随着使用的广泛,几乎每门开发语言都有处理JSON的API。
(php python JavaScript都对json数据结构进行解析)
优点:易于人的阅读和编写,易于程序解析与生产
2.JSON 表示一个对象
1.JSON格式特点1
- 一般首先一个大括号{},同时里面是一种Key-Value的存储形式
- key 一般是一个字符串
- value 可以是字符串,数字,boolean
案例1:
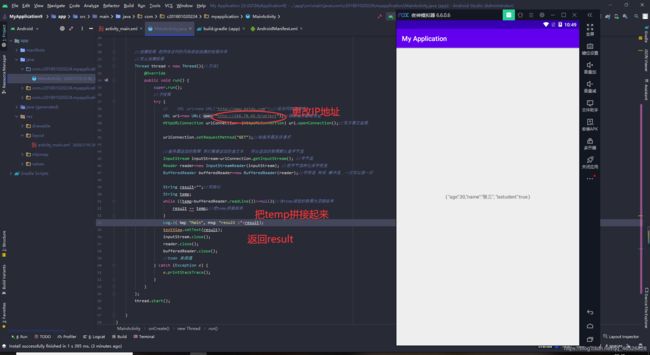
IP地址:http://148.70.46.9/object
json数据 :{ “age”:30,“name”:“张三”, “isstudent”:true }
2.java解析方法
第一步,先将json数据结构拼接起来
这里我们没有用temp了,因为temp一次只读一行,后面我们json比较长的时候会有多行,所以多行的话,我们先把所有的json结构拼接起来,拼到一个字符串里面。
public class MainActivity extends AppCompatActivity {

    @Override
    protected void onCreate(Bundle savedInstanceState) {
        super.onCreate(savedInstanceState);
        setContentView(R.layout.activity_main);
        //默认线程

        final TextView textView=findViewById(R.id.text);


        //创建线程 把网络访问的代码放到创建的线程中来
        //怎么创建线程
        Thread thread = new Thread(){//方法1
            @Override
            public void run() {
                super.run();
                //子线程
                try {
                    //    URL url=new URL("http://www.baidu.com");//这访问的是域名
                    URL url=new URL("http://148.70.46.9/object");//获取服务器哦地址
                    HttpURLConnection urlConnection= (HttpURLConnection) url.openConnection();//双方建立连接

                    urlConnection.setRequestMethod("GET");//给服务器发送请求

                    //服务器返回的数据 我们需要返回的是文本   所以返回的数据默认是字节流
                    InputStream inputStream=urlConnection.getInputStream(); //字节流
                    Reader reader=new InputStreamReader(inputStream); //把字节流转化成字符流
                    BufferedReader bufferedReader=new BufferedReader(reader);//字符流 转成 缓冲流,一次可以读一行

                    String result="";//初始化
                    String temp;
                    while ((temp=bufferedReader.readLine())!=null){//当temp读到的数据为空就结束
                        result += temp;//把temp拼接起来
                    }
                    Log.i("Main","result :"+result);
                    textView.setText(result);
                    inputStream.close();
                    reader.close();
                    bufferedReader.close();
                    //todo 关闭流
                } catch (Exception e) {
                    e.printStackTrace();
                }
            }
        };
        thread.start();

    }
}
xml代码(其实就只有一个文本,强迫症的我还是贴一下)
<?xml version="1.0" encoding="utf-8"?>
<androidx.constraintlayout.widget.ConstraintLayout xmlns:android="http://schemas.android.com/apk/res/android"
    xmlns:app="http://schemas.android.com/apk/res-auto"
    xmlns:tools="http://schemas.android.com/tools"
    android:layout_width="match_parent"
    android:layout_height="match_parent"
    tools:context=".MainActivity">

    <TextView
        android:id="@+id/text"
        android:layout_width="wrap_content"
        android:layout_height="wrap_content"
        android:text="Hello World!"
        app:layout_constraintBottom_toBottomOf="parent"
        app:layout_constraintLeft_toLeftOf="parent"
        app:layout_constraintRight_toRightOf="parent"
        app:layout_constraintTop_toTopOf="parent" />

</androidx.constraintlayout.widget.ConstraintLayout>
第二步,我们来分析一下,这个json的数据结构
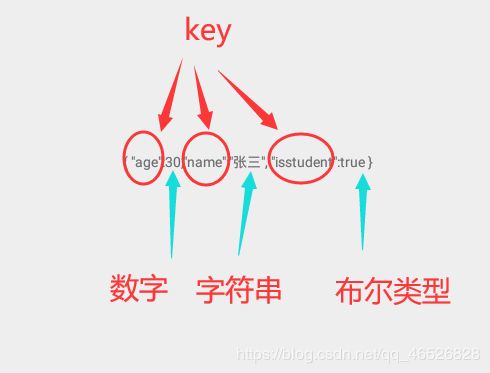
然后通过获取key来返回所对应的值
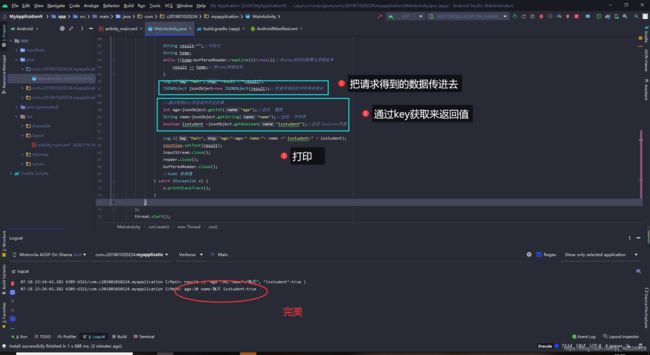
核心代码
                    JSONObject jsonObject=new JSONObject(result);//把请求得到的字符串传进去

                    //通过获取key来返回所对应的值
                    int age=jsonObject.getInt("age");//返回  整数
                    String name=jsonObject.getString("name");//返回  字符串
                    boolean isstudent =jsonObject.getBoolean("isstudent");//返回 boolean类型

                    Log.i("Main","age:"+age+" name:"+ name +" isstudent:" + isstudent);
                    textView.setText( "age:"+age);//把age返回的值填充到文本控件
3.JSON 格式表示数组
1.JSON格式特点2
- 如果是一个中括号[],里面全部是value,value之间用逗号给开
- [value,value,…]
- value 可以是字符串,数字,boolean(必须是同一种类型)
案例2:
IP地址:http://148.70.46.9/array
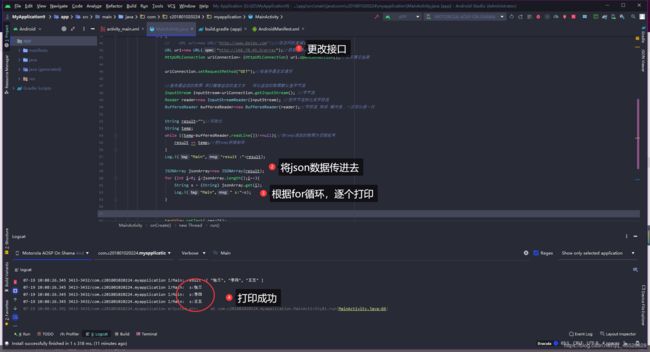
json数据: [ “张三”, “李四”, “王五” ]
2.Java解析方法
先将json数据传进JSONArray,然后再用for循环,根据字符串在数组中的位置逐个打印
核心代码
 JSONArray jsonArray=new JSONArray(result);
                    for (int i=0; i<jsonArray.length();i++){
                        String s = (String) jsonArray.get(i);
                        Log.i("Main"," s:"+s);
                    }
4.JSON嵌套
1.JSON数据嵌套1-json对象+json对象
JSON格式特点1
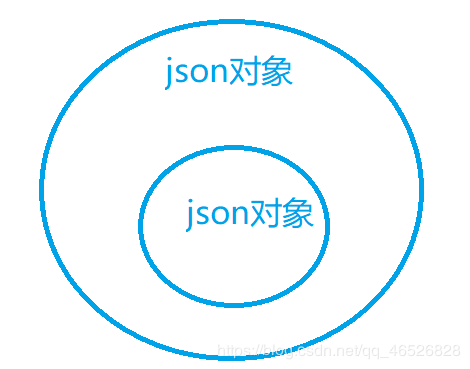
- value也可以是一个json对象
案例3:
IP地址:http://148.70.46.9/object1
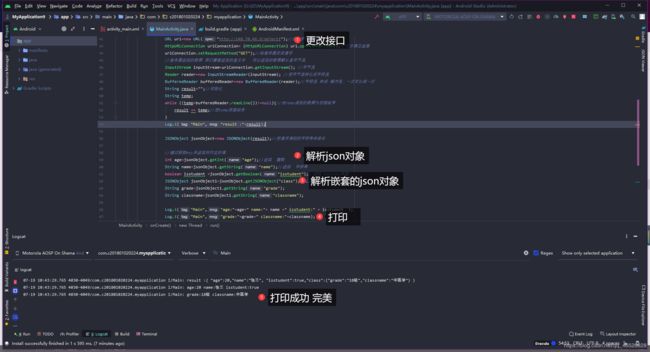
json数据:{ “age”:20,“name”:“张三”, “isstudent”:true,“class”:{“grade”:“18级”,“classname”:“中医学”} }
java解析方法
这里讲一下如何简单判断用哪种方法解析 :最外层是大括号{}的就用JSONObject,最外层是中括号【】的就用JSONArray ,我们这组数据最外层是大括号,所以我们用JSONObject,然后解析出的数据里,再解析的嵌套的json对象
 JSONObject jsonObject=new JSONObject(result);//把请求得到的字符串传进去

                    //通过获取key来返回所对应的值
                    int age=jsonObject.getInt("age");//返回  整数
                    String name=jsonObject.getString("name");//返回  字符串
                    boolean isstudent =jsonObject.getBoolean("isstudent");//返回 boolean类型
                    JSONObject jsonObject1=jsonObject.getJSONObject("class");//返回JSON对象
                    String grade=jsonObject1.getString("grade");
                    String classname=jsonObject1.getString("classname");

                    Log.i("Main","age:"+age+" name:"+ name +" isstudent:" + isstudent  );
                    Log.i("Main","grade:"+grade+" classname:"+classname);
2.JSON数据嵌套2-json对象+json数组
JSON格式特点2
- value也可以是一个json数组
案例4:
IP地址:http://148.70.46.9/object2
json数据:{ “grade”:“18级”,“classname”:“中医学”,“students”:[“张三”,“李四”,“王五”] }
java解析方法
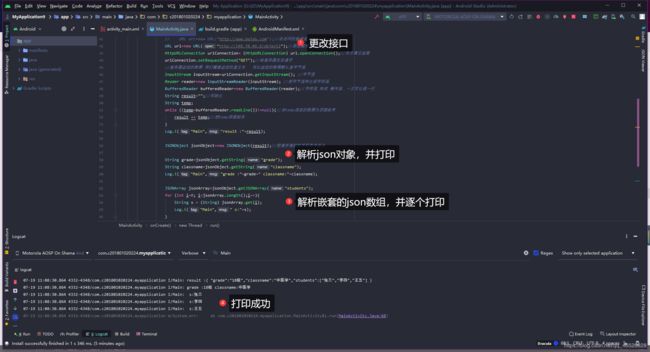
先解析json对象,再解析json数组
核心代码
 JSONObject jsonObject=new JSONObject(result);//把请求得到的字符串传进去

                    String grade=jsonObject.getString("grade");
                    String classname=jsonObject.getString("classname");
                    Log.i("Main","grade :"+grade+" classname:"+classname);

                    JSONArray jsonArray=jsonObject.getJSONArray("students");
                    for (int i=0; i<jsonArray.length();i++){
                        String s = (String) jsonArray.get(i);
                        Log.i("Main"," s:"+s);
                    }
3.JSON数据嵌套3-json对象+json数组+json对象
JSON格式总结:json的key对应的value 可以是整型、字符型、布尔型、Json数组、Json对象
案例5:
IP地址:http://148.70.46.9/object3
json数据: {“grade”:“18级”,“classname”:“中医学”,“students”:[ {“id”:“001”,“age”:30,“name”:“张三”, “isstudent”:false }, { “id”:“002”,“age”:25,“name”:“李四”, “isstudent”:true }, {“id”:“003”,“age”:26,“name”:“王五”, “isstudent”:true } ]}
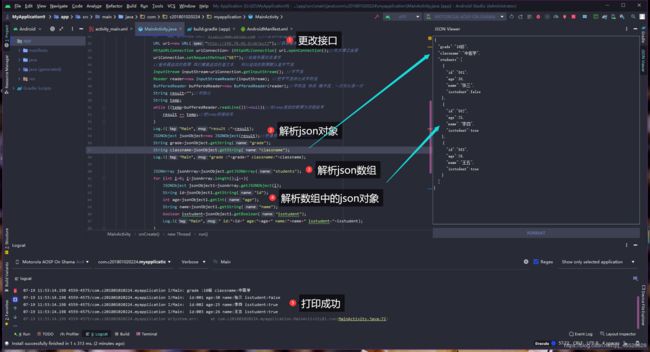
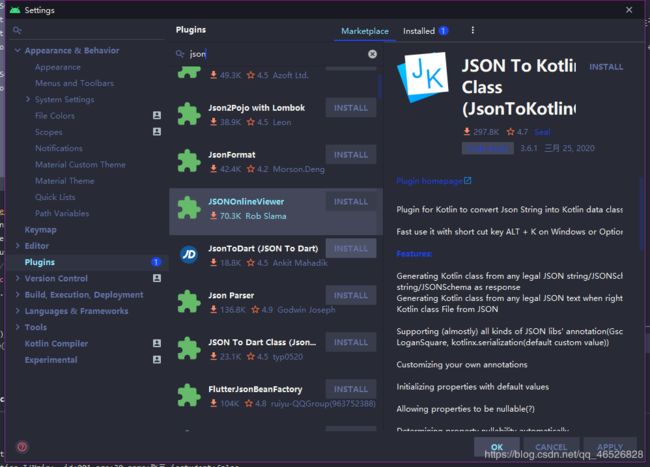
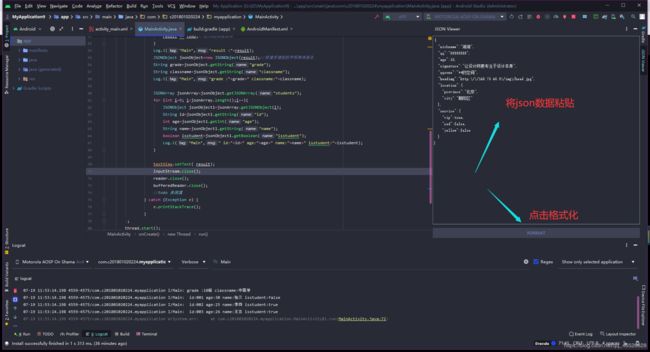
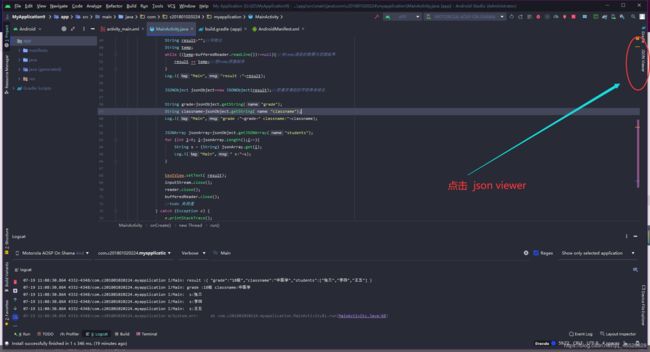
我们先对这json数据进行分析(可以用as自带插件,网上也有很多在线解析工具,例如我推荐的下面这个)
JSON在线解析及格式化验证
第一步,打开工具
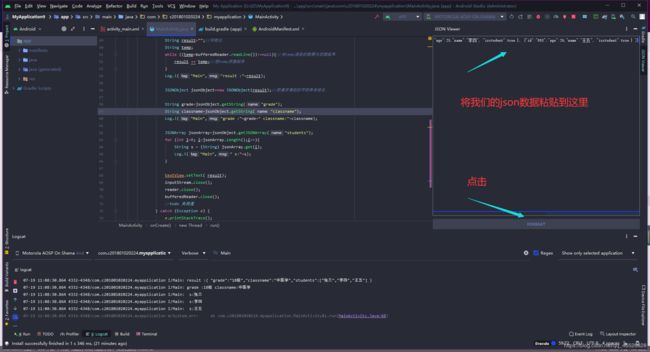
第二步,粘贴数据并格式化
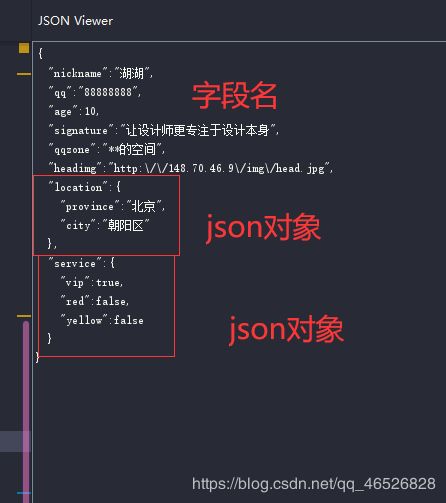
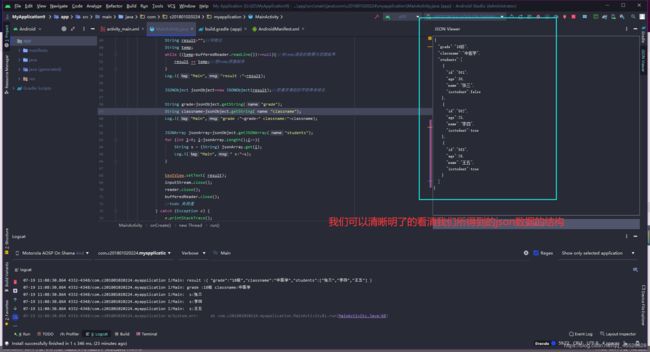
第三步,分析json数据结构
 java解析方法
最外层是一个json对象,里面包含两个字段并且嵌套了一个数组,数组是由三个json对象组成的
 JSONObject jsonObject=new JSONObject(result);//把请求得到的字符串传进去
                    String grade=jsonObject.getString("grade");
                    String classname=jsonObject.getString("classname");
                    Log.i("Main","grade :"+grade+" classname:"+classname);

                    JSONArray jsonArray=jsonObject.getJSONArray("students");
                    for (int i=0; i<jsonArray.length();i++){
                        JSONObject jsonObject1=jsonArray.getJSONObject(i);
                        String id=jsonObject1.getString("id");
                        int age=jsonObject1.getInt("age");
                        String name=jsonObject1.getString("name");
                        boolean isstudent=jsonObject1.getBoolean("isstudent");
                        Log.i("Main"," id:"+id+" age:"+age+" name:"+name+" isstudent:"+isstudent);
                    }
5.JSON 解析实战
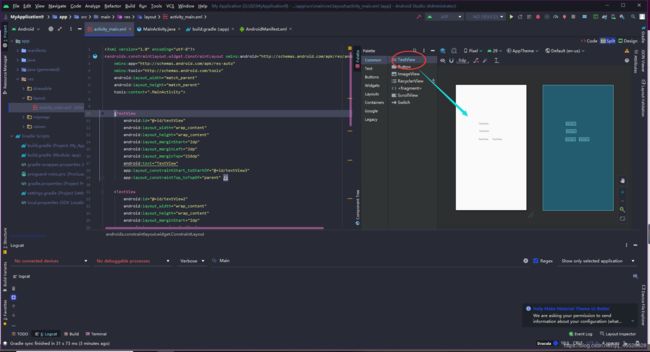
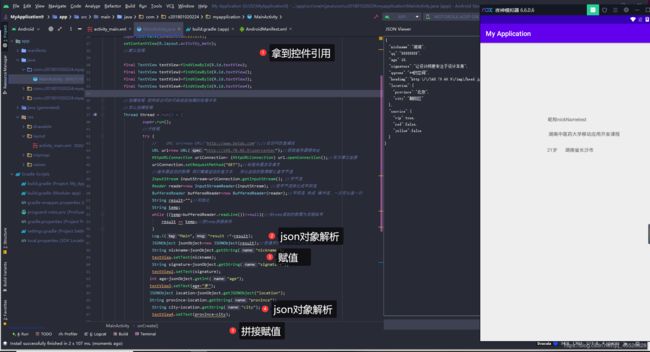
根据以下的json数据接口完成下图UI(我这里粗略的写一下,其他的都方法上述都已讲到)
实战:
IP地址:http://148.70.46.9/usercenter
json数据:{ “nickname”:“湖湖”,“qq”:“88888888”, “age”:10,“signature”:“让设计师更专注于设计本身”,“qqzone”:"**的空间",“headimg”:“http://148.70.46.9/img/head.jpg”,“location”:{“province”:“北京”,“city”:“朝阳区”},“service”:{“vip”:true,“red”:false,“yellow”:false} }
那个heading的地址我这里格式化有点小问题,但是不影响我们分析结构
<?xml version="1.0" encoding="utf-8"?>
<androidx.constraintlayout.widget.ConstraintLayout xmlns:android="http://schemas.android.com/apk/res/android"
    xmlns:app="http://schemas.android.com/apk/res-auto"
    xmlns:tools="http://schemas.android.com/tools"
    android:layout_width="match_parent"
    android:layout_height="match_parent"
    tools:context=".MainActivity">


    <TextView
        android:id="@+id/textView"
        android:layout_width="wrap_content"
        android:layout_height="wrap_content"
        android:layout_marginStart="2dp"
        android:layout_marginLeft="2dp"
        android:layout_marginTop="216dp"
        android:text="TextView"
        app:layout_constraintStart_toStartOf="@+id/textView3"
        app:layout_constraintTop_toTopOf="parent" />

    <TextView
        android:id="@+id/textView2"
        android:layout_width="wrap_content"
        android:layout_height="wrap_content"
        android:layout_marginStart="2dp"
        android:layout_marginLeft="2dp"
        android:layout_marginTop="24dp"
        android:text="TextView"
        app:layout_constraintStart_toStartOf="@+id/textView"
        app:layout_constraintTop_toBottomOf="@+id/textView" />

    <TextView
        android:id="@+id/textView3"
        android:layout_width="wrap_content"
        android:layout_height="wrap_content"
        android:layout_marginEnd="23dp"
        android:layout_marginRight="23dp"
        android:text="TextView"
        app:layout_constraintBaseline_toBaselineOf="@+id/textView4"
        app:layout_constraintEnd_toStartOf="@+id/textView4"
        app:layout_constraintHorizontal_chainStyle="packed"
        app:layout_constraintStart_toStartOf="parent" />

    <TextView
        android:id="@+id/textView4"
        android:layout_width="wrap_content"
        android:layout_height="wrap_content"
        android:layout_marginTop="28dp"
        android:layout_marginEnd="10dp"
        android:layout_marginRight="10dp"
        android:text="TextView"
        app:layout_constraintEnd_toEndOf="parent"
        app:layout_constraintStart_toEndOf="@+id/textView3"
        app:layout_constraintTop_toBottomOf="@+id/textView2" />
</androidx.constraintlayout.widget.ConstraintLayout>
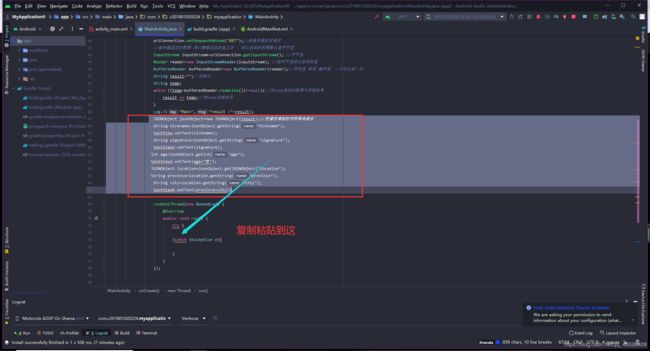
1.关于线程问题
解决方法,创建一个主线程
`
 runOnUiThread(new Runnable() {
                        @Override
                        public void run() {
                         //对ui的操作 只能放到主线程
                            try {

                            }catch (Exception e){

                            }
                        }
                    });`
出现这个问题的原因是,我们本来操作是在一个子线程里执行的,但是子线程是不能修改ui的,我们要把修改ui的操作放到主线程里面
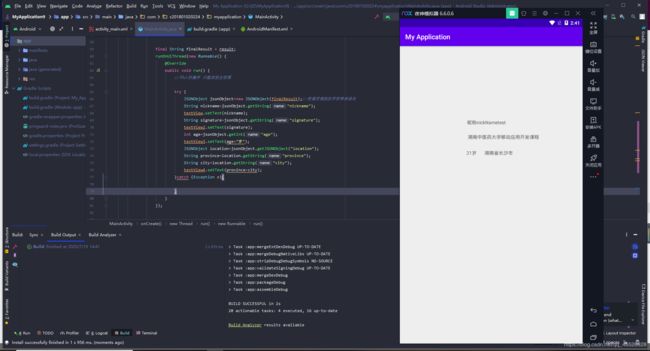
运行结果
代码
public class MainActivity extends AppCompatActivity {

    @Override
    protected void onCreate(Bundle savedInstanceState) {
        super.onCreate(savedInstanceState);
        setContentView(R.layout.activity_main);
        //默认线程

        final TextView textView=findViewById(R.id.textView);
        final TextView textView2=findViewById(R.id.textView2);
        final TextView textView3=findViewById(R.id.textView3);
        final TextView textView4=findViewById(R.id.textView4);

        //创建线程 把网络访问的代码放到创建的线程中来
        //怎么创建线程
        Thread thread = new Thread(){//方法1
            @Override
            public void run() {
                super.run();
                //子线程
                try {
                    //    URL url=new URL("http://www.baidu.com");//这访问的是域名
                    URL url=new URL("http://148.70.46.9/usercenter");//获取服务器哦地址
                    HttpURLConnection urlConnection= (HttpURLConnection) url.openConnection();//双方建立连接
                    urlConnection.setRequestMethod("GET");//给服务器发送请求
                    //服务器返回的数据 我们需要返回的是文本   所以返回的数据默认是字节流
                    InputStream inputStream=urlConnection.getInputStream(); //字节流
                    Reader reader=new InputStreamReader(inputStream); //把字节流转化成字符流
                    BufferedReader bufferedReader=new BufferedReader(reader);//字符流 转成 缓冲流,一次可以读一行
                    String result="";//初始化
                    String temp;
                    while ((temp=bufferedReader.readLine())!=null){//当temp读到的数据为空就结束
                        result += temp;//把temp拼接起来
                    }
                    Log.i("Main","result :"+result);


                    final String finalResult = result;
                    runOnUiThread(new Runnable() {
                        @Override
                        public void run() {
                            //对ui的操作 只能放到主线程

                            try {
                                JSONObject jsonObject=new JSONObject(finalResult);//把请求得到的字符串传进去
                                String nickname=jsonObject.getString("nickname");
                                textView.setText(nickname);
                                String signature=jsonObject.getString("signature");
                                textView2.setText(signature);
                                int age=jsonObject.getInt("age");
                                textView3.setText(age+"岁");
                                JSONObject location=jsonObject.getJSONObject("location");
                                String province=location.getString("province");
                                String city=location.getString("city");
                                textView4.setText(province+city);
                            }catch (Exception e){

                            }
                        }
                    });


                    inputStream.close();
                    reader.close();
                    bufferedReader.close();
                    //todo 关闭流
                } catch (Exception e) {
                    e.printStackTrace();
                }
            }
        };
        thread.start();

    }
}
2.免费源码
https://download.csdn.net/download/qq_46526828/12638845
运行结果
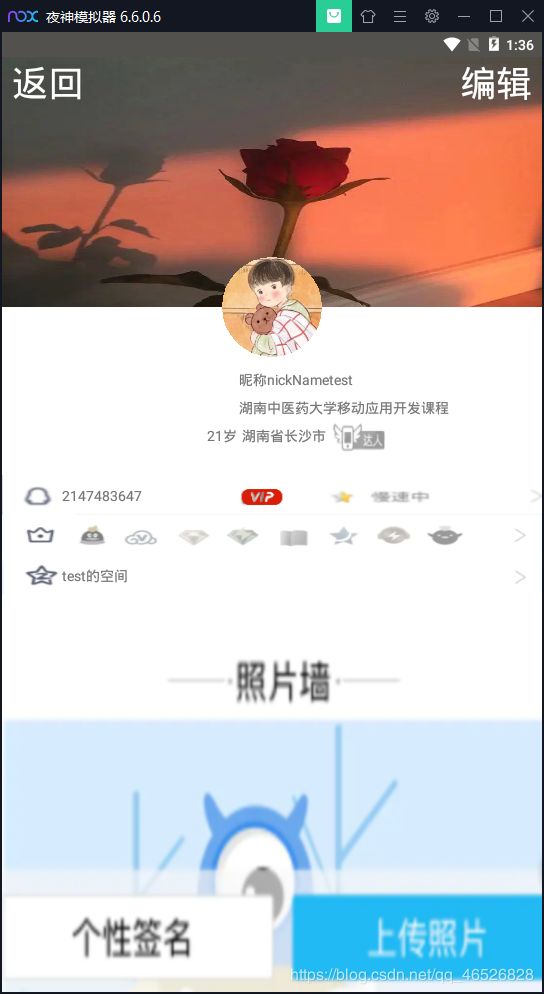
关于json的内容就讲到这里啦,欢迎各路小伙伴指点和阅读,我们一起进步,奥利给,谢谢您的阅读,我们下一讲继续奋斗!!!
Android 入门第六讲03-Handler(学会Debug模式断点调试,Handler机制(线程问题分析,Handler的使用方法),Handler的原理(超详细))
