使用IDEA搭建springcloud微服务(二)-----Eureka服务注册中心(BASE认证)
一、工具及说明
开发工具:IntelliJ IDEA 2018.2.2 (Ultimate Edition)
框架:spring boot 2.0.8、spring cloud Finchley.SR2
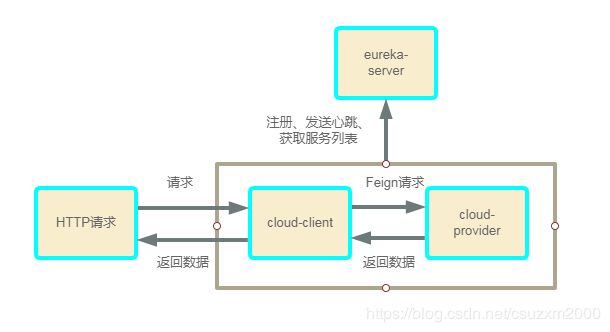
以通用户ID获取用户信息为例,搭建一套spring cloud微服务系统。
需要搭建一个父工程spring-cloud,一个服务注册中心eureka-server,两个微服务cloud-client,cloud-provider。
两个微服务均注册到服务注册中心。
二、服务注册中心搭建
1.File—>New—>Module

2.选择Spring Initializr,选择对应的JDK,
Choose Initializr Server URL 选择 default。
Next。

3.输入项目组Group:com.cloud。
组件名称Artifact:cloud-discovery。
Type:选择Maven Project。
修改自动生成的Package。
Next。

4.dependencies选择Cloud Discovery—>Eureka Server。
Spring Boot选择你需要的版本,我这选择2.0.8。
Next。

5.Project Name一般不做修改,和组件名称Artifact一样。
Content root、Module file location 均按自动生成,不做修改。
Finish。

6.配置。
将自动生成的application.properties更改为application.yml文件,个人习惯使用yml文件。
rename的快捷键是Shift+F6。
在application.yml中加入以下配置:
spring:
  application:
    name: eureka-server     #服务名称,自定义
  security:
    user:
      name: user            #配置BASIC认证登录的账号
      password: 123456      #配置BASIC认证登录的密码
server:
  port: 8080                #指定该Eureka实例的端口
eureka:
  client:
    registerWithEureka: false     #禁止注册自身
    fetchRegistry: false          #因为该服务没有注册到其他注册中心,所以关闭从注册中心拉取服务列表。
                                    #如果是服务注册中心集群,需要开启,开启就是去掉该配置,采用默认配置即可
    serviceUrl:
      defaultZone: http://user:123456@localhost:8080/eureka/  #服务注册中心地址,http://账号:密码@主机名称:端口/Eureka/
  server:
    renewalPercentThreshold: 0.49    #设置心跳正常的阀值,默认为1,测试时可以调低
7.修改pom文件。
可以发现,pom文件中已自动引入了Eureka服务端依赖。
将按以下修改,使用父工程spring-cloud的spring boot依赖。
如果需要使用/health进行健康检查,则加入健康检查模块。
如果需使用Tomcat运行,需要加入tomcat支持模块和web模块。
    4.0.0


        com.cloud
        spring-cloud
        1.0

    com.cloud
    cloud-discovery
    0.0.1-SNAPSHOT
    cloud-discovery
    Demo project for Spring Boot


        UTF-8
        UTF-8
        1.8
        Finchley.SR2


            org.springframework.boot
            spring-boot-starter-web


            org.springframework.cloud
            spring-cloud-starter-netflix-eureka-server


            org.springframework.boot
            spring-boot-starter-security


            org.springframework.boot
            spring-boot-starter-actuator


            org.springframework.boot
            spring-boot-starter-tomcat
            provided


            org.springframework.boot
            spring-boot-starter-test
            test


                org.springframework.cloud
                spring-cloud-dependencies
                ${spring-cloud.version}
                pom
                import


                org.springframework.boot
                spring-boot-maven-plugin
8.启动类CloudDiscoveryApplication。
在启动类上加入@EnableEurekaServer注解,声明这是一个服务注册中心。
在启动类中加入WebSecurityConfigure方法,忽略csrf验证。
import org.springframework.boot.SpringApplication;
import org.springframework.boot.autoconfigure.SpringBootApplication;
import org.springframework.cloud.netflix.eureka.server.EnableEurekaServer;
import org.springframework.security.config.annotation.web.builders.HttpSecurity;
import org.springframework.security.config.annotation.web.configuration.EnableWebSecurity;
import org.springframework.security.config.annotation.web.configuration.WebSecurityConfigurerAdapter;

@EnableEurekaServer
@SpringBootApplication
public class CloudDiscoveryApplication {

    public static void main(String[] args) {

        SpringApplication.run(CloudDiscoveryApplication.class, args);
    }

    @EnableWebSecurity
    static class WebSecurityConfigure extends WebSecurityConfigurerAdapter {
        @Override
        protected void configure(HttpSecurity http) throws Exception {
            // 在/eureka/**端点忽略csrf验证
            http.csrf().ignoringAntMatchers("/eureka/**");
            // 配置使请求需要通过httpBasic或form验证
            http.authorizeRequests().anyRequest()
                    .authenticated()
                    .and()
                    .formLogin()
                    .and()
                    .httpBasic();
            super.configure(http);
        }
    }
}
9.使用Tomcat启动,需创建类ServletInitializer。
import org.springframework.boot.builder.SpringApplicationBuilder;
import org.springframework.boot.web.servlet.support.SpringBootServletInitializer;

public class ServletInitializer extends SpringBootServletInitializer {

    @Override
    protected SpringApplicationBuilder configure(SpringApplicationBuilder application) {
        return application.sources(CloudDiscoveryApplication.class);
    }
}