基于ADT bundle快速搭建Android开发环境
ADT bundle 是什么? 看来自官网的解释http://developer.android.com/sdk/index.html
Download the ADT Bundle to quickly start developing apps. It includes the essential Android SDK components and a version of the Eclipse IDE with built-in ADT (Android Developer Tools) to streamline your Android app development.
With a single download, the Eclipse ADT bundle includes everything you need to begin developing apps:
Eclipse + ADT plugin
Android SDK Tools
Android Platform-tools
A version of the Android platform
A version of the Android system image for the emulator
也就是,ADT bundle由Google Android官方提供的集成式IDE,已经包含了Eclipse,你无需再去下载Eclipse,并且里面已集成了插件,他还是很能为初学者搭建复杂的Android开发环境节省了不少精力的。那么下面我们就开动吧。
第一步,我们还是一样像以前那样很复杂的搭建过程的第一步一样,先安装Java SDK,配置好Java开发的环境变量(自行搜索~)。
当这一步完成后,当然点击上面链接下载ADT bundle了。继续看官方教程。
Install the SDK andEclipse IDE
1. Unpack the ZIP file (named adt-bundle-
2. Open the adt-bundle-
That's it! The IDE isalready loaded with the Android Developer Tools plugin and the SDK is ready togo. To start developing, read Building Your FirstApp.
Caution: Donot move any of the files or directories from the adt-bundle-
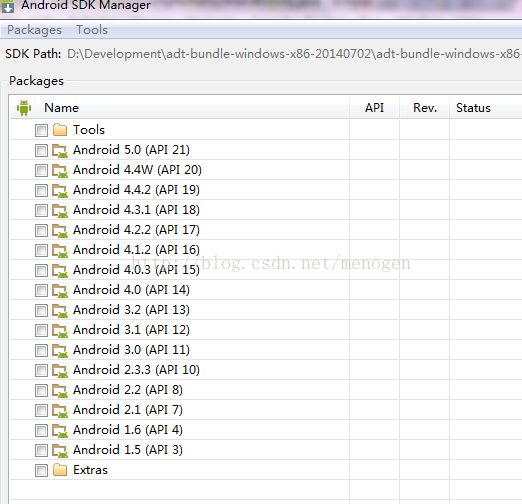
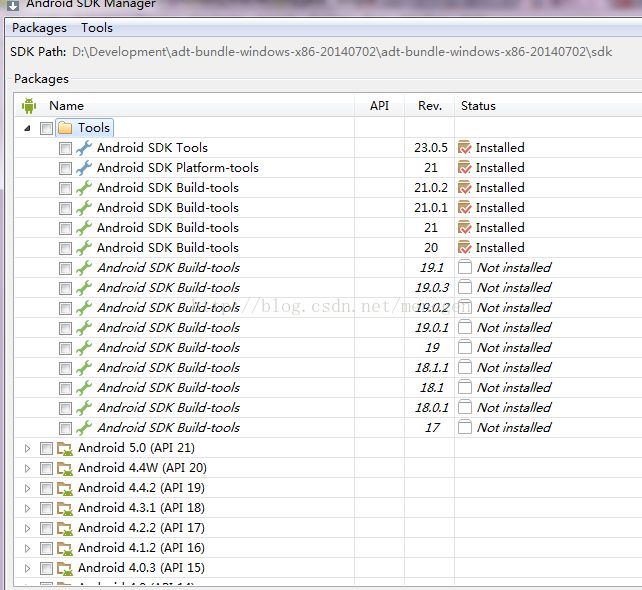
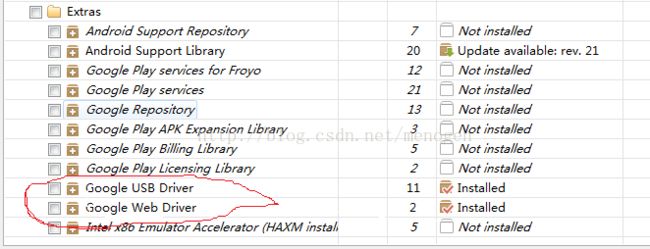
下载后,按照上面说明,1)将下载后的文件解压缩,会得到一个包含 Eclipse,SDK,SDK manager.exe的文件夹,打开 SDK manager.exe 选择需要安装的包,SDK我是从最新的选择到4.1.2, tools选择如下,而 extra中红色标出的那两个要选上,因为他跟真机调试有关,
这个过程会很慢,一般是可以在睡觉期间让他更新。
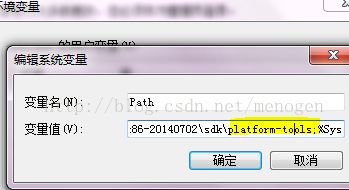
然后配置Android开发环境变量,主要是将解压缩后中的sdk目录下的tools还有plateform-tools 加入到环境变量path中,
我的是D:\Development\adt-bundle-windows-x86-20140702\adt-bundle-windows-x86-20140702\sdk\tools;以及D:\Development\adt-bundle-windows-x86-20140702\adt-bundle-windows-x86-20140702\sdk\platform-tools;
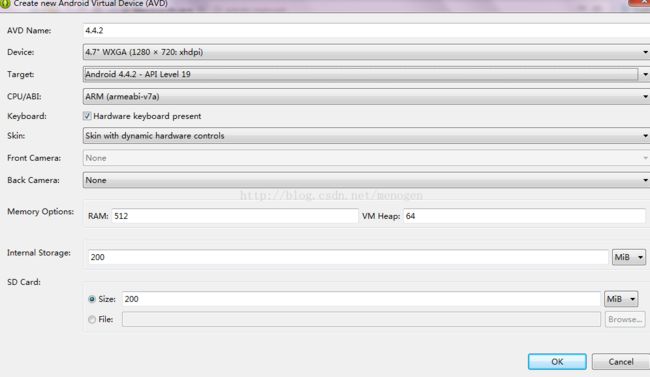
然后打开 Eclipse,然后点击windows 下面Android virtual device,新建一个ADV,如下,解释一下下面一些条目的含义
AVD name就是你给你模拟器取得名字,device就是设备的分辨率,target就是你设备的API版本,back camera就是使用可以将你的电脑摄像头模拟手机摄像机加入到模拟机中,memory当然就是你的手机 RAM了,点击OK就可以创建一个模拟器了。
这样就完成了整个搭建过程,就可以file->new->new android project 去创建第一个APP了。
搭建过程遇到的两个问题:
1 启动Eclipse时候,总是提示fail to create the java virtual machine,开始以为是我的Java环境没有搭建好,但是发现没错啊。后来按照网上一个解决方法解决了,就是在Eclipse目录下有个 Eclipse.ini文件, 用文本打开他后,将下面我标亮的改为128m(原始的是256),好像就是因为这两个量设置太大不合适了吧,具体我没再追究。
2 创建ADV时候,信息都填完了,但是OK按钮一直是灰色的,创建不了,原来是因为CPU/ABI 哪一项是像front camera一样也是灰色的,这是因为安装ADK时候没有把下面这一项给安装上,更新安装好这个后,会发现CPU/ABI不再是灰色,而是像上面那样是可以选的,OK按钮也不再是灰色,可以创建了。
