Spring Boot 实践之十三 10 Spring Boot综合项目实战——个人博客系统
注:实践内容参考人民邮电出版社的教程《 Spring Boot企业级开发教程》作者:黑马程序员,上传本文仅以实践过程以供大家共同学习解决问题,如有侵权不当行为,请告知后,我会更正或删除。
10.1 系统概述
本章涉及的引入资源请通过百度云盘下载:https://pan.baidu.com/s/1QCxpOfyjfKLsGcCDPfO1jQ
因内容较多,不少文字内容也以截图显示,敬请谅解。
10.1.1 系统功能介绍

10.1.2 项目效果预览


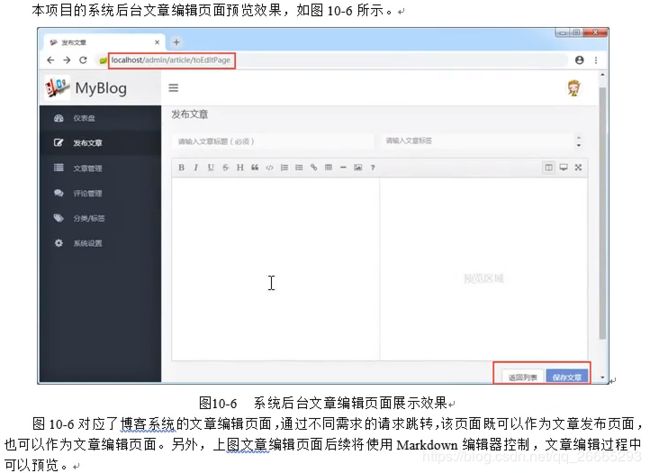
5.后台文件编辑页面预览


10.2 项目设计
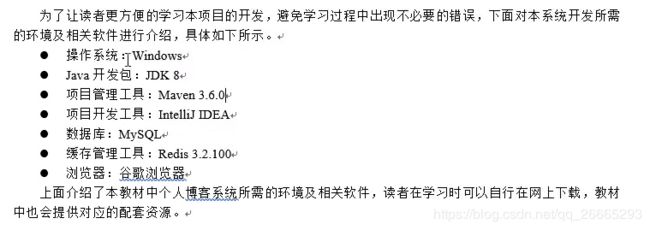
10.2.1 系统开发及运行环境
10.2.2 文件组织结构

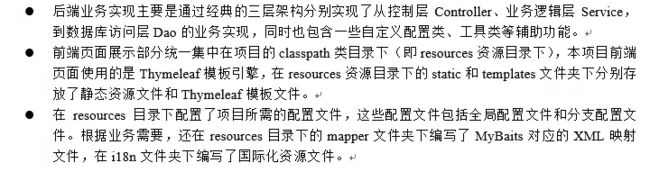
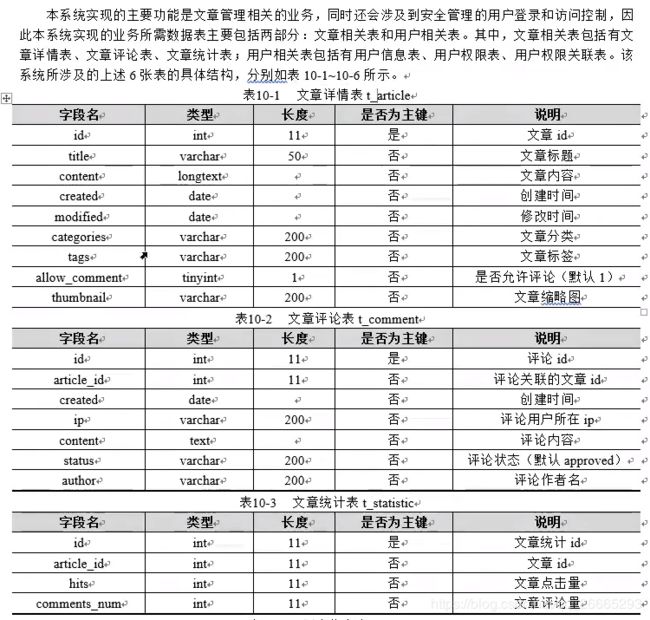
10.2.3 数据库设计

 “ROLE_”开头。
10.3 系统环境搭建
10.3.1 准备数据库资源
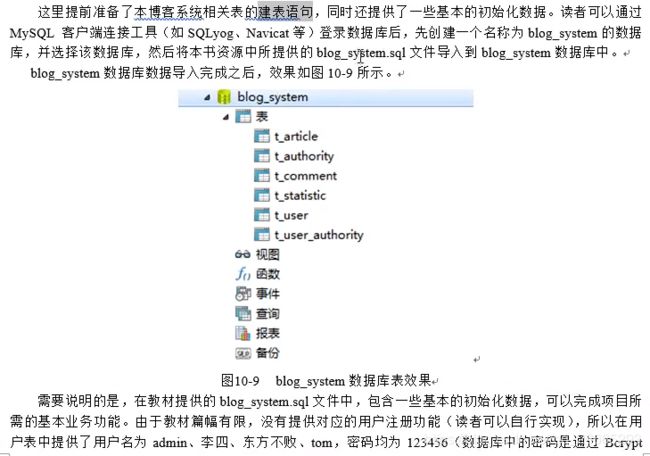
-
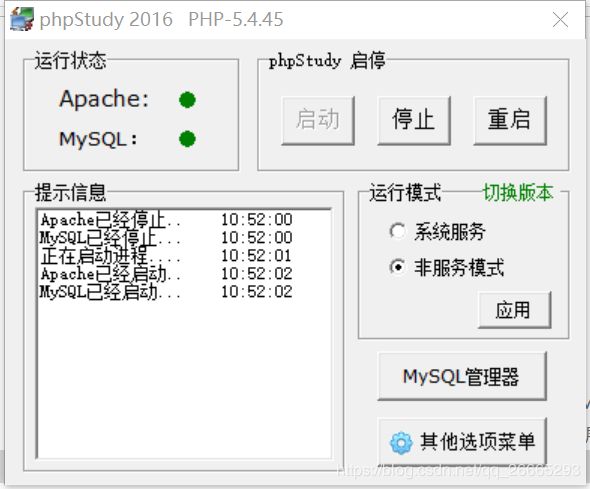
1.运行MYSQL数据库,这里我们使用之前的phpstudy.
-
2.运行SQLyog,创建数据库blog_system

-
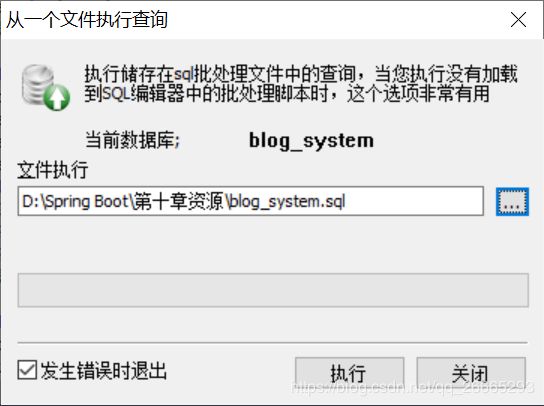
3.导入SQL文件完成数据库内容的创建。
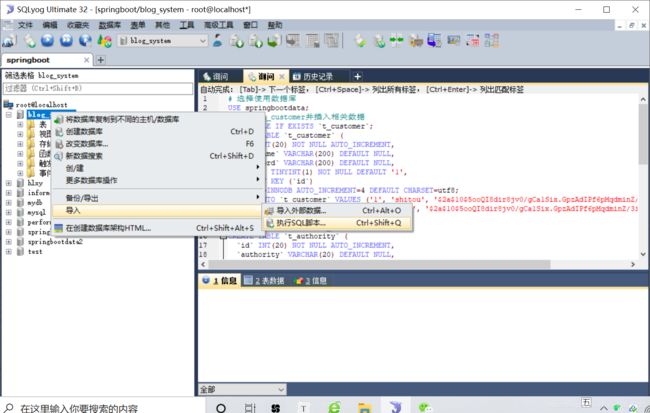
-
4.执行SQL文件blog_system.sql
-
5.执行成功后,6张表成功创建及导入了数据,至此,准备数据库资源完成。如图:

10.3.2 准备项目环境
- 1.创建项目,引入依赖文件


            com.alibaba
            druid-spring-boot-starter
            1.1.10


            org.mybatis.spring.boot
            mybatis-spring-boot-starter
            2.0.0


            mysql
            mysql-connector-java
            runtime


            org.springframework.boot
            spring-boot-starter-data-redis


            org.springframework.boot
            spring-boot-starter-mail


            org.thymeleaf.extras
            thymeleaf-extras-springsecurity5


            org.springframework.boot
            spring-boot-starter-security


            org.springframework.boot
            spring-boot-starter-thymeleaf


            org.springframework.boot
            spring-boot-starter-web


            com.github.pagehelper
            pagehelper-spring-boot-starter
            1.2.8


            org.apache.commons
            commons-lang3
            3.5


            com.atlassian.commonmark
            commonmark
            0.11.0


            com.atlassian.commonmark
            commonmark-ext-gfm-tables
            0.11.0


            com.vdurmont
            emoji-java
            4.0.0


            org.springframework.boot
            spring-boot-devtools
            runtime


            org.springframework.boot
            spring-boot-starter-test
            test


                org.springframework.boot
                spring-boot-maven-plugin
-
2.编写配置文件

server:
  port: 80

spring:
  profiles:
    # 外置jdbc、redis和mail配置文件
    active: jdbc,redis,mail
  # 关闭thymeleaf页面缓存
  thymeleaf:
    cache: false
  # 配置国际化资源文件
  messages:
    basename: i18n.logo

# MyBatis配置
mybatis:
  configuration:
    #开启驼峰命名匹配映射
    map-underscore-to-camel-case: true
  #配置MyBatis的xml映射文件路径
  mapper-locations: classpath:mapper/*.xml
  #配置XML映射文件中指定的实体类别名路径
  type-aliases-package: com.itheima.model.domain

#pagehelper分页设置
pagehelper:
  helper-dialect: mysql
  reasonable: true
  support-methods-arguments: true
  params: count=countSql

#浏览器cookie相关设置
COOKIE:
  # 设置cookie默认时长为30分钟
  VALIDITY: 1800
application-jdbc.properties内容如下:
#添加并配置第三方数据库连接池druid
spring.datasource.type = com.alibaba.druid.pool.DruidDataSource
spring.datasource.initialSize=20
spring.datasource.minIdle=10
spring.datasource.maxActive=100

#数据源连接配置
spring.datasource.url = jdbc:mysql://localhost:3306/blog_system?serverTimezone=UTC&useSSL=false
spring.datasource.username = root
spring.datasource.password = root
#driver-class-name可以省略
#spring.datasource.driver-class-name = com.mysql.jdbc.Driver
application-mail.properties内容如下:
#QQ邮箱邮件发送服务配置
spring.mail.host=smtp.qq.com
spring.mail.port=587

# 请根据自己的QQ和授权码,配置个人QQ账户和密码(密码是加密后的授权码)
[email protected]
spring.mail.password=zfulnobbgagjbgjf
application-redis.properties内容如下:
# Redis服务器地址,另外注意要开启Redis服务
spring.redis.host=127.0.0.1
# Redis服务器连接端口
spring.redis.port=6379
# Redis服务器连接密码(默认为空)
spring.redis.password=
# 连接池最大连接数(使用负值表示没有限制)
spring.redis.jedis.pool.max-active=8
# 连接池最大阻塞等待时间(使用负值表示没有限制)
spring.redis.jedis.pool.max-wait=-1
# 连接池中的最大空闲连接
spring.redis.jedis.pool.max-idle=8
-
3.前端资源引入,

-
4.后端基础代码引入


10.4 前台管理模块

10.4.1 文章分页展示
-
1.数据访问层实现
实现文章分类展示效果需要同时实现文章查询以及文章统计数据查询,这里先编 写文章类Article和统计类Statistic对应的数据访问方法。
-
(1)创建 Dao层接口文件
在com.itheima下创建dao包,并在该包下使用MyBatis框架分别创建文章类Article和统计类Statistic对应的Mapper接口文件,ArticleMapper.java内容如下:
package com.itheima.dao; import com.itheima.model.domain.Article; import org.apache.ibatis.annotations.*; import java.util.List; @Mapper public interface ArticleMapper { // 根据id查询文章信息 @Select("SELECT * FROM t_article WHERE id=#{id}") public Article selectArticleWithId(Integer id); // 发表文章,同时使用@Options注解获取自动生成的主键id @Insert("INSERT INTO t_article (title,created,modified,tags,categories," + " allow_comment, thumbnail, content)" + " VALUES (#{title},#{created}, #{modified}, #{tags}, #{categories}," + " #{allowComment}, #{thumbnail}, #{content})") @Options(useGeneratedKeys=true, keyProperty="id", keyColumn="id") public Integer publishArticle(Article article); // 文章发分页查询 @Select("SELECT * FROM t_article ORDER BY id DESC") public ListselectArticleWithPage(); // 通过id删除文章 @Delete("DELETE FROM t_article WHERE id=#{id}") public void deleteArticleWithId(int id); // 站点服务统计,统计文章数量 @Select("SELECT COUNT(1) FROM t_article") public Integer countArticle(); // 通过id更新文章 public Integer updateArticleWithId(Article article); }
-

StatisticMapper.java内容如下:

```
package com.itheima.dao;

import com.itheima.model.domain.Article;
import com.itheima.model.domain.Statistic;
import org.apache.ibatis.annotations.*;
import java.util.List;

@Mapper
public interface StatisticMapper {
    // 新增文章对应的统计信息
    @Insert("INSERT INTO t_statistic(article_id,hits,comments_num) values (#{id},0,0)")
    public void addStatistic(Article article);

    // 根据文章id查询点击量和评论量相关信息
    @Select("SELECT * FROM t_statistic WHERE article_id=#{articleId}")
    public Statistic selectStatisticWithArticleId(Integer articleId);

    // 通过文章id更新点击量
    @Update("UPDATE t_statistic SET hits=#{hits} " +
            "WHERE article_id=#{articleId}")
    public void updateArticleHitsWithId(Statistic statistic);

    // 通过文章id更新评论量
    @Update("UPDATE t_statistic SET comments_num=#{commentsNum} " +
            "WHERE article_id=#{articleId}")
    public void updateArticleCommentsWithId(Statistic statistic);

    // 根据文章id删除统计数据
    @Delete("DELETE FROM t_statistic WHERE article_id=#{aid}")
    public void deleteStatisticWithId(int aid);

    // 统计文章热度信息
    @Select("SELECT * FROM t_statistic WHERE hits !='0' " +
            "ORDER BY hits DESC, comments_num DESC")
    public List getStatistic();

    // 统计博客文章总访问量
    @Select("SELECT SUM(hits) FROM t_statistic")
    public long getTotalVisit();

    // 统计博客文章总评论量
    @Select("SELECT SUM(comments_num) FROM t_statistic")
    public long getTotalComment();
}
```
![]()
-
(2)创建MyBatis对应的XML映射文件

在resources类目录下创建名为mapper的包,并在该包创建Article文章类操作对应的XML映射文件,ArticleMapper.xml内容如下:
/*针对ArticleMapper.java中的"updateArticleWithId"方法进行编写*/ update t_article /*根据ID进行修改时,标题不为空时进行修改,为空则保留*/ title = #{title}, created = #{created}, modified = #{modified}, tags = #{tags}, categories = #{categories}, hits = #{hits}, comments_num = #{commentsNum}, allow_comment = #{allowComment}, thumbnail = #{thumbnail}, content = #{content}, -
2.业务处理层实现
-
(1)创建Service层接口文件
在com.itheima下创建service的包,包下创建用于文 章操作的接口类并编写文章相关的分页查询以及文章热度统计的方法,IArticleService.java的内容如下:
package com.itheima.service; import com.github.pagehelper.PageInfo; import com.itheima.model.domain.Article; import java.util.List; public interface IArticleService { // 分页查询文章列表 public PageInfoselectArticleWithPage(Integer page, Integer count); // 统计前10的热度文章信息 public List getHeatArticles(); } -
(2)创建Service层接口实现类文件
在Service包下创建一个impl包,在该包下创建 IArticleService接口文件对应的实现类ArticleServiceImpl.java,并实现接口中的方法。
package com.itheima.service.impl; import com.github.pagehelper.PageHelper; import com.github.pagehelper.PageInfo; import com.itheima.dao.ArticleMapper; import com.itheima.dao.StatisticMapper; import com.itheima.model.domain.Article; import com.itheima.model.domain.Statistic; import com.itheima.service.IArticleService; import org.springframework.beans.factory.annotation.Autowired; import org.springframework.stereotype.Service; import java.util.ArrayList; import java.util.List; @Service @Transactional public class ArticleServiceImpl implements IArticleService { @Autowired private ArticleMapper articleMapper; @Autowired private StatisticMapper statisticMapper; // 分页查询文章列表 @Override public PageInfoselectArticleWithPage(Integer page, Integer count) { PageHelper.startPage(page, count); List articleList = articleMapper.selectArticleWithPage(); // 封装文章统计数据 for (int i = 0; i < articleList.size(); i++) { Article article = articleList.get(i); Statistic statistic = statisticMapper.selectStatisticWithArticleId(article.getId()); article.setHits(statistic.getHits()); article.setCommentsNum(statistic.getCommentsNum()); } PageInfo pageInfo=new PageInfo<>(articleList); return pageInfo; } // 统计前10的热度文章信息 @Override public List getHeatArticles( ) { List list = statisticMapper.getStatistic(); List articlelist=new ArrayList<>(); for (int i = 0; i < list.size(); i++) { Article article = articleMapper.selectArticleWithId(list.get(i).getArticleId()); article.setHits(list.get(i).getHits()); article.setCommentsNum(list.get(i).getCommentsNum()); articlelist.add(article); if(i>=9){ break; } } return articlelist; } }
-
-
3.请求处理层实现
-
(1)com.itheima下创建名为web.client的包用于客户端文章统一管理,在client包下创建博客首页处理类IndexController,并编写文章分页查询和热度统计的方法,IndexController.java内容如下:
package com.itheima.web.client; import com.github.pagehelper.PageInfo; import com.itheima.model.domain.Article; import com.itheima.service.IArticleService; import org.slf4j.Logger; import org.slf4j.LoggerFactory; import org.springframework.beans.factory.annotation.Autowired; import org.springframework.stereotype.Controller; import org.springframework.web.bind.annotation.GetMapping; import org.springframework.web.bind.annotation.PathVariable; import org.springframework.web.bind.annotation.RequestParam; import javax.servlet.http.HttpServletRequest; import java.util.List; @Controller public class IndexController { private static final Logger logger = LoggerFactory.getLogger(IndexController.class); @Autowired private IArticleService articleServiceImpl; // 博客首页,会自动跳转到文章页 @GetMapping(value = "/") private String index(HttpServletRequest request) { return this.index(request, 1, 5); } // 文章页 @GetMapping(value = "/page/{p}") public String index(HttpServletRequest request, @PathVariable("p") int page, @RequestParam(value = "count", defaultValue = "5") int count) { PageInfoarticles = articleServiceImpl.selectArticleWithPage(page, count); // 获取文章热度统计信息 List articleList = articleServiceImpl.getHeatArticles(); request.setAttribute("articles", articles); request.setAttribute("articleList", articleList); logger.info("分页获取文章信息: 页码 "+page+",条数 "+count); return "client/index"; } }
-

- (2)实现自定义拦截器Interceptor

package com.itheima.web.interceptor;

import com.itheima.utils.Commons;
import org.springframework.beans.factory.annotation.Autowired;
import org.springframework.context.annotation.Configuration;
import org.springframework.web.servlet.HandlerInterceptor;
import org.springframework.web.servlet.ModelAndView;
import javax.servlet.http.HttpServletRequest;
import javax.servlet.http.HttpServletResponse;
/**
 * 自定义的Interceptor拦截器类,用于封装请求后的数据类到request域中,供html页面使用
 * 注意:自定义Mvc的Interceptor拦截器类
 *  1、使用@Configuration注解声明
 *  2、自定义注册类将自定义的Interceptor拦截器类进行注册使用
 */
@Configuration
public class BaseInterceptor implements HandlerInterceptor {
    @Autowired
    private Commons commons;

    @Override
    public boolean preHandle(HttpServletRequest request, HttpServletResponse response, Object handler) throws Exception {
        return true;
    }
    @Override
    public void postHandle(HttpServletRequest request, HttpServletResponse response, Object handler, ModelAndView modelAndView) throws Exception {
        // 用户将封装的Commons工具返回页面
        request.setAttribute("commons",commons);
    }
    @Override
    public void afterCompletion(HttpServletRequest request, HttpServletResponse response, Object handler, Exception ex) throws Exception {
    }
}
-
(3)自定义拦截器实现后,还需要通过Spring框架提供的WebMvcConfigur接口类进行注册,在interceptor包下编写WebMvcConfig接口实现类进行自定义拦截器注册,内容如下:
-
package com.itheima.web.interceptor; import org.springframework.beans.factory.annotation.Autowired; import org.springframework.context.annotation.Configuration; import org.springframework.web.servlet.config.annotation.InterceptorRegistry; import org.springframework.web.servlet.config.annotation.WebMvcConfigurer; @Configuration public class WebMvcConfig implements WebMvcConfigurer { @Autowired private BaseInterceptor baseInterceptor; @Override // 重写addInterceptors()方法,注册自定义拦截器 public void addInterceptors(InterceptorRegistry registry) { registry.addInterceptor(baseInterceptor); } } -
4.实现前端页面功能,因为index.html已导入。详情查看导入文件。
-
5.启动项目启动类,可以看到生成的随机密码和访问端口为80,效果如图:

浏览器运行http://localhost/,效果如图:
输入默认用户名user,密码为控制台生成的随机密码,进入首页。效果如图:
可以看到,首页和文章分页均正常!
10.4.2 文章详情查看
-
1.数据访问层实现

package com.itheima.dao; import com.itheima.model.domain.Comment; import org.apache.ibatis.annotations.*; import java.util.List; @Mapper public interface CommentMapper { // 分页展示某个文章的评论 @Select("SELECT * FROM t_comment WHERE article_id=#{aid} ORDER BY id DESC") public ListselectCommentWithPage(Integer aid); // 后台查询最新几条评论 @Select("SELECT * FROM t_comment ORDER BY id DESC") public List selectNewComment(); // 发表评论 @Insert("INSERT INTO t_comment (article_id,created,author,ip,content)" + " VALUES (#{articleId}, #{created},#{author},#{ip},#{content})") public void pushComment(Comment comment); // 站点服务统计,统计评论数量 @Select("SELECT COUNT(1) FROM t_comment") public Integer countComment(); // 通过文章id删除评论信息 @Delete("DELETE FROM t_comment WHERE article_id=#{aid}") public void deleteCommentWithId(Integer aid); } -
2.业务处理层实现
在业务层进行具体的文章详情查询之前,必须理清文章详情查询过程中需要处理的业务,这些业务包括:对文章详情查询并进行Redis缓存管理、查询文章后对文章评论进行查询封装,对文章点击量进行统计更新。
-
(1)编写Service层接口文件
1)在IArticleService.java中添加根据文章id查询单个文章详情,内容如下:
// 根据文章id查询单个文章详情
public Article selectArticleWithId(Integer id);
在service包下创建评论业务处理和博客站点业务处理的Service接口文件。
评论业务处理接口文件"ICommentService.java",内容如下:
package com.itheima.service; import com.github.pagehelper.PageInfo; import com.itheima.model.domain.Comment; public interface ICommentService { // 获取文章下的评论 public PageInfogetComments(Integer aid, int page, int count); } 博客站点业务处理接口文件"ISiteService.java",内容如下:
package com.itheima.service; import com.itheima.model.ResponseData.StaticticsBo; import com.itheima.model.domain.Article; import com.itheima.model.domain.Comment; import java.util.List; public interface ISiteService { // 最新收到的评论 public ListrecentComments(int count); // 最新发表的文章 public List recentArticles(int count); // 获取后台统计数据 public StaticticsBo getStatistics(); // 更新某个文章的统计数据 public void updateStatistics(Article article); }
-

-
(2)编写Service层接口实现类文件
在文章业务层接口实现类ArticleServiceImpl中实现新增的查询文章详情方法,并在文章详情查询的业务实现中嵌入Redis缓存管理。,内容如下:
@Autowired
private RedisTemplate redisTemplate;
// 根据id查询单个文章详情,并使用Redis进行缓存管理
public Article selectArticleWithId(Integer id){
    Article article = null;
    Object o = redisTemplate.opsForValue().get("article_" + id);
    if(o!=null){
        article=(Article)o;
    }else{
        article = articleMapper.selectArticleWithId(id);
        if(article!=null){
            redisTemplate.opsForValue().set("article_" + id,article);
        }
    }
    return article;
}

文件10-17:ICommentService对应的实现类CommentServiceImpl.java的内容如下:
```
package com.itheima.service.impl;

import com.github.pagehelper.PageHelper;
import com.github.pagehelper.PageInfo;
import com.itheima.dao.CommentMapper;
import com.itheima.dao.StatisticMapper;
import com.itheima.model.domain.Comment;
import com.itheima.model.domain.Statistic;
import com.itheima.service.ICommentService;
import org.springframework.beans.factory.annotation.Autowired;
import org.springframework.stereotype.Service;
import org.springframework.transaction.annotation.Transactional;
import java.util.List;


@Service
@Transactional
public class CommentServiceImpl implements ICommentService {
    @Autowired
    private CommentMapper commentMapper;
    @Autowired
    private StatisticMapper statisticMapper;

    // 根据文章id分页查询评论
    @Override
    public PageInfo getComments(Integer aid, int page, int count) {
        PageHelper.startPage(page,count);
        List commentList = commentMapper.selectCommentWithPage(aid);
        PageInfo commentInfo = new PageInfo<>(commentList);
        return commentInfo;
    }
}
```
-
文件10-17:ISiteService对应的实现类SiteServiceImpl.java的内容如下:
package com.itheima.service.impl; import com.github.pagehelper.PageHelper; import com.itheima.dao.ArticleMapper; import com.itheima.dao.CommentMapper; import com.itheima.dao.StatisticMapper; import com.itheima.model.ResponseData.StaticticsBo; import com.itheima.model.domain.Article; import com.itheima.model.domain.Comment; import com.itheima.model.domain.Statistic; import com.itheima.service.ISiteService; import org.springframework.beans.factory.annotation.Autowired; import org.springframework.stereotype.Service; import org.springframework.transaction.annotation.Transactional; import java.util.List; @Service @Transactional public class SiteServiceImpl implements ISiteService { @Autowired private CommentMapper commentMapper; @Autowired private ArticleMapper articleMapper; @Autowired private StatisticMapper statisticMapper; @Override public void updateStatistics(Article article) { Statistic statistic = statisticMapper.selectStatisticWithArticleId(article.getId()); statistic.setHits(statistic.getHits()+1); statisticMapper.updateArticleHitsWithId(statistic); } @Override public ListrecentComments(int limit) { PageHelper.startPage(1, limit>10 || limit<1 ? 10:limit); List byPage = commentMapper.selectNewComment(); return byPage; } @Override public List recentArticles(int limit) { PageHelper.startPage(1, limit>10 || limit<1 ? 10:limit); List list = articleMapper.selectArticleWithPage(); // 封装文章统计数据 for (int i = 0; i < list.size(); i++) { Article article = list.get(i); Statistic statistic = statisticMapper.selectStatisticWithArticleId(article.getId()); article.setHits(statistic.getHits()); article.setCommentsNum(statistic.getCommentsNum()); } return list; } @Override public StaticticsBo getStatistics() { StaticticsBo staticticsBo = new StaticticsBo(); Integer articles = articleMapper.countArticle(); Integer comments = commentMapper.countComment(); staticticsBo.setArticles(articles); staticticsBo.setComments(comments); return staticticsBo; } } -
3.请求处理层实现
打开用户首页请求处理类IndexController,在类中新增用于查询大量文章详情的处理方法,代码如下:@Autowired private ICommentService commentServiceImpl; @Autowired private ISiteService siteServiceImpl; // 文章详情查询 @GetMapping(value = "/article/{id}") public String getArticleById(@PathVariable("id") Integer id, HttpServletRequest request){ Article article = articleServiceImpl.selectArticleWithId(id); if(article!=null){ // 查询封装评论相关数据 getArticleComments(request, article); // 更新文章点击量 siteServiceImpl.updateStatistics(article); request.setAttribute("article",article); return "client/articleDetails"; }else { logger.warn("查询文章详情结果为空,查询文章id: "+id); // 未找到对应文章页面,跳转到提示页 return "comm/error_404"; } } // 查询文章的评论信息,并补充到文章详情里面 private void getArticleComments(HttpServletRequest request, Article article) { if (article.getAllowComment()) { // cp表示评论页码,commentPage String cp = request.getParameter("cp"); cp = StringUtils.isBlank(cp) ? "1" : cp; request.setAttribute("cp", cp); //Comment注意导入domain的包 PageInfocomments = commentServiceImpl.getComments(article.getId(),Integer.parseInt(cp),3); request.setAttribute("cp", cp); request.setAttribute("comments", comments); } }

-
4.实现前端页面功能,这对应的是client目录中的文章详情页面articleDetails.html,进行具体的文章详情获取和展示,具体参看导入的文档,主要通过th:*属性获取并展示了后台查询的文章及评论详情数据,同时在页面底部的“《script》”标签中实现了一个图片缩放功能。
-
5.Redis服务启动与配置

-
6.效果展示
-
1启动项目启动类,用默认用户user和控制台生成的密码进行登录。单击文章名或选择阅读排行榜的一篇文章查看文章详情及对应评论。如图:

-
通过Redis Desktop Manager,可以查看到浏览过的文章已生成缓存。如图:

-
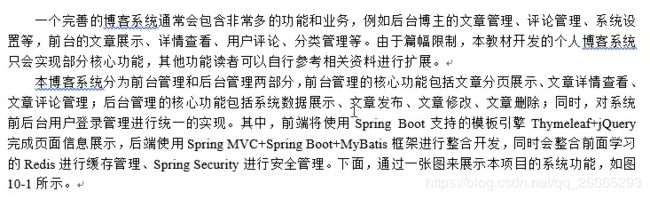
10.4.3 文章评论管理

下面对文章评论发布功能部分进行实现。
-
1.业务处理层实现
在文章详情查看功能实现中,已经附带编写了比较完善的评论类Comment对应的数据库操作Mapper接口文件,这里可以直接从Service业务层开始进行评论管理的具体实现
-
(1)编写Service层接口文件
在评论业务接口文件ICommentService中编 写一个发布文 章评论的方法(前面已添加),代码如下:
// 用户发表评论 public void pushComment(Comment comment); -
(2)编写Service层接口实现类文件
在评论业务层接口实现类CommentServiceImpl中实现新增的评论发布方法,代码如下:
@Autowired
private StatisticMapper statisticMapper;
// 用户发表评论
@Override
public void pushComment(Comment comment){
    commentMapper.pushComment(comment);
    // 更新文章评论数据量
    Statistic statistic = statisticMapper.selectStatisticWithArticleId(comment.getArticleId());
    statistic.setCommentsNum(statistic.getCommentsNum()+1);
    statisticMapper.updateArticleCommentsWithId(statistic);
}
-
![]()
-
2.请求处理层实现
在client包下创建 一个用户评论管理的控制类CommentController.java,并编写相应的请求控制方法:
package com.itheima.web.client; import com.itheima.model.ResponseData.ArticleResponseData; import com.itheima.model.domain.Comment; import com.itheima.service.ICommentService; import com.itheima.utils.MyUtils; import com.vdurmont.emoji.EmojiParser; import org.slf4j.Logger; import org.slf4j.LoggerFactory; import org.springframework.beans.factory.annotation.Autowired; import org.springframework.security.core.context.SecurityContextHolder; import org.springframework.security.core.userdetails.User; import org.springframework.stereotype.Controller; import org.springframework.web.bind.annotation.PostMapping; import org.springframework.web.bind.annotation.RequestMapping; import org.springframework.web.bind.annotation.RequestParam; import org.springframework.web.bind.annotation.ResponseBody; import javax.servlet.http.HttpServletRequest; import java.util.Date; @Controller @RequestMapping("/comments") public class CommentController { private static final Logger logger = LoggerFactory.getLogger(CommentController.class); @Autowired private ICommentService commentServcieImpl; // 发表评论操作 @PostMapping(value = "/publish") @ResponseBody public ArticleResponseData publishComment(HttpServletRequest request,@RequestParam Integer aid, @RequestParam String text) { // 去除js脚本 text = MyUtils.cleanXSS(text); text = EmojiParser.parseToAliases(text); // 获取当前登录用户 User user=(User) SecurityContextHolder.getContext().getAuthentication().getPrincipal(); // 封装评论信息 Comment comments = new Comment(); comments.setArticleId(aid); comments.setIp(request.getRemoteAddr()); comments.setCreated(new Date()); comments.setAuthor(user.getUsername()); comments.setContent(text); try { commentServcieImpl.pushComment(comments); logger.info("发布评论成功,对应文章id: "+aid); return ArticleResponseData.ok(); } catch (Exception e) { logger.error("发布评论失败,对应文章id: "+aid +";错误描述: "+e.getMessage()); return ArticleResponseData.fail(); } } } -
3.实现前端页面功能
文章详情展示页面articleDetails.html中展示了文章的评论页面位置为 client/comments::comments,这里打开client文件夹下的comments.html文件进行具体的评论展示和发布实现。具体代码可查阅导入的文件。
-
4.重启项目进行测试。使用user及控制台提供的密码登陆,查阅第一篇文章进行评论,效果如图

至此,文章评论管理已实现完成。
10.5 后台管理模块
本博客系统中,后台管理模块包括的主要功能有:系统数据展示示、文章发布、文章修改、文章删除以及用户登录控制,下面分别对这些功能进行实现和讲解。
10.5.1 数据展示
这里,我们对博客系统后台首页数据展示功能部分进行实现。
-
1.请求处理层实现


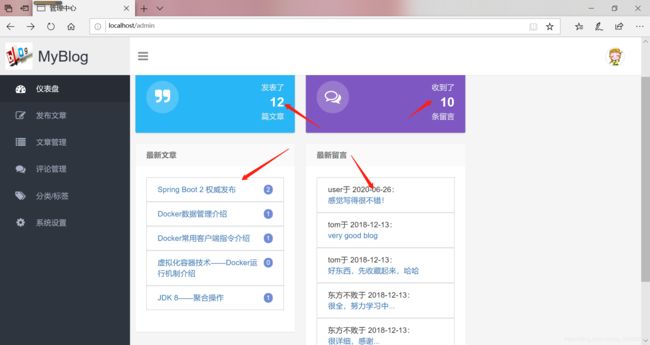
package com.itheima.web.admin; import com.itheima.model.ResponseData.StaticticsBo; import com.itheima.model.domain.Article; import com.itheima.model.domain.Comment; import com.itheima.service.IArticleService; import com.itheima.service.ISiteService; import org.slf4j.Logger; import org.slf4j.LoggerFactory; import org.springframework.beans.factory.annotation.Autowired; import org.springframework.stereotype.Controller; import org.springframework.web.bind.annotation.GetMapping; import org.springframework.web.bind.annotation.RequestMapping; import javax.servlet.http.HttpServletRequest; import java.util.List; @Controller @RequestMapping("/admin") public class AdminController { private static final Logger logger = LoggerFactory.getLogger(AdminController.class); @Autowired private ISiteService siteServiceImpl; @Autowired private IArticleService articleServiceImpl; // 管理中心起始页 @GetMapping(value = {"", "/index"}) public String index(HttpServletRequest request) { // 获取最新的5篇博客、评论以及统计数据 Listarticles = siteServiceImpl.recentArticles(5); List comments = siteServiceImpl.recentComments(5); StaticticsBo staticticsBo = siteServiceImpl.getStatistics(); // 向Request域中存储数据 request.setAttribute("comments", comments); request.setAttribute("articles", articles); request.setAttribute("statistics", staticticsBo); return "back/index"; } } -
2.实现后台前端页面功能,这里使用引入的back/index.html文件。核心内容是使用th:* 相关属性获取后台封装在Request域中的最新文章信息、最新评论信息和相关统计数据,并展示。
-
3.效果展示,使用用户名user和控制台密码登陆后,在首页点击“后台管理”,效果如图:
10.5.2 文章发布

 // 发布文章
    public void publish(Article article);
![]()
 // 发布文章
    @Override
    public void publish(Article article) {
        // 去除表情
        article.setContent(EmojiParser.parseToAliases(article.getContent()));
        article.setCreated(new Date());
        article.setHits(0);
        article.setCommentsNum(0);
        // 插入文章,同时插入文章统计数据
        articleMapper.publishArticle(article);
        statisticMapper.addStatistic(article);
    }

![]()
  // 向文章发表页面跳转
    @GetMapping(value = "/article/toEditPage")
    public String newArticle( ) {
        return "back/article_edit";//跳转页面
    }
    // 发表文章
    @PostMapping(value = "/article/publish")//点击发表会跳转到此路径
    @ResponseBody
    public ArticleResponseData publishArticle(Article article) {
        if (StringUtils.isBlank(article.getCategories())) {
            article.setCategories("默认分类");
        }
        try {
            articleServiceImpl.publish(article);//调用articleServiceImpl.publish()方法来保存文章到数据库
            logger.info("文章发布成功");
            return ArticleResponseData.ok();
        } catch (Exception e) {
            logger.error("文章发布失败,错误信息: "+e.getMessage());
            return ArticleResponseData.fail();
        }
    }
    // 跳转到后台文章列表页面
    @GetMapping(value = "/article")
    public String index(@RequestParam(value = "page", defaultValue = "1") int page,
                        @RequestParam(value = "count", defaultValue = "10") int count,
                        HttpServletRequest request) {
        PageInfo pageInfo = articleServiceImpl.selectArticleWithPage(page, count);
        request.setAttribute("articles", pageInfo);
        return "back/article_list";
    }

我们可以打开导入的文件进行查看。这里不再展示。

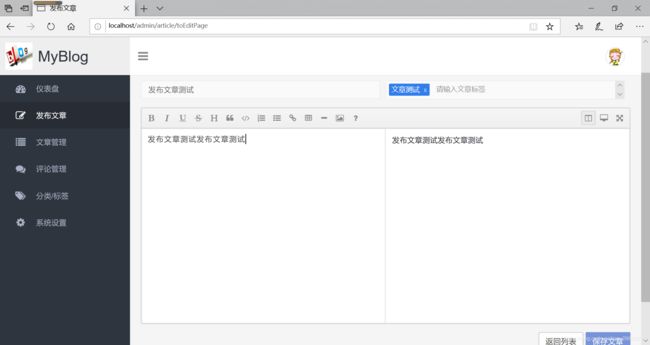
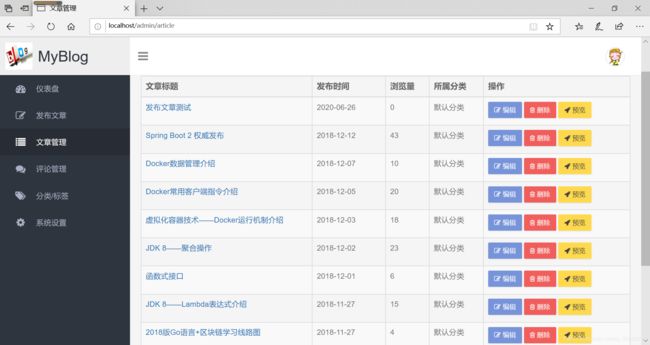
点击保存文章,保存成功后跳转到文章管理。如图:
10.5.3 文章修改

// 根据主键更新文章
public void updateArticleWithId(Article article);
![]()
// 更新文章
@Override
public void updateArticleWithId(Article article) {
    article.setModified(new Date());//获得当前时间用于更新
    articleMapper.updateArticleWithId(article);//针对文章进行更新处理
    redisTemplate.delete("article_" + article.getId());//删除指定ID中的文章缓存信息
}

// 向文章修改页面跳转
@GetMapping(value = "/article/{id}")
public String editArticle(@PathVariable("id") String id, HttpServletRequest request) {
    Article article = articleServiceImpl.selectArticleWithId(Integer.parseInt(id));
    request.setAttribute("contents", article);
    request.setAttribute("categories", article.getCategories());
    return "back/article_edit";
}

// 文章修改处理
@PostMapping(value = "/article/modify")
@ResponseBody
public ArticleResponseData modifyArticle(Article article) {
    try {
        articleServiceImpl.updateArticleWithId(article);
        logger.info("文章更新成功");
        return ArticleResponseData.ok();
    } catch (Exception e) {
        logger.error("文章更新失败,错误信息: "+e.getMessage());
        return ArticleResponseData.fail();
    }
}


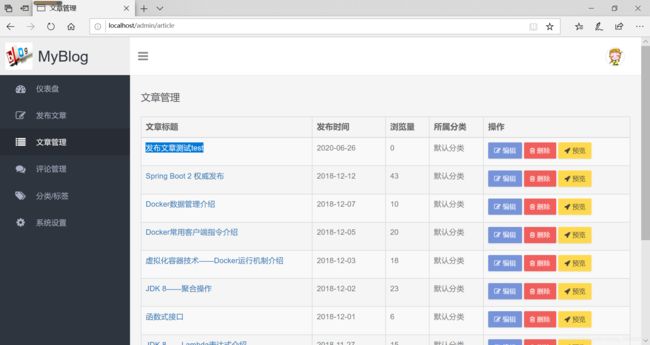
修改文章并保存后,弹 出操作成功提示框,点击“确定’’,会跳转到文章管理页面,并能查看到文章已修改。如图:
10.5.4 文章删除

 // 根据主键删除文章
    public void deleteArticleWithId(int id);
![]()
// 删除文章
@Autowired
private CommentMapper commentMapper;
@Override
public void deleteArticleWithId(int id) {
    // 删除文章的同时,删除对应的缓存
    articleMapper.deleteArticleWithId(id);
    redisTemplate.delete("article_" + id);
    // 同时删除对应文章的统计数据
    statisticMapper.deleteStatisticWithId(id);
    // 同时删除对应文章的评论数据
    commentMapper.deleteCommentWithId(id);
}

 // 文章删除
    @PostMapping(value = "/article/delete")
    @ResponseBody
    public ArticleResponseData delete(@RequestParam int id) {
        try {
            articleServiceImpl.deleteArticleWithId(id);
            logger.info("文章删除成功");
            return ArticleResponseData.ok();
        } catch (Exception e) {
            logger.error("文章删除失败,错误信息: "+e.getMessage());
            return ArticleResponseData.fail();
        }
    }

前端页面我们使用文章管理列表页面(article_list.html)进行文章列表的展示和删除实现。具体代码请查阅引入的文件。


删除后文章管理页面也随之不再显示。
10.6 用户登录控制

package com.itheima.web.client;

import org.springframework.stereotype.Controller;
import org.springframework.web.bind.annotation.GetMapping;
import org.springframework.web.bind.annotation.PathVariable;
import javax.servlet.http.HttpServletRequest;
import java.util.Map;

@Controller
public class LoginController {
    // 向登录页面跳转,同时封装原始页面地址
    @GetMapping(value = "/login")
    public String login(HttpServletRequest request, Map map) {
        // 分别获取请求头和参数url中的原始访问路径
        String referer = request.getHeader("Referer");
        String url = request.getParameter("url");
        System.out.println("referer= "+referer);
        System.out.println("url= "+url);

        // 如果参数url中已经封装了原始页面路径,直接返回该路径
        if (url!=null && !url.equals("")){
            map.put("url",url);
            // 如果请求头本身包含登录,将重定向url设为空,让后台通过用户角色进行选择跳转
        }else if (referer!=null && referer.contains("/login")){
            map.put("url", "");
        }else {
            // 否则的话,就记住请求头中的原始访问路径
            map.put("url", referer);
        }
        return "comm/login";
    }

    // 对Security拦截的无权限访问异常处理路径映射
    @GetMapping(value = "/errorPage/{page}/{code}")
    public String AccessExecptionHandler(@PathVariable("page") String page, @PathVariable("code") String code) {
        return page+"/"+code;
    }
}

登录博客后台
~欢迎登录博客~
用户名或密码错误!
package com.itheima.config;

import org.springframework.beans.factory.annotation.Autowired;
import org.springframework.beans.factory.annotation.Value;
import org.springframework.security.access.AccessDeniedException;
import org.springframework.security.config.annotation.authentication.builders.*;
import org.springframework.security.config.annotation.web.builders.HttpSecurity;
import org.springframework.security.config.annotation.web.configuration.*;
import org.springframework.security.core.Authentication;
import org.springframework.security.core.AuthenticationException;
import org.springframework.security.core.GrantedAuthority;
import org.springframework.security.core.authority.SimpleGrantedAuthority;
import org.springframework.security.crypto.bcrypt.BCryptPasswordEncoder;
import org.springframework.security.web.access.AccessDeniedHandler;
import org.springframework.security.web.authentication.AuthenticationFailureHandler;
import org.springframework.security.web.authentication.AuthenticationSuccessHandler;
import org.springframework.security.web.savedrequest.HttpSessionRequestCache;
import org.springframework.security.web.savedrequest.RequestCache;
import org.springframework.security.web.savedrequest.SavedRequest;

import javax.servlet.RequestDispatcher;
import javax.servlet.ServletException;
import javax.servlet.http.HttpServletRequest;
import javax.servlet.http.HttpServletResponse;
import javax.sql.DataSource;
import java.io.IOException;
import java.net.URL;
import java.util.Collection;

@EnableWebSecurity  // 开启MVC security安全支持
public class SecurityConfig extends WebSecurityConfigurerAdapter {
    @Autowired
    private DataSource dataSource;
    @Value("${COOKIE.VALIDITY}")
    private Integer COOKIE_VALIDITY;

    /**
     * 重写configure(HttpSecurity http)方法,进行用户授权管理
     */
    @Override
    protected void configure(HttpSecurity http) throws Exception {
        // 1、自定义用户访问控制
        http.authorizeRequests()
                .antMatchers("/","/page/**","/article/**","/login").permitAll()
                .antMatchers("/back/**","/assets/**","/user/**","/article_img/**").permitAll()
                .antMatchers("/admin/**").hasRole("admin")
                .anyRequest().authenticated();
        // 2、自定义用户登录控制
        http.formLogin()
                .loginPage("/login")
                .usernameParameter("username").passwordParameter("password")
                .successHandler(new AuthenticationSuccessHandler() {
                    @Override
                    public void onAuthenticationSuccess(HttpServletRequest httpServletRequest,HttpServletResponse httpServletResponse, Authentication authentication) throws IOException, ServletException {
                        String url = httpServletRequest.getParameter("url");
                        // 获取被拦截的原始访问路径
                        RequestCache requestCache = new HttpSessionRequestCache();
                        SavedRequest savedRequest = requestCache.getRequest(httpServletRequest,httpServletResponse);
                        if(savedRequest !=null){
                            // 如果存在原始拦截路径,登录成功后重定向到原始访问路径
                            httpServletResponse.sendRedirect(savedRequest.getRedirectUrl());
                        } else if(url != null && !url.equals("")){
                            // 跳转到之前所在页面
                            URL fullURL = new URL(url);
                            httpServletResponse.sendRedirect(fullURL.getPath());
                        }else {
                            // 直接登录的用户,根据用户角色分别重定向到后台首页和前台首页
                            Collection authorities = authentication.getAuthorities();
                            boolean isAdmin = authorities.contains(new SimpleGrantedAuthority("ROLE_admin"));
                            if(isAdmin){
                                httpServletResponse.sendRedirect("/admin");
                            }else {
                                httpServletResponse.sendRedirect("/");
                            }
                        }
                    }
                })
                // 用户登录失败处理
                .failureHandler(new AuthenticationFailureHandler() {
                    @Override
                    public void onAuthenticationFailure(HttpServletRequest httpServletRequest,HttpServletResponse httpServletResponse, AuthenticationException e) throws IOException, ServletException {
                        // 登录失败后,取出原始页面url并追加在重定向路径上
                        String url = httpServletRequest.getParameter("url");
                        httpServletResponse.sendRedirect("/login?error&url="+url);
                    }
                });
        // 3、设置用户登录后cookie有效期,默认值
        http.rememberMe().alwaysRemember(true).tokenValiditySeconds(COOKIE_VALIDITY);
        // 4、自定义用户退出控制
        http.logout().logoutUrl("/logout").logoutSuccessUrl("/");
        // 5、针对访问无权限页面出现的403页面进行定制处理
        http.exceptionHandling().accessDeniedHandler(new AccessDeniedHandler() {
            @Override
            public void handle(HttpServletRequest httpServletRequest, HttpServletResponse httpServletResponse, AccessDeniedException e) throws IOException, ServletException {
                // 如果是权限访问异常,则进行拦截到指定错误页面
                RequestDispatcher dispatcher = httpServletRequest.getRequestDispatcher("/errorPage/comm/error_403");
                dispatcher.forward(httpServletRequest, httpServletResponse);
            }
        });
    }

    /**
     * 重写configure(AuthenticationManagerBuilder auth)方法,进行自定义用户认证,
     * 此方法在重启项目进行访问时,则只需要输入数据库中已有的用户信息就可以登录认证。
     * @param auth
     * @throws Exception
     */
    @Override
    protected void configure(AuthenticationManagerBuilder auth) throws Exception {
        //  密码需要设置编码器
        BCryptPasswordEncoder encoder = new BCryptPasswordEncoder();
        //  使用JDBC进行身份认证
        String userSQL ="select username,password,valid from t_user where username = ?";
        String authoritySQL ="select u.username,a.authority from t_user u,t_authority a," +
                             "t_user_authority ua where ua.user_id=u.id " +
                             "and ua.authority_id=a.id and u.username =?";
        auth.jdbcAuthentication().passwordEncoder(encoder)
                .dataSource(dataSource)
                .usersByUsernameQuery(userSQL)
                .authoritiesByUsernameQuery(authoritySQL);
    }
}
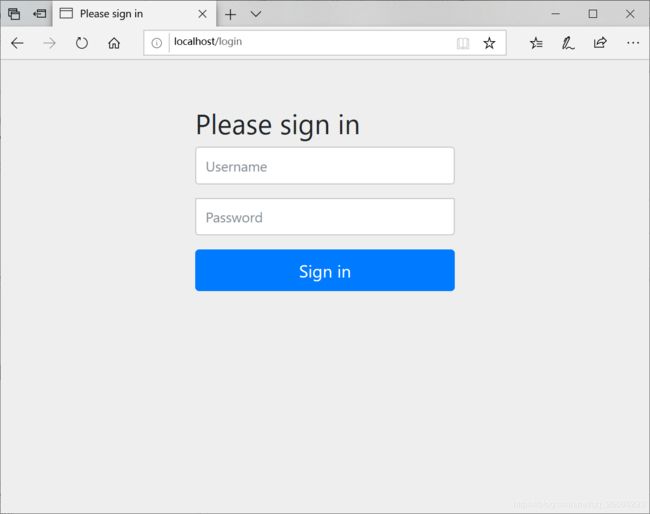
重启项目启动类,浏览器访问首页:http://localhost,不再被拦截,效果如图:
点击登录,效果如图:
用数据库中的用户名admin和密码:123456登录,效果 如图:
至此,完成用户登陆功能设计。
10.7 定时邮件发送

package com.itheima.utils;

import org.springframework.beans.factory.annotation.Autowired;
import org.springframework.beans.factory.annotation.Value;
import org.springframework.mail.SimpleMailMessage;
import org.springframework.mail.javamail.JavaMailSenderImpl;
import org.springframework.stereotype.Component;
/**
 * @Classname MailUtils
 * @Description 邮件发送工具类
 */
@Component
public class MailUtils {
    @Autowired
    private JavaMailSenderImpl mailSender;
    @Value("${spring.mail.username}")
    private String mailfrom;

    // 发送简单邮件
    public void sendSimpleEmail(String mailto, String title, String content) {
        //  定制邮件发送内容
        SimpleMailMessage message = new SimpleMailMessage();
        message.setFrom(mailfrom);
        message.setTo(mailto);
        message.setSubject(title);
        message.setText(content);
        // 发送邮件
        mailSender.send(message);
    }
}

package com.itheima.web.scheduletask;

import com.itheima.dao.StatisticMapper;
import com.itheima.utils.MailUtils;
import org.springframework.beans.factory.annotation.Autowired;
import org.springframework.beans.factory.annotation.Value;
import org.springframework.scheduling.annotation.Scheduled;
import org.springframework.stereotype.Component;
/**
 * @Classname ScheduleTask
 * @Description 定时任务管理
 */
@Component
public class ScheduleTask {
    @Autowired
    private StatisticMapper statisticMapper;
    @Autowired
    private MailUtils mailUtils;
    @Value("${spring.mail.username}")
    private String mailto;

    /**
     * 定时邮件发送任务,每月1日中午12点整发送邮件
     */
    @Scheduled(cron = "0 0 12 1 * ?")
//    @Scheduled(cron = "0 */3 * * * ? ")
    public void sendEmail(){
        //  定制邮件内容
        long totalvisit = statisticMapper.getTotalVisit();
        long totalComment = statisticMapper.getTotalComment();
        StringBuffer content = new StringBuffer();
        content.append("博客系统总访问量为:"+totalvisit+"人次").append("\n");
        content.append("博客系统总评论量为:"+totalComment+"人次").append("\n");
        mailUtils.sendSimpleEmail(mailto,"个人博客系统流量统计情况",content.toString());
    }
}

@EnableScheduling
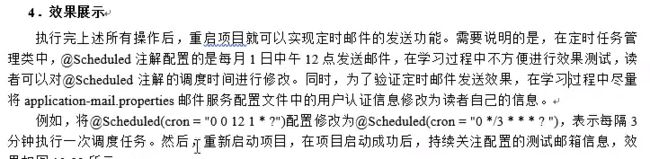
果如图:

至此,个人博客系统完成。