OpenCV图像处理教程C++(十四)卷积算子、自定义线性滤波以及边缘处理
卷积概念:
卷积是图像处理中一个操作,是kernel在图像的每个像素上的操作。
Kernel本质上一个固定大小的矩阵数组,其中心点称为锚点(anchor point)
卷积如何工作:
把kernel放到像素数组之上,求锚点周围覆盖的像素乘积之和(包括锚点),用来替换锚点覆盖下像素点值称为卷积处理。
Sum = 8x1+6x1+6x1+2x1+8x1+6x1+2x1+2x1+8x1
New pixel = sum / (m*n) 每个卷积和都要除以kernel的尺寸
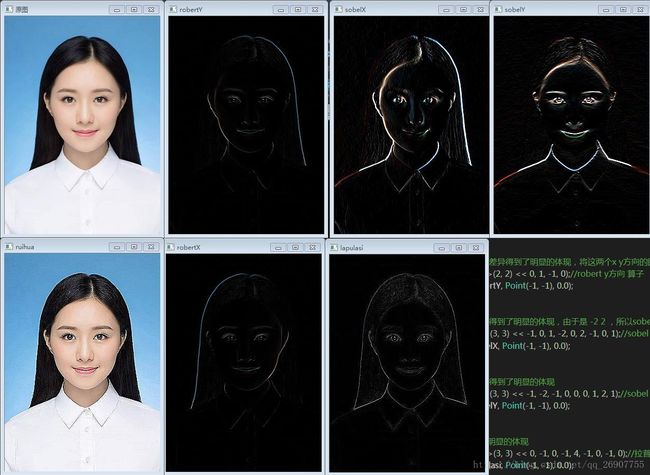
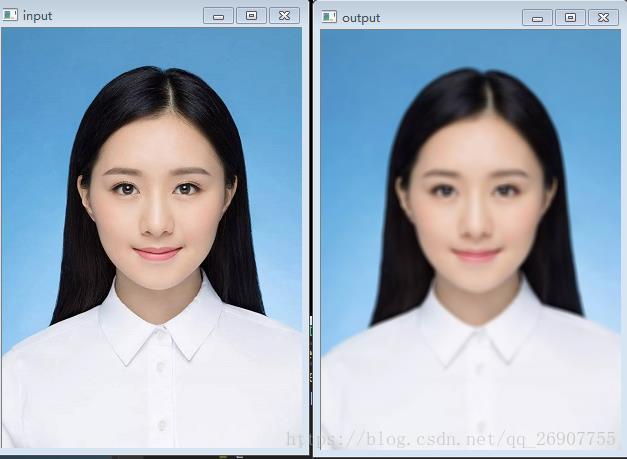
卷积的作用:模糊图像,提取边缘,进行图像的锐化
卷积和常称为(卷积)算子,常见算子:
Robert算子:
┌ +1 0 ┐ ┌ 0 +1 ┐ 也可以用来寻找梯度,寻找边缘 主对角线与副对角线上的梯度
└ 0 -1 ┘ └ -1 0 ┘
Sobel算子 :
┌ -1 0 1 ┐ ┌ -1 -2 -1 ┐ 也可以用来寻找梯度,寻找边缘 水平与垂直方向的度
│ -2 0 2 │ │ 0 0 0 │
└ -1 0 1 ┘ └ 1 2 1 ┘
拉普拉斯算子:
┌ 0 -1 0 ┐ 用来寻找梯度,寻找边缘整个的梯度,整体轮廓
│ -1 4 -1 │
└ 0 -1 0 ┘
代码:
#include
#include
using namespace cv;
using namespace std;
int main()
{
Mat src, dst1, dst2, dst3, dst4, dst5, dst6;
src = imread("C:\\Users\\Administrator\\Desktop\\pic\\z2.jpg");
imshow("原图", src);
//图像在主对角线(x)方向的差异得到了明显的体现,这些差异就像图像的边缘一样
Mat robertX = (Mat_<int>(2, 2) << 1, 0, 0, -1);//robert x方向 算子 前两个参数表示卷积的第一行
filter2D(src, dst1, -1, robertX, Point(-1, -1), 0.0);//计算卷积和,参数delta 表示计算出来的像素+delta, -1一般固定
imshow("robertX", dst1);
//图像在副对角线(y)方向的差异得到了明显的体现,将这两个x y方向的图像合起来,就能得到图像的轮廓
Mat robertY = (Mat_<int>(2, 2) << 0, 1, -1, 0);//robert y方向 算子
filter2D(src, dst2, -1, robertY, Point(-1, -1), 0.0);
imshow("robertY", dst2);
//图像在左右(x)方向的差异得到了明显的体现,由于是 -2 2 ,所以sobel比robert算子差异体现的更大
Mat sobelX = (Mat_<int>(3, 3) << -1, 0, 1, -2, 0, 2, -1, 0, 1);//sobel x方向 算子
filter2D(src, dst3, -1, sobelX, Point(-1, -1), 0.0);
imshow("sobelX", dst3);
//图像在上下(y)方向的差异得到了明显的体现
Mat sobelY = (Mat_<int>(3, 3) << -1, -2, -1, 0, 0, 0, 1, 2, 1);//sobel y方向 算子
filter2D(src, dst4, -1, sobelY, Point(-1, -1), 0.0);
imshow("sobelY", dst4);
//图像整体上的差异得到了明显的体现
Mat lapulasi = (Mat_<int>(3, 3) << 0, -1, 0, -1, 4, -1, 0, -1, 0);//拉普拉斯 算子
filter2D(src, dst5, -1, lapulasi, Point(-1, -1), 0.0);
imshow("lapulasi", dst5);
//图像锐化,仅仅只是将拉普拉斯算子的中心点 由4改成5,卷积后的图像结果差距巨大。。
Mat ruihua = (Mat_<int>(3, 3) << 0, -1, 0, -1, 5, -1, 0, -1, 0);//锐化 算子 (掩膜)
filter2D(src, dst6, -1, ruihua, Point(-1, -1), 0.0);
imshow("ruihua", dst6);
waitKey(0);
}自定义卷积模糊操作:
#include
#include
using namespace cv;
using namespace std;
int main() {
Mat src, dst;
src = imread("C:\\Users\\Administrator\\Desktop\\pic\\z2.jpg");
imshow("input", src);
int ksize = 3;
int index = 0;
int c = 0;
while (true) {
c = waitKey(500);
if ((char)c == 27) {//esc
break;
}
ksize = 4 + (index % 8) * 2 + 1;
Mat kernel = Mat::ones(Size(ksize, ksize), CV_32F) / (float)(ksize*ksize);
filter2D(src, dst, -1, kernel);
index++;
imshow("output", dst);
}
}卷积边缘问题:
图像卷积的时候边界像素,不能被卷积操作,原因在于边界像素没有完全跟kernel重叠,
所以当3x3滤波时候有1个像素的边缘没有被处理,5x5滤波的时候有2个像素的边缘没有被处理。
处理边缘过程:
在卷积开始之前增加边缘像素,填充的像素值为0或者RGB黑色,比如3x3在四周各填充1个像素的边缘,这样就确保图像的边缘被处理,在卷积处理之后再去掉这些边缘。
openCV中默认的处理方法是: BORDER_DEFAULT,此外常用的还有如下几种:
- BORDER_CONSTANT – 填充边缘用指定像素值
- BORDER_REPLICATE – 填充边缘像素用已知的边缘像素值。(插值,双线性插值?)
- BORDER_WRAP – 用另外一边的像素来补偿填充
- BORDER_DEFAULT - 用倒影的方式填充
给图像添加边缘API
copyMakeBorder(
     Mat src, // 输入图像
     Mat dst, // 添加边缘图像
     int top, // 边缘长度,一般上下左右都取相同值,
     int bottom,
     int left,
     int right,
     int borderType // 边缘类型
     Scalar value // 边缘类型为 BORDER_CONSTANT 时,有效
    )
代码:
#include
#include
using namespace cv;
using namespace std;
int main() {
Mat src, dst;
src = imread("C:\\Users\\Administrator\\Desktop\\pic\\5.jpg");
imshow("input", src);
int top = (int)(0.05*src.rows);
int bottom = (int)(0.05*src.rows);
int left = (int)(0.05*src.cols);
int right =(int)( 0.05*src.cols);
int c = 0;
int borderType = BORDER_DEFAULT;
RNG rng(12345);
while (true) {
c = waitKey(500);
if ((char)c == 27) {
break;
}
if ((char)c == 'r') {
borderType = BORDER_REFLECT;
}
else if ((char)c == 'w') {
borderType = BORDER_WRAP;
}
else if ((char)c == 'c') {
borderType = BORDER_CONSTANT;
}
Scalar color = Scalar(rng.uniform(0, 255), rng.uniform(0, 255), rng.uniform(0, 255));
copyMakeBorder(src, dst, top, bottom, left, right, borderType, color);
imshow("output", dst);
}
}

