前言
组件化是前端生产力提升的另一大变革,之前jq时代大家都是一份代码复制来复制去,对代码复用性和可维护性非常不友好。现在MV*框架全部是支持组件的,只不过使用上略有区别。
Component
首先,让我们注册一个具有template、props和自定义事件的组件:
Moon.component("my-component", {
// options
template: `This is a Component {{content}} 计数器{{count}}!
`,
props: ['content'],
data: function() {
return {
count: 0
}
},
methods: {
increment: function() {
this.set("count", this.get("count") + 1);
this.emit("increment");
}
}
});
它是一个计数器组件,拥有content这个从父组件传来的prop,也有increment这个事件可以发射到父组件以便相互通信。
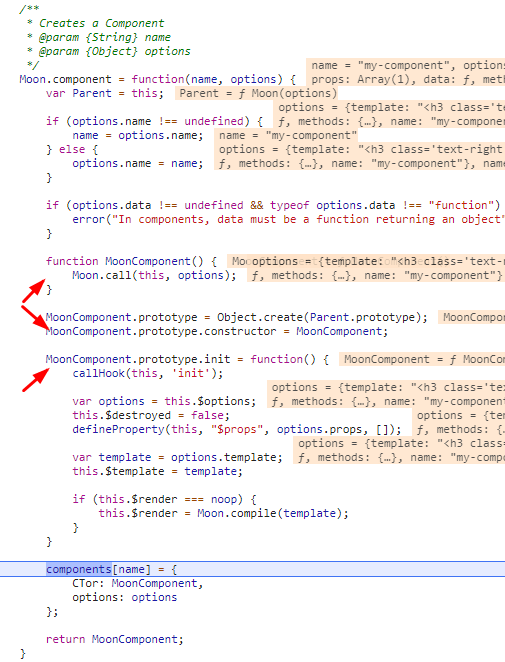
让我们打个断点看看里面发生了什么:
可以看出,我们传了name和options两个参数用于注册组件。首先,初始化了组件的options,然后让MoonComponent继承Moon,并重写了init方法(主要是为了处理props数据)。
之后把MoonComponent和options挂载到全局的components[name]上,返回MoonComponent构造函数。
html->code过程与组件
组件既然是继承自Moon实例,自然也少不了html->tokens->ast->code->vnode->node->html的过程。拿我们这个例子来说也是一样:
这段html自然也会先被转成code。只不过组件对于编译过程中来说暂时还没有什么特别的。
code->html与组件
组件html被稀里糊涂转成code了,之后解析code的过程就变得麻烦许多。
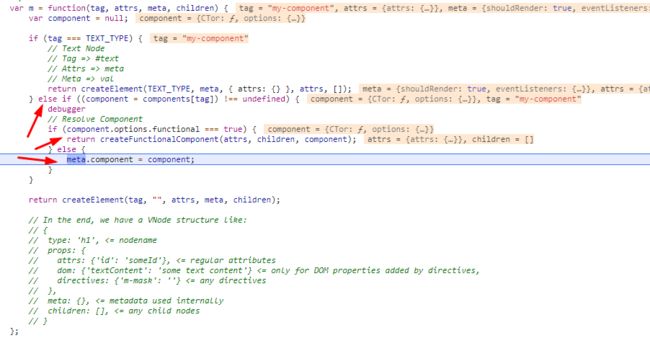
第一个与之相遇的就是m函数:
可见它会先判断此组件是否是函数式组件,是的话就按函数式的方法返回一段函数式组件vnode,不是的话先挂载到meta上去再创建vnode。
函数式组件
函数式组件没有任何状态,也没有生命周期方法。它只是一个接收参数的函数。创建函数式组件的代码其实很好懂:
var createFunctionalComponent = function(props, children, functionalComponent) {
    var options = functionalComponent.options;
    var attrs = props.attrs;
    var data = options.data;

    if (data === undefined) {
        data = {};
    }

    // Merge data with provided props
    var propNames = options.props;
    if (propNames === undefined) {
        data = attrs;
    } else {
        for (var i = 0; i < propNames.length; i++) {
            var prop = propNames[i];
            data[prop] = attrs[prop];
        }
    }

    // Call render function
    return functionalComponent.options.render(m, {
        data: data,
        slots: getSlots(children)
    });
}
它其实就是将一个拥有attrs(props会被合并进去)和data的组件直接render,至于slot,我们稍后再讲。
createComponentFromVNode
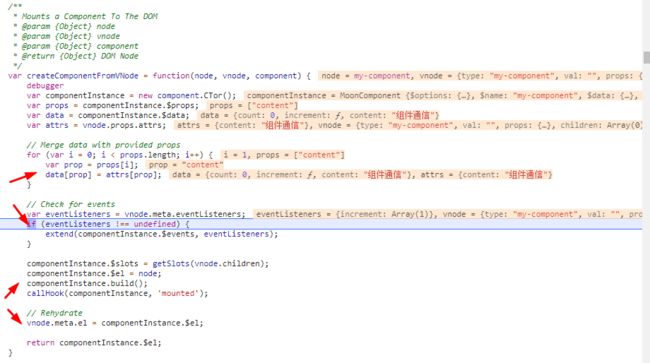
它区别于createNodeFromVNode,专门用于产生组件vnode的node:
可以看出,它分四步走:
- 合并prop到data属性上去
- 扩展vnode的事件监听到组件实例上去
- 获取slot和实际挂载元素并build产生node
- 混入vnode和node然后返回实际node
appendChild/removeChild/replaceChild
在这期间它可能还会遇见一些vnode层面上的增/删/替操作:
// appendChild Check for Component
var component = null;
if ((component = vnode.meta.component) !== undefined) {
    createComponentFromVNode(node, vnode, component);
}

// removeChild Check for Component
var componentInstance = null;
if ((componentInstance = node.__moon__) !== undefined) {
    // Component was unmounted, destroy it here
    componentInstance.destroy();
}

// Check for Component
var componentInstance = null;
if ((componentInstance = oldNode.__moon__) !== undefined) {
    // Component was unmounted, destroy it here
    componentInstance.destroy();
}
// Replace It
parent.replaceChild(newNode, oldNode);
// replaceChild Check for Component
var component = null;
if ((component = vnode.meta.component) !== undefined) {
    createComponentFromVNode(newNode, vnode, component);
}
增的情况最简单,如果有组件就创建一个组件的node,删的情况则是有组件就销毁掉。替的话则是结合了增和删的情况,先删后增。
hydrate
在build->patch的最后几步,还会遇到hydrate里处理组件的代码:
// Check for Component
if (vnode.meta.component !== undefined) {
    // Diff the Component
    diffComponent(node, vnode);

    // Skip diffing any children
    return node;
}
也就是diff组件
diffComponent
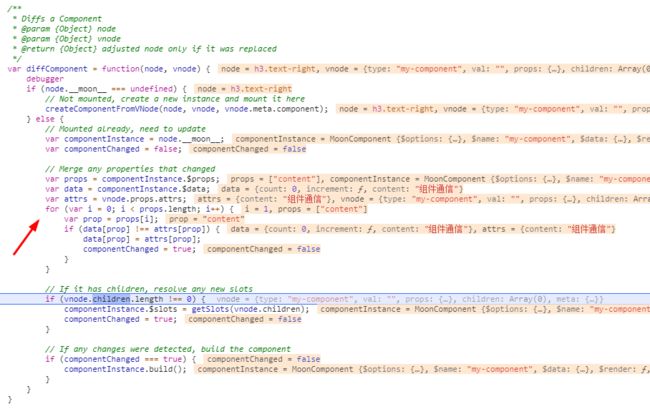
diff组件做的事情也很简单:
若当前node没有被挂载,直接创建一个node。否则获取当前组件实例,对node的props和vnode的attrs进行diff,diff成功就标记componentChanged标志位为真并在最后build一次这个实例。
还有一件事情要处理:如果vnode还有子元素,就要给组件实例加上slot。
slot与getSlots
slot是组件内嵌的元素,思想来源于shadow dom
Moon中关于slot的关键函数式getSlots:
var getSlots = function(children) {
    var slots = {};

    // Setup default slots
    var defaultSlotName = "default";
    slots[defaultSlotName] = [];

    // No Children Means No Slots
    if (children.length === 0) {
        return slots;
    }

    // Get rest of the slots
    for (var i = 0; i < children.length; i++) {
        var child = children[i];
        var childProps = child.props.attrs;
        var slotName = "";
        var slotValue = null;

        if ((slotName = childProps.slot) !== undefined) {
            slotValue = slots[slotName];
            if (slotValue === undefined) {
                slots[slotName] = [child];
            } else {
                slotValue.push(child);
            }
            delete childProps.slot;
        } else {
            slots[defaultSlotName].push(child);
        }
    }

    return slots;
}
可以发现它传入的是children参数,先会建立一个默认的slots,然后从children里取每个child,如果slot是不是具名slot就放进默认slot里。
getSlots使用处
- createFunctionalComponent
return functionalComponent.options.render(m, {
    data: data,
    slots: getSlots(children)
});
创建函数式组件的时候slot会被提取出来放到创建组件的options里去。
- createComponentFromVNode
componentInstance.$slots = getSlots(vnode.children);
类似创建函数式组件,创建实例组件也是把slot提取出来挂载到实例的$slots属性上。
- diffComponent
// If it has children, resolve any new slots
if (vnode.children.length !== 0) {
    componentInstance.$slots = getSlots(vnode.children);
    componentChanged = true;
}
diff的过程中也会修改组件实例,可以发现与createComponentFromVNode类似,是把slot提取出来挂载到实例的$slots属性上。
- generateNode
else if (node.type === "slot") {
    parent.meta.shouldRender = true;
    parent.deep = true;

    var slotName = node.props.name;
    return ("instance.$slots[\"" + (slotName === undefined ? "default" : slotName.value) + "\"]");
}
generate的过程中也会处理slot,处理方式自然是把它变成code了。
总结
组件化对我们前端开发工程化、提高代码复用性和可维护性起到了革命式的作用,从此各种UI组件库如雨后春笋似的冒了出来,对我们前端解放生产力来说是非常大的一个进步。相信有一天,HTML5会支持原生定义组件和Slot。


