阻塞队列(ArrayBlockingQueue) 迭代器源码分析
文章目录
- 为什么 ArrayBlockingQueue 迭代器复杂呢?
- 提出几个 ArrayBlockingQueue 迭代器的问题用于下面代码分析时进行思考
- Itrs
- Itr
- 1.重要变量
- 2. 构造方法
- 3. doSomeSweeping - 清除迭代器链
- 4. 迭代操作 hasNext 与 next
- 4.1 hasNext
- 4.2 next
- 5. incorporateDequeues
- 6. Itr#remove
- 7.ArrayBlockingQueue#removeAt
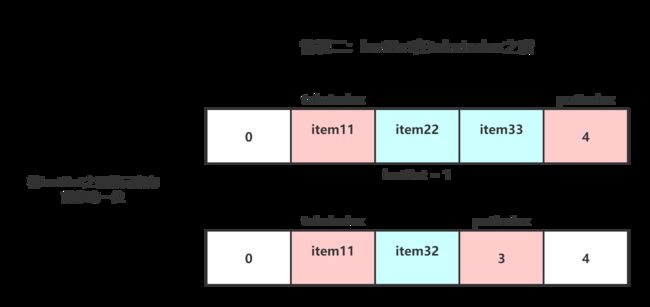
- 7.1 情况一
- 7.2 情况二
在看到 ArrayBlockingQueue 迭代器时感觉比之前看到的迭代器实现都要复杂,所有就专门提出来说一说。
ArrayBlockingQueue 迭代器与 ConcurrentHashMap 迭代器类似都是一种“弱一致性”迭代器,在遍历数组时修改数组并不会抛出 ConcurrentModificationException 异常。
为什么 ArrayBlockingQueue 迭代器复杂呢?
ArrayBlockingQueue 是由数组实现的有界队列,难就难在它是有界队列并且还要保证元素的顺序。使用数组实现有界队列,就只能使用记录队头、队尾索引的方式来实现一个循环队列。
在 ArrayBlockingQueue 中使用takeIndex记录队头索引、putIndex记录队尾索引用来操作队列。
/** items index for next take, poll, peek or remove */
int takeIndex;

/** items index for next put, offer, or add */
int putIndex;
迭代器中需要使用到takeIndex,因为从队头向队尾遍历才能最大程度的保证遍历的一致性(可以遍历到创建迭代器之后添加到队列中的元素)。
提出几个 ArrayBlockingQueue 迭代器的问题用于下面代码分析时进行思考
- 怎样记录迭代器的遍历状态
- 如何判断迭代器当前状态是否有效
- 在迭代器创建完成之后并未立即使用,在多次入、出队操作或删除元素之后,迭代器会做如何处理
- 如果迭代器没有失效会怎么处理
- 如果迭代器失效了会怎么处理
Itrs
在 ArrayBlockingQueue 中使用 Itrs 维护这一个 Itr 链表,用于在一个队列下的多个 Itr 迭代器中共享队列元素,保证多个迭代器中的元素数据的一致性。
虽然 Itrs 这个设计增加了维护上的复杂性,但是为了保证迭代器在删除元素时,各个迭代器中能够保持一致,这个 Itrs 的设计时有必要的。Itrs 通过
- 跟踪 takeIndex 循环到 0 的次数。提供 takeIndexWrapped 方法,当 takeIndex 循环到 0 时,清除过期迭代。
- 提供 removedAt,通知所有的迭代器执行 removedAt 来保证所有的 Itr 迭代器数据保持一致。
以上的两项操作应当能够保证 Itr 迭代器间的一致性,但是增加了许多其他的操作来维护这些 Itr 迭代器。Itrs 通过一个链表和弱引用来维护 Itr 迭代器,并通过一下三种方式清空 Itr 迭代器:
- 当创建 Itr 迭代器时,检查链表中的 Itr 迭代器是否过期。
- 当 takeIndex 循环到 0 时,检查超过一次循环,但是从未被使用的迭代器。
- 如果队列被清空,那么所有的 Itr 迭代器都会被通知数据作废。
所以为了保证正确性,removedAt、shutdown 和 takeIndexWrapped 方法都做检查 Itr 迭代器是否过期的操作。如果元素都过期,GC 。如果决定迭代器作废或者迭代器通知自己过期,那么这些过期的元素会被清除。这个操作不需要做额外的其他操作就可完成。
Itr
当调用 iterator() 方法时,创建迭代器对象 Itr
public Iterator<E> iterator() {
   return new Itr();
}
1.重要变量
这些变量记录着迭代器的遍历状态非常重要,在每次调用next()都会去修正这些变量以维护迭代器的遍历状态。
/** Index to look for new nextItem; NONE at end */
private int cursor;

/** Element to be returned by next call to next(); null if none */
private E nextItem;

/** Index of nextItem; NONE if none, REMOVED if removed elsewhere */
private int nextIndex;
nextItem:调用next()方法的返回值
nextIndex:nextItem对象的索引
cursor:nextIndex的下一个位置的索引
在不断调用next()方法获取元素的过程中,这三个变量以两个在前一个在后向后移动着。
/** Last element returned; null if none or not detached. */
private E lastItem;

/** Index of lastItem, NONE if none, REMOVED if removed elsewhere */
private int lastRet;
lastItem:上一次返回的元素
lastRet:lastItem的索引
需要注意:lastRet、nextIndex、cursor 这三个变量是判断迭代器是否失效的主要依据(满足 cursor < 0 && nextIndex < 0 && lastRet < 0 时代表迭代器失效)
/** Previous value of takeIndex, or DETACHED when detached */
private int prevTakeIndex;

/** Previous value of iters.cycles */
private int prevCycles;
prevTakeIndex :代表本次遍历开始的索引,每此 next 都会进行修正
prevCycles :Itrs 管理 Itr 链,它里面有个变量 cycles 记录 takeIndex 回到 0 位置的次数,迭代器的 prevCycles 存储该值
需要注意:这两个变量存储的值可能过时(在创建迭代器之后未立即使用,而对数组进行了修改),迭代器多处操作前都会通过这两个值来判断数据是否过时,以做相应的处理。
/** Special index value indicating "not available" or "undefined" */
private static final int NONE = -1;

/**
 * Special index value indicating "removed elsewhere", that is,
 * removed by some operation other than a call to this.remove().
 */
private static final int REMOVED = -2;

/** Special value for prevTakeIndex indicating "detached mode" */
private static final int DETACHED = -3;
DETACHED:专门用于prevTakeIndex ,isDetached方法通过其来判断迭代器状态是否失效
NONE:用于三个下标变量:cursor,nextIndex,lastRet;这三个下标变量用于迭代功能的实现。表明该位置数据不可用或未定义
REMOVED:用于lastRet 与 nextIndex。表明数据过时或被删除
2. 构造方法
在构造方法中对迭代器中的变量进行初始化
Itr() {
    // assert lock.getHoldCount() == 0;
    lastRet = NONE;
    final ReentrantLock lock = ArrayBlockingQueue.this.lock;
    // 在创建迭代器过程加锁,防止队列改变导致初始化错误
    lock.lock();
    try {
    	// 如果队列为空
        if (count == 0) {
            // assert itrs == null;
            // 迭代器为DETACHED模式 - 失效状态
            cursor = NONE;
            nextIndex = NONE;
            prevTakeIndex = DETACHED;
        } else {
            final int takeIndex = ArrayBlockingQueue.this.takeIndex;
            // 初始化遍历起始索引prevTakeIndex为队头索引takeIndex
            prevTakeIndex = takeIndex;
            // 下一个遍历元素nextItem为队头元素itemAt(takeIndex)
            // nextIndex为nextItem的索引
            nextItem = itemAt(nextIndex = takeIndex);
            // 获取nextIndex下一个元素的索引
            cursor = incCursor(takeIndex);
            // 如果itrs为null,就初始化;
            if (itrs == null) {
                itrs = new Itrs(this);
            }
			// 否则将当前迭代器注册到itrs中,并清理失效迭代器
			else {
                itrs.register(this); // in this order
                itrs.doSomeSweeping(false);
            }
            // 当前迭代器记录最新的轮数
            prevCycles = itrs.cycles;
            // assert takeIndex >= 0;
            // assert prevTakeIndex == takeIndex;
            // assert nextIndex >= 0;
            // assert nextItem != null;
        }
    } finally {
        lock.unlock();
    }
}
下面用一张存在元素的队列的示意图来展示一下初始过程各变量的状态:
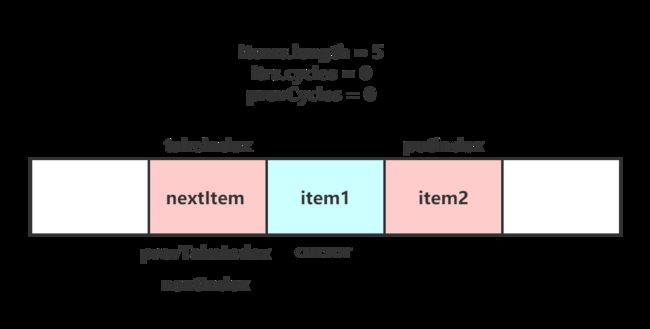
关于 cursor 的增加操作:
private int incCursor(int index) {
    // assert lock.getHoldCount() == 1;
    if (++index == items.length)
        index = 0;
    // index == putIndex:标志着迭代结束
    if (index == putIndex)
        index = NONE;
    return index;
}
当遍历到 putIndex ,代表数据遍历结束,应该终止迭代,将 cursor 置为 NONE 标识,cursor 置为 NONE 后会引起迭代器的终止,逻辑在 next 与 hasNext 方法中。
3. doSomeSweeping - 清除迭代器链
doSomeSweeping方法不是在调用之后并非一次将整个链表探测一遍,而是根据传入参数boolean tryHarder来选择探测范围是4或16,若在范围内未探测到无效迭代器则结束,若是探测到则扩大探测范围,将范围恢复为16,继续往下探测。
Itrs 中的三个相关变量
//记录上次探测的结束位置节点,下次从此开始往后探测。
private Node sweeper = null;
// 探测范围
private static final int SHORT_SWEEP_PROBES = 4;
private static final int LONG_SWEEP_PROBES = 16;
doSomeSweeping将清除迭代器链中无效的迭代器结点:
- 结点持有的
Itr对象为空,说明被GC回收,说明使用线程完成迭代 - 迭代器
Itr为 DETACHED 模式,对于迭代结束或数据过时的迭代器会被置于 DETACHED 模式
void doSomeSweeping(boolean tryHarder) {
    // assert lock.getHoldCount() == 1;
    // assert head != null;
	// tryHarder 为true则 probes 为 16,否则为 4
	// probes 代表本次的探测长度
    int probes = tryHarder ? LONG_SWEEP_PROBES : SHORT_SWEEP_PROBES;
    // o 代表 p 的前一个节点,用于链表中节点的删除
    Node o, p;
    // 它代表了一次探测中到达的最后一个节点
    final Node sweeper = this.sweeper;
    /**
     * passedGo:限制一次遍历
     * 	若从头开始遍历,passedGo设为true,
     * 		如果当前结点为null且probes>0可以直接break
     * 	若从中开始遍历,passedGo设为false,
     * 		如果当前结点为null且probes>0就会转回到头部继续遍历
     */
    boolean passedGo;
    if (sweeper == null) {
        o = null;
        p = head;
        passedGo = true;
    // 从上一个线程的终止位置开始向后探测,passedGo = false
    } else {
        o = sweeper;
        p = o.next;
        passedGo = false;
    }
    for (; probes > 0; probes--) {
    	// 如果遇到结点为空说明遍历到了链表尾
    	// 就需要根据passedGo判断是否继续探测
        if (p == null) {
        	// passedGo 为true,从链表头开始探测,那就不需要继续探测,直接break
            if (passedGo)
                break;
            // passedGo 为false,说明本次遍历是从中间某位置开始,
            // 也就是说链表前面有一段是未遍历的,
            // 遍历到了尾部需要转回到头部继续遍历
            o = null;
            p = head;
            passedGo = true;
        }
        // 获取当前结点的迭代器
        final Itr it = p.get();
        final Node next = p.next;
        // 1.节点持有的迭代器对象为null
        // 2.数组为空或数据过时导致的DETACHED模式
        //	删除此节点
        if (it == null || it.isDetached()) {
            /**
             * 当发现了一个被抛弃或过时的迭代器,
             * 则将探测范围probes变为16,相当于延长探测范围。
             * 这样做的目的:
             * 		1.减少该方法持有锁的时间(在当前探测范围没有失效结点就退出)
             * 		2.保证清理迭代器的高效(当发现存在失效迭代器,就扩大范围)
             */
            probes = LONG_SWEEP_PROBES; // "try harder"
            // unlink p
            p.clear();
            p.next = null;
            // 从链表头开始探测,在上面初始化时(o=null)或从链表尾转到链表头探测
            if (o == null) {
                head = next;
                if (next == null) {
                    // We've run out of iterators to track; retire
                    itrs = null;
                    return;
                }
            }
            else
                o.next = next;
        } else {
            o = p;
        }
        p = next;
    }
	// 记录本次遍历结束位置节点
    this.sweeper = (p == null) ? null : o;
}
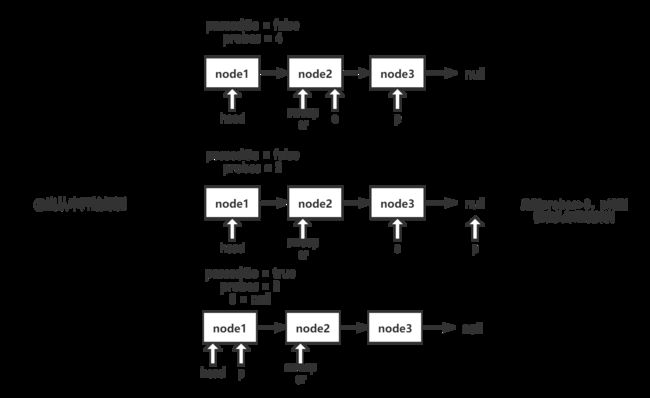
下面用示意图来展示在清理迭代器时遇到的情况:
情况一:链表中只有一个结点并且sweeper为null进入if (o == null)分支

情况二:sweeper在链表中,从中开始探测
4. 迭代操作 hasNext 与 next
4.1 hasNext
判断是否存在下一个元素
public boolean hasNext() {
    // assert lock.getHoldCount() == 0;
    // 如果存在下一个元素
    if (nextItem != null)
        return true;
    // 能进入noNext方法,说明不存在下一个元素
    // 即 cursor == NONE 且 nextIndex == NONE
    noNext();
    return false;
}
当不存在下一个元素调用noNext()方法
noNext()
能够进入该方法说明数组元素已经全部遍历完,即cursor == putIndex且cursor = NONE ,nextIndex = NONE , nextItem = null,这些状态会在上一次调用next方法时被设置。
noNext()作用:将迭代器的状态置为 DETACHED,这样才能被doSomeSweeping方法清除。
private void noNext() {
    final ReentrantLock lock = ArrayBlockingQueue.this.lock;
    lock.lock();
    try {
        // assert cursor == NONE;
        // assert nextIndex == NONE;

        /**
         * 判断该迭代器是否已经在上一次调用next方法时被变为失效
         *  如果已经失效,那么就不需要进入代码块
         */
        if (!isDetached()) {
        	// lastRet记录前一个next方法返回的元素的下标
            // assert lastRet >= 0;
            /**
             * 调用该方法修正 lastRet 是否过时
             *  下面代码中会通过 lastRet 获取 lastItem
             * 	如果lastRet过时就没有必要去获取
             */
            incorporateDequeues(); // might update lastRet
            // 如果lastRet没有过时,获取lastItem
            if (lastRet >= 0) {
                lastItem = itemAt(lastRet);
                // assert lastItem != null;
                // 调用detach,将迭代器置为DETACHED状态
                detach();
            }
        }
        // assert isDetached();迭代器处于了DETACHED状态
        // assert lastRet < 0 ^ lastItem != null;相当于lastRet < 0 && lastItem == null
    } finally {
        lock.unlock();
    }
}
这个方法只要迭代器不是DETACHED模式,最终都会调用detach方法,无论是隐藏在incorporateDequeues还是直接调用detach方法。
可能会有疑问:既然是想要迭代器失效,那 lastItem 值是否设置也就无关紧要了,
为什么在 if (!isDetached()) 不直接将调用 detach() 方法让迭代器失效,而是去
设置 lastItem 的值(这个值在迭代器失效之后也无法使用了)?

这个 lastItem 会在调用 remove 方法时用到,等后面分析 remove 方法时就会明白。
4.2 next
记录返回的元素nextItem,并加锁获取下一次调用next方法所要返回的元素,在获取之前需要调用incorporateDequeues去修正相关变量索引的值。
public E next() {
    // assert lock.getHoldCount() == 0;
    final E x = nextItem;
    // 判断x的值,如果nextItem元素出队或删除,那么就抛出异常
    if (x == null)
        throw new NoSuchElementException();
    final ReentrantLock lock = ArrayBlockingQueue.this.lock;
    lock.lock();
    try {
    	// 如果迭代器没有失效,就修正变量索引
        if (!isDetached())
        	// 保证返回的元素不是过时的数据
            incorporateDequeues();
        // assert nextIndex != NONE;
        // assert lastItem == null;
        lastRet = nextIndex;
        final int cursor = this.cursor;
        if (cursor >= 0) {
            nextItem = itemAt(nextIndex = cursor);
            // assert nextItem != null;
            this.cursor = incCursor(cursor);
        } else {
        	// 如果cursor<0表示遍历完成,就将nextIndex置为NONE
        	// 以便下一次hasNext方法将迭代器置为DETACHED模式
            nextIndex = NONE;
            nextItem = null;
        }
    } finally {
        lock.unlock();
    }
    return x;
}
5. incorporateDequeues
作用:修正下标,保证返回数据的有效性。
由于多线程下为了确保安全迭代线程每次调用next都要先获取独占锁,得不到便需等待,等到被唤醒继续执行就需要对数组此时的状况进行判断,判断当前迭代器要获取的数据是否已经过时,将最新的 takeIndex 赋给迭代器的 cursor,从而确保迭代器不会返回过时的数据。
private void incorporateDequeues() {
    // assert lock.getHoldCount() == 1;
    // assert itrs != null;
    // assert !isDetached();
    // assert count > 0;

	// 记录itrs里最新的变量数据
    final int cycles = itrs.cycles;
    final int takeIndex = ArrayBlockingQueue.this.takeIndex;
	// 保存当前迭代器的这两个变量,用于判断数据是否过时
    final int prevCycles = this.prevCycles;
    final int prevTakeIndex = this.prevTakeIndex;

	// 如果迭代器记录的轮数与最新的轮数不同
	// 或者迭代器记录的当前遍历元素的索引与最新的队列头的索引不同
    if (cycles != prevCycles || takeIndex != prevTakeIndex) {
        final int len = items.length;
        // how far takeIndex has advanced since the previous
        // operation of this iterator
        // 计算此时takeIndex 与迭代器存储的 prevTakeIndex之间的长度
        // 接下来要用它来判断迭代器接下来读取的数据是否已过时
        long dequeues = (cycles - prevCycles) * len
            + (takeIndex - prevTakeIndex);

        // 检查各个下标变量lastRet,nextIndex,cursor
        // 查看它们指向的数据是否已过时,所谓过时指的是此时 takeIndex 已在其前
        // 若过时就将lastRet与nextIndex置为REMOVED,cursor置为此时的takeIndex
        if (invalidated(lastRet, prevTakeIndex, dequeues, len))
            lastRet = REMOVED;
        if (invalidated(nextIndex, prevTakeIndex, dequeues, len))
            nextIndex = REMOVED;
        if (invalidated(cursor, prevTakeIndex, dequeues, len))
            cursor = takeIndex;

		// 这三个下标变量若都<0,表示迭代器遍历结束
		// detach会将preTakeIndex置为DETACHED,然后调用doSomeSweeping清扫迭代器链
		// 在isDetached中就是通过preTakeIndex是否小于0来判断迭代器是否终止
        if (cursor < 0 && nextIndex < 0 && lastRet < 0)
            detach();
        // 迭代器没有失效的话,更新prevCycles与prevTakeIndex的值
        // 回到next方法从takeIndex处开始继续往下遍历
        // 也正是会将cursor置为takeIndex,才体现了迭代器的弱一致性
        else {
            this.prevCycles = cycles;
            this.prevTakeIndex = takeIndex;
        }
    }
}
invalidated:检查变量索引是否过时
过时返回true,未过时或者已经失效返回false
private boolean invalidated(int index, int prevTakeIndex,
                            long dequeues, int length) {
	/**
	 * 下标变量小于0返回false,表明该下标变量的值不需要进行更改
	 * 有三个状态 NONE ,REMOVED,DETACHED 它们皆小于0。
	 * 	DETACHED:专门用于preTakeIndex使用,isDetached方法通过其来判断
	 * 	NONE:用于cursor,nextIndex,lastRet;这三个用于迭代功能的实现
	 * 	NONE:表明迭代结束可能因为数组为空或是遍历完
	 * 	REMOVED:表示lastRet 与 nextIndex 的数据过时
	 */
    if (index < 0)
        return false;
    int distance = index - prevTakeIndex;
    // distance<0:表示迭代器已经遍历第二圈了
    if (distance < 0)
        distance += length;
    // 如果当前takeIndex与preTakeIndex的距离
    // 大于index(cursor,nextIndex,lastRet)与preTakeIndex的距离
    // 说明这些索引的元素已经出队或者被删除 已过时返回true
    return dequeues > distance;
}
用一张示意图来分析一下这个方法是如何判断的:
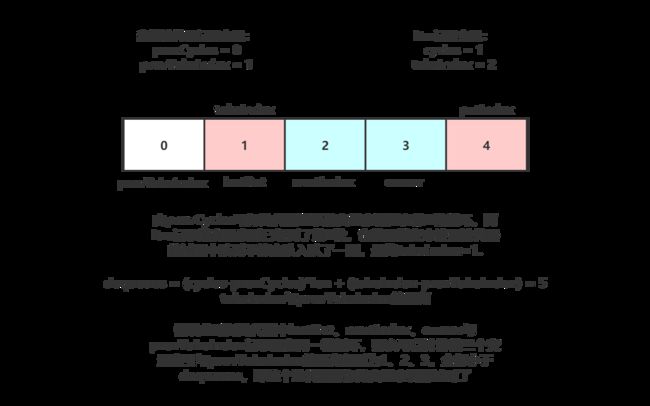
由上图可以看出takeIndex(在第1圈)是在cursor、nextIndex、lastRet(他们在第0圈)这三个变量之后的,也可以看出他们数据过时了。
detach:标记失效的迭代器的状态,即将prevTakeIndex置为DETACHED
private void detach() {
    // Switch to detached mode 将迭代器转换为 detached模式
    // 下面的这些申明都说明了调用该方法时迭代器变量索引的状态
    // assert lock.getHoldCount() == 1;
    // assert cursor == NONE;
    // assert nextIndex < 0;
    // assert lastRet < 0 || nextItem == null;
    // assert lastRet < 0 ^ lastItem != null;相当于lastRet < 0 && lastItem == null
    if (prevTakeIndex >= 0) {
        // assert itrs != null;
        prevTakeIndex = DETACHED;
        // try to unlink from itrs (but not too hard)
        itrs.doSomeSweeping(true);
    }
}
6. Itr#remove
迭代器的remove方法:删除迭代器上一次遍历元素索引lastRet对应的元素(这样做可以保证当前迭代器的nextIndex、cursor不变)。
public void remove() {
    // assert lock.getHoldCount() == 0;
    final ReentrantLock lock = ArrayBlockingQueue.this.lock;
    lock.lock();
    try {
    	// 如果迭代器未失效,修正最新的变量索引
        if (!isDetached())
        	// 主要是修正lastRet是否过时,也可能让迭代器失效
            incorporateDequeues(); // might update lastRet or detach
        final int lastRet = this.lastRet;
        this.lastRet = NONE;
        /**
         * 迭代器上一次调用next方法返回的索引有效
         * 	需要注意下面方法能够调用removeAt()方法说明
         * 	lastRet==takeIndex 或 lastRet 在 takeIndex之后,
         * 	所以在removeAt()方法中会分情况来处理.
         */
        if (lastRet >= 0) {
        	// 1.如果迭代器未失效,直接删除索引lastRet对应的元素
            if (!isDetached())
                removeAt(lastRet);
            // 2.迭代器失效,在最后一次noNext方法中会记录lastItem的值
            else {
                final E lastItem = this.lastItem;
                // assert lastItem != null;
                this.lastItem = null;
                // 如果迭代器记录的索引lastRet对应元素与lastItem相同就会删除
                if (itemAt(lastRet) == lastItem)
                    removeAt(lastRet);
            }
        } else if (lastRet == NONE)
            throw new IllegalStateException();
        // else lastRet == REMOVED and the last returned element was
        // previously asynchronously removed via an operation other
        // than this.remove(), so nothing to do.
        // lastRet < 0 && cursor < 0 && nextIndex < 0:迭代器遍历完成
        if (cursor < 0 && nextIndex < 0)
            detach();
    } finally {
        lock.unlock();
        // assert lastRet == NONE;
        // assert lastItem == null;
    }
}
在上面代码注释2处,我们便解决了之前在noNext方法留下的疑问。
在迭代器失效时记录最后一次遍历的元素,就是为了可以在调用当前
迭代器的remove方法时依然可以返回lastItem。

或许还会有一个疑问:在noNext方法中是加锁调用detach方法,这个方法不是会清除
迭代器吗,怎会让这个迭代器还能调用remove方法?

其实在detach方法中调用itrs.doSomeSweeping(true)方法并不能保证将这个迭代器
完全清除掉,因为该方法最多扫描16个迭代器。
7.ArrayBlockingQueue#removeAt
上面迭代器调用的是 ArrayBlockingQueue 类中的removeAt方法,这个方法有别于Itr#removedAt方法和Itrs#removedAt。
在上面我们提到了能够调用removeAt()方法说明lastRet==takeIndex 或 lastRet 在 takeIndex之后。所以在removeAt()方法中也需要分情况处理:
- lastRet==takeIndex:将
takeIndex位删除,再将takeIndex向后移动一位,之后会根据情况进行处理,在elementDequeued方法,后面分析; - lastRet在takeIndex之后:将
lastRet位删除,后面元素向后移动一位,改动情况通知迭代器链上所有迭代器。
/**
 * Deletes item at array index removeIndex.
 * Utility for remove(Object) and iterator.remove.
 * Call only when holding lock.
 */
void removeAt(final int removeIndex) {
    // assert lock.getHoldCount() == 1;
    // assert items[removeIndex] != null;
    // assert removeIndex >= 0 && removeIndex < items.length;
    final Object[] items = this.items;
    // 情况1:lastRet==takeIndex
    if (removeIndex == takeIndex) {
        // removing front item; just advance
        items[takeIndex] = null;
        if (++takeIndex == items.length)
            takeIndex = 0;
        count--;
        // 如果迭代器链存在迭代器会进一步处理各个迭代器的遍历状态
        if (itrs != null)
        	// 下文分析
            itrs.elementDequeued();
    } else {
    	// 情况2:lastRet在takeIndex之后
        // an "interior" remove

        // slide over all others up through putIndex.
        final int putIndex = this.putIndex;
        // 从lastRet位开始,前一位覆盖后一位
        for (int i = removeIndex;;) {
            int next = i + 1;
            if (next == items.length)
                next = 0;
            if (next != putIndex) {
                items[i] = items[next];
                i = next;
            } else {
                items[i] = null;
                this.putIndex = i;
                break;
            }
        }
        count--;
        // 通知所有迭代器进行修正
        if (itrs != null)
            itrs.removedAt(removeIndex);
    }
    notFull.signal();
}
7.1 情况一
在情况一移除takeIndex位元素之后会有下面这段代码。
if (itrs != null)
     itrs.elementDequeued();
itrs.elementDequeued()方法:队列为空或takeIndex==0会处理迭代器链中的迭代器,只有这两种情况出现才会导致迭代器失效。
/**
 * Called whenever an element has been dequeued (at takeIndex).
 */
void elementDequeued() {
    // assert lock.getHoldCount() == 1;
    // 1.队列为空,迭代器链中所有迭代器失效
    if (count == 0)
    	// 清除所有迭代器
        queueIsEmpty();
    // 2.takeIndex == 0表示新的一轮循环,可能导致takeIndex覆盖
    // 迭代器中记录的变量值,从而导致迭代器失效
    else if (takeIndex == 0)
    	// 清除迭代器链失效迭代器以及新的一轮循环而导致失效的迭代器
        takeIndexWrapped();
}
queueIsEmpty()代码很简单就是将每个迭代器都关闭,这里就不在分析。
Itrs#takeIndexWrapped():清除迭代器链失效迭代器以及新的一轮循环而导致失效的迭代器。
/**
 * Called whenever takeIndex wraps around to 0.
 *  * Notifies all iterators, and expunges any that are now stale.
 */
void takeIndexWrapped() {
    // assert lock.getHoldCount() == 1;
    // itrs中记录的轮数+1
    cycles++;
    // 遍历所有迭代器
    for (Node o = null, p = head; p != null;) {
        final Itr it = p.get();
        final Node next = p.next;
        // 迭代器失效
        // it.takeIndexWrapped() 判断当前迭代器是否失效
        if (it == null || it.takeIndexWrapped()) {
            // unlink p
            // assert it == null || it.isDetached();
            p.clear();
            p.next = null;
            if (o == null)
                head = next;
            else
                o.next = next;
        } else {
            o = p;
        }
        p = next;
    }
    // 所有迭代器都失效,itrs置为null
    if (head == null)   // no more iterators to track
        itrs = null;
}
Itr#takeIndexWrapped():判断当前迭代器是否失效,返回true表示迭代器失效。
/**
 * Called whenever takeIndex wraps around to zero.
 *  * @return true if this iterator should be unlinked from itrs
 */
boolean takeIndexWrapped() {
    // assert lock.getHoldCount() == 1;
    // 判断是否失效
    if (isDetached())
        return true;
    // 如果迭代器记录的轮数小于最新的轮数2轮或以上
    // 说明新的数据已经将当时迭代器记录的变量索引全部覆盖
    // 即迭代器中的变量索引过时,就让该迭代器失效
    if (itrs.cycles - prevCycles > 1) {
        // All the elements that existed at the time of the last
        // operation are gone, so abandon further iteration.
        // 关闭迭代器,将迭代器记录的变量索引都<0
        shutdown();
        return true;
    }
    return false;
}
7.2 情况二
同样情况二后面也有一段代码。
if (itrs != null)
     itrs.removedAt(removeIndex);
Itrs#removedAt:清除失效迭代器并修正各个迭代器(it.removedAt)。
/**
 * Called whenever an interior remove (not at takeIndex) occurred.
 *  * Notifies all iterators, and expunges any that are now stale.
 */
void removedAt(int removedIndex) {
    for (Node o = null, p = head; p != null;) {
        final Itr it = p.get();
        final Node next = p.next;
        // 迭代器失效 或 修正迭代器中的变量索引
        if (it == null || it.removedAt(removedIndex)) {
            // unlink p
            // assert it == null || it.isDetached();
            p.clear();
            p.next = null;
            if (o == null)
                head = next;
            else
                o.next = next;
        } else {
            o = p;
        }
        p = next;
    }
    if (head == null)   // no more iterators to track
        itrs = null;
}
Itr#removedAt:修正迭代器中的变量索引,返回true表示迭代器失效。
在修正三个变量索引cursor 、lastRet 、nextIndex时会出现三种情况(用x表示三个变量其中某一个):
- removedIndex == x:如果是
lastRet 、nextIndex置为REMOVED,而cursor不需要修正(在调用next方法时会修正)。但如果removedIndex == cursor == putIndex那就表示遍历结束,将cursor置为NONE; - removeIndex在x之前:removeIndex是迭代器之前遍历过的元素,那么 x 需要向后移动一位;
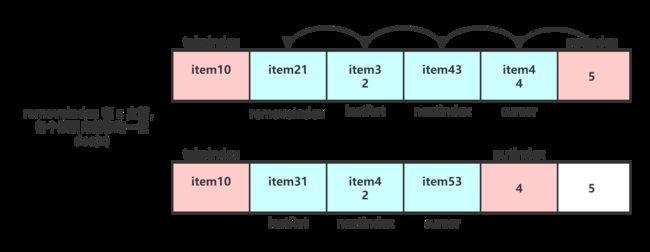
- removeIndex在x之后:因为迭代器未遍历到所以这种情况不会影响索引的值,所以不作处理。
这里判断 removeIndex 在 x 的哪个位置与incorporateDequeues方法中判断索引是否过时的方法相似,都是计算出于与prevTakeIndex的距离进而进行判断。
/**
 * Called whenever an interior remove (not at takeIndex) occurred.
 *
 * @return true if this iterator should be unlinked from itrs
 */
boolean removedAt(int removedIndex) {
    // assert lock.getHoldCount() == 1;
    if (isDetached())
        return true;

    final int cycles = itrs.cycles;
    final int takeIndex = ArrayBlockingQueue.this.takeIndex;
    final int prevCycles = this.prevCycles;
    final int prevTakeIndex = this.prevTakeIndex;
    final int len = items.length;
    // 轮循差
    int cycleDiff = cycles - prevCycles;
    // 这个判断防止takeIndex并未到第二轮循环,而putIndex已经在第二轮,
    // 这是就存在removeIndex
    // 所以需要将轮轮循差+1
    if (removedIndex < takeIndex)
        cycleDiff++;
    // removeIndex与prevTakeIndex的距离
    final int removedDistance =
        (cycleDiff * len) + (removedIndex - prevTakeIndex);
    // assert removedDistance >= 0;
    int cursor = this.cursor;
    if (cursor >= 0) {
        int x = distance(cursor, prevTakeIndex, len);
        // cursor==removedDistance,当cursor==putIndex才更新
        if (x == removedDistance) {
            if (cursor == putIndex)
                this.cursor = cursor = NONE;
        }
        // 如果removeIndex在cursor之前,cursor向前移动一位
        else if (x > removedDistance) {
            // assert cursor != prevTakeIndex;
            this.cursor = cursor = dec(cursor);
        }
    }
    int lastRet = this.lastRet;
    // 同上
    if (lastRet >= 0) {
        int x = distance(lastRet, prevTakeIndex, len);
        if (x == removedDistance)
            this.lastRet = lastRet = REMOVED;
        else if (x > removedDistance)
            this.lastRet = lastRet = dec(lastRet);
    }
    int nextIndex = this.nextIndex;
    if (nextIndex >= 0) {
        int x = distance(nextIndex, prevTakeIndex, len);
        if (x == removedDistance)
            this.nextIndex = nextIndex = REMOVED;
        else if (x > removedDistance)
            this.nextIndex = nextIndex = dec(nextIndex);
    }
    // 迭代器失效,将迭代器置为DETACHED模式
    else if (cursor < 0 && nextIndex < 0 && lastRet < 0) {
        this.prevTakeIndex = DETACHED;
        return true;
    }
    return false;
}
至此 ArrayBlockingQueue 源码分析就结束了,那么回过头还能答出我提出的问题吗?

