vue+elementui+springboot实现前后端分离的小例子
前后端分离有什么好处?
1、前端js可以做很多数据处理的工作,减小服务器的压力。
2、后台的错误不会直接反映到前台。
3、前后端工程师约定交互接口,实现并行开发,可以提高开发效率,同时代码可以更好的维护。
前后端分离会存在跨域的问题,什么是跨域呢?
当一个请求url的协议、域名、端口三者之间任意一个与当前页面url不同即为跨域。
打个比方,后端运行的项目占用了8080端口,前端运行的项目就不能使用8080端口了,可以使用8081端口,那么前端调用后端接口时就存在跨域的问题。
关键代码如下:
(后端对应的controller上记得加上@CrossOrigin注解处理跨域)
//指定请求方法,然后放上后端的接口,如果成功,显示成功的弹窗,再执行回调函数进行页面的刷新
axios.post('http://localhost:8080/find').then(function(resp){
                    _this.$alert('find!!!' , 'message',{
                        confirmButtonText: 'yes',
                        //回调函数,操作完成后刷新该页面
                        callback: action => {
                           window.location.reload()
                        }
                    })
            })
通过下面一个简单的小例子来感受一下是如何前后端分离进行数据库的增删改查的。
一、创建一个数据库
SET FOREIGN_KEY_CHECKS=0;

DROP TABLE IF EXISTS `student`;
CREATE TABLE `student` (
  `student_id` varchar(32) COLLATE utf8_bin NOT NULL,
  `student_name` varchar(32) COLLATE utf8_bin NOT NULL,
  `student_sex` char(4) COLLATE utf8_bin NOT NULL,
  `student_class` varchar(32) COLLATE utf8_bin NOT NULL,
  `student_phone` varchar(64) COLLATE utf8_bin DEFAULT NULL
) ENGINE=InnoDB DEFAULT CHARSET=utf8 COLLATE=utf8_bin;

INSERT INTO `student` VALUES ('001', '智慧包', '女', '软件2班', '18866778899');
INSERT INTO `student` VALUES ('002', '皇后娘娘', '男', '软件2班', '18877889900');
INSERT INTO `student` VALUES ('003', '铁根', '女', '软件2班', '18855667788');
INSERT INTO `student` VALUES ('004', '下巴', '男', '软件2班', '18899001122');
二、后端部分
1、创建一个spring初始化项目
2、实现数据的增删改查
student.java
package com.test.Entity;
import lombok.Data;

@Data
public class Student {
    private String studentId;
    private String studentName;
    private String studentSex;
    private String studentClass;
    private String studentPhone;
}
studentDao.java
package com.test.dao;
import com.test.Entity.Student;
import org.apache.ibatis.annotations.*;
import org.springframework.stereotype.Repository;
import java.util.List;

@Repository
public interface StudentDao {

    @Select("select * from student")
    public List<Student> getAll();

    @Insert("insert into student values(#{studentId}, #{studentName}, #{studentSex}, #{studentClass}, #{studentPhone})")
    public int insertStudent(Student student);

    @Select("select * from student where student_id = #{studentId}")
    public Student findById(@Param("studentId") String studentId);

    @Update("update student set student_name = #{studentName}, student_sex = #{studentSex}, student_class = #{studentClass}, student_phone = #{studentPhone} where student_id = #{studentId}")
    public int updateStudent(Student student);

    @Delete("delete from student where student_id = #{studentId}")
    public int deleteStudent(@Param("studentId") String studentId);
}
studentService.java
package com.test.Service;
import com.test.Entity.Student;
import java.util.List;

public interface StudentService {
    public List<Student> getAll();
    public int insertStudent(Student student);
    public Student findById(String studentId);
    public int updateStudent(Student student);
    public int deleteStudent(String studentId);
}
studentServiceImpl.java
package com.test.ServiceImpl;
import com.test.Entity.Student;
import com.test.Service.StudentService;
import com.test.dao.StudentDao;
import org.springframework.beans.factory.annotation.Autowired;
import org.springframework.stereotype.Service;
import java.util.List;

@Service
public class StudentServiceImpl implements StudentService {
    @Autowired
    private StudentDao studentDao;

    @Override
    public List<Student> getAll() {
        return studentDao.getAll();
    }

    @Override
    public int insertStudent(Student student) {
        return studentDao.insertStudent(student);
    }

    @Override
    public Student findById(String studentId) {
        return studentDao.findById(studentId);
    }

    @Override
    public int updateStudent(Student student) {
        return studentDao.updateStudent(student);
    }

    @Override
    public int deleteStudent(String studentId) {
        return studentDao.deleteStudent(studentId);
    }
}
studentController.java
注意这里的@CrossOrigin注解,可以解决跨域的问题
package com.test.Controller;
import com.test.Entity.Student;
import com.test.Service.StudentService;
import org.springframework.beans.factory.annotation.Autowired;
import org.springframework.stereotype.Controller;
import org.springframework.web.bind.annotation.*;
import java.util.List;

@Controller
@CrossOrigin(allowCredentials="true")
public class StudentController {
    @Autowired
    private StudentService studentService;

    @RequestMapping("/getAll")
    @ResponseBody
    public List<Student> getAll(){
        return studentService.getAll();
    }

    @PostMapping("/addStudent")
    @ResponseBody
    public int insertStudent(@RequestBody Student student){
        int row = studentService.insertStudent(student);
        return row;
    }

    @GetMapping("/findById/{studentId}")
    @ResponseBody
    public Student findById(@PathVariable("studentId") String studentId){
        return studentService.findById(studentId);
    }

    @RequestMapping("/updateStudent")
    @ResponseBody
    public int updateStudent(@RequestBody Student student){
        return studentService.updateStudent(student);
    }

    @RequestMapping("/delete/{studentId}")
    @ResponseBody
    public int deleteStudent(@PathVariable("studentId") String studentId){
        return studentService.deleteStudent(studentId);
    }
}
application.properties
spring.datasource.driver-class-name=com.mysql.cj.jdbc.Driver
spring.datasource.url=jdbc:mysql://localhost:3306/separate?useUnicode=true&characterEncoding=utf-8&useJDBCCompliantTimezoneShift=true&useLegacyDatetimeCode=false&serverTimezone=UTC
spring.datasource.username=root
spring.datasource.password=123456

mybatis.configuration.map-underscore-to-camel-case=true

logging.level.com.test.dao=debug
pom.xml
<?xml version="1.0" encoding="UTF-8"?>
<project xmlns="http://maven.apache.org/POM/4.0.0" xmlns:xsi="http://www.w3.org/2001/XMLSchema-instance"
         xsi:schemaLocation="http://maven.apache.org/POM/4.0.0 https://maven.apache.org/xsd/maven-4.0.0.xsd">
    <modelVersion>4.0.0</modelVersion>
    <parent>
        <groupId>org.springframework.boot</groupId>
        <artifactId>spring-boot-starter-parent</artifactId>
        <version>2.2.5.RELEASE</version>
        <relativePath/> <!-- lookup parent from repository -->
    </parent>
    <groupId>com.test</groupId>
    <artifactId>demo</artifactId>
    <version>0.0.1-SNAPSHOT</version>
    <name>Separate</name>
    <description>Demo project for Spring Boot</description>

    <properties>
        <java.version>1.8</java.version>
    </properties>

    <dependencies>
        <dependency>
            <groupId>org.springframework.boot</groupId>
            <artifactId>spring-boot-starter-data-jdbc</artifactId>
        </dependency>
        <dependency>
            <groupId>org.springframework.boot</groupId>
            <artifactId>spring-boot-starter-web</artifactId>
        </dependency>
        <dependency>
            <groupId>org.mybatis.spring.boot</groupId>
            <artifactId>mybatis-spring-boot-starter</artifactId>
            <version>2.1.2</version>
        </dependency>

        <dependency>
            <groupId>mysql</groupId>
            <artifactId>mysql-connector-java</artifactId>
            <scope>runtime</scope>
        </dependency>
        <dependency>
            <groupId>org.projectlombok</groupId>
            <artifactId>lombok</artifactId>
            <optional>true</optional>
        </dependency>

        <dependency>
            <groupId>junit</groupId>
            <artifactId>junit</artifactId>
            <scope>test</scope>
        </dependency>

        <dependency>
            <groupId>org.slf4j</groupId>
            <artifactId>slf4j-log4j12</artifactId>
            <version>1.7.6</version>
        </dependency>

        <dependency>
            <groupId>org.springframework.boot</groupId>
            <artifactId>spring-boot-starter-test</artifactId>
            <scope>test</scope>
            <exclusions>
                <exclusion>
                    <groupId>org.junit.vintage</groupId>
                    <artifactId>junit-vintage-engine</artifactId>
                </exclusion>
            </exclusions>
        </dependency>
    </dependencies>

    <build>
        <plugins>
            <plugin>
                <groupId>org.springframework.boot</groupId>
                <artifactId>spring-boot-maven-plugin</artifactId>
            </plugin>
        </plugins>
    </build>

</project>
三、前端部分
1、创建vue初始化项目
打开终端,切换到要创建项目的目录,输入下面的语句,然后根据自己的需要进行选择
(install vue-router一定要选择yes,会免去后面很多不必要的麻烦,use eslint这一项选择了yes的话会帮你代码规范,你的代码少了一个空格他都会给你揪出来,我就直接选no了)
vue init webpack 项目名

创建完成后目录结构如下:
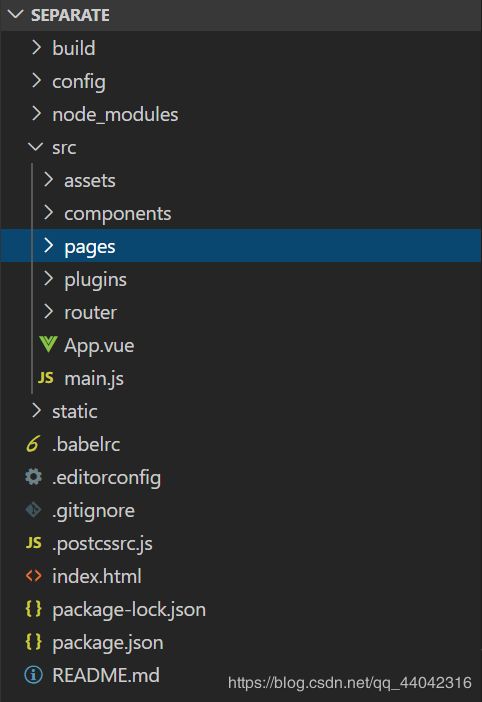
在src下新建一个pages文件,并添加四个vue文件
2、设置路由跳转
在router下的index.js中添加语句,完整代码如下:
import Vue from 'vue'
import Router from 'vue-router'
import Home from '@/pages/Home'
import Find from '@/pages/Find'
import One from '@/pages/One'
import Two from '@/pages/Two'

Vue.use(Router)

export default new Router({
  routes: [
    {
      path: '/',
      name: '主页',
      component: Home
    },
    {
      path: '/find',
      name: '查询学生',
      component: Find
    },
    {
      path: '/One',
      name: '添加学生',
      component: One
    },
    {
      path: '/Two',
      name: '修改学生',
      component: Two
    }
  ]
})
3、导入elementUI,axios
官网入口
在终端输入以下语句来安装elementUI和axios(解决跨域的问题)
npm i element-ui -S
npm install axios -S
在main.js中添加语句
import './plugins/axios'
import ElementUI from 'element-ui';
import 'element-ui/lib/theme-chalk/index.css';
Vue.use(ElementUI)
完整代码如下:
import Vue from 'vue'
import App from './App'
import router from './router'
import './plugins/axios'
import ElementUI from 'element-ui';
import 'element-ui/lib/theme-chalk/index.css';
Vue.config.productionTip = false
Vue.use(ElementUI)
new Vue({
el: '#app',
router,
components: { App },
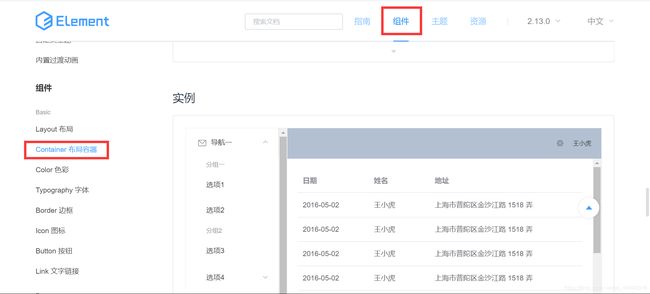
template: '在elementUI中选择需要的组件添加到自己的代码中
找到自己需要的布局容器后点击显示代码,将代码复制App.vue中,根据自己的需要做一点修改
App.vue完整代码如下:
<template>
  <div id="app">
     <el-container style="height: 500px; border: 1px solid #eee">
            <el-aside width="200px" style="background-color: rgb(238, 241, 246)">
                <el-menu router>
                  <el-submenu >
                    <template slot="title"><i class="el-icon-message"></i>学生管理</template>
                    //从我们设置的路由路径中遍历,动态显示在左侧的导航栏中
                     <el-menu-item v-for="item in $router.options.routes" :key="item" :index="item.path" :class="$route.path==item.path?'is-active':''">{{item.name}}</el-menu-item>
                  </el-submenu>
                </el-menu>
            </el-aside>
            <el-container>
                <el-header style="text-align: right; font-size: 12px"></el-header>
                <el-main>
                //这里加上了路由才能渲染出页面
                <router-view/>
                </el-main>
            </el-container>
        </el-container>
  </div>
</template>

<script>
export default {
  name: 'App',
  data() {}
}
</script>
<style>
  #app {
    font-family: 'Avenir', Helvetica, Arial, sans-serif;
    -webkit-font-smoothing: antialiased;
    -moz-osx-font-smoothing: grayscale;
    text-align: center;
    color: #2c3e50;
  }
  .el-header {
    background-color: #B3C0D1;
    color: #333;
    line-height: 60px;
  }
  .el-aside {
    color: #333;
  }
</style>
编写Home.vue主页面
这里就随便写一点东西显示在主页面上,完整代码如下:
<template>
    <div>
    this is home
    </div>
</template>

<script>
  export default {
    name: 'Home'
  }
</script>

<style>
</style>
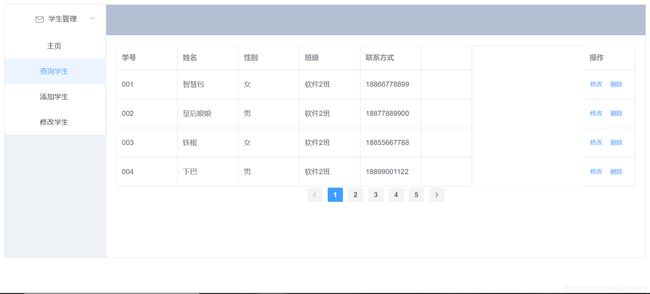
编写Find.vue查询页面
找一个table表格组件,复制到Find.vue文件中,根据自己的需要做一点修改
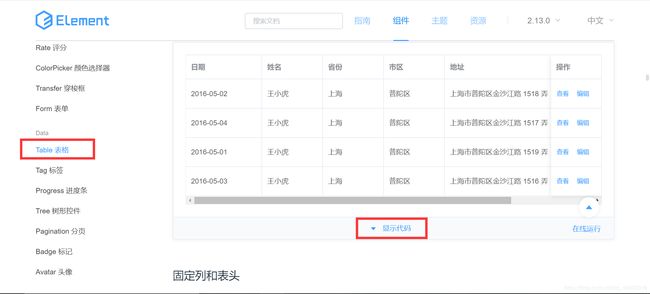
完整Find.vue代码如下:
<template>
    <div>
    <el-table :data="student" border style="width: 100%">
        <el-table-column fixed prop="studentId" label="学号" width="120"></el-table-column>
        <el-table-column prop="studentName" label="姓名" width="120"></el-table-column>
        <el-table-column prop="studentSex" label="性别" width="120"></el-table-column>
        <el-table-column prop="studentClass" label="班级" width="120"></el-table-column>
        <el-table-column prop="studentPhone" label="联系方式" width="120"></el-table-column>
        <el-table-column fixed="right" label="操作" width="100">
            <template slot-scope="scope">
                <el-button @click="edit(scope.row)" type="text" size="small">修改</el-button>
                <el-button @click="deleteStudent(scope.row)" type="text" size="small">删除</el-button>
            </template>
        </el-table-column>
    </el-table>
    //分页功能的实现
    <el-pagination background layout="prev, pager, next" :page-size="2" :total="10" @current-change="page"></el-pagination>
    </div>
</template>

<script>
    export default {
        name: 'Find',
        methods: {
            edit(row) {
                this.$router.push({
                    path: '/Two',
                    //点击修改时,把studentId传给修改页面
                    query: {
                        studentId: row.studentId
                    }
                })
            },
            deleteStudent(row){
                 const _this =this
                 //调用后端的接口
                axios.post('http://localhost:8080/delete/'+row.studentId).then(function(resp){
                    _this.$alert('delete!!!' , 'message',{
                        confirmButtonText: 'yes',
                        //回调函数,操作完成后刷新该页面
                        callback: action => {
                           window.location.reload()
                        }
                    })
            })
            },
            page(currentPage){
                alert(currentPage)
            }
        },
        data(){
            return{
                 student:[]
            }
        },
        //进入这个页面后自动加载我们生成的数据
        created(){
            const _this = this
            //调用后端的接口
            axios.get('http://localhost:8080/getAll').then(function(resp){
                _this.student = resp.data
            })
        }
    }
</script>

<style  scoped>
</style>
编写One.vue添加页面
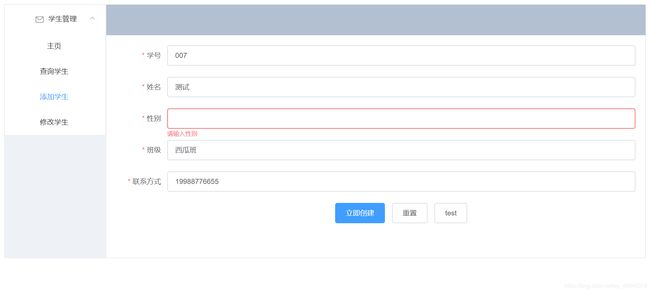
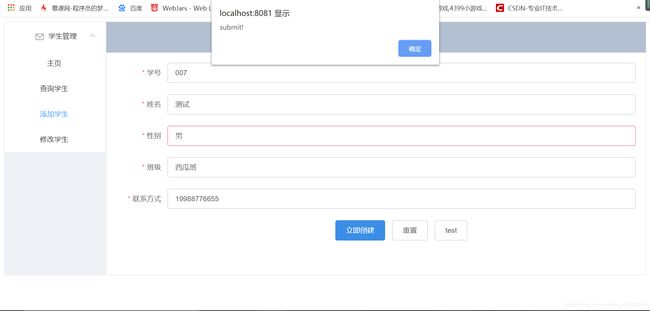
找一个表单组件,复制到One.vue文件中,根据自己的需要做一点修改,这个表单验证组件还可以进行数据的检验
<template>
    <div>
        <el-form :model="ruleForm" :rules="rules" ref="ruleForm" label-width="100px" >
          <el-form-item label="学号" prop="studentId">
            <el-input v-model="ruleForm.studentId"></el-input>
          </el-form-item>
          <el-form-item label="姓名" prop="studentName">
            <el-input v-model="ruleForm.studentName"></el-input>
          </el-form-item>
          <el-form-item label="性别" prop="studentSex">
            <el-input v-model="ruleForm.studentSex"></el-input>
          </el-form-item>
          <el-form-item label="班级" prop="studentClass">
            <el-input v-model="ruleForm.studentClass"></el-input>
          </el-form-item>
          <el-form-item label="联系方式" prop="studentPhone">
            <el-input v-model="ruleForm.studentPhone"></el-input>
          </el-form-item>
          <el-form-item>
            <el-button type="primary" @click="submitForm('ruleForm')">立即创建</el-button>
            <el-button @click="resetForm('ruleForm')">重置</el-button>
            <el-button @click="test">test</el-button>
          </el-form-item>
        </el-form>
    </div>
</template>

<script>
  export default {
    name: 'One',
     data() {
      return {
        ruleForm: {
          studentId: '',
          studentName: '',
          studentSex: '',
          studentClass: '',
          studentPhone: ''
        },
        //校验规则
        rules: {
          studentId: [
            { required: true, message: '请输入学号', trigger: 'blur' },
            { min: 3, max: 5, message: '长度在 3 到 5 个字符', trigger: 'blur' }
          ],
          studentName: [
            { required: true, message: '请输入姓名', trigger: 'blur' }
          ],
          studentSex: [
            { required: true, message: '请输入性别', trigger: 'blur' }
          ],
          studentClass: [
            { required: true, message: '请输入班级', trigger: 'blur' }
          ],
          studentPhone: [
            { required: true, message: '请输入电话', trigger: 'blur' }
          ],
        }
      };
    },
    methods: {
      submitForm(formName) {
        const _this = this
        this.$refs[formName].validate((valid) => {
          if (valid) {
            alert('submit!');
            //调用后端的接口
            axios.post('http://localhost:8080/addStudent',this.ruleForm).then(function(resp){
                _this.$alert('add!!!' , 'message',{
                        confirmButtonText: 'yes',
                        //回调函数,操作完成后自动转入查找页面
                        callback: action => {
                            _this.$router.push('/Find')
                        }
                    })
            })
          } else {
            console.log('error submit!!');
            return false;
          }
        });
      },
      resetForm(formName) {
        this.$refs[formName].resetFields();
      },
      test(){
        console.log(this.ruleForm)
      }
    }
  }
</script>

<style>
</style>
编写Two.vue修改页面
逻辑与One.vue页面相似,完整代码如下:
<template>
    <div>
        <el-form :model="ruleForm" :rules="rules" ref="ruleForm" label-width="100px" >
          <el-form-item label="学号" prop="studentId">
            <el-input v-model="ruleForm.studentId"></el-input>
          </el-form-item>
          <el-form-item label="姓名" prop="studentName">
            <el-input v-model="ruleForm.studentName"></el-input>
          </el-form-item>
          <el-form-item label="性别" prop="studentSex">
            <el-input v-model="ruleForm.studentSex"></el-input>
          </el-form-item>
          <el-form-item label="班级" prop="studentClass">
            <el-input v-model="ruleForm.studentClass"></el-input>
          </el-form-item>
          <el-form-item label="联系方式" prop="studentPhone">
            <el-input v-model="ruleForm.studentPhone"></el-input>
          </el-form-item>
          <el-form-item>
            <el-button type="primary" @click="submitForm('ruleForm')">修改</el-button>
            <el-button @click="resetForm('ruleForm')">重置</el-button>
            <el-button @click="test">test</el-button>
          </el-form-item>
        </el-form>
    </div>
</template>

<script>
  export default {
    name: 'two',
     data() {
      return {
        ruleForm: {
          studentId: '',
          studentName: '',
          studentSex: '',
          studentClass: '',
          studentPhone: ''
        },
        rules: {
          studentId: [
            { required: true, message: '请输入学号', trigger: 'blur' },
            { min: 3, max: 5, message: '长度在 3 到 5 个字符', trigger: 'blur' }
          ],
          studentName: [
            { required: true, message: '请输入姓名', trigger: 'blur' }
          ],
          studentSex: [
            { required: true, message: '请输入性别', trigger: 'blur' }
          ],
          studentClass: [
            { required: true, message: '请输入班级', trigger: 'blur' }
          ],
          studentPhone: [
            { required: true, message: '请输入电话', trigger: 'blur' }
          ],
        }
      };
    },
    created(){
        const _this = this
        //调用后端接口,获取查找页面点击修改时传过来的studentId
        axios.get('http://localhost:8080/findById/'+this.$route.query.studentId).then(function(resp){
          _this.ruleForm = resp.data
        })
      },
    methods: {
      submitForm(formName) {
        const _this = this
        this.$refs[formName].validate((valid) => {
          if (valid) {
            _this.$alert('successbefore')
            _this.$alert(this.ruleForm)
            //调用后端接口
            axios.post('http://localhost:8080/updateStudent',this.ruleForm).then(function(resp){
                _this.$alert('change!!!' , 'message',{
                        confirmButtonText: 'yes',
                        //回调函数,执行完毕返回查询页面
                        callback: action => {
                            _this.$router.push('/Find')
                        }
                    })
            })
          } else {
            console.log('error submit!!');
            return false;
          }
        });
      },
      resetForm(formName) {
        this.$refs[formName].resetFields();
      },
      test(){
        console.log(this.ruleForm)
      }
    }
  }
</script>

<style>
</style>
四、效果展示
1、首页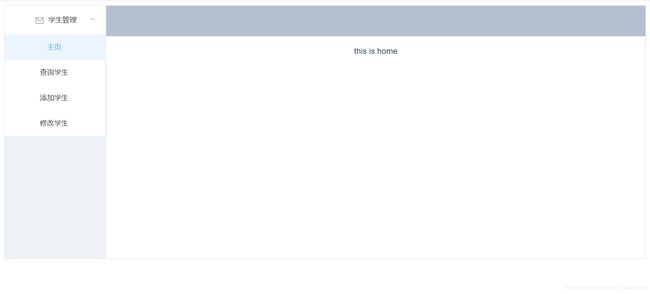
2、查询
3、添加
自动校验功能
4、修改
点击修改表单会自动添加相应的信息


