pacemaker与corosync搭建高可用集群
pacemaker
Pacemaker是一个集群资源管理器。它利用集群基础构件(OpenAIS 、heartbeat或corosync)提供的消息和成员管理能力来探测并从节点或资源级别的故障中恢复,以实现群集服务(亦称资源)的高可用。
corosync
Corosync是集群管理套件的一部分,它在传递信息的时候可以通过一个简单的配置文件来定义信息传递的方式和协议。Corosync可以实现HA心跳信息传输的功能。corosync集群引擎是一个组通信系统,具有在应用程序中实现高可用性的附加功能
使用pacmaker与corosync搭建高可用集群
一、集群服务器设置
1、环境部署:
服务器1:172.25.13.110
服务器2:172.25.13.120
关闭防火墙以及设置selinux为disabled
以下配置,在集群中的所有服务器都需要设置,设置过程一致
2、配置yum源——添加高可用源以及弹性存储源
在系统安装镜像中存在需要设置的源,只需要根据自己的挂载路径,进行添加即可。本机系统镜像挂载目录为: /var/www/html/toto_7.3
[root@foundation13 ~]# cd /var/www/html/toto_7.3/addons/
[root@foundation13 addons]# ls
HighAvailability  ResilientStorage    # 两个需要进行添加的源
修改yum源配置文件:/etc/yum.repos.d/toto.repo
[toto7.3]     # 基础安装包
name=toto
gpgcheck=0
enable=1
baseurl=http://172.25.13.250/toto_7.3

[HighAvailability]   # 高可用安装包
name=HighAvailability
gpgcheck=0
enable=1
baseurl=http://172.25.13.250/toto_7.3/addons/HighAvailability

[ResilientStorage]   # 弹性存储安装包
name=ResilientStorage
gpgcheck=0
enable=1
baseurl=http://172.25.13.250/toto_7.3/addons/ResilientStorage
检验yum 源是否正常:
[root@toto1 ~]# yum repolist
Loaded plugins: product-id, search-disabled-repos, subscription-manager
This system is not registered to Red Hat Subscription Management. You can use subscription-manager to register.
HighAvailability                                         | 4.1 kB     00:00
ResilientStorage                                         | 4.1 kB     00:00
toto7.3                                                  | 4.1 kB     00:00
(1/6): HighAvailability/group_gz                           | 3.4 kB   00:00
(2/6): HighAvailability/primary_db                         |  27 kB   00:00
(3/6): ResilientStorage/group_gz                           | 4.9 kB   00:00
(4/6): ResilientStorage/primary_db                         |  33 kB   00:00
(5/6): toto7.3/primary_db                                  | 3.9 MB   00:00
(6/6): toto7.3/group_gz                                    | 136 kB   00:00
repo id                              repo name                            status
HighAvailability                     HighAvailability                        37
ResilientStorage                     ResilientStorage                        42
toto7.3                              toto                                 4,751
repolist: 4,830
3 、设置本地解析,使得集群中的服务器可以通过主机名称定位到具体主机。
vim /etc/hosts
172.25.13.110   toto1
172.25.13.120   toto2
172.25.13.130   toto3
172.25.13.140   toto4
4 、安装软件 pacmaker、corosync以及pcs
yum install -y pacemaker corosync pcs # 安装软件
systemctl start pcsd.service #开启管理工具
systemctl enable pcsd.service # 设置服务开机自动启动
5、 配置SSH,使得集群中各个服务器可以互相免密连接。
每一个服务器中创建一个密钥并允许所有有这个密钥的用户登入:
ssh-keygen    # 生成密钥
 ssh-copy-id toto1
 ssh-copy-id toto2   # 将生成的密钥发送给所有的集群服务器,包括自己
6 、设置用户hacluster密码
安装完成软件之后,系统会自动生成一个用户:hacluster,使用该用户对集群进行管理。需要在所有的集群服务器中设置该用户的密码,此时所有的服务器的密码设置必须一致。
[root@toto1 ~]# id hacluster    # 查看存在该用户
uid=189(hacluster) gid=189(haclient) groups=189(haclient)
[root@toto1 ~]# echo redhat |passwd --stdin hacluster   # 设置该用户的密码为redhat
Changing password for user hacluster.
passwd: all authentication tokens updated successfully.  # 密码设置成功
二、创建集群(任意一台服务器即可)
1 、通过用户和密码对集群中的服务器进行认证:
pcs cluster auth toto1 toto2
用户为:hacluster
密码为上面为该用户设置的密码。
[root@toto1 ~]# pcs cluster auth toto1 toto2     # 对集群中的所有服务器进行认证
Username: hacluster   # 用户
Password:         # 密码
toto1: Authorized
toto2: Authorized   # 全部通过认证
2 、创建一个集群,并且指定集群中的服务器。
pcs cluster setup --name toto_cluster toto1 toto2 # 创建集群,指定名称以及集群中的服务器
[root@toto1 ~]# pcs cluster setup --name toto_cluster toto1 toto2
Destroying cluster on nodes: toto1, toto2...
toto1: Stopping Cluster (pacemaker)...
toto2: Stopping Cluster (pacemaker)...
toto1: Successfully destroyed cluster
toto2: Successfully destroyed cluster

Sending cluster config files to the nodes...
toto1: Succeeded
toto2: Succeeded

Synchronizing pcsd certificates on nodes toto1, toto2...
toto1: Success
toto2: Success

Restarting pcsd on the nodes in order to reload the certificates...
toto1: Success
toto2: Success
[root@toto1 ~]#
3 开启集群中的所有服务器并且设置自动开启
pcs cluster start --all # 设置集群所有服务器开启
pcs cluster enable --all # 设置集群中所有服务器自动开启
pcs status # 查看集群的状态信息
[root@toto1 ~]# pcs cluster start --all    # 设置服务器启动
toto1: Starting Cluster...
toto2: Starting Cluster...

[root@toto1 ~]# pcs cluster enable --all  # 设置服务器自动启动
toto1: Cluster Enabled
toto2: Cluster Enabled

[root@toto1 ~]# pcs  status   # 查看集群运行状态
Cluster name: toto_cluster
WARNING: no stonith devices and stonith-enabled is not false
Stack: corosync
Current DC: toto2 (version 1.1.15-11.el7-e174ec8) - partition with quorum
Last updated: Mon Jun 24 22:58:51 2019		Last change: Mon Jun 24 22:58:38 2019 by hacluster via crmd on toto2

2 nodes and 0 resources configured     # 两个节点以及0个资源

Online: [ toto1 toto2 ]    # 在线的服务器

No resources   # 添加的资源


Daemon Status:     #  守护进程状态
  corosync: active/enabled
  pacemaker: active/enabled
  pcsd: active/enabled
4 检查配置并进行错误修改:crm_verify -L -V
[root@toto1 ~]# crm_verify -L -V   # 检查下配置文件
   error: unpack_resources:	Resource start-up disabled since no STONITH resources have been defined
   error: unpack_resources:	Either configure some or disable STONITH with the stonith-enabled option
   error: unpack_resources:	NOTE: Clusters with shared data need STONITH to ensure data integrity
Errors found during check: config not valid   # 发现的错误
错误产生的原因:为了保证数据的安全,起搏器配备了Stonith功能。但是,它还知道何时没有提供stonith配置,并将其报告为问题
我们将 stonith-enabled设置为 false 来关闭STONITH
pcs property set stonith-enabled=false # 暂时关闭STONITH
crm_verify -L -V # 再次检测没有错误
三 、添加资源(任意一台服务器即可)
1 、添加vip
首先要做的是配置一个IP地址,不管集群服务在哪运行,我们要一个固定的地址来提供服务,给它取一个名字totovip 并且告诉集群 每30秒检查它一次。选择的IP地址不能被节点所占用。
pcs resource create totovip ocf:heartbeat:IPaddr2 ip=172.25.13.100 cidr_netmask=32 op monitor interval=30s
pcs property set no-quorum-policy=ignore # 忽略仲裁机制
当有半数以上的节点在线时,这个集群就认为自己拥有法定人数了,是“合法”的。当在线节点不能满足使得集群拥有法定人数,为了减少这种可能性对于数据损坏,起搏器的默认行为是停止所有资源。
两个节点的集群只有在两个节点都在运行时才具有仲裁,我们可以告诉集群完全忽略仲裁
当设置忽略仲裁之后,将定资源现在运行在服务器1,默认服务器1宕机之后,资源会转移到服务器2,然后将服务器1恢复,资源并不会切换会服务器1,而是继续运行在服务器2.
2、 添加apache服务
集群中的所有的服务器均安装apache服务。并设置共享页面。注意不用开启服务,集群会根据资源情况自动开启。
pcs resource create apache systemd:httpd op monitor interval=1min # 添加apache服务资源,并且指定启动脚本以及对服务健康状况的监控周期为1分钟。
查看集群资源状态:
[root@toto1 ~]# pcs status
Cluster name: toto_cluster
Stack: corosync
Current DC: toto1 (version 1.1.15-11.el7-e174ec8) - partition with quorum
Last updated: Tue Jun 25 21:29:34 2019		Last change: Tue Jun 25 21:27:34 2019 by root via cibadmin on toto1

2 nodes and 2 resources configured

Online: [ toto1 toto2 ]

Full list of resources:

 totovip	(ocf::heartbeat:IPaddr2):	Started toto1   # vip资源运行在toto1
 apache	(systemd:httpd):	Started toto2   # apache资源运行在toto2

Daemon Status:
  corosync: active/enabled
  pacemaker: active/enabled
  pcsd: active/enabled
3 、创建资源组,并将vip以及apache资源添加到同一个资源组中
显示vip资源和apoache服务资源分别运行在不同的后端服务器。这是由于集群具有对资源平均分配到各个后端服务器的特性设置的。但是实际需要是vip必须和apache服务运行在同一个后端服务器,才能保证客户的正常访问。此时需要设置资源组。
pcs resource group add toto_group totovip apache # 创建资源组toto_group,并将资源totovip和apache添加到资源组中。
查看集群资源信息状态:所有资源在同一个资源组中,运行在同一个资源组中。
[root@toto1 ~]# pcs status
Cluster name: toto_cluster
Stack: corosync
Current DC: toto1 (version 1.1.15-11.el7-e174ec8) - partition with quorum
Last updated: Tue Jun 25 21:37:25 2019		Last change: Tue Jun 25 21:36:08 2019 by root via cibadmin on toto1

2 nodes and 2 resources configured

Online: [ toto1 toto2 ]

Full list of resources:

 Resource Group: toto_group    # 资源在同一个组中,使得资源同时运行在一个节点上
     totovip	(ocf::heartbeat:IPaddr2):	Started toto1
     apache	(systemd:httpd):	Started toto1

Daemon Status:
  corosync: active/enabled
  pacemaker: active/enabled
  pcsd: active/enabled
测试:
1、模拟节点宕机
此时资源运行在节点toto1
[root@toto1 ~]# pcs status
Cluster name: toto_cluster
Stack: corosync
Current DC: toto1 (version 1.1.15-11.el7-e174ec8) - partition with quorum
Last updated: Tue Jun 25 21:37:25 2019		Last change: Tue Jun 25 21:36:08 2019 by root via cibadmin on toto1

2 nodes and 2 resources configured

Online: [ toto1 toto2 ]

Full list of resources:

 Resource Group: toto_group
     totovip	(ocf::heartbeat:IPaddr2):	Started toto1
     apache	(systemd:httpd):	Started toto1

Daemon Status:
  corosync: active/enabled
  pacemaker: active/enabled
  pcsd: active/enabled
将节点toto1服务器关闭,资源会自动移动到节点toto2,保证正常提供服务。
#关闭集群中的节点toto1 模拟节点宕机
[root@toto1 ~]# pcs cluster stop toto1
toto1: Stopping Cluster (pacemaker)...
toto1: Stopping Cluster (corosync)...

#再次查看集群资源信息状态:
[root@toto2 html]# crm_mon
Stack: corosync
Current DC: toto2 (version 1.1.15-11.el7-e174ec8) - partition with quorum
Last updated: Tue Jun 25 21:53:14 2019          Last change: Tue Jun 25 21:36:07
 2019 by root via cibadmin on toto1

2 nodes and 2 resources configured

Online: [ toto2 ]
OFFLINE: [ toto1 ]

Active resources:

 Resource Group: toto_group  # 资源转移到节点toto2上运行,保证对外提供的服务正常
     totovip    (ocf::heartbeat:IPaddr2):	Started toto2
     apache     (systemd:httpd):        Started toto2
当节点toto1恢复正常之后,集群会根据健康检查情况将该结点自动添加集群,但是资源继续在节点toto2上运行,不会回切到节点toto1
2 、节点状态正常,但是节点中的资源apache被关闭。
该情况下,集群会认为切换资源到另外一个节点所需要的资源以及时间远远大于检查并将目前运行主机的apache服务开启。所以不会切换资源,而是会自动开启目前资源运行阶段上的被关闭的apache服务。
[root@toto2 html]# systemctl stop httpd.service   # 关闭资源所在节点的httpd服务


[root@toto1 html]# crm_mon
Stack: corosync
Current DC: toto2 (version 1.1.15-11.el7-e174ec8) - partition with quorum
Last updated: Tue Jun 25 21:59:47 2019          Last change: Tue Jun 25 21:36:07
 2019 by root via cibadmin on toto1

2 nodes and 2 resources configured

Online: [ toto1 toto2 ]

Active resources:

 Resource Group: toto_group
     totovip    (ocf::heartbeat:IPaddr2):	Started toto2
     apache     (systemd:httpd):        Started toto2   # 监控解群资源情况,资源被没有发生切换

#再次查看节点toto2上的httpd服务状态,集群自动开启可该服务。
[root@toto2 html]# systemctl status httpd.service
● httpd.service - Cluster Controlled httpd
   Loaded: loaded (/usr/lib/systemd/system/httpd.service; disabled; vendor preset: disabled)
  Drop-In: /run/systemd/system/httpd.service.d
           └─50-pacemaker.conf
   Active: active (running) since Tue 2019-06-25 22:00:52 CST; 57s ago
     Docs: man:httpd(8)
           man:apachectl(8)
四、添加fence
为了防止两台节点服务端一直进行资源的争抢,造成客户体验端的不稳定;需要添加fence,即相当于1个开关,可以在抢占对方节点的资源之间对对方节点进行断电重启。
1、所有的集群节点中,全部安装fence服务,并且将已经设置好的密钥传给各个节点服务器。
yum install fence-virt -y # 安装fence服务
mkdir /etc/cluster # 创建存放密钥目录
将fence密钥文件分别传给各个集群节点服务器的密钥目录中
2 、集群中添加fence资源
pcs stonith create vmfence fence_xvm pcmk_host_map="toto1:toto1;toto2:toto2" op monitor interval=1min # 添加fence资源,主机名称:虚拟机名称
pcs property set stonith-enabled=true # 开启stonish。
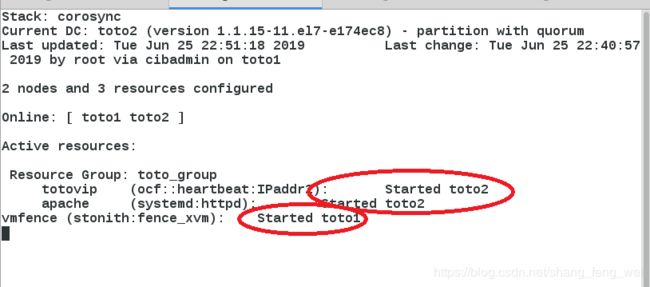
查看集群节点资源信息:其中资源组和fence资源运行在不同节点上面,是因为fence需要运行在没有资源的节点,好在抢夺资源的时候,可以关闭运行资源的节点。
[root@toto1 ~]# pcs status
Cluster name: toto_cluster
Stack: corosync
Current DC: toto2 (version 1.1.15-11.el7-e174ec8) - partition with quorum
Last updated: Tue Jun 25 22:32:25 2019		Last change: Tue Jun 25 22:30:34 2019 by root via cibadmin on toto1

2 nodes and 3 resources configured

Online: [ toto1 toto2 ]

Full list of resources:

 Resource Group: toto_group
     totovip	(ocf::heartbeat:IPaddr2):	Started toto2
     apache	(systemd:httpd):	Started toto2
 vmfence	(stonith:fence_xvm):	Started toto1

Daemon Status:
  corosync: active/enabled
  pacemaker: active/enabled
  pcsd: active/enabled
3 测试:
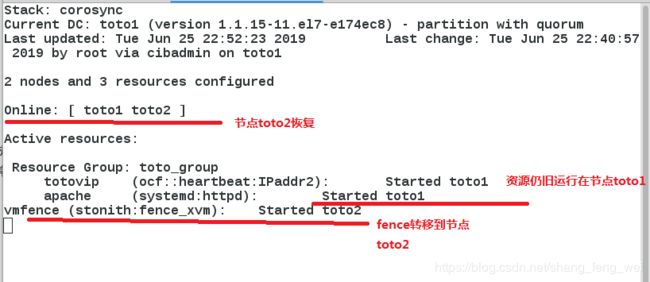
目前资源运行在节点toto2,模拟节点toto2宕机,fence会自动关闭重启节点toto2,将资源运行在节点toto1。当节点toto2重新启动正常之后,fence运行转移到节点toto2.
服务的高可用实现!!!
五、添加iscsi网络共享磁盘,实现资源共享
使用另外一台主机,共享磁盘,作为资源服务器,所有的资源都存储在资源服务器上,所有的节点服务器都是用该共享磁盘。
资源服务器:172.25.13.130
共享磁盘:/dev/vda
1 、添加磁盘设置共享(资源服务器)
yum install -y targetcli # 安装磁盘共享编辑工具
targetcli # 对共享磁盘进行设置:共享磁盘设置参考
[root@toto3 ~]# targetcli
Warning: Could not load preferences file /root/.targetcli/prefs.bin.
targetcli shell version 2.1.fb41
Copyright 2011-2013 by Datera, Inc and others.
For help on commands, type 'help'.

/> backstores/block create toto_disk /dev/vda
Created block storage object toto_disk using /dev/vda.
/> iscsi/ create iqn.2019-06.com.toto:toto3
Created target iqn.2019-06.com.toto:toto3.
Created TPG 1.
Global pref auto_add_default_portal=true
Created default portal listening on all IPs (0.0.0.0), port 3260.
/> iscsi/iqn.2019-06.com.toto:toto3/tpg1/luns create /backstores/block/toto_disk
Created LUN 0.
/> iscsi/iqn.2019-06.com.toto:toto3/tpg1/acls create iqn.2019-06.com.toto:toto
Created Node ACL for iqn.2019-06.com.toto:toto
Created mapped LUN 0.
/> exit
Global pref auto_save_on_exit=true
Last 10 configs saved in /etc/target/backup.
2、 集群节点设置共享次磁盘客户端(所有的节点服务器均要进行设置)
 [root@toto1 ~]# yum install -y iscsi-*
 [root@toto1 ~]# vim /etc/iscsi/initiatorname.iscsi
[root@toto1 ~]# cat /etc/iscsi/initiatorname.iscsi
InitiatorName=iqn.2019-06.com.toto:toto
[root@toto1 ~]# systemctl restart iscsid
[root@toto1 ~]# iscsiadm -m discovery -t st -p 172.25.13.130
172.25.13.130:3260,1 iqn.2019-06.com.toto:toto3
[root@toto1 ~]# iscsiadm -m node -l
Logging in to [iface: default, target: iqn.2019-06.com.toto:toto3, portal: 172.25.13.130,3260] (multiple)
Login to [iface: default, target: iqn.2019-06.com.toto:toto3, portal: 172.25.13.130,3260] successful.
[root@toto1 ~]# partprobe
[root@toto1 ~]# cat /proc/partitions
major minor  #blocks  name

   8        0   20971520 sda
   8        1    1048576 sda1
   8        2   19921920 sda2
 253        0   17821696 dm-0
 253        1    2097152 dm-1
   8       16   20971520 sdb
集群节点作为客户端成功登陆网络共享磁盘。
3 、对共享磁盘进行分区,格式化以及挂载(在一个节点中进行。其他节点同步分区即可)
fdisk /dev/sdb
partprobe
mkfs.xfs /dev/sdb1
4 、添加挂载资源(apache的高可用):
pcs resource create apache_data ocf:heartbeat:Filesystem device=/dev/sdb1 directory=/var/www/html/ fstype=xfs op monitor interval=30s # 添加挂载资源
pcs resource group add toto_group apache_data # 将该资源加入资源组
实现不论资源在哪个节点服务器上,所看到的apache资源都是来自于共享磁盘。


