MyEclipse2017使用maven搭建SSM项目
主要分为以下几步:
一、安装maven(也可以使用MyEclipse自带的)
二、Tomcat服务器准备(也可以使用MyEclipse自带的)
三、创建项目并配置SSM环境
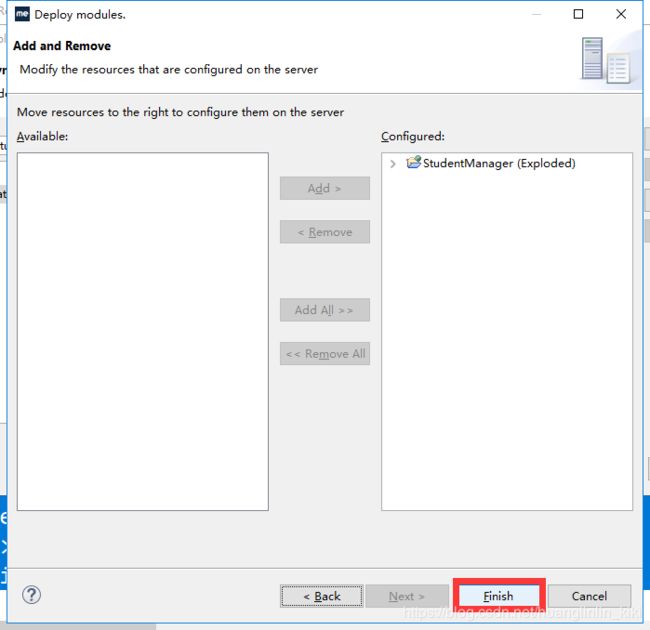
四、部署项目并运行
首先,我们来看第一步。
注意:在此之前JDK的环境已经准备好,MyEclipse2017也已经安装并破解。
maven我们可以去官网下载,下载后解压到我们自己的电脑上。
![]()
然后就是配置maven环境,右击我的电脑--》属性--》高级系统设置--》环境变量--》系统变量--》新建,如下图
![]()
接着编辑系统变量的path
![]()
加在之前的那个配置后面即可。
最后,我们来检测一下:
打开cmd命令窗口,输入命令:mvn -v 如果出现下图的信息,那么恭喜你,配置成功了!当然,信息可能有些许出入,如版本不同等,这些不用在意。
![]()
接下来将eclipse集成的maven换成我们自己的,而不用eclipse自带的,重新定位,点击Window -> Preference -> Maven -> Installation -> Add进行设置,如下图
![]()
点击添加找到自己的解压路径,添加进来。
接下来进行第二步:点击添加找到自己的解压路径,添加进来。
同样,首先去官网下载,我下载的是tomcat9:https://tomcat.apache.org/download-90.cgi
下载完成后解压放在自己电脑即可。
接下来打开myeclipse2017来添加tomcat:
![]()
![]()
添加完成后在servers视图窗口就可以看到自己添加的tomcat服务器。
在接下来进行第三步:创建项目
创建一个web project,项目名自拟。
![]()
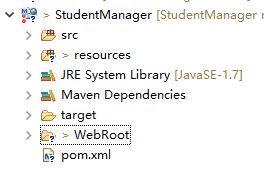
代码还没有开始写,暂时的目录结构为:
其中pom.xml的代码为:
-
3.0 -
UTF-8 -
4.0.2.RELEASE -
3.2.8 -
1.7.12 -
1.2.17
接下来创建一个源码文件夹,用来存放相关的配置文件:resources
applicationContext.xml的代码:
xmlns:context="http://www.springframework.org/schema/context"
xmlns:mvc="http://www.springframework.org/schema/mvc"
xmlns:aop="http://www.springframework.org/schema/aop"
xmlns:cache="http://www.springframework.org/schema/cache"
xsi:schemaLocation="http://www.springframework.org/schema/beans
http://www.springframework.org/schema/beans/spring-beans-3.1.xsd
http://www.springframework.org/schema/context
http://www.springframework.org/schema/context/spring-context-3.1.xsd
http://www.springframework.org/schema/mvc
http://www.springframework.org/schema/mvc/spring-mvc-4.0.xsd
http://www.springframework.org/schema/aop
http://www.springframework.org/schema/aop/spring-aop-4.0.xsd
http://www.springframework.org/schema/cache
http://www.springframework.org/schema/cache/spring-cache-3.2.xsd">
db.properties (我是连的sql server数据库,大家可以自行改为与自己数据库匹配的驱动和连接字符串,当然数据库的用户名密码肯定要与实际情况一致)
driver=com.microsoft.sqlserver.jdbc.SQLServerDriver
url=jdbc:sqlserver://localhost:1433; DatabaseName=pro_StuMgr
username=sa
password=sasa
initialSize=0
maxActive=20
maxIdle=20
minIdle=1
maxWait=60000
log4j.properties
#\u5B9A\u4E49LOG\u8F93\u51FA\u7EA7\u522B
log4j.rootLogger=DEBUG,Console,File
#\u5B9A\u4E49\u65E5\u5FD7\u8F93\u51FA\u76EE\u7684\u5730\u4E3A\u63A7\u5236\u53F0
log4j.appender.Console=org.apache.log4j.ConsoleAppender
log4j.appender.Console.Target=System.out
#\u53EF\u4EE5\u7075\u6D3B\u5730\u6307\u5B9A\u65E5\u5FD7\u8F93\u51FA\u683C\u5F0F\uFF0C\u4E0B\u9762\u4E00\u884C\u662F\u6307\u5B9A\u5177\u4F53\u7684\u683C\u5F0F
log4j.appender.Console.layout = org.apache.log4j.PatternLayout
log4j.appender.Console.layout.ConversionPattern=[%c] - %m%n
#\u6587\u4EF6\u5927\u5C0F\u5230\u8FBE\u6307\u5B9A\u5C3A\u5BF8\u7684\u65F6\u5019\u4EA7\u751F\u4E00\u4E2A\u65B0\u7684\u6587\u4EF6
log4j.appender.File = org.apache.log4j.RollingFileAppender
#\u6307\u5B9A\u8F93\u51FA\u76EE\u5F55
log4j.appender.File.File = logs/dcxlogs.log
#\u5B9A\u4E49\u6587\u4EF6\u6700\u5927\u5927\u5C0F
log4j.appender.File.MaxFileSize = 10MB
# \u8F93\u51FA\u6240\u4EE5\u65E5\u5FD7\uFF0C\u5982\u679C\u6362\u6210DEBUG\u8868\u793A\u8F93\u51FADEBUG\u4EE5\u4E0A\u7EA7\u522B\u65E5\u5FD7
log4j.appender.File.Threshold = ALL
log4j.appender.File.layout = org.apache.log4j.PatternLayout
log4j.appender.File.layout.ConversionPattern =[%p] [%d{yyyy-MM-dd HH\:mm\:ss}][%c]%m%n
spring-db.xml (mapper文件还没有创建,所以把那句配置注释了,后面实现具体功能后再取消注释即可)
xmlns:context="http://www.springframework.org/schema/context"
xmlns:mvc="http://www.springframework.org/schema/mvc"
xsi:schemaLocation="http://www.springframework.org/schema/beans
http://www.springframework.org/schema/beans/spring-beans-3.1.xsd
http://www.springframework.org/schema/context
http://www.springframework.org/schema/context/spring-context-3.1.xsd
http://www.springframework.org/schema/mvc
http://www.springframework.org/schema/mvc/spring-mvc-4.0.xsd">
spring-dao.xml
xmlns:context="http://www.springframework.org/schema/context"
xmlns:mvc="http://www.springframework.org/schema/mvc"
xsi:schemaLocation="http://www.springframework.org/schema/beans
http://www.springframework.org/schema/beans/spring-beans-3.1.xsd
http://www.springframework.org/schema/context
http://www.springframework.org/schema/context/spring-context-3.1.xsd
http://www.springframework.org/schema/mvc
http://www.springframework.org/schema/mvc/spring-mvc-4.0.xsd">
spring-mvc.xml
xmlns:context="http://www.springframework.org/schema/context"
xmlns:aop="http://www.springframework.org/schema/aop"
xmlns:mvc="http://www.springframework.org/schema/mvc"
xsi:schemaLocation="http://www.springframework.org/schema/beans
http://www.springframework.org/schema/beans/spring-beans-3.1.xsd
http://www.springframework.org/schema/context
http://www.springframework.org/schema/context/spring-context-3.1.xsd
http://www.springframework.org/schema/aop
http://www.springframework.org/schema/aop/spring-aop-4.0.xsd
http://www.springframework.org/schema/mvc
http://www.springframework.org/schema/mvc/spring-mvc-4.0.xsd">
spring-tx.xml
xmlns:context="http://www.springframework.org/schema/context"
xmlns:aop="http://www.springframework.org/schema/aop"
xmlns:tx="http://www.springframework.org/schema/tx"
xmlns:mvc="http://www.springframework.org/schema/mvc"
xsi:schemaLocation="http://www.springframework.org/schema/beans
http://www.springframework.org/schema/beans/spring-beans-3.1.xsd
http://www.springframework.org/schema/context
http://www.springframework.org/schema/context/spring-context-3.1.xsd
http://www.springframework.org/schema/aop
http://www.springframework.org/schema/aop/spring-aop-3.1.xsd
http://www.springframework.org/schema/tx
http://www.springframework.org/schema/tx/spring-tx-3.1.xsd">
web.xml
最后是第四步:部署项目并运行
启动服务,确保没有出现异常(可在控制台查看),打开浏览器,输入地址:http://localhost:8080/项目名/
如果能成功显示首页即可。


