- 消息中间件有哪些常见类型
xmh-sxh-1314
java
消息中间件根据其设计理念和用途,可以大致分为以下几种常见类型:点对点消息队列(Point-to-PointMessagingQueues):在这种模型中,消息被发送到特定的队列中,消费者从队列中取出并处理消息。队列中的消息只能被一个消费者消费,消费后即被删除。常见的实现包括IBM的MQSeries、RabbitMQ的部分使用场景等。适用于任务分发、负载均衡等场景。发布/订阅消息模型(Pub/Sub
- 06选课支付模块之基于消息队列发送支付通知消息
echo 云清
学成在线javarabbitmq消息队列支付通知学成在线
消息队列发送支付通知消息需求分析订单服务作为通用服务,在订单支付成功后需要将支付结果异步通知给其他对接的微服务,微服务收到支付结果根据订单的类型去更新自己的业务数据技术方案使用消息队列进行异步通知需要保证消息的可靠性即生产端将消息成功通知到服务端:消息发送到交换机-->由交换机发送到队列-->消费者监听队列,收到消息进行处理,参考文章02-使用Docker安装RabbitMQ-CSDN博客生产者确
- 在RabbitMQ中四种常见的消息路由模式
Xwzzz_
rabbitmq分布式
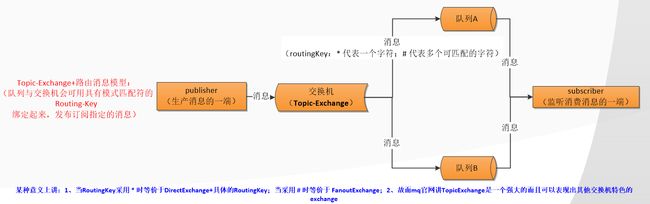
1.Fanout模式Fanout模式的交换机是扇出交换机(FanoutExchange),它会将消息广播给所有绑定到它的队列,而不考虑消息的内容或路由键。工作原理:生产者发送消息到FanoutExchange。FanoutExchange会将消息广播给所有绑定到它的队列,所有绑定的队列都会收到这条消息。消费者监听绑定的队列,处理收到的消息。特点:没有路由键:消息不需要路由键,所有绑定的队列都会接收
- 【RabbitMQ 项目】服务端:数据管理模块之绑定管理
月夜星辉雪
rabbitmq分布式
文章目录一.编写思路二.代码实践一.编写思路定义绑定信息类交换机名称队列名称绑定关键字:交换机的路由交换算法中会用到没有是否持久化的标志,因为绑定是否持久化取决于交换机和队列是否持久化,只有它们都持久化时绑定才需要持久化。绑定就好像一根绳子,两端连接着交换机和队列,当一方不存在,它就没有存在的必要了定义绑定持久化类构造函数:如果数据库文件不存在则创建,打开数据库,创建binding_table插入
- RabbitMQ生产者重复机制与确认机制
java炒饭小能手
java-rabbitmqrabbitmqjava
重复机制生产者发送消息时,出现了网络故障,导致与MQ的连接中断。为了解决这个问题,SpringAMQP提供的消息发送时的重试机制。即:当RabbitTemplate与MQ连接超时后,多次重试。需要修该发送端模块的application.yaml文件,添加下面的内容:spring:rabbitmq:connection-timeout:1s#设置MQ的连接超时时间template:retry:ena
- Kafka 基础与架构理解
StaticKing
KAFKAkafka
目录前言Kafka基础概念消息队列简介:Kafka与传统消息队列(如RabbitMQ、ActiveMQ)的对比Kafka的组件Kafka的工作原理:消息的生产、分发、消费流程Kafka系统架构Kafka的分布式架构设计Leader-Follower机制与数据复制Log-basedStorage和持久化Broker间通信协议Zookeeper在Kafka中的角色总结前言Kafka是一个分布式的消息系
- 【RabbitMQ 项目】服务端数据管理模块之交换机管理
月夜星辉雪
rabbitmqoracle数据库
文章目录一.编写思路二.代码实践一.编写思路定义交换机类型直接交换广播交换主题交换定义交换机名字类型是否持久化定义交换机持久化类(持久化到sqlite3)构造函数(只能成功,不能失败)如果数据库(文件)不存在则创建打开数据库打开exchange_table数据库表插入交换机移除交换机将数据库中的交换机恢复到内存中传入一个哈希表,key为名字,value为交换机的智能指针,填充该哈希表定义交换机管理
- 【仿RabbitMQ消息队列项目day2】使用muduo库中基于protobuf的应用层协议进行通信
月夜星辉雪
rabbitmq网络分布式c++后端服务器linux
一.什么是muduo?muduo库是⼀个基于非阻塞IO和事件驱动的C++高并发TCP网络编程库。简单来理解,它就是对原生的TCP套接字的封装,是一个比socket编程接口更好用的编程库。二.使用muduo库完成一个英译汉翻译服务TranslateServer.hpp:#pragmaonce#include#include#include#include#include"muduo/net/TcpC
- rabbitmq
楚楚ccc
Java系列rabbitmq分布式
1.消息服务概述、rabbitmq核心概念消息服务概述:大多数应用中,可通过消息服务中间件来提升系统异步通信,扩展解耦能力两个重要概念:消息代理(messagebroker)和目的地(destination)。当消息发送者者发出消息后,将由消息代理接管,消息代理保证将消息传递至目的地两种形式的目的地:队列(queue):点对点的消息通信(point-to-point)主题(topic):发布(pu
- 使用 RabbitMQ 实现秒杀订单系统的异步消息处理
c137范特西
rabbitmq分布式
使用RabbitMQ实现秒杀订单系统的异步消息处理在秒杀系统中,如何确保高并发环境下的订单处理稳定高效是个很大的挑战。为了解决这个问题,我们通常会引入消息队列,通过异步处理来削峰填谷。这篇文章将详细讲解如何使用RabbitMQ来设计一个秒杀订单系统的异步消息处理流程,重点是如何使用交换机(Exchange)、队列(Queue)、路由键(RoutingKey)以及死信队列(DeadLetterQue
- RabbitMQ 手册 - "Hello World"
乡间IT学者
英文原文链接介绍准备本手册假定RabbitMQ已经安装并且运行在本机,监听了标准的5672端口。如果你使用了不同的主机,端口或者凭证,连接设置也需要相应地调整。从哪里获取帮助如果你在阅读本手册有任何困惑,可以通过邮件列表联系我们RabbitMQ是一个消息代理:它接受并转发消息。你可以认为他是一个邮局:当你在邮箱放了一封你想邮送的信件,你可以确定某个邮递员最终会将邮件送达给收件人。在这个类比中,Ra
- 解决** (ArgumentError) argument error (stdlib) io_lib.erl:187: :io_lib.format(‘ * effective user\‘
独角戏 满天星
java
解决**(ArgumentError)argumenterror(stdlib)io_lib.erl:187::io_lib.format(’*effectiveuser’shomedirectory:sn’,[[67,58,92,85,115,101,114,115,92,24352,21344,35946]])的问题话不多上记录错误信息更改RabbitMQ的工作路径其中D:\RabbitMQ就
- 分布式中间件-几个常用的消息中间件
问道飞鱼
分布式技术分布式中间件
文章目录常见消息中间件1.RabbitMQ2.ApacheKafka3.RedisPub/Sub4.ActiveMQ5.AmazonSimpleNotificationService(SNS)和SimpleQueueService(SQS)6.RocketMQ差异总结消息协议1.AMQP(AdvancedMessageQueuingProtocol)2.STOMP(SimpleTextOrient
- 怎么连接服务器修改mq,如何连接远程RabbitMQ服务器
weixin_39602637
怎么连接服务器修改mq
我要建立一个应用程序(Asp.netC#)连接位于另一个国家/地区的RabbitMQ服务器。我已经从NuGet包安装了RabbitMQ客户端。在我的本地机器上运行RabbitMQ服务需要这个吗?需要在本地机器上安装RabbitMQ服务器吗?从客户那里得到的一些参数用户名、密码、主机名、带有私钥的证书。我很想知道从本地主机应用程序连接服务器的基本步骤是什么。有人能提供博客参考吗?我已经尝试了不同的步
- Docker安装RabbitMQ【单机】
时光不负所望
Linuxrabbitmqdocker
#RABBITMQ_DEFAULT_USER账号#RABBITMQ_DEFAULT_PASS密码#18090:15672管理端口18090改为15672#8090:5672数据端口8090改为5672dockerrun-d--namerabbitmq-eRABBITMQ_DEFAULT_USER=admin-eRABBITMQ_DEFAULT_PASS=123456,-p18090:15672-p
- 消息总线RabbitMQ
Crystalqy
微服务消息队列rabbitmq
RabbitMQ是实现了高级消息队列协议(AMQP)的开源消息代理软件,也称为面向消息的中间件,是一个在AMQP基础上完整的,可复用的企业消息系统。它可以用于大型软件系统各个模块之间的高效通信,支持高并发,支持可扩展。AMQP,即AdvancedMessageQueuingProtocol,一个提供统一消息服务的应用层标准高级消息队列协议,是应用层协议的一个开放标准,为面向消息的中间件设计,它定义
- RocketMQ复习
slh别学了
微服务rocketmq微服务java
之前写的博客太杂,最近想把RocketMQ的知识点再系统的过一遍,带着自己的理解使用简短的话把一些问题总结一下,尤其是开发中和面试中的高频问题,基础知识点可以参考之前写的一些博客,这篇不再赘述。SpringCloud入门(3)RabbitMQRocketMQ学习(1)快速入门RocketMQ学习(2)深入学习RocketMQ学习(3)秒杀实战目录MQ技术对比基本概念(消费者组、订阅关系等)消费模式
- RabbitMQ学习笔记
我叫奈奈
RabbitMQ相关接受mq消息//接收//需要手动创建queueName的消息队列@RabbitListener(queues="queueName")发送mq消息//发送//@AutowiredprivateAmqpTemplateamqpTemplate//第一个参数时队列名称,剩下的是参数列表publicvoidsend(){ampqTemplate.convertAndSend("que
- 【SpringBoot MQ 系列】RabbitListener 消费基本使用姿势介绍
一灰灰blog
SpringBoot专题SpringBootRabbitMQ基础教程rabbitmqspringjava队列
【MQ系列】RabbitListener消费基本使用姿势介绍之前介绍了rabbitmq的消息发送姿势,既然有发送,当然就得有消费者,在SpringBoot环境下,消费可以说比较简单了,借助@RabbitListener注解,基本上可以满足你90%以上的业务开发需求下面我们来看一下@RabbitListener的最最常用使用姿势I.配置首先创建一个SpringBoot项目,用于后续的演示spring
- @rabbitlistener注解
小小懒懒
RabbitMQ
@RabbitListener是SpringAMQP(AdvancedMessageQueuingProtocol)框架中的一个注解,用于创建RabbitMQ消息监听器。RabbitMQ是一个开源的消息代理和队列服务器,它实现了AMQP协议,用于在分布式系统中进行消息传递。SpringAMQP是Spring框架对RabbitMQ的集成,提供了方便的消息发送和接收的功能。通过使用@RabbitLis
- 4.3万字详解PHP+RabbitMQ(AMQP协议、通讯架构、6大模式、交换机队列消息持久化、死信队列、延时队列、消息丢失、重复消费、消息应答、消息应答、发布确认、故障转移、不公平分发、优先级、等)
小松聊PHP进阶
laravelPHPphp架构服务器中间件后端laravelrabbitmq
理论(后半部分有实操详解)哲学思考易经思维:向各国人讲述一种动物叫乌龟,要学很久的各国语言,但是随手画一个乌龟,全世界的人都能看得懂。道家思维:努力没有用(指劳神费心的机械性重复、肢体受累、刻意行为),要用心(深度思考、去感悟、透过现象看本质)才有用。举例:类似中学做不出来的几何题的底层原理:不是不知道xx定理或公式(招式),而是不知道画辅助线的思路(内功)。总结:万事万物、用道家思维思考本质与规
- 如何优雅地处理 RabbitMQ 连接中断问题
吃面不喝汤66
RabbitMQrabbitmq分布式
在使用RabbitMQ作为消息队列时,我们常常会碰到长时间运行的连接由于各种原因(网络波动、空闲时间过长等)突然中断的情况。这导致我们的消息无法正常发送,并且抛出了pika.exceptions.StreamLostError和pika.exceptions.AMQPConnectionError等异常。面对这些异常,如何优雅地处理并自动恢复连接是一个常见的技术挑战。今天我们来探讨如何在Pytho
- PHP使用rabbitMQ
每天瞎忙的农民工
php实战rabbitMQphprabbitmq
在PHP中使用RabbitMQ通常是为了处理异步任务、队列、消息推送等场景,特别是在高并发、分布式系统中,RabbitMQ提供了可靠的消息队列服务。RabbitMQ是基于AMQP协议的消息中间件,具有高效、可靠、可扩展的特点。下面将介绍如何在PHP中使用RabbitMQ,并结合场景给出实现方法。一、RabbitMQ基础概念Producer(生产者):发送消息的客户端,负责将消息发送到消息队列。Co
- RabbitMQ安装 以及 Spring Boot整合
RealGUO
笔记rabbitmqjava
SpringBoot+整合RabbitMQ1、docker配置RabbitMQ运行环境dockerpullrabbitmq:management#tag为management版本的rabbitmq#运行容器dockerrun-dit--namerabbitmq01-eRABBITMQ_DEFAULT_USER=admin-eRABBITMQ_DEFAULT_PASS=admin-p15672:15
- Ubuntu中安装RabbitMQ
不爱开发的干饭人
ubunturabbitmqlinux
1.安装sudoaptinstallrabbitmq-server2.检查状态systemctlstatusrabbitmq-server#检查状态servicerabbitmq-serverstatus#检查状态3.开启Web管理sudorabbitmq-pluginsenablerabbitmq_management4.打开浏览器输入网址http://localhost:15672#用默认gu
- 深入探讨 RabbitMQ 的整体架构:消息传递的核心机制
需要重新演唱
rabbitmq架构ruby
深入探讨RabbitMQ的整体架构:消息传递的核心机制引言在现代分布式系统中,消息队列(MessageQueue)是实现异步通信和解耦的重要工具。RabbitMQ是一个广泛使用的开源消息代理,提供了可靠的消息传递机制。本文将深入探讨RabbitMQ的整体架构,帮助你理解其核心组件和工作原理。无论你是初学者还是有经验的开发者,这篇文章都将为你提供全面而深入的理解。什么是RabbitMQ?Rabbit
- Spring常用中间件
贺仙姑
spring中间件java
1.数据库中间件(1)MySQL:常用的关系型数据库,支持JDBC和JPA。(2)PostgreSQL:功能强大的开源关系型数据库,支持复杂查询。(3)MongoDB:NoSQL数据库,适合存储非结构化数据。(4)Redis:内存数据结构存储,常用于缓存和消息队列。2.消息队列(1)RabbitMQ:开源消息代理,支持多种消息协议,适合异步处理。(2)Kafka:分布式流处理平台,适合处理大规模数
- ASP.NET Core消息队列RabbitMQ基础入门实战演练
阿笨NET
跟着阿笨一起玩NETASP.NETCoreASP.NETCore消息队列ASP.NETCoreRabbitMQ.NETCore视频教程ASP.NETCore视频课程
一、课程介绍人生苦短,我用.NETCore!消息队列RabbitMQ大家相比都不陌生,本次分享课程阿笨将给大家分享一下在一般项目中99%都会用到的消息队列MQ的一个实战业务运用场景。本次分享课程不是零基础教学,课程内容的侧重点是讲解的RabbitMQ的最实用、最简单的实战运用场景:Publish/Subscrib(发布/订阅)模式,发送端发送消息,单个接收端接收处理消息。学完本次"是猴子都看的懂的
- chapter01 Java语言概述 知识点Note
月下绯烟
Javajava开发语言
JavaSEJavaEEJavaME大数据Java基础常用技术栈mysqlJDBCSSMspring+springmvc+mybatisLinuxnacosHadoopFlinkJAVAEE消息队列rabbitMQdocker数据库redisspringbootspringcloudsshstruts+spring+hibernate过时技术栈很少用JAVA虚拟机jvm分布式微服务高并发常见dos
- Windows安装RabbitMQ详细教程
赵亚旭
中间件个人开发windows
一、RabbitMQ简介RabbitMQ是一个功能强大且易于使用的开源消息代理,它支持多种消息协议(AMQP、STOMP、MQTT等),并提供了一个易用的用户界面来监控和管理消息Broker。RabbitMQ的高可靠性、灵活的路由、集群支持和多语言客户端等特点,使其成为企业级消息传递系统的理想选择。二、安装前准备在开始安装RabbitMQ之前,需要做好以下准备工作:确认系统环境:确保你的Windo
- ASM系列五 利用TreeApi 解析生成Class
lijingyao8206
ASM字节码动态生成ClassNodeTreeAPI
前面CoreApi的介绍部分基本涵盖了ASMCore包下面的主要API及功能,其中还有一部分关于MetaData的解析和生成就不再赘述。这篇开始介绍ASM另一部分主要的Api。TreeApi。这一部分源码是关联的asm-tree-5.0.4的版本。
在介绍前,先要知道一点, Tree工程的接口基本可以完
- 链表树——复合数据结构应用实例
bardo
数据结构树型结构表结构设计链表菜单排序
我们清楚:数据库设计中,表结构设计的好坏,直接影响程序的复杂度。所以,本文就无限级分类(目录)树与链表的复合在表设计中的应用进行探讨。当然,什么是树,什么是链表,这里不作介绍。有兴趣可以去看相关的教材。
需求简介:
经常遇到这样的需求,我们希望能将保存在数据库中的树结构能够按确定的顺序读出来。比如,多级菜单、组织结构、商品分类。更具体的,我们希望某个二级菜单在这一级别中就是第一个。虽然它是最后
- 为啥要用位运算代替取模呢
chenchao051
位运算哈希汇编
在hash中查找key的时候,经常会发现用&取代%,先看两段代码吧,
JDK6中的HashMap中的indexFor方法:
/**
* Returns index for hash code h.
*/
static int indexFor(int h, int length) {
- 最近的情况
麦田的设计者
生活感悟计划软考想
今天是2015年4月27号
整理一下最近的思绪以及要完成的任务
1、最近在驾校科目二练车,每周四天,练三周。其实做什么都要用心,追求合理的途径解决。为
- PHP去掉字符串中最后一个字符的方法
IT独行者
PHP字符串
今天在PHP项目开发中遇到一个需求,去掉字符串中的最后一个字符 原字符串1,2,3,4,5,6, 去掉最后一个字符",",最终结果为1,2,3,4,5,6 代码如下:
$str = "1,2,3,4,5,6,";
$newstr = substr($str,0,strlen($str)-1);
echo $newstr;
- hadoop在linux上单机安装过程
_wy_
linuxhadoop
1、安装JDK
jdk版本最好是1.6以上,可以使用执行命令java -version查看当前JAVA版本号,如果报命令不存在或版本比较低,则需要安装一个高版本的JDK,并在/etc/profile的文件末尾,根据本机JDK实际的安装位置加上以下几行:
export JAVA_HOME=/usr/java/jdk1.7.0_25
- JAVA进阶----分布式事务的一种简单处理方法
无量
多系统交互分布式事务
每个方法都是原子操作:
提供第三方服务的系统,要同时提供执行方法和对应的回滚方法
A系统调用B,C,D系统完成分布式事务
=========执行开始========
A.aa();
try {
B.bb();
} catch(Exception e) {
A.rollbackAa();
}
try {
C.cc();
} catch(Excep
- 安墨移动广 告:移动DSP厚积薄发 引领未来广 告业发展命脉
矮蛋蛋
hadoop互联网
“谁掌握了强大的DSP技术,谁将引领未来的广 告行业发展命脉。”2014年,移动广 告行业的热点非移动DSP莫属。各个圈子都在纷纷谈论,认为移动DSP是行业突破点,一时间许多移动广 告联盟风起云涌,竞相推出专属移动DSP产品。
到底什么是移动DSP呢?
DSP(Demand-SidePlatform),就是需求方平台,为解决广 告主投放的各种需求,真正实现人群定位的精准广
- myelipse设置
alafqq
IP
在一个项目的完整的生命周期中,其维护费用,往往是其开发费用的数倍。因此项目的可维护性、可复用性是衡量一个项目好坏的关键。而注释则是可维护性中必不可少的一环。
注释模板导入步骤
安装方法:
打开eclipse/myeclipse
选择 window-->Preferences-->JAVA-->Code-->Code
- java数组
百合不是茶
java数组
java数组的 声明 创建 初始化; java支持C语言
数组中的每个数都有唯一的一个下标
一维数组的定义 声明: int[] a = new int[3];声明数组中有三个数int[3]
int[] a 中有三个数,下标从0开始,可以同过for来遍历数组中的数
- javascript读取表单数据
bijian1013
JavaScript
利用javascript读取表单数据,可以利用以下三种方法获取:
1、通过表单ID属性:var a = document.getElementByIdx_x_x("id");
2、通过表单名称属性:var b = document.getElementsByName("name");
3、直接通过表单名字获取:var c = form.content.
- 探索JUnit4扩展:使用Theory
bijian1013
javaJUnitTheory
理论机制(Theory)
一.为什么要引用理论机制(Theory)
当今软件开发中,测试驱动开发(TDD — Test-driven development)越发流行。为什么 TDD 会如此流行呢?因为它确实拥有很多优点,它允许开发人员通过简单的例子来指定和表明他们代码的行为意图。
TDD 的优点:
&nb
- [Spring Data Mongo一]Spring Mongo Template操作MongoDB
bit1129
template
什么是Spring Data Mongo
Spring Data MongoDB项目对访问MongoDB的Java客户端API进行了封装,这种封装类似于Spring封装Hibernate和JDBC而提供的HibernateTemplate和JDBCTemplate,主要能力包括
1. 封装客户端跟MongoDB的链接管理
2. 文档-对象映射,通过注解:@Document(collectio
- 【Kafka八】Zookeeper上关于Kafka的配置信息
bit1129
zookeeper
问题:
1. Kafka的哪些信息记录在Zookeeper中 2. Consumer Group消费的每个Partition的Offset信息存放在什么位置
3. Topic的每个Partition存放在哪个Broker上的信息存放在哪里
4. Producer跟Zookeeper究竟有没有关系?没有关系!!!
//consumers、config、brokers、cont
- java OOM内存异常的四种类型及异常与解决方案
ronin47
java OOM 内存异常
OOM异常的四种类型:
一: StackOverflowError :通常因为递归函数引起(死递归,递归太深)。-Xss 128k 一般够用。
二: out Of memory: PermGen Space:通常是动态类大多,比如web 服务器自动更新部署时引起。-Xmx
- java-实现链表反转-递归和非递归实现
bylijinnan
java
20120422更新:
对链表中部分节点进行反转操作,这些节点相隔k个:
0->1->2->3->4->5->6->7->8->9
k=2
8->1->6->3->4->5->2->7->0->9
注意1 3 5 7 9 位置是不变的。
解法:
将链表拆成两部分:
a.0-&
- Netty源码学习-DelimiterBasedFrameDecoder
bylijinnan
javanetty
看DelimiterBasedFrameDecoder的API,有举例:
接收到的ChannelBuffer如下:
+--------------+
| ABC\nDEF\r\n |
+--------------+
经过DelimiterBasedFrameDecoder(Delimiters.lineDelimiter())之后,得到:
+-----+----
- linux的一些命令 -查看cc攻击-网口ip统计等
hotsunshine
linux
Linux判断CC攻击命令详解
2011年12月23日 ⁄ 安全 ⁄ 暂无评论
查看所有80端口的连接数
netstat -nat|grep -i '80'|wc -l
对连接的IP按连接数量进行排序
netstat -ntu | awk '{print $5}' | cut -d: -f1 | sort | uniq -c | sort -n
查看TCP连接状态
n
- Spring获取SessionFactory
ctrain
sessionFactory
String sql = "select sysdate from dual";
WebApplicationContext wac = ContextLoader.getCurrentWebApplicationContext();
String[] names = wac.getBeanDefinitionNames();
for(int i=0; i&
- Hive几种导出数据方式
daizj
hive数据导出
Hive几种导出数据方式
1.拷贝文件
如果数据文件恰好是用户需要的格式,那么只需要拷贝文件或文件夹就可以。
hadoop fs –cp source_path target_path
2.导出到本地文件系统
--不能使用insert into local directory来导出数据,会报错
--只能使用
- 编程之美
dcj3sjt126com
编程PHP重构
我个人的 PHP 编程经验中,递归调用常常与静态变量使用。静态变量的含义可以参考 PHP 手册。希望下面的代码,会更有利于对递归以及静态变量的理解
header("Content-type: text/plain");
function static_function () {
static $i = 0;
if ($i++ < 1
- Android保存用户名和密码
dcj3sjt126com
android
转自:http://www.2cto.com/kf/201401/272336.html
我们不管在开发一个项目或者使用别人的项目,都有用户登录功能,为了让用户的体验效果更好,我们通常会做一个功能,叫做保存用户,这样做的目地就是为了让用户下一次再使用该程序不会重新输入用户名和密码,这里我使用3种方式来存储用户名和密码
1、通过普通 的txt文本存储
2、通过properties属性文件进行存
- Oracle 复习笔记之同义词
eksliang
Oracle 同义词Oracle synonym
转载请出自出处:http://eksliang.iteye.com/blog/2098861
1.什么是同义词
同义词是现有模式对象的一个别名。
概念性的东西,什么是模式呢?创建一个用户,就相应的创建了 一个模式。模式是指数据库对象,是对用户所创建的数据对象的总称。模式对象包括表、视图、索引、同义词、序列、过
- Ajax案例
gongmeitao
Ajaxjsp
数据库采用Sql Server2005
项目名称为:Ajax_Demo
1.com.demo.conn包
package com.demo.conn;
import java.sql.Connection;import java.sql.DriverManager;import java.sql.SQLException;
//获取数据库连接的类public class DBConnec
- ASP.NET中Request.RawUrl、Request.Url的区别
hvt
.netWebC#asp.nethovertree
如果访问的地址是:http://h.keleyi.com/guestbook/addmessage.aspx?key=hovertree%3C&n=myslider#zonemenu那么Request.Url.ToString() 的值是:http://h.keleyi.com/guestbook/addmessage.aspx?key=hovertree<&
- SVG 教程 (七)SVG 实例,SVG 参考手册
天梯梦
svg
SVG 实例 在线实例
下面的例子是把SVG代码直接嵌入到HTML代码中。
谷歌Chrome,火狐,Internet Explorer9,和Safari都支持。
注意:下面的例子将不会在Opera运行,即使Opera支持SVG - 它也不支持SVG在HTML代码中直接使用。 SVG 实例
SVG基本形状
一个圆
矩形
不透明矩形
一个矩形不透明2
一个带圆角矩
- 事务管理
luyulong
javaspring编程事务
事物管理
spring事物的好处
为不同的事物API提供了一致的编程模型
支持声明式事务管理
提供比大多数事务API更简单更易于使用的编程式事务管理API
整合spring的各种数据访问抽象
TransactionDefinition
定义了事务策略
int getIsolationLevel()得到当前事务的隔离级别
READ_COMMITTED
- 基础数据结构和算法十一:Red-black binary search tree
sunwinner
AlgorithmRed-black
The insertion algorithm for 2-3 trees just described is not difficult to understand; now, we will see that it is also not difficult to implement. We will consider a simple representation known
- centos同步时间
stunizhengjia
linux集群同步时间
做了集群,时间的同步就显得非常必要了。 以下是查到的如何做时间同步。 在CentOS 5不再区分客户端和服务器,只要配置了NTP,它就会提供NTP服务。 1)确认已经ntp程序包: # yum install ntp 2)配置时间源(默认就行,不需要修改) # vi /etc/ntp.conf server pool.ntp.o
- ITeye 9月技术图书有奖试读获奖名单公布
ITeye管理员
ITeye
ITeye携手博文视点举办的9月技术图书有奖试读活动已圆满结束,非常感谢广大用户对本次活动的关注与参与。 9月试读活动回顾:http://webmaster.iteye.com/blog/2118112本次技术图书试读活动的优秀奖获奖名单及相应作品如下(优秀文章有很多,但名额有限,没获奖并不代表不优秀):
《NFC:Arduino、Andro