Linux 目录结构、基本权限 UGO
一.Linux 目录结构
Windows: 以多根的方式组织文件 C:\ D:\ E:
Linux: 以单根的方式组织文件 /
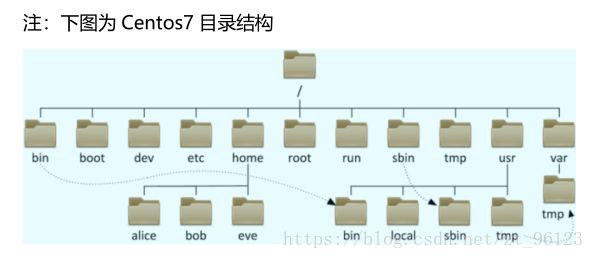
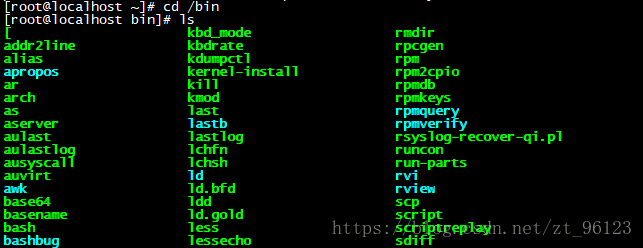
① bin 普通用户使用的命令 /bin/ls, /bin/date 用于存放二进制可执行文件和常用命令。
②boot 存放的系统启动相关的文件,例如 kernel,grub(引导装载程序)
③dev 设备文件
/dev/sda,/dev/sda1,/dev/tty1,/dev/tty2,/dev/pts/1, /dev/zero,/dev/null, /dev/random
④etc 配置文件(系统相关如网络/etc/sysconfig/network,应用相关配置文件如/etc/ssh/sshd_config…)
⑤home 存储普通用户家目录
⑥root root 用户的 HOME
⑦tmp 临时文件(全局可写:进程产生的临时文件)
⑧var 存放的是一些变化文件,比如数据库,日志,邮件…
2.文件时间
①ls -l 文件名 仅看的是文件的修改时间
②stat anaconda-ks.cfg //查看文件的详细属性(其中包括文件时间属性)
③Linux 文件有四种时间:
访问时间:atime,查看内容 //RHEL6 会延后修改 atime
修改时间:mtime,修改内容
改变时间:ctime,文件属性,比如权限
删除时间:dtime,文件被删除的时间
3.文件类型
方法一:
ls -l 文件名 //看第一个字符
-普通文件(文本文件,二进制文件,压缩文件,电影,图片。。。)
d 目录文件(蓝色)
b 设备文件(块设备)存储设备硬盘,U 盘 /dev/sda, /dev/sda1
c 设备文件(字符设备)打印机,终端 /dev/tty1
s 套接字文件
p 管道文件
l 链接文件(淡蓝色)
方法二:
[yang@localhost ~]$ file /etc/hosts
/etc/hosts: ASCII text
[yang@localhost ~]$ file /bin/ls
/bin/ls: ELF 64-bit LSB executable, x86-64, version 1 (SYSV), dynamically
linked (uses shared libs), for GNU/Linux 2.6.32,
BuildID[sha1]=aa7ff68f13de25936a098016243ce57c3c982e06, stripped
[yang@localhost ~]$ file /dev/sda
/dev/sda: block special
[yang@localhost ~]$ file /dev/tty1
/dev/tty1: character special
[yang@localhost ~]$ file /etc/grub2.cfg
/etc/grub2.cfg: broken symbolic link to `…/boot/grub2/grub.cfg’
/home: directory
[yang@localhost ~]$ file /run/dmeventd-client
/run/dmeventd-client: fifo (named pipe)
3.路径(定位文件)
①命名规则:
1、长度不能超过 255 个字符;
2、不能使用/当文件名;
3、严格区分大小写;
4、以.开头的文件为隐藏文件;
/etc/sysconfig/
. : 当前目录;----------------------->. : sysconfig
… : 当前目录的上一级目录;------->… : /etc
②绝对路径: 从/开始的路径 /home/alice/file1
③相对路径: 相对于当前目录开始 a.txt ./a.txt …/bob/b.txt
4.文件管理之:创建/ /复制/ /移动/ /删除
①创建
a.touch:创建一个文件:
b.touch:创建多个文件:
c.mkdir:创建目录
a.-v
b. -p 参数来递归创建出具有嵌套叠层关系的文件目录,包括其父母的创建,不会有任何消息输出
②cp:复制:
③ mv:移动&重命名
mv file1 /home/dir3 将 file2 移动到/home/dir3
mv file2 /home/dir3/file20 将 file2 移动到/home/dir3,并改名为 file20
mv file4 file5 将 file4 重命名为 file5,当前位置的移动就是重命名
④rm:删除 (-r—> 递归 -f—> force 强制 -v—> 详细过程)
[root@localhost ~]# mkdir /home/dir10
[root@localhost ~]# touch /home/dir10/{file2,file3,.file4}
[root@localhost ~]# rm -rf /home/dir10/* //不包括隐藏文件
二.基本权限 UGO
文件权限设置: 可以赋于某个用户或组 能够以何种方式 访问某个文件
文件权限管理之: UGO 设置基本权限(r、w、x)
权限类型:
属主:u,u 表示“用户(user)”,即文件或目录的所有者。
属组:g ,g 表示“同组(group)用户”,即与文件属主有相同组ID的所有用户
其他人: o,o 表示“其他(others)用户”。
读:r 4 写:w 2 执 行: x 1
文件:
-rw-r–r--. 1 root root 46571 6 月 1 23:37 /root/install.log**
最前面一位‘-’,表示文件类型为普通文件。
第一个组为"rw-",表示文件属主具有读和写权限,但没有执行权限。
第二个组为"r–",表示同组其他用户具有读权限,但没有写和执行权限。
第三个组为"r–",表示其他组用户具有读权限,但没有写和执行权限。
r、w、x 权限对文件的意义
r:可获取文件的数据;
w: 可修改文件的数据;
x:可将此文件运行为进程;
目录:
drwxr-xr-x 2 root root 4096 9 28 22:33 Desktop
最前面一位‘d’,表示文件类型为目录。
第一个组为"drwx",表示文件属主具有读、写和执行权限。
第二个组为"r-x",表示同组其他用户具有读和执行权限,但没有写权限。
第三个组为"r-x",表示其他组用户具有读和执行权限,但没有写权限。
目录和文件的权限位是一样的,但目录与文件在权限定义上有一些区别,目录的读操作指列出目录中的内容,写操作指在目录中创建或删除文件,执行操作指搜索和访问目录。
r、w、x 权限对目录的意义
r:可使用 ls 命令获取其下的所有文件列表;
w: 可修改此目录下的文件列表;即创建或删除文件;
x: 可 cd 至此目录中,且可使用 ls -l 来获取所有文件的详细属性信息;
1.设置权限
- 更改文件的属主、属组
=chown:
chown linux file1(更改file1的属主为linux,且linux这个用户必须存在)
chown .alice file2(更改file2的属组为alice,且alice这个组必须存在)
chown linux:alice file3(同时更改file3的属主和属组)
=chgrp:
chgrp alice file4(更改file4的属组)
chgrp -R alice /dir1(更改dir1目录下的所有文件和目录)
2. 更改权限
①使用符号
对象 赋值符 权限类型
chmod u+r 文件名(给属主加读权限)
chmod a+x 文件名(给所有用户和其他人加执行权限)
chmod g-w file1(file1的属组去掉写权限)
chmod o=x 文件名(其他用户只有执行权限)
chmod a=- 文件名(所有人没有权限)
chmod ug=rw,o=r file(给属主属组读写权限,给其他用户读权限)
②使用数字:
例如,如果想让某个文件的属主有“读/写”二种权限,需要把4(可读)+2(可写)=6(读/写)。
chmod 644 file1(给属组读写权限,其他用户和属组为读权限)
设置权限示例:
针对 hr 部门的访问目录设置权限,要求如下:
- root 用户和 hr 组的员工可以读、写、执行
- 其他用户没有任何权限
代码如下:
①创建hr组:
[root@localhost ~]# groupadd hr
②添加用户hr01 hr02到组hr中(-G:指定一个或多个扩展用户组 #附加组)
[root@localhost ~]# useradd hr01 -G hr
[root@localhost ~]# useradd hr02 -G hr
③在家目录下创建一个目录hr
[root@localhost ~]# mkdir /home/hr
[root@localhost ~]# chgrp hr /home/hr
[root@localhost ~]# chmod 770 /home/hr
[root@localhost ~]# ll -d /home/hr/
drwxrwx—. 2 root hr 4096 3 月 13 14:26 /home/hr/
示例 1: 对文件的影响
[root@localhost ~]# mkdir /dir10
[root@localhost ~]# touch /dir10/file1
[root@localhost ~]# chmod 777 /dir10/file1
[root@localhost ~]# ll -d /dir10/
drwxr-xr-x. 2 root root 4096 3 月 11 18:37 /dir10/
[root@localhost ~]# ll /dir10/file1
-rwxrwxrwx. 1 root root 0 3 月 11 18:37 /dir10/file1
切换成普通用户alice:
[alice@localhost ~]$ cat /dir10/file1
[alice@localhost ~]$ rm -rf /dir10/file1
rm: 无法删除"/dir10/file1": 权限不够
示例 2: 对目录有 w 权限
[root@localhost ~]# chmod 777 /dir10/
[root@localhost ~]# chmod 000 /dir10/file1
[root@localhost ~]# ll -d /dir10/
drwxrwxrwx. 2 root root 4096 3 月 11 18:37 /dir10/
[root@localhost ~]# ll /dir10/file1
----------. 1 root root 0 3 月 11 18:37 /dir10/file1
切换成普通用户alice:
[alice@localhost ~]$ cat /dir10/file1
cat: /dir10/file1: 权限不够
[alice@localhost ~]$ rm -rf /dir10/file1
[alice@localhost ~]$ touch /dir10/file2
2. 用户命令
①新增用户:useradd 用户名
主要参数: -d 根目录 -g 主组 -G 附加组列表(逗号隔开)
参数 作用
-d 指定用户的家目录(默认为/home/username)
-e 账户到期时间 #默认创建用户无过期
-u 指定该用户的默认uid #系统创建时默认给用户分配的uid
-g 指定一个初始的用户基本组 #主组
-G 指定一个或多个扩展用户组 #附加组
-s 指定该用户的默认Shell解释器
参数 作用
-l 锁定用户,禁止其登录
-u 接触锁定,允许用户登录
–stdin 通过标准输入修改密码
-d 使该用户可用空密码登录系统
-e 强制用户在下次登录时修改密码
③修改用户:usermod -d 根目录 -g 主组 -G 附加组列表(逗号隔开) 用户名
④删除用户:userdel 用户名
参数 作用
-f 强制删除用户
-r 同时删除用户及用户家目录
⑤查看所有用户:cat /etc/passwd
3. 用户组命令
①新增组:groupadd 用户
参数 作用
-c 填写账户的备注信息
-e 账户的到期时间
-g 变更所属用户组
-G 变更扩展用户组
-L 锁定用户禁止其登录系统
-U 解锁用户,允许其登录系统
-s 变更默认终端
-u 修改用户uid
②修改组:groupmod -n 新组名 组名 ----------可以用来改组名。
③删除组:groupdel 组名-------------如果组内还有用户,则无法删除。
④查看用户的组信息:id 用户名
⑤将用户添加入组里:gpasswd -a 用户名 组名
⑥将用户从组里移除:gpasswd -d 用户组 组名
⑦查看所有组+查看某个组内的用户:cat /etc/group。
课堂练习巩固:
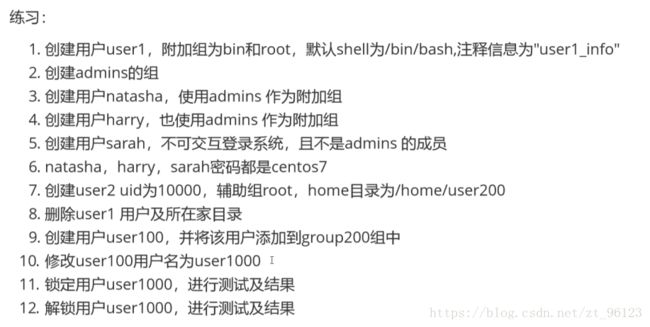
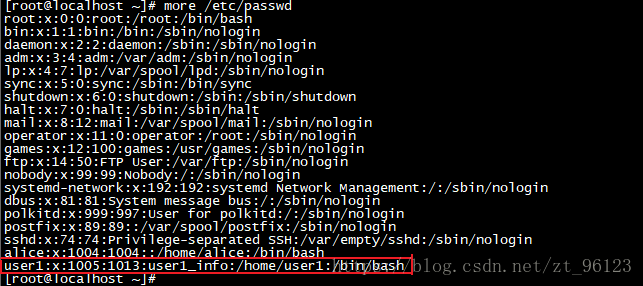
1.创建用户user1,附加组委bin和root,默认shell为/bin/bash,注释信息为“user1_info"
查看是否创建成功:
出现上图所示即创建成功。
2.创建admins的组
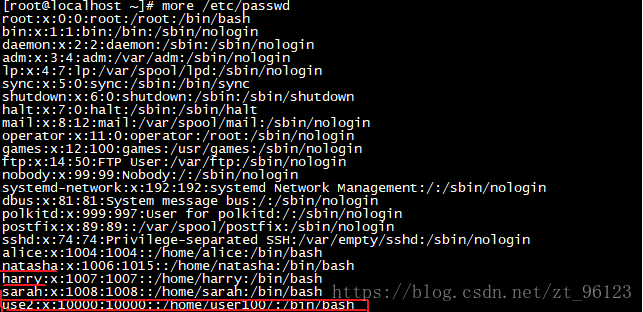
3.创建用户natasha,使用admins作为附加组
4.创建用户harry,也使用admins作为附加组
5.创建用户sarah,不可交互登录系统,且不是admins的成员
6.natasha,harry,sarah密码都是centos7
7.创建user2 uid为10000,辅助组root,home目录为/home/user200
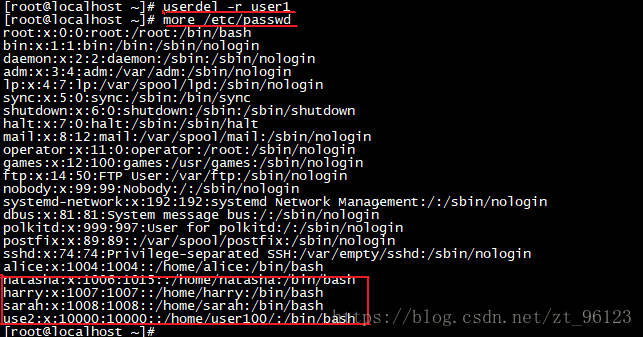
8.删除user1用户及所在家目录
命令执行完后,再进行查看,若无,则表示user1用户及所在家目录已删除;
9.创建用户user100,并将用户添加到group200组中
查看:cat /etc/group 若出现下图所示则添加成功
10.修改user100用户名为user1000
法一:①vi /etc/passwd
②i /insert 100–>1000
③Esc shift+ : wq enter
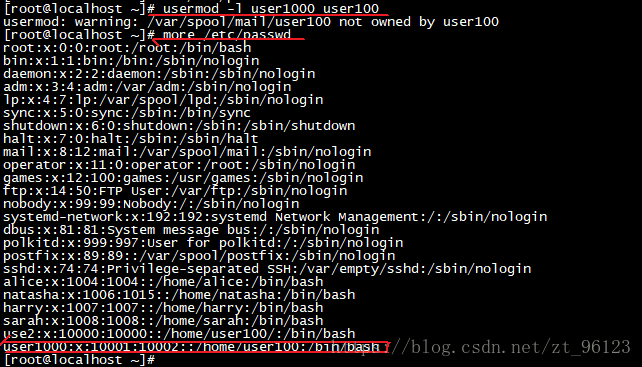
法二:usermod -l user1000 user100
11.锁定用户user1000,进行测试及结果
usermod -L user1000
12.解锁用户user1000,进行测试及结果
usermod -U user1000
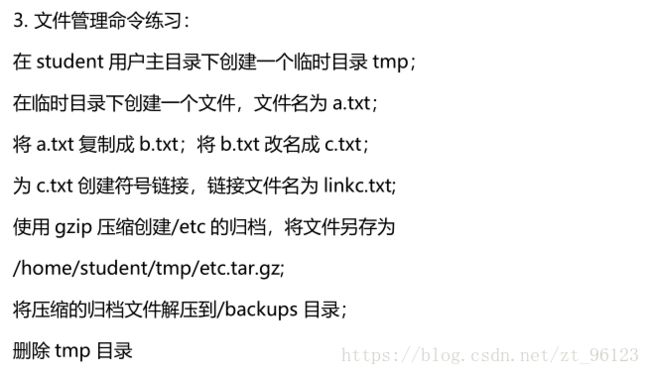
文件管理命令练习
1.在student用户目录下创建一个临时目录tmp
useradd student
2.在临时目录下创建一个文件,文件名为a.txt
① mkdir /home/student/tmp
② touch /home/student/tmp/a.txt
3.将a.txt复制成b.txt;将b.txt改名为c.txt
①cp /home/student/tmp/a.txt /home/student/tmp/b.txt
②mv /home/student/tmp/b.txt /home/student/tmp/c.txt
4.为c.txt创建符号链接,链接文件名为linkc.txt
ln -s /home/student/tmp/c.txt /home/student/tmp/linkc.txt
5.使用gzip压缩创建/etc的归档,将文件另存 为/home/student/tmp/etc.tar.gz
tar -czvf /home/student/tmp/etc.tar.gz /etc
6.将压缩的归档文件解压到/backups目录
tar -xzvf /home/student/tmp/etc.tar.gz -C backups
7.删除tmp目录
rm -rf /home/student/tmp
