k8s下lnmp Web服务器的搭建(学习记录,一步一步找错,肯定会有所收货的)
搭建服务的环境如下:
	虚拟机版本:Centos7
	docker版本:1.13.1, build 64e9980/1.13.1,master以及node节点都要安装docker服务,保证版本一样。
	kubernetes版本:最新的
	Matser以及node节点要安装nfs服务,来保证挂载成功,或者用其他的方式进行挂载或者映射,这里采用的是configmap以及nfs服务。
搭建web服务器的总的流程,首先建立nginx服务,并修改nginx的conf文件,让其能解析php文件,实现web服务,最后建立mysql服务,最后测试完毕。
1:建立nginx-config.yaml文件
apiVersion: v1
kind: ConfigMap
metadata:
    name: nginx-config
data:
    default.conf: |
        server {
            listen       80;
            server_name  localhost;
            root   /usr/share/nginx/html;
            access_log  /var/log/nginx/host_access.log;
            error_log  /var/log/nginx/host_error.log debug;
            location / {
            root   /usr/share/nginx/html;
            index  index.html index.htm index.php;
            }
            error_page   500 502 503 504  /50x.html;
            location = /50x.html {
            root   /usr/share/nginx/html;
            }
            location ~ \.php$ {
            root   /usr/share/nginx/html;
            fastcgi_pass   10.254.144.154:9000;	#要和nginx-phpdeployment.yaml中的ip一样
            fastcgi_index  index.php;
            fastcgi_param  SCRIPT_FILENAME  $document_root$fastcgi_script_name;
            include        fastcgi_params;
            }
            }
2:建立nginx-deployment.yaml文件
apiVersion: v1
kind: Service								#指定为service服务,让nginx可以被外部访问
metadata:
    name: nginx-service
spec:
    type: NodePort							#设置为外部port
    selector:
        app: nginx
    ports:
        - protocol: TCP
          port: 80							#指定端口为80
          targetPort: 80
---
apiVersion: extensions/v1beta1
kind: Deployment							#指定为deployment服务
metadata:
    name: nginx-deployment
spec:
    selector:
        matchLabels:
            app: nginx						#选择nginx的app
    template:
        metadata:
            labels:
                app: nginx
        spec:
            containers:
                - name: nginx
                  image: nginx:alpine		#指定nginx以及和最小的linux服务
                  volumeMounts:
                      - name: nginx-config
 						mountPath: /etc/nginx/conf.d	#映射到nginx的目录
                      - name: web-root					#名字要和volumes下面的名字一样
                        mountPath: /usr/share/nginx/html#映射到usr/share/nginx/html下
            volumes:
                - name: nginx-config
                  configMap:
                      name: nginx-config				#第一个文件中的name名称
                - name: web-root						#要和上面volumeMounts的名字一样
                  nfs:
                      server: 192.168.78.199			#挂载nfs服务的ip地址,我是挂载在master上的
                      path: /root/html					#宿主机映射的目录
3:建立php-deployment.yaml文件
apiVersion: v1
kind: Service
metadata:
    name: php-service
spec:
    clusterIP: 10.254.144.154								#要和nginx-comfigmap.yaml中的ip一样
    selector:
        app: php
    ports:
        - name: php
          port: 9000										#映射为9000端口
          targetPort: 9000
---
apiVersion: extensions/v1beta1
kind: Deployment
metadata:
    name: php-deployment
spec:
    replicas: 1												#指定启动的服务为1,可以是多个,修改值就可以;
    selector:
        matchLabels:
            app: php
    template:
        metadata:
            labels:
                app: php
        spec:
            containers:
                - name: php
                  image: devilbox/php-fpm:5.2-work-0.89		#指定php版本,这里指定的是doker官方的比较稳定的一个;
                  volumeMounts:
                      - name: web-root						#要和下面的volumes的名称一样;
                        mountPath: /usr/share/nginx/html	#不映射这个,不能解析.php文件,nginx中的是.html文件
            volumes:
                - name: web-root
                  nfs:
                      server: 192.168.78.199				#挂载nfs服务的ip地址,我是挂载在master上的
                      path: /root/html						#宿主机映射的目录
4:建立mysql.deployment.yaml文件
apiVersion: extensions/v1beta1
kind: Deployment
metadata:
   name: mysql-deployment
spec:
  selector:
        matchLabels:
            app: mysql
  template:
    metadata:
      labels:
        app: mysql
    spec:
      containers:
      - name: mysql
        image: mysql:5.7									#指定mysql版本,这个版本好用
        ports:
        - containerPort: 3306
        env:
        - name: MYSQL_ROOT_PASSWORD							#设置mysql数据库的密码
          value: '123456'
---
apiVersion: v1
kind: Service												#指定为service服务
metadata:
    name: mysql
spec:
    selector:
        app: mysql
    ports:
        - name: mysql
          port: 3306
          targetPort: 3306
5:配置数据库相关操作
	1:首先查看mysql容器的ID是多少
	  docker ps | grep mysql
	  a94fe4e35390        mysql:5.7
	  3365081b56f0        registry.access.redhat.com/rhel7/pod-infrastruct
    2:进入该容器,可以用两种命令进入
      1:在相应的node节点上:docker exec -it a94fe4e35390 bash
      2:在master kubectl get pod 查看mysql的名称,这里查到的是mysql-deployment-4144028371-tdtc2
      2:在Master节点上,kubectl mysql-deployment-4144028371-tdtc2 exec -it /bin/sh
    3:进入mysql数据库服务
       mysql -uroot -p123456
    4:建立用户以及授权
       use mysql;
       CREATE USER 'llh2025'@'%' IDENTIFIED BY '123456';	#创建用户llh2025以及设置密码123456
       grant all privileges on *.* to 'llh2025'@'%';		#给与所有权限给llh2025
	   grant SUPER on *.* to 'llh2025'@'%';					#给与所有权限给llh2025
	   flush privileges;									#刷新所有mysql数据库的所有配置
	5:建立数据库以及表
	   create datavase User									#创建名字为User的库名称
	   use User												#进入到User库目录下
	   create table llh2025(name int(5));					#建立名字为llh2025的表,并只有一个name结构
	   insert into llh2025 values(159);						#添加一条数据
	   insert into llh2025 values(9874);					#添加一条数据
	至此,数据库配置完毕,其实这些都可以像设置密码一样简单,直接在mysql-deployment中配置,不过还没学到,只好自己配置了;
	End
6:配置nfs
	1:vim /etc/exports
	  /root/html *(rw,no_root_squash,sync)					#挂载/root/html
	  /root/conf *(rw,no_root_squash,sync)					#挂载/root/conf,尽量用绝对路径;
	2:挂载nfs服务
	  mount -t nfs 192.168.78.199:/root/html /lnmp/nfsdata	#ip为master主机ip,后面的目录也是绝对路径,要先建立;
	3:重新启动nfs服务
	  systemctl restart nfs
7:防火墙以及selinux
	1:首先要关闭防火墙
	  systemctl stop firewalld.service
	2:关闭selinux服务
	  vim /etc/selinux/config
	  将配置文件的第一行未被注释改为:SELINUX=disabled
	3:可能需要重新启动虚拟机,也可能不用重启;
	4:重要:要设置防火墙规则,k8s要能被外面访问,必须修改其中的一条规则,直接在终端运行一面一条命令即可:
	iptables -P FORWARD ACCEPT
    至此相关配置完毕
    End
结果验证
1:首先查看/root/html下的有哪些的文件,测试只用到了index.html,test.php以及sq2.php文件,其他的没用到
[root@k8s-master ~]# tree /root/html/
/root/html/
├── index.html
├── ios.html
├── mm.php
├── mysql.php
├── php.php
├── redis.php
├── sq2.php
├── sq.php
└── test.php
2:修改test.php,sq2.php,test.php,index.html文件内容
1:修改test.php文件
        phpinfo();
?>
	2:修改sq2.php文件,这里有个点,我也不知道其他人怎么做的,这里的10.254.177.154为mysql Servie的ip地址,
	不过一般的mysql服务都是自己另起一台主机的,这里省事,就直接在master节点中起了一个mysql容器服务;
[root@k8s-master html]# kubectl get svc
NAME            CLUSTER-IP       EXTERNAL-IP   PORT(S)        AGE
kubernetes      10.254.0.1       <none>        443/TCP        11d
mysql           10.254.177.154   <none>        3306/TCP       2h		#就是这个地址
nginx-service   10.254.37.102    <nodes>       80:32386/TCP   13h
php-service     10.254.235.214   <none>        9000/TCP       12h
	$servername = "10.254.177.154";
	$username = "llh2025";
	$password = "123456";
	$dbname = "User";
	$conn = new mysqli($servername, $username, $password, $dbname);
	if ($conn->connect_error) {
    	die("errors: " . $conn->connect_error);
	}
	$sql = "select * from llh2025";
	$result = $conn->query($sql);
	if ($result->num_rows > 0) {
	    while($row = $result->fetch_assoc()) {
        echo "id: " . $row["name"]. "
";
    }
}   else {
    	echo "0 结果";
}
	$conn->close();
?>
3:修改index.html默认文件的内容
	echo "HelloWorld"
?>
3:查看nginx服务所暴露的外部端口
	[root@k8s-master ~]# kubectl get svc
	NAME            CLUSTER-IP       EXTERNAL-IP   PORT(S)        AGE
	kubernetes      10.254.0.1       <none>        443/TCP        11d
	mysql           10.254.177.154   <none>        3306/TCP       1h
	nginx-service   10.254.37.102    <nodes>       80:32386/TCP   13h
	php-service     10.254.235.214   <none>        9000/TCP       12h
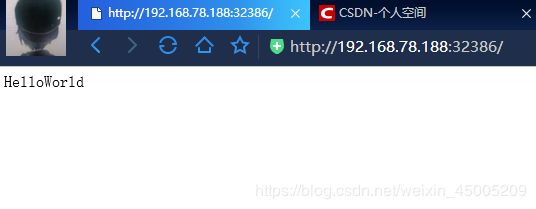
这里可以看到nginx服务的端口Web为32386,直接在web服务器访问:192.168.78.188:32386皆可
返回了index.html中的内容,访问没有问题
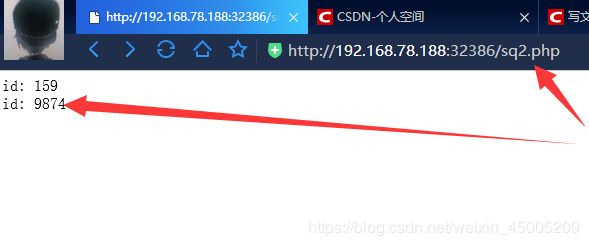
5:访问192.168.78.188:32386/sq2.php

返回了数据库中的内容,访问没有问题
6:访问192.168.78.188:32386/test.php

返回了php的默认界面,访问没有问题
测试结束
(qq:九七二四三九三二九(972439329)微信:(liang7890234),有哪里不对欢迎指正,大家一起学习交流)
